Table of Contents >> Show >> Hide
- Quick Start: The 20-Minute Setup That Makes Everything Easier
- How to Think About Cabinet Organization (So It Stays Organized)
- The 23 Tips
- 1) Empty one cabinet at a time (and wipe it down while it’s empty)
- 2) Declutter duplicates like you’re paying by the spatula
- 3) Sort by category firstthen choose a home
- 4) Create “zones” that match your routine
- 5) Store items where you use them (point-of-use organizing)
- 6) Use “prime real estate” for daily items
- 7) Put heavy items low (your future self will thank you)
- 8) Add a shelf riser to instantly double usable space
- 9) Use Lazy Susans for deep shelves and corner cabinets
- 10) Install pull-out shelves if your base cabinets are a black hole
- 11) Store baking sheets, cutting boards, and trays vertically
- 12) Give pot lids a real job (not a chaotic side hustle)
- 13) Prevent the “food container avalanche”
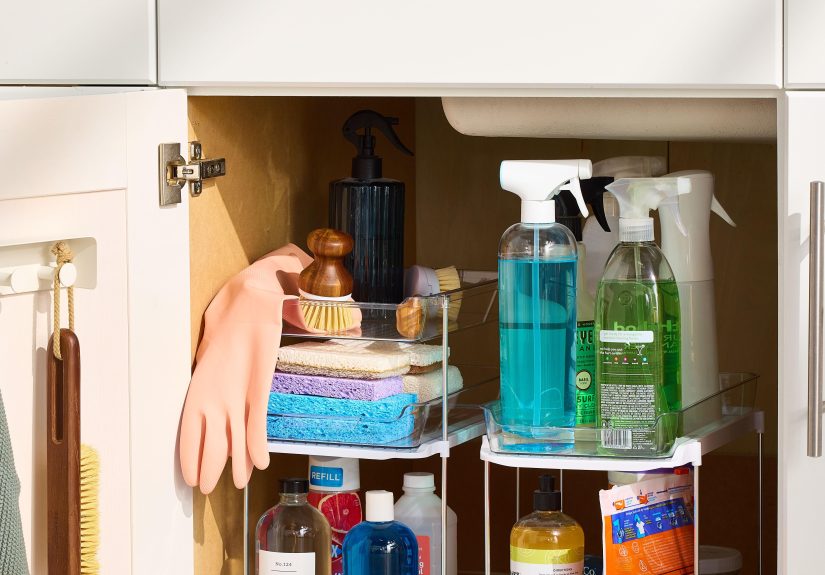
- 14) Use clear bins to corral small stuff (and stop micro-clutter)
- 15) Label only what truly needs labels
- 16) Put a rack on the inside of a cabinet door
- 17) Give spices a system (so you’re not buying paprika every month)
- 18) Build a “coffee and tea station” that makes mornings smoother
- 19) Make a snack zone (especially if you live with hungry people)
- 20) Organize drawers like toolboxes (because they basically are)
- 21) Tame the “junk drawer” with mini containers
- 22) Schedule tiny maintenance instead of one huge meltdown
- 23) Re-home the stuff that’s wasting space
- Putting It All Together: A Simple Cabinet Map Example
- Common Mistakes That Make Cabinets Feel Messy (Even After You “Organize”)
- 500+ Words of Real-Life Style Experiences and Scenarios
- Conclusion: Your Cabinets Should Support Your Life, Not Complicate It
- SEO Tags
If your kitchen cabinets could talk, they’d probably say something like: “I didn’t choose the clutter life… the clutter life chose me.”
The good news? You don’t need a full renovation (or a label maker with a superiority complex) to make your cabinets feel calm, logical,
and ridiculously easy to use.
This guide walks you through a practical, real-life approach to kitchen cabinet organizationone that actually supports how you cook,
snack, pack lunches, and do the nightly “please tell me there’s one clean spoon” routine. You’ll get 23 tips you can mix-and-match
based on your kitchen layout, your habits, and the fact that you probably own at least three spatulas that do the exact same job.
Quick Start: The 20-Minute Setup That Makes Everything Easier
Before you reorganize, set yourself up so you don’t quit halfway and declare the whole project “a tomorrow problem.”
Here’s the easiest prep:
- Grab 4 containers: Keep, Donate, Relocate, Trash/Recycle.
- Clear one countertop (yes, even if it’s temporary).
- Turn on a timer for 20 minutes so this doesn’t become your new personality.
- Start with one cabinetmomentum beats perfection every time.
How to Think About Cabinet Organization (So It Stays Organized)
The secret isn’t “buy more bins.” The secret is building a system around:
frequency of use (daily vs. occasional), point of use (store items where you use them),
and visibility (if you can’t see it, you’ll buy it again).
Imagine your kitchen as a set of mini “zones”:
a cooking zone near the stove, a prep zone near the main counter, a drink station near the mugs and coffee maker, and so on.
When each cabinet has a job, you stop playing hide-and-seek with the cumin.
The 23 Tips
1) Empty one cabinet at a time (and wipe it down while it’s empty)
This is the fastest way to reset without turning your whole kitchen into a disaster movie set.
Pull everything out of a single cabinet, toss crumbs, wipe shelves, and only put back what earns its rent.
2) Declutter duplicates like you’re paying by the spatula
Duplicates quietly eat cabinet space: extra measuring cups, mystery lids, five travel mugs for one commuter.
Keep the best version of an item and donate the rest. A smaller, higher-quality set is easier to store and faster to use.
3) Sort by category firstthen choose a home
Don’t reorganize chaos into prettier chaos. Group items into categories (drinkware, baking, food storage, cookware, snacks),
then decide where each category should live.
4) Create “zones” that match your routine
Think in workflows: coffee/tea zone, lunch-packing zone, cooking zone, baking zone, kids’ snack zone.
Zoning reduces steps, which reduces mess, which reduces the urge to scream into a paper towel roll.
5) Store items where you use them (point-of-use organizing)
Put coffee supplies near the coffee maker. Put oils and spices near the cooking area (but not right next to heat).
Keep everyday plates and bowls near the sink or dishwasher so unloading is basically autopilot.
6) Use “prime real estate” for daily items
Your easiest-to-reach shelves should hold your everyday essentials:
the glasses you actually drink from, the plates you use Monday through Friday, the pan that never gets a day off.
Save high shelves or deep corners for occasional items like holiday platters or specialty appliances.
7) Put heavy items low (your future self will thank you)
Dutch ovens, stand mixers, stacks of dinner platesthese belong in lower cabinets or sturdy pull-outs.
It’s safer, easier on your body, and reduces the chance of “oops, I almost dropped a cast-iron skillet on my toes.”
8) Add a shelf riser to instantly double usable space
Shelf risers let you stack in two levels so you’re not building a teetering tower of bowls.
Use them for plates, mugs, pantry items, or small containers that like to disappear behind taller things.
9) Use Lazy Susans for deep shelves and corner cabinets
Turntables are magic for bottles, jars, vitamins, condiments, and anything else that normally gets pushed to the back to live forever.
If you have corner cabinets, a Lazy Susan can turn that awkward space into something you’ll actually use.
10) Install pull-out shelves if your base cabinets are a black hole
Deep base cabinets are notorious for hiding things until they expire or become “a surprise duplicate.”
Pull-out organizers bring items to youno crawling required. Even one pull-out can dramatically improve a problem cabinet.
11) Store baking sheets, cutting boards, and trays vertically
Vertical storage means you can “file” items like folders instead of stacking them like unstable pancakes.
Add a rack or dividers inside a cabinet to keep sheet pans, muffin tins, and boards upright and easy to grab.
12) Give pot lids a real job (not a chaotic side hustle)
Lids are the most dramatic kitchen items. They clatter, topple, and vanish at the exact moment you need them.
Use a lid rack, tension rod system, or vertical divider so each lid has a predictable spot.
13) Prevent the “food container avalanche”
Nest containers by size (like sensible little storage turtles) and keep them in a tray or bin so they don’t migrate.
Store lids separately in a dedicated container so you can find a match without holding a lid audition.
14) Use clear bins to corral small stuff (and stop micro-clutter)
Small items are the fastest way to make a cabinet feel messy: snack bars, seasoning packets, tea bags, pudding cups, travel napkins.
Use clear bins so everything stays grouped and visible. Bonus: bins slide out like drawers.
15) Label only what truly needs labels
Labels are helpful for shared homes, kids’ snack bins, baking ingredients, and anything you want to keep “sorted by category.”
But don’t label your way into burnout. If it’s obvious (like “mugs”), your eyeballs can handle it.
16) Put a rack on the inside of a cabinet door
Cabinet doors are underrated storage real estate. Add a slim rack for wraps, sandwich bags, spice packets, or cleaning cloths.
It’s like finding bonus footage in your own kitchen.
17) Give spices a system (so you’re not buying paprika every month)
Use a spice rack, tiered shelf, or angled organizer so labels face forward.
Keep spices near your cooking zone for convenience, and group them by cuisine, frequency, or alphabetwhatever your brain likes best.
18) Build a “coffee and tea station” that makes mornings smoother
Keep mugs, coffee/tea, filters, sweeteners, and stirrers together near your machine or kettle.
If your routine is “grab, brew, go,” your cabinets should support that, not slow it down.
19) Make a snack zone (especially if you live with hungry people)
Use a low cabinet or drawer for snacks and lunch items so kids (or roommates) can find what they need without opening every door.
Add bins like “Grab-and-go,” “School lunch,” and “Protein” to keep it from becoming a chip pile.
20) Organize drawers like toolboxes (because they basically are)
Use dividers for utensils and cooking tools, and keep the most-used items toward the front.
Group by function: everyday silverware, prep tools, cooking tools, baking tools.
The goal: one glance, one grab, done.
21) Tame the “junk drawer” with mini containers
A junk drawer isn’t the problem. A junk drawer with zero boundaries is the problem.
Use small bins for batteries, takeout menus, scissors, tape, and random keys that may or may not open anything.
Your drawer can still be chaotic-neutraljust not chaotic-evil.
22) Schedule tiny maintenance instead of one huge meltdown
A quick monthly checkone cabinet at a timekeeps clutter from rebuilding into a cabinet monster.
Also: do a regular sweep for expired spices and pantry items. Less old stuff = more usable space.
23) Re-home the stuff that’s wasting space
Be honest about what’s hogging storage: piles of random mugs, bulky appliances that never get used, mismatched containers,
oversized boards you can’t store without performing geometry.
Keep what supports your real routine and let the rest go. Your cabinets are not a museum for “things I might use someday.”
Putting It All Together: A Simple Cabinet Map Example
If you want a clear starting point, here’s a practical layout many kitchens can adapt:
- Near dishwasher/sink: plates, bowls, everyday glasses, mugs
- Near stove: oils, spices, utensils, potholders, sauté pans
- Prep zone cabinet: mixing bowls, measuring cups, prep tools, cutting boards
- Baking zone cabinet: sheet pans, baking dishes, muffin tins, parchment, rolling pin
- Snack/lunch zone: containers, lunch bags, wraps, snack bins
- High/low storage: holiday serveware, specialty appliances, backups
Common Mistakes That Make Cabinets Feel Messy (Even After You “Organize”)
- Organizing without decluttering (you just packed clutter into straighter lines).
- Storing by “where it fits” instead of where you use it.
- Stacking everything flat so you can’t see what you own.
- Keeping the hardest cabinet for daily items (why do that to yourself?).
- Buying organizers before measuring (we’ve all been emotionally wounded by the “almost fits” bin).
500+ Words of Real-Life Style Experiences and Scenarios
Kitchen cabinet organization sounds simple until you actually open the doors and realize your cookware has formed a secret society.
In many homes, the cabinet chaos isn’t caused by lazinessit’s caused by life. People move in. Kids grow. Schedules change. A new air fryer appears.
And suddenly the cabinet that used to hold “a few pans” is now hosting the entire extended family of pots, lids, and suspicious strainers.
One of the most common experiences is the “container drawer betrayal.” You open the cabinet for one food container and get a plastic landslide.
The fix isn’t just buying more containersit’s assigning containers a simple structure: nest by size, store lids together, and keep the whole group in a bin.
Once you do that, packing leftovers feels less like a competitive sport.
Another familiar scenario: the mug situation. Mugs multiply because they’re gifts, souvenirs, freebies, and emotional support ceramics.
The cabinet becomes a mug parking lot where only three mugs ever get used, while the others take up premium shelf space.
A realistic approach is to keep a “daily rotation” row (the ones you actually reach for) and store the sentimental extras elsewhereor donate the ones you never choose.
The funny part is how often people discover they don’t even like half the mugs they’ve been storing “just in case.”
Then there’s the snack zone reality check. In a busy household, snacks are going to happenwhether you plan for them or not.
Without a snack zone, people open every cabinet like they’re searching for hidden treasure, and things end up shoved into the nearest available space.
But when snacks live in a dedicated bin or low shelf, everyone can find what they need without turning your kitchen into a scavenger hunt.
Even adults benefit from this (because “Where’s the granola?” is not a personality trait anyone needs).
A surprisingly powerful moment happens when you organize by how you actually move in your kitchen.
For example, storing plates near the dishwasher turns unloading into a simple, quick loop instead of a back-and-forth marathon.
Putting oils and spices near the cooking area means you’re not crossing the kitchen mid-sauté with greasy hands.
Creating a coffee station turns mornings into a smooth routine: mug, coffee, filter, scoopdone.
These changes feel small, but they add up every single day.
Finally, there’s the experience of realizing that “organized” doesn’t mean “perfect.”
A good cabinet system is one you can maintain when you’re tired, busy, and doing three things at once.
If you can put something away one-handed while holding a boiling pot lid (carefully), your system is working.
If you need to move five items to put one thing back, your system is quietly plotting against you.
The best organizing wins are the ones that feel invisiblebecause everything is simply where it should be.
Conclusion: Your Cabinets Should Support Your Life, Not Complicate It
The goal isn’t “Instagram cabinets.” The goal is a kitchen that runs smoother: less searching, fewer duplicates, easier cleanups,
and routines that feel automatic. Start with one cabinet, organize by zones and frequency, and use simple tools like risers, bins,
turntables, and dividers where they make the biggest difference. Your future selfholding a grocery bag in one hand and a child’s science project in the otherwill be grateful.