Table of Contents >> Show >> Hide
- Why Neapolitan Works So Well in Marshmallow Treats
- Ingredients
- Equipment and Setup
- Neapolitan Marshmallow Treats Recipe (Step-by-Step)
- Pro Tips for Soft, Chewy, Perfect Layers
- Flavor Variations (Because You’re Powerful Now)
- Storage and Make-Ahead Tips
- FAQ
- Conclusion
- Kitchen Experiences: The Real-Life Adventures of Making Neapolitan Marshmallow Treats
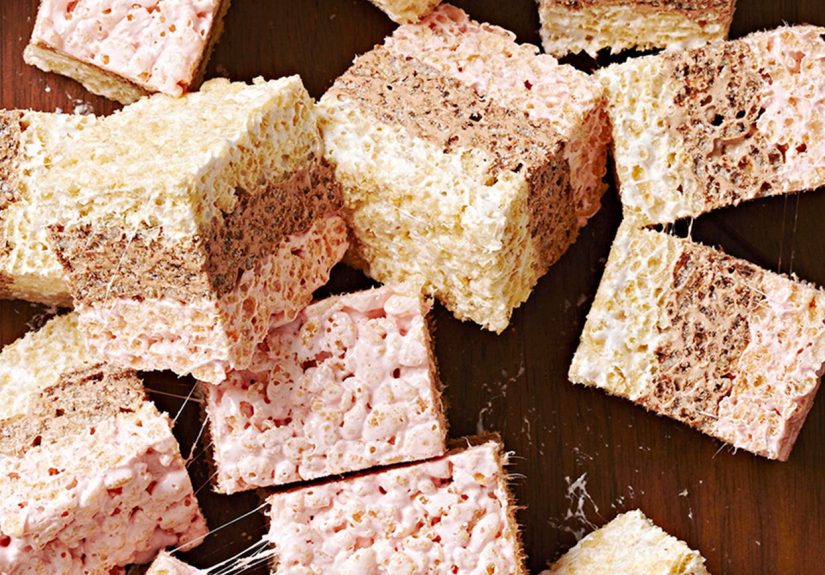
If classic marshmallow treats are the little black dress of the dessert world, Neapolitan marshmallow treats are that same dress…
but with pockets, sparkles, and the confidence to walk into a party carrying three flavors at once.
This recipe takes the chewy, buttery snap-crackle-pop vibe you already love and turns it into a
three-layer strawberry–vanilla–chocolate masterpiece that looks fancy, tastes nostalgic, and still counts as “no-bake.”
(Yes, melting marshmallows is basically cardio. We’ll call it “stove-adjacent.”)
Why Neapolitan Works So Well in Marshmallow Treats
Neapolitan desserts are popular for a simple reason: your taste buds get options without having to negotiate with anyone.
Strawberry brings brightness, vanilla brings cozy creaminess, and chocolate brings the dramatic monologue.
The secret is contrast (and a tiny bit of salt)
Marshmallow treats are sweet by nature, so the goal is balance: a pinch of salt makes the flavors pop, vanilla rounds everything out,
and cocoa adds depth so the chocolate layer doesn’t taste like “sweet on sweet on sweet.”
Strawberry flavor that doesn’t taste like pink air
Strawberry is the trickiest layer because artificial strawberry can go from “cute” to “cough syrup” in one wrong turn.
The cheat code: freeze-dried strawberries. They add real fruit flavor and color without watering down the mixture.
Ingredients
This is a Neapolitan marshmallow treats recipe, not a scavenger hunt. Everything should be easy to find in a typical U.S. grocery store.
Measurements below make a generous 9×13-inch pan (about 18–24 bars, depending on how “helpful” your slicing is).
Base ingredients (for all layers)
- Crispy rice cereal (about 12 cups total, divided)
- Mini marshmallows (about 18–20 oz total, divided)
- Unsalted butter (12 tablespoons / 1 1/2 sticks, divided)
- Vanilla extract (2 teaspoons, divided)
- Fine salt (1/2 teaspoon total, divided)
Strawberry layer add-ins
- Freeze-dried strawberries, crushed into powder (about 1 cup whole pieces, or ~1/2 cup powder)
- Optional: 1–2 tablespoons strawberry jam (for a slightly “ice cream shop” vibe)
- Optional: 1/3 cup white chocolate chips (makes it extra dessert-y)
Chocolate layer add-ins
- Unsweetened cocoa powder (1/4 cup, sifted if lumpy)
- Optional: 1/2 cup semi-sweet chocolate chips (for richer chocolate flavor)
Optional toppings (purely for showing off)
- Mini chocolate chips, extra strawberry powder, or sprinkles
- A light drizzle of melted chocolate
- Flaky salt (just a whisper)
Equipment and Setup
- 9×13-inch pan
- Parchment paper (highly recommended for clean removal)
- Large pot (marshmallows expand like they pay rent)
- Rubber spatula or wooden spoon
- Nonstick spray or a little extra butter for greasing
Prep tip: Line your pan with parchment, leaving overhang on the long sides. Grease the parchment lightly.
This makes lifting the whole slab out of the pan delightfully dramatic (and dramatically less sticky).
Neapolitan Marshmallow Treats Recipe (Step-by-Step)
You’ll make three quick batchesvanilla, strawberry, and chocolateand press them into one pan.
The key is speed, gentle pressing, and not wandering off to “just check one thing” on your phone.
(Marshmallow waits for no one.)
Step 1: Divide ingredients (so you don’t panic later)
Roughly divide your cereal into three bowls:
4 cups for vanilla, 4 cups for strawberry, 4 cups for chocolate.
Divide marshmallows into three portions: about 6–7 oz per layer (plus a handful extra for optional “gooey pockets”).
Divide butter into three portions: 4 tablespoons per layer.
Step 2: Vanilla layer (the calm, dependable middle child)
- Melt 4 tablespoons butter over low heat in a large pot.
- Add 6–7 oz mini marshmallows and stir until just melted and smooth.
- Remove from heat. Stir in 2/3 teaspoon vanilla and a pinch of salt.
- Fold in 4 cups cereal until evenly coated.
- Optional: Stir in a small handful of extra mini marshmallows for gooey pockets.
- Press into the prepared pan in an even layer. Press gentlyyou’re tucking it in, not compacting a driveway.
Step 3: Strawberry layer (the pretty one with actual flavor)
- In the same pot (wipe it quickly if needed), melt 4 tablespoons butter on low heat.
- Add 6–7 oz mini marshmallows and stir until melted.
- Remove from heat. Quickly stir in:
- Strawberry powder (start with 1/3 cup, add more to taste)
- 2/3 teaspoon vanilla
- A pinch of salt
- Optional: 1–2 tablespoons jam
- Optional: white chocolate chips (they’ll melt in beautifully)
- Fold in 4 cups cereal until coated and pink.
- Spread over the vanilla layer. Lightly grease your hands or spatula and press gently into an even layer.
Step 4: Chocolate layer (the one that makes everyone stop talking)
- Melt 4 tablespoons butter over low heat.
- Stir in 1/4 cup cocoa powder until smooth and glossy (low heat helps it bloom without burning).
- Add 6–7 oz mini marshmallows and stir until melted.
- Remove from heat. Stir in 2/3 teaspoon vanilla and a pinch of salt.
- Optional: Add chocolate chips and stir until melted.
- Fold in 4 cups cereal until coated.
- Spread over the strawberry layer and press gently into place.
Step 5: Cool, slice, and claim your compliments
Let the pan cool at room temperature for 30–60 minutes until set.
Lift out using parchment overhang, place on a cutting board, and slice with a lightly greased knife.
Pro Tips for Soft, Chewy, Perfect Layers
1) Low heat = tender treats
Overheating marshmallows makes the sugar tighten up and the treats turn firm faster.
Keep the heat low and melt only until smooth.
2) Don’t press like you’re mad at the cereal
Firm pressing compresses the cereal and can lead to dense bars. Gentle pressing keeps the texture airy and chewy.
If you need leverage, use a greased sheet of parchment over the top and press lightly.
3) The “extra marshmallow” trick
For a gooier bite, reserve a small handful of mini marshmallows for each layer and stir them in after the pot comes off the heat.
They’ll half-melt into soft pockets of joy.
4) Want a gourmet upgrade? Brown the butter (optional)
Browning butter adds a nutty, caramel-like depth that makes these taste like a grown-up version of a childhood favorite.
If you do this, watch closelybrown butter turns to burnt butter faster than you can say “just one more stir.”
Flavor Variations (Because You’re Powerful Now)
- Neapolitan + sprinkles: Add rainbow sprinkles to the vanilla layer for birthday-cake energy.
- Strawberries & cream: Use white chocolate in the strawberry layer and top with crushed freeze-dried berries.
- Double chocolate: Swap in chocolate cereal for the chocolate layer and add chocolate chips. It’s intense. It’s also correct.
- “Ice cream sandwich” vibe: Press the finished bars between two thin graham cracker sheets before slicing.
Storage and Make-Ahead Tips
These layered marshmallow cereal treats keep best when protected from air (which dries them out) and moisture (which makes them sad).
- Room temperature: Store airtight for about 2–3 days for best chew.
- Fridge: Not idealcold can make them firmer. If you refrigerate, let bars sit out a bit before serving.
- Freezer: Wrap individual squares tightly and freeze; thaw at room temperature still wrapped.
Make-ahead move: If you’re making these for a party, slice them the day of serving for the freshest texture,
but you can absolutely make the slab a day ahead and keep it airtight.
FAQ
Can I use regular (big) marshmallows?
Yes. They melt a little slower, so just keep the heat low and stir patiently. Mini marshmallows are simply faster and easier to measure.
Do I have to use freeze-dried strawberries?
If you want real strawberry flavor without sogginess, freeze-dried is the best option. Strawberry jam helps, but too much can soften the structure.
You can also add a tiny splash of strawberry extractjust don’t overdo it.
How do I get clean slices?
Let the treats fully set, then use a sharp knife lightly greased with butter or nonstick spray. Wipe the blade between cuts if you want bakery-level edges.
Can I make these gluten-free?
Often yesuse a certified gluten-free crispy rice cereal and confirm your marshmallows are gluten-free (many are, but labels matter).
Conclusion
Neapolitan marshmallow treats are the easiest way to bring big “dessert table” energy without turning your kitchen into a flour-dusted crime scene.
You get three flavors, a show-stopping layered look, and that classic chewy-crispy bite that disappears suspiciously fast.
Make them for birthdays, bake sales, movie nights, or any time you want a dessert that says,
“I’m fun,” while also quietly whispering, “I planned this.”
Kitchen Experiences: The Real-Life Adventures of Making Neapolitan Marshmallow Treats
Here’s what tends to happen in real kitchens when people tackle a layered Neapolitan marshmallow treats recipethe fun parts,
the mildly sticky parts, and the “why is my spatula glued to my hand?” parts.
First, everyone starts with heroic optimism. You line the pan, you set out three bowls of cereal, and you feel like a cooking show host.
Then you melt the first batch of marshmallows and remember: marshmallow is basically edible glue with charisma.
The trick is accepting the sticky reality early. Grease your spatula. Grease your hands. If you have a dog, do not grease the dog.
The second common experience is the pressing dilemma. Most of us have an internal voice that says,
“Press it down firmly so it holds together!” That voice is well-meaning but misguided.
Over-pressing compacts the cereal and can turn your treats dense. The better mental image is “patting a pillow,” not “installing tile.”
If you want perfectly even layers, put a piece of parchment on top and gently smooth it with an open palm.
You’ll get the neat look without the jaw workout.
Layer timing is another real-world plot twist. If you wait too long between layers, the next layer might not want to stick as neatly,
and you can get a little separation when slicing. If you rush too fast, you might smear strawberry into vanilla and create
a lovely “sunset swirl” that you will pretend was intentional. (It’s okay. It’s still delicious.)
The sweet spot is: press each layer in while it’s still warm and pliable, then move on.
This recipe rewards people who commit to the moment and don’t wander off to answer a text titled “quick question.”
Strawberry layer experiences are their own sitcom. If you use freeze-dried strawberry powder, you’ll notice it blooms fast:
suddenly the mixture smells like actual berries and looks cheerfully pink. If you use jam, you’ll feel like a genius right up until you add too much
and the mixture starts acting softer than expected. The fix is simple: keep jam to a couple tablespoons, and lean on freeze-dried berries for intensity.
Also: yes, strawberry powder will try to become airborne the moment you sneeze. Consider that your warning.
Chocolate layer experiences are usually the happiest because cocoa + marshmallow = instant brownie-adjacent comfort.
The only risk is going too hot and making the mixture stiff. Low heat keeps it smooth, and a pinch of salt keeps it tasting like chocolate,
not just “sweet brown.”
Finally, there’s the slicing moment: the big reveal. This is where parchment overhang makes you feel like a wizard.
If the layers look clean, you’ll want to take a picture before anyone touches them.
If the layers are a little rustic, you’ll still want to take a picturebecause rustic is a vibe and you’re busy.
Either way, the first bite usually earns the same reaction: a grin, a pause, and then someone asking,
“Wait… did you make these?” Yes. Yes you did. And you didn’t even preheat an oven. Iconic.


