
Table of Contents >> Show >> Hide
- Before You Start: What You’re Really Measuring (And Why)
- Tools You’ll Want (So You Don’t “Eyeball” Your Way Into Regret)
- Step 1: Draw a Simple Floor Plan (No One Is Grading Your Artwork)
- Step 2: Measure Each Wall RunTwice (Because Walls Lie)
- Step 3: Measure Ceiling Height in Multiple Spots (Corners + Midpoints)
- Step 4: Mark Doors, Windows, and Trim (Measure to the Outside Edge)
- Step 5: Locate Plumbing, Electrical, Gas, Vents, and Anything That “Can’t Move”
- Step 6: Measure Existing Appliances and Their Clearances (Not Just the Pretty Front)
- Step 7: Check the Floor and Baseboard Situation (Toe Kicks Don’t Like Surprises)
- Step 8: Understand Standard Cabinet Dimensions (So Your Numbers Make Sense)
- Step 9: Measure the Existing Cabinets (If You’re Replacing Like-for-Like)
- Step 10: Plan for Fillers, Scribes, Corners, and “Nothing Is Square” Reality
- Step 11: Double-Check Everything and Create a Final Measurement Checklist
- Bonus: Measuring Cabinet Doors and Drawer Fronts (For Refacing or Replacement)
- Common Measuring Mistakes (So You Don’t Become a Cautionary Tale)
- Conclusion: Measure Like You’re Paying for Mistakes (Because You Are)
- Experiences From Real Projects: What Measuring Actually Feels Like (And What People Learn)
Measuring kitchen cabinets sounds like a “five-minute DIY” until you realize your walls are about as straight as a spaghetti noodle.
The good news: you don’t need a fancy laser setup or a math degree. You need a tape measure, a simple sketch, and a process that
assumes your house will try to trick you (because it will).
This guide walks you through how to measure kitchen cabinets in 11 clear stepswhether you’re replacing cabinets,
ordering semi-custom boxes, planning a layout with a designer, or just trying to avoid the heartbreak of a sink base that’s 1/2″ too
wide. We’ll cover the room, the cabinets, the openings, the “surprise” obstacles, and the details that separate a smooth install from a
weekend of creative swearing.
Before You Start: What You’re Really Measuring (And Why)
When people say “measure kitchen cabinets,” they often mean one of three things:
- Measuring the room for new cabinets (most common): walls, ceilings, windows, doors, and obstacles.
- Measuring existing cabinet boxes: useful for replacements, fillers, or matching sizes.
- Measuring cabinet doors/drawer fronts: for refacing or replacement fronts.
This article focuses mainly on the first (the room), because that’s where most expensive mistakes are born. But you’ll also get practical
cabinet and door measuring tips along the way.
Tools You’ll Want (So You Don’t “Eyeball” Your Way Into Regret)
- 25-foot tape measure (a stiff one, not the floppy “I gave up” tape)
- Notepad or measurement worksheet + pencil
- Painter’s tape (label walls and write quick notes)
- Step stool (for cabinet and ceiling measurements)
- Stud finder (optional but handy if you’re also planning install)
- Phone camera (photos save you from “Wait, where was that outlet?”)
Step 1: Draw a Simple Floor Plan (No One Is Grading Your Artwork)
Start by sketching your kitchen from above: walls, corners, and the basic shape (L, U, galley, one-wall, etc.). Keep it simple:
straight lines, labeled corners, and enough space to write measurements.
Pro tip
Label walls clockwise (Wall A, B, C…) so your notes don’t turn into a mystery novel later.
Step 2: Measure Each Wall RunTwice (Because Walls Lie)
Measure the total length of each wall firstcorner to corner. Then measure again at a second height (for example, around
countertop level). If those two numbers differ, your wall likely bows.
What to record
- Wall length at floor/baseboard area
- Wall length at roughly countertop height
- The smaller of the two as your “cabinet run” baseline (and note the difference)
Why smaller? Cabinets don’t flex to match a bulging wall. Your installer will shim, scribe, or add fillersbut only if you planned for it.
Step 3: Measure Ceiling Height in Multiple Spots (Corners + Midpoints)
Measure floor-to-ceiling height at least in a few placesespecially the corners and a midpoint on each wall. Ceilings can slope or dip,
even in homes that look perfectly normal (which is what makes it so rude).
Why this matters
- Upper cabinet height choices depend on the lowest ceiling point.
- Soffits, crown molding plans, and “to the ceiling” cabinets all require accurate vertical numbers.
- Small variations can change whether you can fit a tall pantry cabinet or need a shorter run.
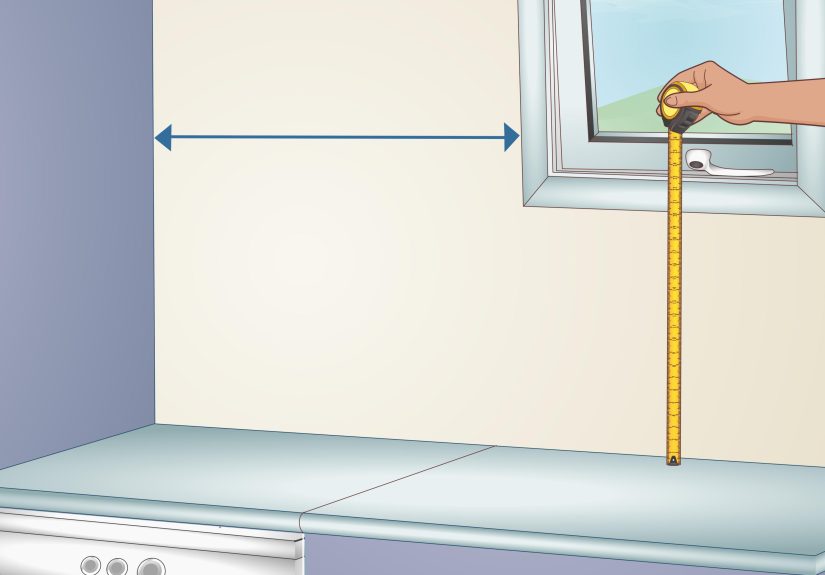
Step 4: Mark Doors, Windows, and Trim (Measure to the Outside Edge)
Now measure openings and their positions along each wall. Measure doors and windows to the outside of the trim/molding,
not just the glass or the door slab.
For each door/window, capture
- Width (outside trim to outside trim)
- Height (outside trim to outside trim)
- Distance from the nearest corner to the edge of trim
- Height from floor to the bottom of the window (important for countertops and backsplashes)
Step 5: Locate Plumbing, Electrical, Gas, Vents, and Anything That “Can’t Move”
On your sketch, mark the location of:
- Sink plumbing supply and drain
- Dishwasher connections
- Gas line (if applicable)
- Electrical outlets, switches, and dedicated circuits
- Hood venting, HVAC vents, returns, radiators, or baseboard heat
You don’t need to measure every outlet down to the millimeter, but you do need enough information to avoid placing a tall cabinet where
a vent must breathe (or where a plumber will laugh and then hand you a change order).
Step 6: Measure Existing Appliances and Their Clearances (Not Just the Pretty Front)
Appliances are the big, expensive puzzle pieces. Measure the space where each appliance sits and the appliance itself if you’re keeping it.
Focus on width, height, and depthand record anything overhead (like upper cabinets) that reduces vertical clearance.
Key appliance measurement notes
- Refrigerator: measure the opening width between cabinets, height to the lowest obstruction above, and depth to the wall.
- Range/oven: confirm width and note venting requirements if there’s a hood or microwave above.
- Dishwasher: measure the opening and confirm nearby plumbing/electrical placement.
- Microwave: if built-in or over-range, note cabinet depth and mounting space.
Also plan “breathing room” for appliancesespecially refrigeratorsso heat can dissipate and doors can open without scraping cabinet pulls.
Step 7: Check the Floor and Baseboard Situation (Toe Kicks Don’t Like Surprises)
Note your flooring type and whether it will stay, be replaced, or be installed under new cabinets. Also record baseboard height and thickness.
Floors can slope, and that affects leveling.
What to watch for
- Uneven floors that require shimming (common in older homes)
- Thick baseboards that might interfere with cabinet backs
- Flooring transitions that change cabinet height alignment
Step 8: Understand Standard Cabinet Dimensions (So Your Numbers Make Sense)
Even if you’re ordering custom, it helps to know “typical” cabinet sizing because it influences how you plan runs, fillers, and clearances.
Here are common standards many lines follow (always confirm with your manufacturer):
- Base cabinets: typically about 34.5″ high (without countertop) and around 24″ deep; widths vary in increments.
- Countertop height: commonly about 36″ from the floor when installed over base cabinets.
- Wall (upper) cabinets: commonly 12″ deep (deeper options exist) and often installed with ~18″ clearance above countertops.
- Tall/pantry cabinets: commonly 84″ to 96″ high depending on ceiling height and design.
Why include this in a measuring guide? Because when your sketch says you have 110″ of wall and you’re trying to fit a sink base, a dishwasher,
and drawers, you’ll need to think in standard widths (plus fillers) instead of imaginary cabinets that don’t exist.
Step 9: Measure the Existing Cabinets (If You’re Replacing Like-for-Like)
If you’re keeping the same layout and replacing cabinets in the same footprint, measure the existing cabinet boxes:
Cabinet box measurements
- Width: side-to-side across the front of the cabinet box (not the countertop)
- Height: floor to top of cabinet box (exclude countertop)
- Depth: wall to front of cabinet box (exclude door thickness if you’re matching box depth)
If your cabinets are face-frame, note that the frame can slightly change what “front-to-front” means. Consistency matters more than perfection:
measure the same way every time.
Step 10: Plan for Fillers, Scribes, Corners, and “Nothing Is Square” Reality
Fillers and scribes are not optional extrasthey’re how real kitchens cope with real houses.
Where fillers commonly go
- Between a cabinet run and a wall (especially if the wall bows)
- Next to appliances (to allow door/handle clearance)
- At corners (so doors/drawers don’t collide)
- Beside a tall pantry near a wall so you can actually open the door fully
A quick example (the “1/2-inch heartbreak” scenario)
Let’s say Wall A measures 120″ at the floor, but only 119 1/2″ at countertop height. If you order cabinets that add up to 120″ exactly,
they may fit at the floor and fail at the work surface lineright where it counts. The fix is usually a filler strip or scribing a panel,
but only if you planned for it. Recording both measurementsand using the smaller numberkeeps you safe.
Step 11: Double-Check Everything and Create a Final Measurement Checklist
Before you send numbers to a cabinet company or designer, do a second pass. This is where you catch the “Oops, I measured to the inside of trim”
errors that haunt remodels.
Final checklist table
| Item | Measure | Where/How | Notes |
|---|---|---|---|
| Wall runs | Length | Corner-to-corner (at floor and countertop height) | Use smaller; note bowing |
| Ceiling | Height | Multiple points per wall | Plan uppers/pantries by lowest point |
| Doors/windows | W/H + location | Outside trim; distance from corners | Countertop/window conflicts |
| Appliances | W/H/D + opening | Measure cavity and appliance | Allow clearance and ventilation |
| Plumbing/electrical | Locations | Mark on sketch | Note vents, gas lines, shutoffs |
| Flooring/baseboards | Type + transitions | Note what stays and what changes | Impacts leveling and heights |
Bonus: Measuring Cabinet Doors and Drawer Fronts (For Refacing or Replacement)
If you’re not replacing the whole kitchen and you only need new doors/drawer fronts, the measurements are different.
Many replacements are based on either:
- Measuring the existing door/drawer front itself (width and height), or
- Measuring the cabinet opening, then adding the overlay based on your hinge/door style.
For example, if you have a face-frame cabinet and you’re using a common overlay style hinge, the door typically extends beyond the opening by a
set amount on all sides. The key: match the overlay and hinge specs to what you’re ordering, and measure twice.
Common Measuring Mistakes (So You Don’t Become a Cautionary Tale)
- Measuring only once: measure twice, especially walls and ceiling heights.
- Ignoring trim: openings should include the outside edges of casing/trim.
- Not noting obstacles: vents, pipes, and outlets matter more than your optimism.
- Forgetting fillers: cabinet runs that equal the wall length exactly are a red flag in older homes.
- Skipping appliance details: you’re not buying “a fridge,” you’re buying a fridge that must fit.
Conclusion: Measure Like You’re Paying for Mistakes (Because You Are)
Measuring your kitchen for cabinets is less about being perfect and more about being methodical.
Draw the plan, measure wall runs at multiple points, record ceiling heights, capture openings to the outside of trim, mark utilities, and treat
appliances like the immovable objects they are. Then plan for fillers and out-of-square wallsbecause real kitchens live in real houses.
If you follow these 11 steps, you’ll have the kind of measurement set that cabinet designers love, installers respect, and your future self will
thank you forpreferably while standing in a finished kitchen, not in a half-demolished room holding a cabinet that’s “so close.”
Experiences From Real Projects: What Measuring Actually Feels Like (And What People Learn)
In real remodels, the measuring phase is where confidence goes to get humbledin a good way. The first experience many homeowners have is realizing
that the kitchen they “know by heart” becomes weirdly unfamiliar when you start writing numbers down. Someone will say, “That wall is about ten feet,”
and then the tape measure calmly replies, “It’s 9′ 10 3/8″, and also your corner is not a corner.” That’s not a failure; it’s the point. Measuring
turns assumptions into facts.
Another common experience: discovering that your “standard” kitchen isn’t actually standard. Cabinets may be built to typical sizes, but homes aren’t
assembled with the emotional stability of a factory. Floors slope. Walls bow. Ceilings dip. People often find a half-inch difference between one end
of a wall run and the other. The smart move isn’t trying to force everything into a perfect rectangle. It’s planning for reality with fillers,
scribes, and panelsthose quiet heroes that make the final install look intentional.
Appliance measuring has its own personality. Refrigerators, in particular, teach a fast lesson: the “listed width” is not the whole story. Doors need
swing clearance. Handles add depth. Ventilation needs space. A kitchen can look like it has plenty of room, but once you measure the opening between
cabinets and the height under an upper cabinet, you realize the new fridge needs a little breathing room to live its best life. People who measure
appliances early tend to avoid last-minute layout compromises, like shaving down a filler or switching to a smaller model because the cabinet order is
already placed.
Windows create a memorable measuring moment too. Many projects hit a speed bump when someone notices the window sill is lower than expectedright where
a backsplash or tall faucet wants to be. Measuring the height from floor to window bottom (and noting trim thickness) can prevent awkward surprises like
a countertop that runs into casing or a cabinet plan that blocks natural light. In practice, this is why photos help: you can annotate your sketch and
still see what the space actually looks like.
One of the most useful experiences people report is switching from “measuring cabinets” to “measuring the room for cabinets.” That shift changes your
whole approach. Instead of obsessing over the old cabinet width, you focus on wall runs, openings, utilities, and the workflow you want. That’s where
better layouts come frommaybe you realize you can center the sink, widen a drawer stack, or add a pantry that fits the ceiling height perfectly.
Measuring isn’t just documentation; it’s design discovery.
Finally, there’s the experience of doing a second passwhere you catch the tiny errors before they become expensive. People often find one measurement
that’s off because they measured to the inside of trim, rounded too aggressively, or forgot to record a soffit. That second pass is the grown-up move.
The tape measure doesn’t care that you’re tired; it cares that your cabinets fit. If you treat your checklist like a flight pre-check (calm, repeatable,
thorough), you’ll end up with numbers you can trustand a cabinet order that won’t turn into a “return policies” research project.


