Table of Contents >> Show >> Hide
- The Remodelista Idea: A Rental-Friendly Bedroom Refresh (Paint the Furniture, Not the Lease)
- Why Farrow & Ball Works for Bedroom Updates
- Color Planning: Build a Bedroom Palette That Feels Calm (Not Like a Hotel Lobby)
- Finish Matters: Matte, Eggshell, or “Please Don’t Show Every Fingerprint”
- Step-by-Step: A Remodelista-Inspired Furniture Paint Refresh
- Step 1: Choose the right piece (and decide what “good enough” means)
- Step 2: Disassemble or prep before assembly (the quiet genius move)
- Step 3: Clean, lightly sand, and dust like you mean it
- Step 4: Prime with purpose (don’t treat primer like an optional side quest)
- Step 5: Fill holes for that flat-front, high-end look
- Step 6: Paint in thin coats (your patience is the finish)
- Step 7: Let it cure before you treat it like furniture again
- Styling the Refreshed Bedroom: Make the Paint Look Like It Belongs There
- Budget Math: Where to Spend (and Where to Save)
- Common Mistakes (and the Fast Fixes)
- Experience Notes: What a Bedroom Refresh with Farrow & Ball Typically Feels Like (Extra )
- Final Thoughts
- SEO Tags
Bedroom refreshes have a funny ROI. Spend $40 on a candle and you feel “new energy” for roughly 11 minutes.
Move a lamp three inches and suddenly you’re an interior designer (congratulations, please accept this invisible award).
But paint? Paint is the rare upgrade that actually changes the mood of a roomand it doesn’t require a contractor, a spreadsheet,
or permission from the “committee” (aka whoever shares your bed).
The Remodelista take on this is especially smart: if you’re renting, or you’re simply not ready to commit to painting four walls,
you can still get that fresh-bedroom feeling by painting furniture. A dresser. A stool. A nightstand.
One strong color move, zero long-term relationship counseling with your landlord.
Let’s break down the Remodelista-inspired approachthen widen it into a practical, in-depth guide: choosing the right Farrow & Ball colors,
picking the best finish, prepping like a pro, and styling the end result so your room looks “considered” instead of “I own a paintbrush.”
The Remodelista Idea: A Rental-Friendly Bedroom Refresh (Paint the Furniture, Not the Lease)
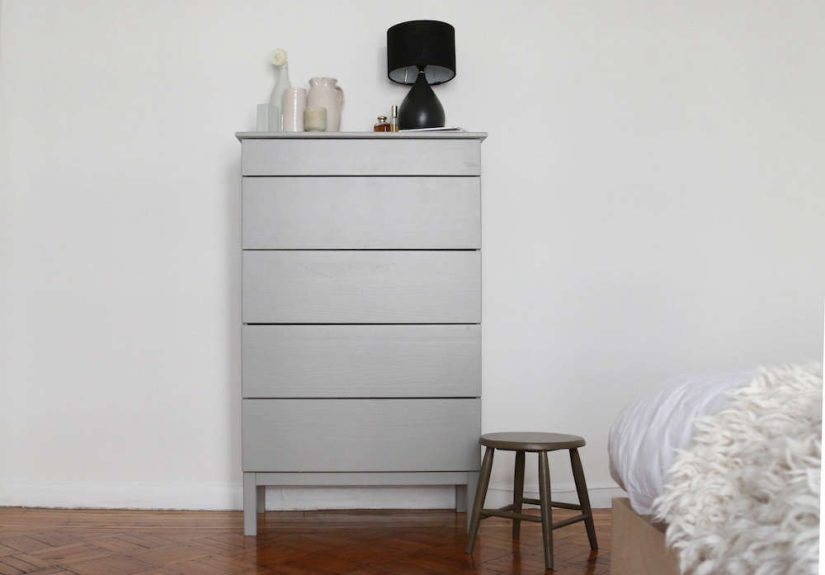
In Remodelista’s “A Bedroom Refresh with Farrow & Ball Paint,” editor Alexa Hotz tackled a bedroom that needed a little lift in a Brooklyn Heights rental.
Her trick was beautifully simple: take inexpensive, plain furniture and give it a high-design look with Farrow & Ball color.
The starring pieces were an unfinished IKEA Tarva 5-drawer chest and a vintage wooden stool repurposed as a bedside table.
The details matter (and this is where the project quietly becomes “designer”):
she prepped each piece before assembly to make painting faster and cleaner, primed carefully for a smooth finish,
filled the pre-drilled hardware holes for a flat-front, minimalist face, and then applied two coats of color.
The dresser went into Worsted (a rich mid-gray that reads calm and tailored),
while the stool became Salon Drab (a deep brown with real depthmoody, warm, and grounded).
Translation: the bedroom didn’t need a total makeover. It needed one strong visual anchor, one supporting accent,
and the confidence to let paint do the heavy lifting.
Why Farrow & Ball Works for Bedroom Updates
Farrow & Ball has a reputation for color that looks “alive” in changing light. Whether you’re a full-room painter or a furniture-upcycler,
the brand’s palette is designed to feel nuancedcomplex without being chaotic. For bedrooms, that’s gold:
you want restful, layered color that doesn’t scream at you when you wake up.
A few Farrow & Ball advantages that matter in real bedrooms
- Color names with personalities. You’re not choosing “Gray #7.” You’re choosing something with a point of viewhelpful when you’re building a mood.
- A system approach. Primers and undercoats are designed to support topcoat richnessespecially on wood furniture.
- Finish options. Ultra-matte, washable wall finishes, and tougher options for trim/furniture mean you can match the paint to the way you live.
Color Planning: Build a Bedroom Palette That Feels Calm (Not Like a Hotel Lobby)
The bedroom is the one room where “vibe” isn’t optional. You want the palette to feel restful in the morning and cozy at night,
in sunlight and lamplight. Start by deciding what you want the room to do:
energize you, calm you down, or cocoon you like a burrito of emotional security.
1) Use the Remodelista pairing as a blueprint
Worsted + Salon Drab is a masterclass in balance:
one tailored mid-tone (Worsted) keeps things airy enough for everyday living,
and one darker supporting shade (Salon Drab) adds gravity. In a bedroom, that combo reads “quiet luxury,” not “try-hard.”
2) Match the palette to your light (because your bedroom has opinions)
Natural light changes everything. Cooler light can make grays feel icier and some whites feel a bit stark.
Warmer light can make neutrals feel creamier and browns feel richer. If your room tends to be dim or cool,
many designers lean toward warmer-leaning neutrals and soft, muted colors that won’t turn gloomy by late afternoon.
3) Easy bedroom color recipes (specific, practical examples)
- Soft and breathable: warm white walls + a gray dresser (Worsted) + natural linen bedding + black metal accents.
- Moody but not cave-like: neutral walls + deep brown nightstand/stool (Salon Drab) + warm bulbs + brass hardware.
- Modern “color drench” lite: paint trim the same color family as walls (or the same color) to reduce contrast and feel more cocoonedespecially in small bedrooms.
- Classic calm: muted blue-green accents with warm wood and creamy whites for a soft coastal feel (without the seashell decor, unless that’s your thing).
Tip: if you’re nervous about bold wall color, put your statement on a piece of furniture first. A painted dresser is like a feature wall
that you can move to a different room when you change your mind (or your personality evolves).
Finish Matters: Matte, Eggshell, or “Please Don’t Show Every Fingerprint”
Paint color gets all the attention, but finish is what determines whether your project looks velvety and refinedor like it belongs in a rental turnover folder.
In bedrooms, many people love low-sheen walls for that soft, light-absorbing calm. For furniture, you usually want something tougher.
Quick finish guide for bedroom refresh projects
- Walls: matte/flat finishes can look luxe and forgiving (great for hiding tiny wall imperfections).
- Trim and doors: eggshell/satin-type finishes handle scuffs better and wipe clean more easily.
- Furniture: choose a durable finish and plan for cure timedressers get touched, leaned on, and occasionally attacked by belt buckles.
If you want the modern “softest possible” look, ultra-matte finishes can be stunningbut pair them with real-world expectations:
darker colors and flatter sheens can show oils or rub marks more easily on high-touch surfaces.
Step-by-Step: A Remodelista-Inspired Furniture Paint Refresh
Here’s a practical, repeatable process based on the Remodelista projectexpanded with pro-prep guidance so you can get the “smooth finish” results
without developing a lifelong feud with brush strokes.
Step 1: Choose the right piece (and decide what “good enough” means)
- Unfinished wood (like IKEA pine): ideal for painting, but it can soak up paint unevenly without proper priming.
- Vintage stools and nightstands: great character, but clean them wellold waxes and oils can mess with adhesion.
- Flat fronts look modern: if you want the minimalist look, plan to fill holes and skip pulls (or choose subtle hardware).
Step 2: Disassemble or prep before assembly (the quiet genius move)
Painting flat panels is faster and cleaner than fighting inside corners. If you’re working with a piece like the Tarva,
paint the components before assembly when possible. It reduces drips, speeds up your workflow, and makes the finish look more intentional.
Step 3: Clean, lightly sand, and dust like you mean it
Cleaning removes oils and grime; light sanding helps the primer grip; dust removal prevents gritty texture.
The goal is not “perfect,” it’s “paint can actually stick.” If you’re skipping sanding on a small piece,
at least make sure the surface is clean and properly primed.
Step 4: Prime with purpose (don’t treat primer like an optional side quest)
Primer is what separates “looks good today” from “peels next month.” A tinted primer/undercoat can also help your topcoat look richer.
Farrow & Ball primers and undercoats are designed in multiple tones to support the final color family, which is especially helpful for mid-tones and darks.
Step 5: Fill holes for that flat-front, high-end look
Want a modern face on a basic dresser? Fill pre-drilled holes with spackle/wood filler, let it dry, sand smooth, and then prime again if needed.
This is one of those small steps that makes a budget piece look custom.
Step 6: Paint in thin coats (your patience is the finish)
- Apply the first coat evenlydon’t overload the brush or roller.
- Let it dry according to the product’s recoat guidance (dry-to-touch is not always recoat-ready).
- Lightly sand between coats if needed for a smoother surface, then remove dust.
- Apply the second coat for full depth and even color.
Step 7: Let it cure before you treat it like furniture again
Paint can feel dry quickly but still needs time to fully harden. For dressers and bedside tables, give it breathing room:
avoid heavy use for a bit, and be gentle with drawers and surfaces at first. This is how you keep your “fresh finish” from becoming “distressed” by accident.
Styling the Refreshed Bedroom: Make the Paint Look Like It Belongs There
Once the paint is done, styling is what makes the project look like a design decision instead of a weekend event.
The easiest approach is to echo the painted tones in two or three small places around the room.
- Repeat the color quietly: a pillow cover, a throw, a framed print, or a bedside lamp base.
- Warm up cool paint: add texturelinen, wool, cane, oak, leatherso gray doesn’t feel sterile.
- Balance dark accents: if you use a deep shade like Salon Drab, pair it with lighter bedding and a warm bulb to keep the room inviting.
Budget Math: Where to Spend (and Where to Save)
If you’re using premium paint, the “save” happens by scaling the project smartly. Painting a dresser uses far less product than repainting an entire room,
but the visual impact is still huge.
Worth spending on
- A quality primer/undercoat
- A good brush (or small foam roller) to reduce texture
- Sandpaper/sanding sponge and a tack cloth or microfiber cloth for dust
Easy places to save
- Choose a basic piece with good bones (unfinished pine, solid wood, simple vintage finds)
- Reuse hardware if it’s decentor skip it for a flat-front look
- Focus on one “hero” piece instead of repainting everything you own (your future self will thank you)
Common Mistakes (and the Fast Fixes)
- Brush marks: use thinner coats, lighter pressure, and consider a foam roller for flat areas.
- Peeling/chipping: usually a prep problemclean better, prime correctly, and give proper cure time.
- Color regret: test samples in your real light and look at them morning and night.
- “Why does it look patchy?” second coat (and sometimes a tinted undercoat) is the magic.
Experience Notes: What a Bedroom Refresh with Farrow & Ball Typically Feels Like (Extra )
A bedroom refresh with Farrow & Ball paint tends to follow a very human emotional arcpart excitement, part second-guessing,
and one brief moment where you stare at a drying coat and wonder if you’ve accidentally invented a brand-new shade called “Regret Greige.”
The most common experience starts with confidence: you’ve picked your color (Worsted! Salon Drab! Very chic!),
you’ve watched a few how-to videos, and you’re convinced this will be the weekend project that makes you feel like a functional adult.
Then the light changes. The same swatch that looked perfectly tailored at 10 a.m. can look moodier at 4 p.m.
That’s not your imaginationthat’s how nuanced colors behave in real rooms. People often end up “auditioning” their samples for a few days:
moving painted cards around the bedroom, holding them near bedding, comparing them against floors, and checking them under warm lamps.
This stage can feel slow, but it’s also where good decisions happen. Bedrooms, more than most rooms, are a mix of daylight and artificial light,
and paint has to perform in both.
The prep portion is where expectations meet reality. Painting furniture sounds quick until you realize how much smoother the finish looks
when you clean thoroughly, prime carefully, and take a moment to knock down roughness with fine sandpaper.
The most common “aha” is that priming isn’t just about adhesionit’s about the final look.
A well-primed surface makes the topcoat appear more even, more saturated, and less blotchy, especially on thirsty woods like unfinished pine.
It’s also where the project stops looking like a craft and starts looking like a finish.
Another frequent experience is discovering how powerful a small painted piece can be in a bedroom.
A single dresser in a calm gray like Worsted can anchor the room the way a headboard mightwithout requiring you to buy anything big.
A small accent piece in a darker color (like a stool or nightstand in Salon Drab) can make the whole space feel more layered,
like you’ve intentionally curated a palette instead of accidentally collecting furniture over the past decade.
It’s common for people to finish the piece, place it in the room, and immediately notice what else feels “off”
not in a bad way, but in a “wow, now the rest of the room wants to catch up” way.
Finally, there’s the cure-time lesson. Fresh paint can feel dry quickly, so people naturally want to load drawers,
put a glass of water on top, and get back to life. The best results come from treating the piece gently for a bit,
especially with furniture that gets daily use. In practice, that means using coasters, being careful with drawer pulls,
and waiting before stacking heavy items. This isn’t about being preciousit’s about letting the finish harden so it stays beautiful.
The payoff is real: a bedroom that feels updated, calmer, and more intentional, achieved with one smart color move and a weekend of steady work.
Final Thoughts
A bedroom refresh doesn’t have to mean repainting the entire room or replacing half your furniture.
Remodelista’s Farrow & Ball approach proves a more strategic truth: pick one or two pieces, choose a nuanced color,
prep well, and let the paint deliver the mood shift. Whether you’re a renter looking for a noncommittal upgrade
or a homeowner who wants maximum impact with minimal chaos, painting furniture is one of the most satisfying ways to make a bedroom feel new again.