Table of Contents >> Show >> Hide
- Meet the Allwinner F1C100S: “Linux in a QFN”
- Dual-Board, Dual-Purpose: What Makes This Design “Nifty”
- How It Boots: From Bare Metal to BusyBox (Without the Tears)
- What You Can Build With an F1C100S Dual-Board Computer
- Engineering Notes: The Gotchas That Make You Smarter
- Why the Dual-Board Approach Is Sneakily Brilliant
- Conclusion
- Maker Experiences: What Building One Is Like (About )
- SEO Tags
There are two kinds of computers in this world: the ones that make you productive, and the ones that make you curious. The F1C100S dual-board computer is unapologetically in the second categoryin the best way. It’s the kind of tiny Linux-capable machine that doesn’t try to replace your laptop. It tries to replace that nagging thought in your head that says, “Surely I could build a real computer out of, like… five parts and spite.”
This particular design is “dual-board” on purpose: a minimal main board that can run on its own, plus a second add-on board that upgrades your experience from “serial console chic” to “hey, that’s actually usable.” It’s a clever approach for makers, tinkerers, and anyone who enjoys modular hardware the way other people enjoy modular closets.
Meet the Allwinner F1C100S: “Linux in a QFN”
The Allwinner F1C100S sits in a weirdly delightful niche: it’s an ARM9-class system-on-chip that can run Linux, and it brings its own RAM to the party. That one detailembedded DDRchanges everything. Suddenly the board doesn’t need external DRAM routing, which typically adds complexity, cost, and the kind of PCB layout pain that makes grown engineers stare into the distance.
What you actually get (and why it matters)
- CPU: ARM926EJ-S (ARMv5TE class). Old? Yes. Useless? Absolutely not.
- Memory: 32MB DDR1 integrated in-packagesmall, but predictable and cost-friendly.
- USB: USB 2.0 OTG, enabling device or host roles depending on board design.
- Display options: RGB TTL LCD support and composite video (CVBS) output for retro-fun output paths.
- Audio: Integrated audio codec and digital audio interfaces (I2S/PCM) for sound projects.
- Storage boot paths: Support for SD/TF and SPI flash boot workflows (and USB-assisted recovery/download modes).
- Multimedia blocks: Capable of handling 720p-class decode/encode tasks in certain pipelines (useful in the right project).
The vibe here isn’t “run a full desktop.” The vibe is “run a tight, purpose-built Linux image that boots fast, does one job well, and doesn’t ask for 8GB of RAM just to display a settings menu.”
Why 32MB RAM is both a limitation and a superpower
32MB forces you to be intentional. You’ll favor BusyBox over a buffet of GNU utilities, pick a lightweight C library, and think about whether you really need Pythonor just the part of Python you actually use. But the payoff is real: once you embrace minimalism, you get fast boots, low power draw, and systems that feel more like appliances than “tiny PCs that are always one update away from sadness.”
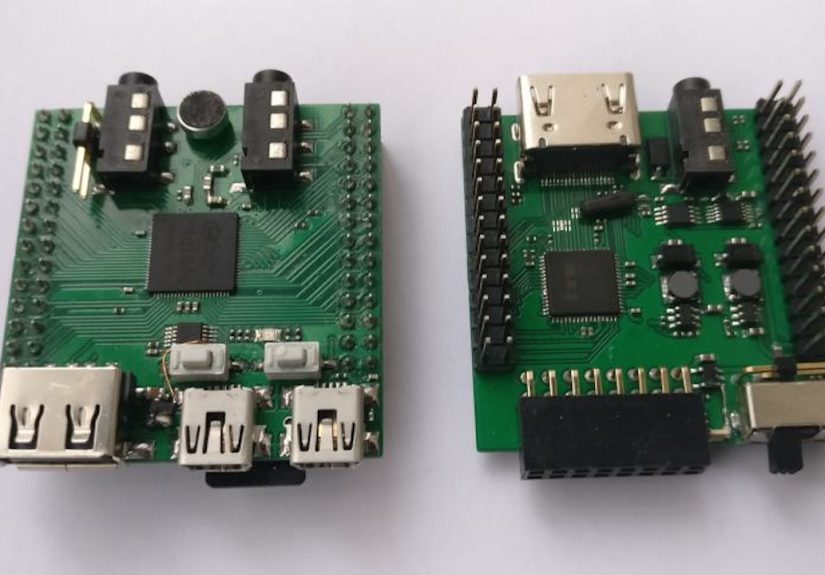
Dual-Board, Dual-Purpose: What Makes This Design “Nifty”
The standout idea in this project is that it’s intentionally split into two boards. In the simplest build, you can assemble the top board and have a functional small Linux computer. Add the second board and you unlock the kind of I/O that makes it feel like a finished gadget instead of a proof-of-concept.
The top board: boot, debug, and “just enough I/O”
The main board is the essentials layercompute, boot, basic connectivity, and the interfaces that make bring-up painless.
- F1C100S (or F1C200S): The heart of the system.
- microSD socket: Friendly for early bring-up and quick iteration.
- USB Host/Device: For peripherals or gadget mode experiments.
- USB-UART bridge: Debug access without exotic adapters.
- Audio: Stereo out, plus mono amplification and mic support.
- TV out: Composite output for displays that scream “retro terminal.”
The bottom board: creature comforts (and a few surprises)
The add-on board is basically the “okay, now it’s a product” layer. It expands power, display, and media options in a way that’s genuinely practical.
- HDMI output: A modern display path when you don’t want composite artifacts as a lifestyle.
- TFT + touch header: Great for small UIs, status panels, and handheld-ish experiments.
- Li-ion power control: Battery support changes the portability story completely.
- RTC: Because time matters when your device isn’t always online.
- FM radio + TV input: Delightfully extra. Also: surprisingly useful for certain media builds.
This split design mirrors a bigger pattern in embedded systems: a “compute module” idea, but applied in a maker- friendly way. Build the minimum when you’re experimenting; add the extras when you’re ready to use it for real.
How It Boots: From Bare Metal to BusyBox (Without the Tears)
Booting Linux on small SoCs can feel like a ritual: you chant “device tree” three times, offer a sacrificial SD card to the boot ROM, and hope your UART wires don’t fall out mid-boot. The good news is that the F1C100S world has a fairly standard playbook now.
A practical, modern boot chain
- Boot ROM finds a boot source (SD/TF or SPI flash, depending on your setup).
- SPL (Secondary Program Loader) initializes enough hardware to load full U-Boot reliably.
- U-Boot loads your kernel + device tree (often packaged together, sometimes as a FIT image).
- Linux kernel boots and mounts a tiny root filesystem (initramfs or Buildroot-generated image).
- Userspace runs your application (the only part your end users should ever notice).
If you’re optimizing for simplicity, a minimalist setup often pairs the SoC with SPI NOR flash for storage. In tight configurations, something in the neighborhood of 8–16MB can be workable for bootloader + kernel + a very small userspace, depending on what you include. If you’re optimizing for iteration speed, microSD is still the friendliest early-stage workflow.
Device tree: the “make Linux understand your PCB” step
The device tree is where your hardware becomes real to Linux. If you’re using the reference design as-is, you’ll typically start from an existing “suniv/f1c100s” baseline and adjust peripherals: SPI flash, MMC wiring, display output, audio routing, GPIOs, and any extra gadgets. This is also where the dual-board approach can shine: the “top board only” configuration can have one device tree, and “top + bottom” can have another.
What You Can Build With an F1C100S Dual-Board Computer
This platform is at its best when you treat it like an embedded Linux appliancenot a tiny desktop. Here are a few projects where the feature set feels oddly perfect.
1) A pocket terminal or tiny “Linux appliance”
Want a serial-console-first machine that boots into a shell instantly, runs scripts, logs data, or controls other hardware? This is prime territory. People have built Linux devices on this SoC in absurdly constrained formats (even novelty form factors) precisely because it’s cheap, Linux-capable, and compact.
2) A minimalist UI panel (TFT + touch)
Add the bottom board and a small TFT, and suddenly you’ve got a compact UI engine for dashboards, status panels, and hardware control screens. Think: a network monitor with a touch menu, a synth controller, a “smart” clock that doesn’t need cloud anything, or a portable instrumentation display.
The trick is to keep the UI lightweight: simple framebuffer apps, direct rendering to an LCD interface, or even a minimal toolkit instead of a full desktop stack. When you keep your UI honest, 32MB is surprisingly workable.
3) Audio gadgets (with optional FM radio)
The presence of audio I/O, an integrated codec path, and extra media features on the add-on board makes this design feel tailor-made for small audio appliances. A tiny internet radio (offline playlists, podcasts synced over USB), a sound-effects box, a voice recorder, or a “learn-to-hack audio” platform all fit naturally.
4) Composite video experiments (because sometimes HDMI is too normal)
Composite output and TV input open up a fun lab of old-school video experiments: overlay graphics, video pass-through concepts, retro display support, or “CRT terminal” vibes. Will this be your daily driver display? Probably not. Will it make you smile? Almost certainly.
Engineering Notes: The Gotchas That Make You Smarter
ARMv5TE realities (a.k.a. choose your toolchain wisely)
The ARM926EJ-S is a classic core, which means you’ll want to pay attention to ABI and floating-point choices. Many builders stick to soft-float expectations and keep userspace lean to avoid surprises. In exchange, you get a platform that’s easy to understand, easy to debug over UART, and honest about its limits.
Mainline Linux support is realbut you still have homework
The ecosystem has strong public breadcrumbs: device-tree bindings for suniv/f1c100s peripherals exist in upstream documentation (USB PHY, interrupt controller, SPI, MMC, audio codec, and more). That’s a big deal: it means you’re not building on secret sauce alone. But you’ll still need to map those pieces to your exact wiring and board layout.
Clock speeds: “it depends” isn’t a cop-out, it’s the truth
You’ll see different references for CPU frequency depending on documentation and board choices. Community docs commonly cite ~533 MHz for the F1C100S. Some boards and writeups mention higher targets. In practice, your stable frequency depends on your clocking setup, power integrity, thermals, and whether your software configuration is tuned for reliability or bravado.
Why the Dual-Board Approach Is Sneakily Brilliant
Splitting a design across two boards isn’t just aestheticit’s practical engineering. It lets you:
- Prototype faster: Bring up the core board first. Make Linux boot. Celebrate.
- Reduce risk: Debug power, storage, and UART before adding display and “extras.”
- Ship variants: One compute board, multiple add-ons for different product ideas.
- Learn in layers: Each board becomes its own lesson: boot on the top, UX on the bottom.
If you’ve ever tried to debug a brand-new SoC board that has everything on it at once, you know why this matters. Layering turns chaos into a checklist.
Conclusion
The F1C100S dual-board computer is a reminder that “useful” doesn’t have to mean “powerful.” Sometimes useful means cheap, small, understandable, and modularso you can actually finish a build instead of collecting half- assembled boards like they’re limited-edition trading cards.
If you want a tiny embedded Linux machine that rewards curiosity, encourages good engineering habits, and offers a surprisingly rich set of interfaces for its size, this is a wonderfully “nifty” path to explore.
Maker Experiences: What Building One Is Like (About )
Here’s what you’ll likely experience when you build (or adapt) an F1C100S dual-board computerbased on patterns that show up again and again in maker writeups and community builds.
First, the emotional arc: confidence, confusion, then a weird amount of joy from seeing a boot log scroll by at 115200 baud. The top board is where you get your first “win.” You power it, connect UART, and suddenly you’re in the most honest user interface in computing history: plain text that tells you exactly what’s happening. No animations. No spinners. Just truth.
Your second experience is learning to love constraints. With 32MB of RAM, you start making decisions the way embedded engineers do. Do you want a shell and a few tools, or do you want one fancy thing like Python? Do you want networking packages, or do you want faster boots? You’ll probably build two images: a “debug build” that’s comfortable, and a “final build” that’s ruthlessly minimal. The final build will feel faster, cleaner, and slightly smug.
Then come the hardware lessons. If you’re assembling boards yourself, you’ll discover that “debug-friendly” I/O is priceless. Having a USB-UART bridge on board (or easy access to UART pins) turns bring-up from a week-long ordeal into an afternoon. You’ll also learn that storage decisions matter more than you think. microSD is great when you’re iterating; SPI flash is satisfying when you want something that boots consistently without removable media. Many builders do microSD first, then migrate to flash once the software is stable.
If you add the bottom board, your experience shifts from “computer science project” to “device.” HDMI output feels like a victory lap. A TFT+touch display feels like you crossed into product territory. Battery support makes you start thinking about power budgets and startup time. An RTC makes you realize that timekeeping is a feature, not a guarantee.
Finally, the best part: you’ll start inventing excuses to use the board. A dedicated music player. A bench tool for serial adapters. A portable config terminal. A little status screen that shows your build server results. The projects that stick are usually the ones with a single purpose and a tight UI. When you keep it focused, the F1C100S stops feeling “small” and starts feeling “efficient.”
And yesat some point you will say, out loud, “I can’t believe this boots Linux.” That moment is basically the whole hobby.