Table of Contents >> Show >> Hide
- Why Add a Dining Area to the Living Room in the First Place?
- Step 1: Do a “Reality Check” Space Audit
- Step 2: Understand Zoning (A.K.A. How to Make It Look On Purpose)
- Step 3: Plan the Dining Footprint (Clearances Matter More Than Vibes)
- Step 4: Choose the Right Table Shape for Your Room
- Step 5: Pick Seating That Doesn’t Bully the Room
- Step 6: Don’t Forget Table Height and Comfort Basics
- Step 7: Lighting That Makes the Dining Area Feel “Real”
- Step 8: Storage and SurfacesBecause Dining Areas Create Stuff
- Three Layout Recipes That Work in Real Homes
- Common Mistakes (and How to Fix Them Fast)
- A Quick Buying Checklist Before You Commit
- Real-World Experiences: What It’s Actually Like to Live With a Living-Room Dining Area (About )
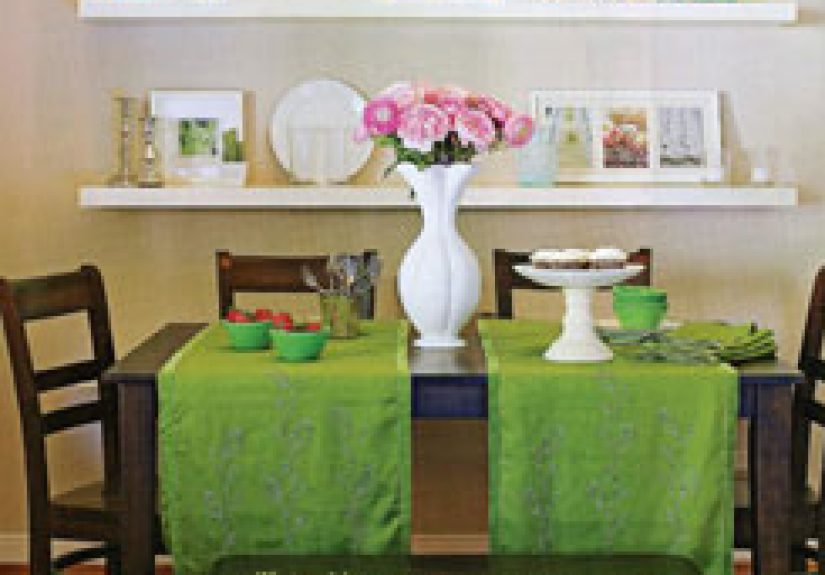
So you want to squeeze a dining area into your living room. Translation: you want a place to eat that isn’t balanced over a laptop, a throw pillow, and pure hope. Good newscreating a living room dining room combo can look intentional (not “we ran out of rooms”) and function beautifully for weeknight meals, board games, homework, and the occasional “sure, come over!” dinner.
The trick is to treat your space like a tiny city: you need districts (zones), streets (walkways), and a few rules that keep traffic from turning into chaos. This guide walks you through planning, choosing the right table and seating, defining zones with rugs and lighting, and avoiding common layout mistakeswithout making your home feel like a furniture showroom with a strict dress code.
Why Add a Dining Area to the Living Room in the First Place?
Combining living and dining space is common in open floor plans and smaller homes because it creates one connected hub instead of multiple underused rooms. It also tends to feel brighter and more socialpeople can hang out, snack, talk, and linger without splitting into separate rooms. The key is to keep it flexible and easy to live with, not just pretty for photos.
Step 1: Do a “Reality Check” Space Audit
Before you fall in love with a table online (we’ve all been there), audit the space you actually have. Grab a tape measure and note:
- Room dimensions (length, width, and any awkward jogs or angles)
- Fixed features (windows, doors, radiators, vents, built-ins)
- Power and lighting (outlets, floor lamps, overhead fixtures)
- Traffic paths (where people naturally walk through the room)
A simple trick: sketch a quick floor plan on graph paper (or use a basic room-planning app) and draw a few possible furniture layouts. You’re aiming for an arrangement that supports real lifewalking through the room, pulling out chairs, and not performing acrobatics to get to the sofa.
Step 2: Understand Zoning (A.K.A. How to Make It Look On Purpose)
In a shared space, zoning is how you tell the eye: “This is the lounging area” and “That is the eating area.” You can do this without walls by using a few classic design moves:
Use furniture as a “soft divider”
A sofa facing away from the dining spot helps define the living zone. Add a slim console table behind the sofa and suddenly it looks intentionalplus you get a spot for a lamp, books, or the mail pile you’ll swear you’re sorting “later.”
Anchor each zone with a rug
A living room rug outlines the conversation area. A separate rug under the dining set can visually “frame” the eating space. If your dining rug is too small, chairs will snag and the zone will feel awkwardlike wearing shoes two sizes too tight.
Define the dining zone with lighting
A pendant or chandelier over the table acts like a big neon sign that politely says, “Dining happens here.” Even if you don’t want to install new wiring, you can mimic this effect with a plug-in pendant, a swag hook, or a pair of matching wall sconces.
Repeat colors and materials for a cohesive look
A living-dining combo works best when there’s a consistent “story” across both zonessimilar wood tones, a repeated metal finish (black, brass, nickel), or a shared color palette. That’s what keeps the space from feeling like two unrelated sets mashed together.
Step 3: Plan the Dining Footprint (Clearances Matter More Than Vibes)
Here’s the unglamorous truth: the difference between “cozy” and “cramped” is often just a few inches. For comfortable circulation, many designers recommend leaving about 36 inches of clearance from the table edge to a wall or other furniture so chairs can slide back and people can pass. In busier paths (like between the table and the main walkway), 42–48 inches is often considered more comfortable.
If you don’t have that clearance on all sides, don’t panicjust design strategically:
- Bench seating on one side takes up less “pull-out” space than chairs.
- Banquette seating against a wall is a space-saver that can feel built-in and cozy.
- Drop-leaf or extendable tables let you shrink the footprint daily and expand for guests.
Step 4: Choose the Right Table Shape for Your Room
Table shape is a layout tool. Pick the one that matches how people move through your living room.
Round tables: best for tight corners and easy flow
A round table is great if your dining area is in a corner or you’re working with a small square-ish zone. With no sharp corners, it’s easier to walk around, and it feels more conversational. A 36–42 inch round table often seats 2–4 comfortably, depending on chair size.
Rectangular tables: best for long rooms
If your living room is long and narrow, a rectangular table can align neatly with the room’s shape and keep pathways predictable. Consider slim or extendable styles so you don’t sacrifice circulation.
Oval tables: a softer, friendlier rectangle
Ovals offer the capacity of a rectangular table with gentler edgesnice for tight layouts where corners would get bumped (especially in high-traffic homes with kids).
Drop-leaf/gateleg tables: tiny footprint, big flexibility
These are MVPs for apartment living and multipurpose rooms. Keep the leaves down for daily life, then pop them up when you’re hosting. It’s basically a table that understands boundaries.
Step 5: Pick Seating That Doesn’t Bully the Room
In a combined living and dining room, bulky chairs can overwhelm the space fast. Look for seating that’s visually lighter and physically slimmer.
Chairs with open backs or slimmer profiles
Open-back dining chairs (or styles with thin frames) keep sightlines airy, which helps your living room still feel like a living roomnot a cafeteria with a sofa.
Benches for space efficiency
A bench on the wall side saves space and reduces the need for clearance behind every seat. Bonus: benches can slide fully under the table for a cleaner look.
Banquettes for the “built-in” look
A corner or wall banquette can be a game-changer because it turns dead space into seating and makes the dining area feel deliberately designed. You can DIY the vibe with a storage bench and cushions if you’re not ready for custom carpentry.
Step 6: Don’t Forget Table Height and Comfort Basics
Standard dining tables are typically around 28–30 inches tall. That height works with most dining chairs and keeps meals comfortable (and elbows less likely to collide). If you’re tempted by counter-height seating, be honest about your habitssome people love the café energy; others feel like they’re perpetually perched.
Step 7: Lighting That Makes the Dining Area Feel “Real”
Lighting is one of the fastest ways to make your dining zone feel anchored and intentional.
- Over-table statement light: A pendant or chandelier sets the zone instantly.
- Layered lighting: Combine overhead light with a nearby floor lamp or wall sconce for warmth.
- Dimmers: If you can add one, do it. It’s the difference between “dinner party” and “interrogation.”
Step 8: Storage and SurfacesBecause Dining Areas Create Stuff
A dining area isn’t just a table. It’s placemats, napkins, candles, serving bowls, chargers you keep losing, and that one random screwdriver that appears whenever people visit. Plan for storage so clutter doesn’t creep into your living space.
Smart storage options
- Sideboard/credenza: Stores linens, dishes, and doubles as a serving station.
- Bar cart: Flexible, small footprint, and moves when you need more room.
- Wall shelves: Great for small spaceskeeps essentials off the floor.
- Storage bench/ottoman nearby: Handy for extra napkins, games, or kid supplies.
Three Layout Recipes That Work in Real Homes
Here are three common ways to add a dining area to your living roomeach with a different vibe and footprint.
Layout 1: The “Behind the Sofa” Dining Zone
Best for: open plan rooms where the living area “floats” away from the wall.
- Float the sofa to face the TV/fireplace.
- Place a console table behind the sofa to create a visual boundary.
- Position the dining table behind that boundary, closer to the kitchen side if possible.
Why it works: the sofa becomes a divider, the console adds polish, and the dining area feels like a separate “room” without any construction dust.
Layout 2: The “Window Nook” Dining Spot
Best for: rooms with a bright corner or bay window.
- Use a round or small oval table near the window.
- Add a bench/banquette on the wall side for space efficiency.
- Hang a pendant or install a wall sconce to frame the nook.
Why it works: natural light makes the dining area feel special, and a nook keeps the main living zone calm and uncluttered.
Layout 3: The “Wall-Hugger” Everyday Table
Best for: small apartments and multipurpose rooms.
- Use a narrow rectangular table or drop-leaf against a wall.
- Keep two chairs on the open side; use a bench that slides under.
- Pull the table out when you host, then tuck it back in daily.
Why it works: you keep circulation open most of the time, but still have a real dining surface for meals and projects.
Common Mistakes (and How to Fix Them Fast)
Mistake: The table fits, but people don’t
If chairs constantly bump into the sofa or a walkway feels clogged, the table is too big for the movement within the room. Fix it by downsizing, switching to a round table, or using a bench on the tight side.
Mistake: A too-small rug under the dining set
If chair legs catch the rug edge every time someone stands up, it’s going to get old fast. Fix it with a larger rug (or skip the dining rug entirely and use lighting + furniture placement to define the zone).
Mistake: Two zones with zero visual connection
If your living area is modern black-and-white and your dining set is rustic farmhouseno shade, but it can feel accidental. Fix it by repeating one element across both: matching wood tone, similar metal finish, or a shared accent color.
Mistake: No landing zone for dining clutter
Without a place for serving pieces, linens, or daily essentials, the dining table becomes a permanent pile. Fix it with a slim sideboard, a rolling cart, or even a closed storage bench.
A Quick Buying Checklist Before You Commit
- Can you keep a comfortable clearance around at least the “busy” sides of the table?
- Will chairs pull out without hitting the sofa, console, or wall?
- Is the table shape friendly to your traffic paths (especially entry-to-kitchen routes)?
- Do you have a lighting plan so the dining zone doesn’t feel like a lonely island?
- Do you have storage so the dining table isn’t always “in use”?
Real-World Experiences: What It’s Actually Like to Live With a Living-Room Dining Area (About )
People who add a dining area to their living room usually report the same surprising shift: they start using the space more. Not in a “we suddenly host formal dinners every weekend” waymore in a “we stopped eating over the sink like raccoons” way. A real table changes routines. Weeknight meals feel more deliberate, even if dinner is takeout in its original container (no judgment).
One common experience is the “two-minute reset” becoming your new best friend. When the dining table is visible from the sofa, clutter feels louder. Homeowners often develop a quick ritual: stack papers, wipe the surface, push chairs in. It’s not about perfectionit’s about making the room feel restful again after a busy day. Many people find that adding a tray, a bowl, or a small lidded box nearby helps corral the little stuff (keys, pens, receipts) so it doesn’t sprawl across the tabletop.
In small homes, the dining area frequently becomes a multitask zonepart breakfast spot, part homework desk, part “I’m going to finally start journaling” station. The best setups account for that reality. A table with a durable finish, chairs that are comfortable for more than 15 minutes, and a nearby outlet (or a neat cable solution) makes the space genuinely usable. Some households keep a slim basket in a credenza or under a bench with placemats, chargers, and a tablecloth so it’s easy to transform “work mode” back into “dinner mode.”
Hosting is another interesting shift. People with a living room dining room combo often entertain more casuallyfriends perched on the sofa with drinks while the host finishes food at the table, then everyone rotates seats as the night goes on. It feels more fluid and social than a formal dining room. A round table can enhance that “everyone’s included” feel, while an extendable table gives you the option to scale up without committing precious square footage every day.
Families often mention that a living-room dining spot becomes a home base: kids do crafts there, adults sort mail there, and someone inevitably leaves a water glass there overnight. That’s normal. The most successful spaces plan for it. Washable rugs, wipeable chair fabrics, felt pads on chair legs, and a small storage piece nearby reduce friction. If noise is a concern (especially in open layouts), adding soft elementsrugs, curtains, upholstered seatingcan make the combined room feel calmer and less echoey.
And finally, there’s a sneaky emotional benefit people mention: sharing a meal in the same room where you relax can make home feel more connected. You don’t need a separate dining room to create “dinner energy.” You just need a spot that’s comfortable, functional, and easy to maintainso you can sit down, eat, and enjoy your space without feeling like you’re living in a furniture obstacle course.