Table of Contents >> Show >> Hide
- Before You Start: The 10-Minute Bathroom Reality Check
- 1) Paint the Vanity (and Make It Look Expensive)
- 2) Swap Hardware Like You’re Giving the Vanity New Jewelry
- 3) Replace the Faucet (Big Upgrade, Surprisingly Doable)
- 4) Upgrade the Vanity Light (Your Face Deserves Better)
- 5) Frame (or Replace) the Mirror for Instant “New Bathroom” Energy
- 6) Re-Caulk the Tub/Shower (The “Stop Feeding Mold” Project)
- 7) Regrout (or Touch Up) Tile for a “New Shower” Illusion
- 8) Add Wainscoting or Beadboard for Classic Charm (and Wall Protection)
- 9) Peel-and-Stick Tile: The “No Demo, Big Wow” Trick
- 10) Peel-and-Stick Wallpaper (Yes, You CanIf You’re Smart About It)
- 11) Upgrade Your Exhaust Fan (The Remodel That Prevents Future Remodels)
- 12) Install Floating Shelves (Storage Without the Bulk)
- 13) Add a Shower Ledge or Niche Alternative (Goodbye, Sad Plastic Caddy)
- 14) Swap the Showerhead (and Upgrade the Whole Experience)
- 15) Refresh the Toilet Zone: Seat, Bidet Attachment, or Full Swap
- Putting It All Together: A Simple “Stunning Change” Game Plan
- Conclusion: Your Bathroom Can Change Without a Full Gut Job
- Extra: Real-World DIY Bathroom Remodel Experiences (What People Don’t Tell You Until After)
If your bathroom feels stuck in a time capsule (and not the cute vintage kind), you don’t need to swing a sledgehammer to see a dramatic upgrade.
The secret is picking DIY bathroom remodel ideas that deliver big visual payoff with minimal chaosbecause nobody wants to brush their teeth in the kitchen for three weeks like it’s a sad sitcom plot.
This guide walks you through 15 high-impact, budget-friendly bathroom makeover projectsfrom quick swaps to “weekend warrior” upgradesplus the real-world gotchas
that separate “wow” from “why is my caulk doing that?” You’ll get practical steps, smart material choices, and specific examples so you can plan your remodel like a pro
(even if your tool belt still smells new).
Before You Start: The 10-Minute Bathroom Reality Check
Bathrooms are small, but they’re demanding. Moisture, steam, and daily wear mean your materials need to be water-smart, not just Pinterest-pretty.
Spend 10 minutes doing this quick assessment before you buy anything:
1) Identify what’s cosmetic vs. what’s failing
Stained grout, peeling caulk, a wobbly faucet handle, and a foggy mirror are more than “ugly”they’re little leaks and humidity traps waiting to level up into bigger problems.
Fixing the functional stuff first makes every style upgrade last longer.
2) Decide your “finish family”
Pick one main metal finish (brushed nickel, matte black, brass, etc.) and stick to it for faucets, hooks, lighting, and hardware.
Your bathroom instantly looks more intentionallike you meant to do this, not like you adopted random fixtures from the clearance aisle.
3) Respect the “water zones”
Not every surface is equal. A vanity side panel is forgiving. A shower surround is basically a rainforest on hard mode.
Use products rated for bathrooms, and treat “high-moisture” areas with extra caution.
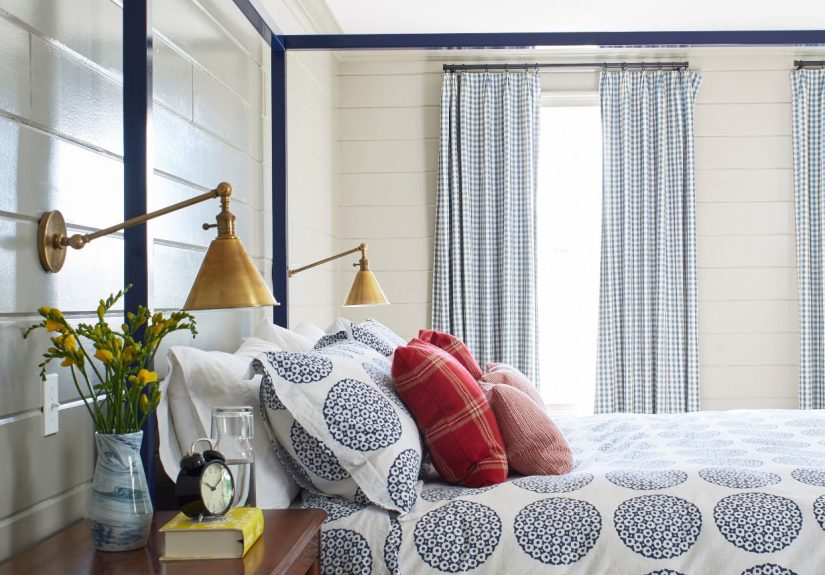
1) Paint the Vanity (and Make It Look Expensive)
A vanity makeover is one of the best DIY bathroom remodel ideas because it changes the whole room’s vibe without changing plumbing.
Painted cabinetry can look custom if you prep wellbecause paint loves effort and punishes shortcuts.
How to do it (the durable way)
- Remove doors/drawers, label hinges, and clean everything with a degreaser.
- Lightly sand or scuff, then wipe dust thoroughly.
- Prime based on surface type (wood vs. laminate) and let it cure.
- Apply 2 thin coats of cabinet-grade paint (don’t glob it like frosting).
- Finish with a protective topcoat if recommended for your paint system.
Pro tip
If your vanity is builder-basic oak, try a warm white, soft greige, or a deep “inky” color like navy/charcoal.
Pair it with upgraded hardware for instant “this came from a showroom” energy.
Typical DIY range: $50–$200 • Time: 1–2 days (dry time is the boss here)
2) Swap Hardware Like You’re Giving the Vanity New Jewelry
New knobs and pulls are small, but they punch above their weight. Matching hardware to your faucet finish makes the whole room feel coordinated.
It’s the easiest way to stop your bathroom from looking like it got dressed in the dark.
How to do it
- Measure existing hole spacing (center-to-center) so replacements fit.
- If you want a new style with different spacing, use a drilling template for clean alignment.
- For a modern look, consider longer pulls even on small drawers.
Typical DIY range: $20–$120 • Time: 30–60 minutes
3) Replace the Faucet (Big Upgrade, Surprisingly Doable)
A new faucet instantly modernizes a sink area, and it’s one of those “looks hard, isn’t” projectsassuming your shutoff valves work and you’re patient.
Bonus: New faucets often have smoother operation and fewer drips.
How to do it safely
- Turn off hot/cold shutoff valves and confirm water is off.
- Place a towel and a small bucket under the supply lines.
- Remove old faucet connections (a basin wrench is your best friend).
- Install the new faucet per instructions, then reconnect supply lines.
- Turn water on slowly and check for leaks with a dry paper towel.
Specific example
If your bathroom is small, a single-handle faucet can reduce visual clutter. In a shared bathroom, a two-handle faucet can make temperature control easier.
Typical DIY range: $60–$250 • Time: 1–2 hours
4) Upgrade the Vanity Light (Your Face Deserves Better)
Lighting is a “hidden remodel.” Swap a dated fixture and suddenly the whole bathroom looks freshereven if the tiles are still living their 2007 truth.
Choose warm-white LEDs for flattering light and consider a dimmer for spa vibes.
How to do it
- Turn off power at the breaker (not just the switch).
- Confirm power is off before touching wires.
- Remove the old fixture, match wire connections, and mount the new one securely.
- Seal around the mounting plate if the wall surface is uneven.
Pro tip
In a primary bath, consider two sconces flanking the mirror for less shadowing.
In a small bath, a single clean-lined vanity bar can still look high-end if it’s sized correctly.
Typical DIY range: $40–$200 • Time: 1–2 hours
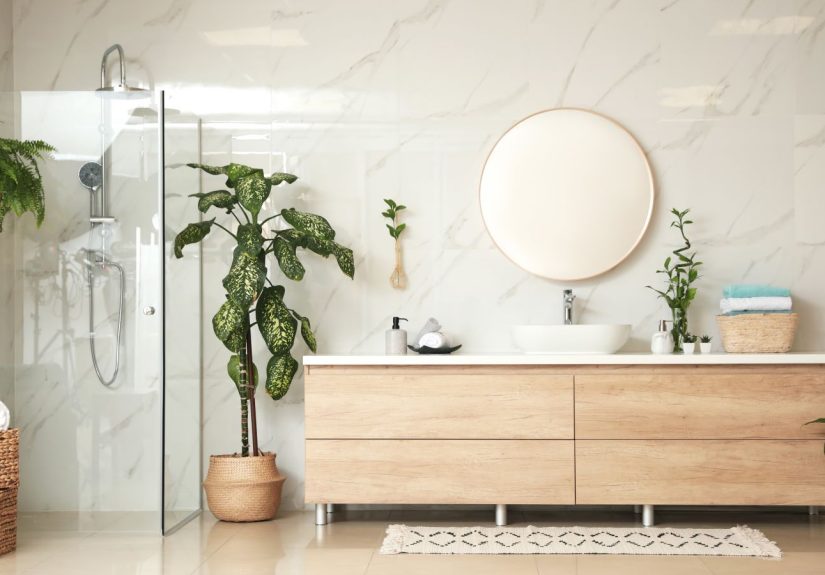
5) Frame (or Replace) the Mirror for Instant “New Bathroom” Energy
A mirror swap is dramatic because it sits at eye level and anchors your vanity area.
A framed mirror can make the room feel finished, while a medicine cabinet mirror boosts storage in small bathrooms.
Ideas that work
- Budget: Add a DIY frame kit or build one with trim and moisture-resistant paint.
- Space-saving: Replace a plain mirror with a recessed medicine cabinet if wall depth allows.
- Modern: Use a rounded rectangle or arch shape to soften hard lines.
Typical DIY range: $25–$250 • Time: 1–3 hours
6) Re-Caulk the Tub/Shower (The “Stop Feeding Mold” Project)
Old caulk can crack, discolor, and let water creep behind surfaces. Fresh, mold-resistant bathroom caulk is a small project with a huge “clean” payoff.
And yesremoving old caulk is annoying. Think of it as exfoliation for your bathtub.
How to do it without losing your mind
- Remove old caulk completely (don’t caulk over failing caulk).
- Clean and dry the area thoroughly so new caulk bonds.
- Tape edges for a crisp line, apply steady pressure, then tool/smooth the bead.
- Let it cure fully before getting it wet.
Pro tip
Use a bathroom-rated silicone or hybrid sealant labeled mold/mildew resistant, especially in wet zones.
Your future self will thank you during the next humid season.
Typical DIY range: $10–$30 • Time: 2–4 hours plus cure time
7) Regrout (or Touch Up) Tile for a “New Shower” Illusion
Grout is basically the eyeliner of your tile: when it’s crisp, everything looks sharper.
When it’s cracked or stained, the whole bathroom looks tiredeven if the tile is fine.
Options by effort level
- Light refresh: Clean grout deeply and repair small gaps.
- Mid-level: Remove and replace failing grout lines in key areas.
- Finish strong: Seal grout after it cures to help resist moisture and stains.
Specific example
If your shower looks dingy but the tile is structurally sound, regrouting the bottom third (the splash zone) can deliver a surprisingly dramatic refresh.
Typical DIY range: $20–$150 • Time: 1–2 days (dry/cure time matters)
8) Add Wainscoting or Beadboard for Classic Charm (and Wall Protection)
Wainscoting adds architectural interest and can protect walls from splashesespecially near sinks where water loves to fling itself like it’s auditioning for a drama series.
Use moisture-resistant materials and seal seams carefully.
How to make it bathroom-proof
- Use PVC panels or moisture-resistant MDF designed for humid areas (or well-sealed wood).
- Seal joints and edges, especially where paneling meets tile or trim.
- Use a semi-gloss or satin bathroom paint for easier wipe-down.
Typical DIY range: $80–$350 • Time: 1–2 days
9) Peel-and-Stick Tile: The “No Demo, Big Wow” Trick
Peel-and-stick tile can upgrade a dated floor or backsplash fast, especially in a powder room or low-splash area.
The key is a clean, flat surface and realistic expectations: it’s an upgrade, not a time machine.
Where it shines
- Powder rooms and half baths (less constant soaking humidity)
- Vanity backsplashes
- Accent strips or small feature areas
Pro tip
Buy extra tiles from the same batch. If you ever need a replacement, you’ll be glad you didbecause “close enough” patterns are not, in fact, close enough.
Typical DIY range: $40–$250 • Time: 2–6 hours
10) Peel-and-Stick Wallpaper (Yes, You CanIf You’re Smart About It)
Wallpaper in a bathroom sounds like a dare, but peel-and-stick can work in low-splash zones with decent ventilation.
Think: behind the toilet, above wainscoting, or on a feature wall that doesn’t get directly soaked.
Make it last
- Apply to smooth, clean walls (texture = bubbles waiting to happen).
- Avoid direct shower spray zones.
- Run the exhaust fan during and after showers to reduce humidity spikes.
Typical DIY range: $30–$120 • Time: 2–4 hours
11) Upgrade Your Exhaust Fan (The Remodel That Prevents Future Remodels)
If your mirror fogs up like a haunted house scene, your ventilation might be underpowered.
A properly sized bathroom exhaust fan helps reduce humidity, odors, and the risk of moldaka the villains of every bathroom renovation story.
How to size it (simple version)
- Many guides use roughly 1 CFM per square foot as a baseline.
- Small bathrooms often do fine at 50 CFM.
- For larger baths, calculate by size and fixtures for better results.
Pro tip
Consider a fan with a humidity sensor so it turns on automaticallylike a responsible adult who doesn’t “forget” ventilation.
Typical DIY range: $80–$250 • Time: 2–6 hours (longer if ductwork is tricky)
12) Install Floating Shelves (Storage Without the Bulk)
Floating shelves add storage and style, especially in small bathrooms where a bulky cabinet can make the room feel crowded.
Keep shelves shallow so they don’t bonk anyone in the forehead during an early-morning zombie shuffle.
How to do it right
- Anchor into studs whenever possible.
- Use moisture-resistant materials (sealed wood, coated metal, glass).
- Style with a mix: daily items (rolled towels) + one decorative piece (plant, candle).
Typical DIY range: $20–$150 • Time: 1–2 hours
13) Add a Shower Ledge or Niche Alternative (Goodbye, Sad Plastic Caddy)
Built-in niches can be more complex, but you can get a similar function with a slim corner shelf, a shower ledge kit, or a surface-mounted niche system.
The goal is to reduce clutter and make the shower look intentional.
Smart approach
- Choose rust-resistant materials (stainless steel, aluminum, coated options).
- Keep it easy to clean (fewer tiny crevices = less soap-scum heartbreak).
- Mount securely and seal any penetrations properly.
Typical DIY range: $25–$200 • Time: 1–3 hours
14) Swap the Showerhead (and Upgrade the Whole Experience)
A new showerhead can make your bathroom feel more spa-like without remodeling anything.
Consider a handheld combo for easier cleaning and better functionalityespecially for kids, pets, or anyone who’s ever tried to rinse shampoo with a weak stream.
How to do it
- Unscrew the old showerhead (use a cloth to protect finishes).
- Clean threads, apply plumber’s tape if recommended, and install the new head.
- Turn water on and check for drips at the connection.
Typical DIY range: $25–$150 • Time: 20–40 minutes
15) Refresh the Toilet Zone: Seat, Bidet Attachment, or Full Swap
A toilet zone refresh can be quick (new soft-close seat), comfort-focused (a non-electric bidet attachment), or a full replacement if your toilet is old,
inefficient, or simply… emotionally draining to look at.
Choose your level
- Easy: Replace the seat and add coordinated hardware/hooks nearby.
- Moderate: Install a bidet attachment using existing supply lines.
- Advanced: Replace the toilet carefully, following step-by-step guidance and checking for leaks.
Typical DIY range: $20–$300+ • Time: 30 minutes to half a day
Putting It All Together: A Simple “Stunning Change” Game Plan
If you want the most dramatic bathroom makeover without losing your weekend (or your sanity), stack upgrades in this order:
Phase 1: Fix the functional stuff
- Re-caulk and address any leaks
- Deep clean/regrout and seal where needed
- Improve ventilation
Phase 2: Upgrade the focal points
- Vanity paint + hardware
- Mirror + lighting
- Faucet swap
Phase 3: Add style and storage
- Wall treatment (wainscoting or wallpaper in low-splash zones)
- Floating shelves
- Shower accessories that reduce clutter
This approach makes your bathroom look better fast, while also solving the moisture issues that quietly ruin “pretty” bathrooms from the inside out.
Conclusion: Your Bathroom Can Change Without a Full Gut Job
A stunning DIY bathroom remodel isn’t about doing everythingit’s about doing the right things.
When you combine moisture-smart fixes (caulk, grout, ventilation) with high-impact visuals (vanity, lighting, mirror),
you get a bathroom that looks refreshed, functions better, and feels more like a space you actually enjoy using.
Start with one project. Then ride that motivation like a freshly installed soft-close drawer: smooth, confident, and slightly addictive.
Your bathroom’s glow-up era is officially underway.
Extra: Real-World DIY Bathroom Remodel Experiences (What People Don’t Tell You Until After)
Here’s the part most “before-and-after” photos skip: the learning curve. DIY bathroom remodel ideas look simple online because the messy middle is cropped out.
In real homes, the biggest difference between a smooth project and a chaotic one is planning for the small stuff.
Many DIYers say the first surprise is how long “prep” actually takes. Painting a vanity isn’t just painting; it’s removing doors, labeling hinges,
cleaning off mystery grime, scuffing surfaces, priming properly, and waiting for cure time. The paint part is almost the shortest part.
But when the prep is done well, the vanity looks like it belongs in a nicer zip code.
The second surprise is how much bathrooms reveal bad ventilation. People often start with cosmetic projectsfresh paint, cute wallpaper, new shelves
and then wonder why everything feels damp or why mildew keeps returning. Upgrading the exhaust fan can feel like an “unsexy” purchase,
but it’s the kind of hidden upgrade that protects everything else you do. A quieter fan that actually clears steam makes the bathroom feel instantly more comfortable,
like it can finally breathe.
Another common experience: the “domino effect” of finishes. Once you swap a shiny old faucet for a modern matte-black one, the towel bar suddenly looks tired.
Then the light fixture feels wrong. Then your mirror seems oddly plain. This isn’t a problemit’s a roadmap. It tells you where small, affordable swaps will create
the biggest visual consistency. A coordinated finish family makes a bathroom look intentionally designed, even if you changed parts over time.
DIYers also learn quickly that water zones punish shortcuts. Caulking over old caulk might look okay for a week, but it tends to fail because the new bead
can’t bond well. The “right way” (remove, clean, dry, reapply, cure) feels slower, but it’s what prevents redo work. Same with grout: sealing isn’t glamorous,
but it reduces staining and makes cleaning easierespecially in showers and around sinks where splashes are constant.
And here’s a surprisingly positive experience many people report: bathrooms reward small changes faster than almost any room in the house.
Replace a mirror, update lighting, and add fresh caulk, and suddenly the space looks cleanereven before you change a single tile.
It’s like the bathroom has been waiting for someone to care enough to give it a little attention.
The best takeaway from real-life projects is simple: choose one “hero upgrade,” support it with two “helper upgrades,” and stop thereat least for this round.
For example: paint the vanity (hero), add new hardware (helper), and swap the light fixture (helper). That trio can transform the entire room.
Then you can decide later if you want to tackle bigger projects like flooring or wainscoting. Momentum matters. Finishing matters more.