Table of Contents >> Show >> Hide
- What Makes a Sofa Table “Mid-Century Modern”?
- Plan Your Size (So It Actually Fits Your Sofa)
- Materials and Tools
- A Clean, Classic Design You Can Build
- Cut List (For the 66" × 11" × 30" Example)
- Step-by-Step: How to Build the Sofa Table
- Step 1: Choose Your Top Strategy (Solid Wood vs. Plywood)
- Step 2: Build the Top
- Step 3: Make or Buy Tapered Legs
- Step 4: Build the Apron Frame (Three Joinery Options)
- Step 5: Add a Lower Shelf (Optional but Very Useful)
- Step 6: Attach the Top (Don’t Forget Wood Movement)
- Step 7: Sand Like You Mean It
- Step 8: Finish for That Warm Mid-Century Glow
- Design Upgrades That Feel “Custom” (Without Getting Complicated)
- Troubleshooting: Common Problems and Fixes
- Cost, Time, and What to Expect
- Real-World Experiences: What People Learn Building a Sofa Table (500+ Words)
- Conclusion
If your couch regularly “eats” remotes, phone chargers, and that one sock you swear you had a second ago, a sofa table (a.k.a. behind-the-couch console table) is basically a rescue mission with legs. A mid-century modern version adds that clean, warm, “I definitely have my life together” vibetapered legs, simple lines, and wood grain that does half the talking.
This guide walks you through building a sturdy, mid-century modern sofa table with beginner-friendly joinery options, plus smarter choices for wood, proportions, and finishing so it looks intentional (not “garage chic,” unless that’s your brand). We’ll also add a real-world “what people learn the hard way” section at the end, because the internet is full of perfect builds and real life is full of slightly crooked clamps.
What Makes a Sofa Table “Mid-Century Modern”?
Mid-century modern furniture is all about clean geometry, practical design, and warm natural materials. For a sofa table, that usually means:
- Slim profile: 8–14 inches deep so it fits behind a sofa without turning your living room into an obstacle course.
- Tapered legs: either bought pre-made or made with angled cuts for that classic silhouette.
- Simple apron/frame: minimal ornament, maximum structure.
- Warm wood tone: walnut is the icon, but white oak, maple, or birch can look great with the right finish.
- Functional extras: a lower shelf, cable pass-throughs, or a slim drawerquietly useful, not showy.
Plan Your Size (So It Actually Fits Your Sofa)
Before you buy lumber, measure your sofa and the space behind it. The “right” size depends on your room and how you’ll use it (lamps, plants, charging station, decorative tray, secret snack storage… no judgment).
Common Sofa Table Dimensions
- Height: 28–32 inches (often 1–2 inches below the sofa back, or level with the top if you want a seamless look)
- Length: 2/3 to the full length of the sofa (a 84-inch sofa often pairs well with a 60–78 inch table)
- Depth: 10–12 inches is the sweet spot for most rooms
- Top thickness: 3/4 inch looks clean; 7/8–1 inch feels more “furniture-grade”
Proportion tip: If your sofa is low and modern, keep the table slim and minimal. If your sofa is tall or plush, consider a slightly thicker top or a lower shelf to add visual weight and balance.
Materials and Tools
Wood Options
- Walnut (premium): classic mid-century tone, beautiful grain, higher cost.
- White oak (great modern-MCM blend): strong, durable, takes stain well (and looks excellent with a clear finish).
- Maple or birch (budget-friendly hardwoods): tight grain, can look very modern with a warm stain.
- Plywood top with hardwood edging: stable, budget-smart, and surprisingly “nice” if you edge-band well.
For a first build, a plywood top with hardwood edging and purchased tapered legs is a solid path to a clean mid-century modern look without needing advanced milling tools.
Hardware and Supplies
- Wood glue
- 1 1/4″ pocket-hole screws (if using pocket holes)
- Sandpaper: 80, 120, 180, 220 grit
- Finish: Danish oil, wiping varnish, wipe-on polyurethane, or hardwax oil
- Optional: figure-8 fasteners or Z-clips (for solid wood tops and wood movement)
- Optional: metal hairpin legs (not classic MCM, but it can still look cool)
Tools (Pick What You Have)
- Measuring tape, pencil, square
- Circular saw with straightedge guide or table saw
- Miter saw (helpful for repeatable cuts)
- Drill/driver
- Clamps (you can never have too manywoodworking law)
- Random orbit sander (strongly recommended)
- Optional: pocket-hole jig, router (for edge profiles), doweling jig, or mortise/tenon tools
Safety note (especially if you’re a teen builder): Power tools deserve respect. Wear eye protection, protect your hearing, and ask an experienced adult for help with table saws, routers, and anything that spins like it’s angry. Clamp your work, keep fingers away from blades, and don’t rush cuts because “it’s basically done.” That’s how projects get… dramatic.
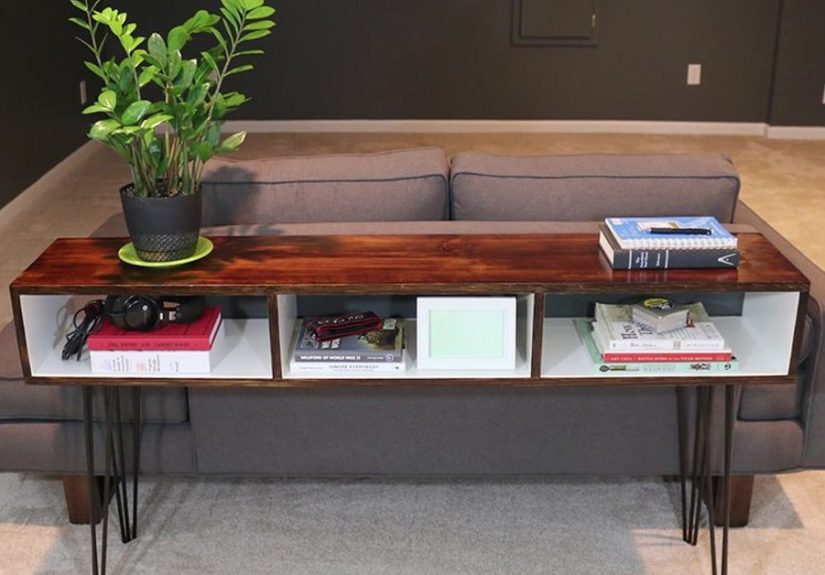
A Clean, Classic Design You Can Build
The design below is a mid-century modern sofa table with tapered legs, an apron frame for strength, and an optional lower shelf. You can build it with pocket holes (beginner-friendly) or upgrade to dowels/mortise-and-tenon if you want a more traditional approach.
Example Build Dimensions
- Finished size: 66″ L × 11″ D × 30″ H
- Top: 66″ × 11″ × 3/4″
- Legs: 1 1/2″ square stock, tapered on two sides (or buy pre-tapered legs)
- Aprons: 3″ tall × 3/4″ thick
- Optional shelf: 60″ × 9″ (set a few inches above the floor)
Adjust the length to match your sofa. Keep the depth slim unless you know you have the clearance. A sofa table that sticks out too far becomes the world’s most annoying shin magnet.
Cut List (For the 66″ × 11″ × 30″ Example)
This assumes a simple apron-frame build with four legs. Modify as needed for your exact measurements.
Top
- 1 piece: 66″ × 11″ × 3/4″ (solid wood panel or plywood)
Legs
- 4 legs: 29 1/4″ long (plus top thickness = ~30″ finished height)
Aprons (Frame)
- 2 long aprons: 60″ × 3″ × 3/4″ (length depends on leg thickness and desired overhang)
- 2 short aprons: 8″ × 3″ × 3/4″
Optional Shelf and Supports
- 1 shelf: 60″ × 9″ × 3/4″
- 2–3 shelf supports/cleats: 60″ × 1″ × 3/4″ (or use corner blocks)
How to calculate apron length: Finished table length minus (2 × leg thickness) minus your desired top overhangs. For example, with 66″ top length, 1.5″ legs, and ~3″ overhang each side, your long apron is roughly 66 – 3 – 3 – 1.5 – 1.5 = 57″. Many builders choose longer overhangs or thicker aprons; it’s your call. Just keep the frame centered and square.
Step-by-Step: How to Build the Sofa Table
Step 1: Choose Your Top Strategy (Solid Wood vs. Plywood)
If you use solid wood, remember it expands and contracts across the grain with seasonal humidity changes. That means your top attachment method should allow movement (figure-8 fasteners, Z-clips, or elongated screw holes in the aprons). If you use plywood, it’s more dimensionally stable, so basic screws (with care) are simpler.
Best-of-both worlds option: plywood core + hardwood edge banding. It looks like solid wood from the outside and behaves like plywood on the inside. Like a tuxedo T-shirt, but for furniture.
Step 2: Build the Top
If you’re gluing up boards into a panel, alternate the growth rings (the “smiles” and “frowns”) to help reduce cupping, and clamp on a flat surface. Once dry, trim to final size and sand.
- Flatten and square edges (or buy pre-milled boards if you don’t have milling tools).
- Glue and clamp, checking the panel stays flat.
- Trim to 66″ × 11″.
- Optional: route a subtle roundover or chamfer on the edges for that mid-century softness.
Step 3: Make or Buy Tapered Legs
Tapered legs are the mid-century modern signature. If you want maximum ease, buy pre-tapered legs and focus on clean assembly. If you want to make them:
- Start with 1 1/2″ square stock (or whatever thickness fits your design).
- Mark a taper starting about 6–8″ below the apron line.
- Taper on two inside faces for a classic look (leaves the outer faces “full” and crisp).
- Cut tapers with a table saw taper jig, band saw, or careful circular saw setup, then clean up with a plane/sander.
Keep all legs identical. One slightly different taper can make the whole table look like it’s trying to leave the room without you.
Step 4: Build the Apron Frame (Three Joinery Options)
The apron frame is what keeps your sofa table from wobbling. Choose the joinery that matches your tools and patience level.
Option A: Pocket Holes (Beginner-Friendly)
- Drill pocket holes on the inside of the aprons (ends of long and short pieces).
- Clamp apron pieces to legs, keeping everything flush and square.
- Glue + pocket-hole screws for strong, quick assembly.
Option B: Dowels (Clean Look, No Visible Hardware)
- Use a doweling jig to drill aligned holes in aprons and legs.
- Dry-fit first, then glue and clamp carefully.
- This makes a very “furniture” result with minimal equipment.
Option C: Mortise and Tenon (Traditional, Super Strong)
- Cut mortises in legs and tenons on aprons.
- Dry-fit to ensure tight joints, then glue and clamp.
- Most durable method, but it takes practice and accurate cutting.
No matter which method you pick, constantly check for square. Measure corner-to-corner diagonally; if both diagonals match, your frame is square.
Step 5: Add a Lower Shelf (Optional but Very Useful)
A lower shelf adds rigidity and gives you a place for baskets, books, or a “charging station box” that hides the cable jungle. Common shelf height is 3–6 inches off the floor, or higher if you want more open space.
- Attach cleats (support strips) along the inside of the long aprons, or use corner blocks.
- Set the shelf in place, leaving a small gap from the legs for a cleaner look.
- Screw from underneath or use hidden fasteners for a tidy finish.
Step 6: Attach the Top (Don’t Forget Wood Movement)
If your top is solid wood, use figure-8 fasteners or Z-clips so the top can expand/contract without cracking or warping. If your top is plywood, you can screw through the apron into the top, but still pre-drill to avoid splitting and keep the top centered.
Quick, smart trick: Use painter’s tape to mark the top’s centerline and the frame’s centerline, then align them during attachment. It reduces “how did it end up 1/2 inch off?” moments.
Step 7: Sand Like You Mean It
Mid-century modern furniture looks simple, which means every flaw is more visible. Sanding is where “DIY” becomes “dang, that looks expensive.”
- Start at 80 grit only if you need to flatten or remove marks; otherwise begin at 120.
- Work through 120 → 180 → 220.
- Lightly break sharp edges by hand for a comfortable feel and better finish adhesion.
- Vacuum dust and wipe with a clean cloth before finishing.
Step 8: Finish for That Warm Mid-Century Glow
Mid-century modern finishes often highlight wood grain rather than bury it. Good finish options:
- Danish oil: easy wipe-on, warm tone, moderate protection (great for low-abuse surfaces).
- Wipe-on polyurethane: more protection, still easy to apply, good for families and frequent use.
- Hardwax oil: natural look and feel, durable, easy spot repairs (follow product cure times carefully).
- Stain + clear coat: helpful if using maple/birch and aiming for a walnut-like tone (test on scraps first).
Apply thin coats, let them cure properly, and don’t rush. A great finish is basically patience in liquid form.
Design Upgrades That Feel “Custom” (Without Getting Complicated)
1) Add Cable Management
Drill two 1 1/2″ holes near the back edge of the top (use a hole saw), then sand the edges smooth. If you’re feeling fancy, add plastic grommets for a clean look.
2) Slim Drawer (One Is Enough)
A shallow drawer is perfect for remotes, batteries, and the tiny screwdriver you only need when you can’t find it. Keep it narrow so it doesn’t interfere with knees and legs behind the sofa.
3) Subtle Edge Profile
A small chamfer or roundover instantly makes the top look more “designed.” Avoid overly decorative profiles; mid-century modern prefers quiet confidence.
Troubleshooting: Common Problems and Fixes
Wobble
- Check that all legs are the same length.
- Confirm the frame is square (diagonal measurements match).
- Add corner blocks inside the apron for stiffness.
- If your floor is uneven, consider adjustable glides (hidden under the legs).
Visible Gaps at Joints
- Dry-fit everything before glue.
- Use clamps and cauls to distribute pressure.
- If a small gap remains, a tinted wood filler can helpbut aim for clean joinery first.
Blotchy Stain
- Use a pre-stain conditioner on blotch-prone woods like pine, maple, and birch.
- Sand evenly and don’t skip grits.
- Test stain on scrap from the same wood.
Cost, Time, and What to Expect
A DIY mid-century modern sofa table can cost anywhere from $60 to $250+ depending on wood choice and hardware. Walnut and premium legs push the price up; plywood + hardwood edging keeps it affordable.
- Build time: 1 day for cutting and assembly + 1–2 days for finishing and cure time
- Difficulty: beginner to intermediate (pocket-hole version is approachable)
- Biggest quality factor: careful measuring + sanding + finish patience
Real-World Experiences: What People Learn Building a Sofa Table (500+ Words)
Most DIY instructions make furniture building look like a smooth montage: cut, assemble, sand, finish, done. In reality, building a mid-century modern sofa table teaches you a lotmostly because the design is so clean that it politely refuses to hide mistakes. Here are the kinds of experiences builders commonly report, along with what they do differently the next time.
Experience #1: “I didn’t measure behind the sofa… and now it’s a hallway table.”
A sofa table’s depth feels small in theory and huge in practice. Many people start with a 14–16 inch depth because it sounds useful, then realize the couch can’t sit close enough to the wall or the walkway becomes tight. Builders who love their finished result often land in the 10–12 inch range, especially in apartments or narrow living rooms. The lesson: mock it up with painter’s tape on the floor, or stack a few books behind the couch to test depth before committing.
Experience #2: “My table looks great… from across the room.”
Mid-century modern is basically the “high-definition TV” of furniture styles. Every uneven edge, scratch, and glue smear shows up under finish, especially on darker woods or walnut-toned stains. Builders who get a truly furniture-grade look usually talk about sanding as the turning point: taking time to remove mill marks, softening edges slightly, and cleaning off dust before finishing. A common “aha” moment is realizing that glue squeeze-out that looks harmless when wet becomes a pale ghost patch after staining. The fix is simple: wipe glue squeeze-out promptly and do a final surface inspection with a bright light before you open the stain.
Experience #3: “I discovered clamps are a lifestyle.”
A lot of first-time furniture builds involve improvising with too few clamps. People end up “clamping” with heavy books, paint cans, or the sheer power of positive thinking. Then they notice joints shift slightly, or panels dry with small misalignments. Over time, builders learn two upgrades that make everything easier: (1) dry-fit and clamp the project before glue, and (2) use cauls (scrap wood strips) to spread clamp pressure evenly and keep surfaces flat. It’s not glamorous, but it’s the difference between “nice table” and “why is this corner doing its own thing?”
Experience #4: “Wood movement is real, and it has opinions.”
When people use a solid wood top and screw it tightly to the frame, it might look fine for a whileuntil seasons change. Wood expands and contracts across the grain, and it can crack, warp, or pull joints. Builders who revisit the project later often become instant fans of figure-8 fasteners, Z-clips, or elongated screw holes. Even if you’ve never thought about humidity and furniture, this is one of those lessons that sticks because the fix (allow movement) is so much easier than the repair.
Experience #5: “The finish looked wrong… until coat #2.”
First coats can be underwhelming. People often panic when the surface looks patchy or not as rich as they imagined. Many finishes deepen with additional coats and proper cure time. Builders who end up happiest tend to do three things: test on scrap, apply thin coats, and stop touching it every five minutes. (The finish is curing, not auditioning for your approval.) A practical habit is keeping a small notebook: finish type, number of coats, dry times, and your favorite results. That way the next project isn’t a guessing game.
Experience #6: “I built it for the sofa, but it became the command center.”
A surprising number of people end up using the sofa table as the household “landing strip”: keys, mail, chargers, a plant, a candle, maybe a small lamp. Builders who plan for this from the start often add one smart feature: cable pass-through holes, a hidden power strip mounted under the top, or a small tray area that corrals daily clutter. The result isn’t just a pretty piece of furnitureit’s a system. And systems make homes feel calmer.
The biggest takeaway from real builds is that a mid-century modern sofa table rewards careful fundamentals: accurate measuring, square assembly, patient sanding, and a finish strategy that matches your wood choice and lifestyle. Do that, and you’ll end up with a piece that looks boutique, works hard, and quietly saves your living room from cable chaos and remote control disappearances.
Conclusion
Building a mid-century modern sofa table is one of the best “weekend-to-wow” woodworking projects: it’s simple enough for a first furniture build, but stylish enough to look like you bought it from a design showroom. Keep the proportions slim, focus on straight cuts and a square frame, and choose a finish that brings out the warmth of the wood grain. Add a shelf or cable management if you want it to function like a modern command center. The end result is a clean-lined console table that makes your space look sharperand keeps your couch from hoarding your stuff like a furry little dragon.