Table of Contents >> Show >> Hide
- Why Turn a Business Card Into a Macro Pad?
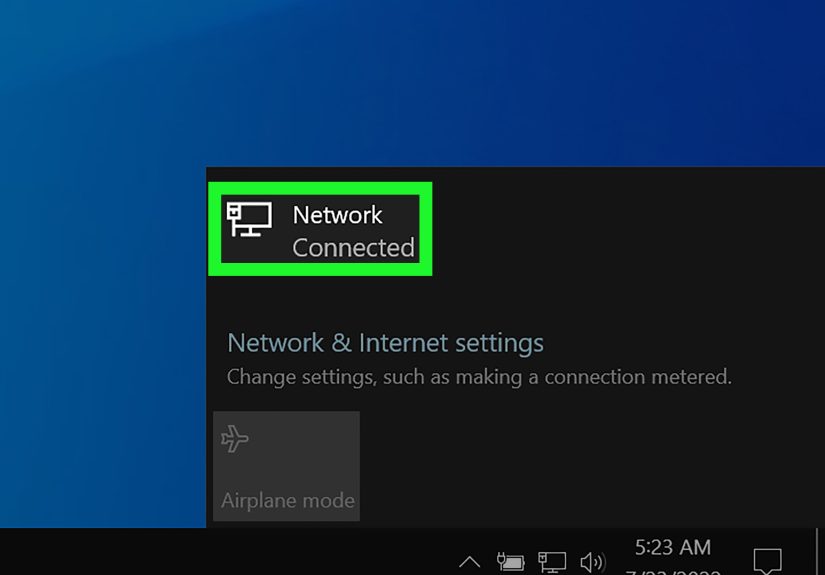
- Macro Pad 101: What You’re Actually Building
- Design Constraints: The “It Has To Fit in a Wallet” Problem
- Hardware Choices That Make or Break the Build
- Firmware: Turning Hardware Into Shortcut Magic
- Rotary Encoders: Why the Knob Feels So Good
- PCB and Enclosure: Making It Look Like a Card (and Not a Science Project)
- Assembly and Cost: What It Takes to Build a Batch
- Security and Social Friction: The Elephant in the USB Port
- Who Should Make a Macro Pad Business Card?
- Conclusion: A Business Card People Actually Use
- Experiences: What It’s Like to Build (and Hand Out) a Macro Pad Business Card
Business cards have one job: get remembered. Unfortunately, most of them get remembered the way a loose ketchup packet gets rememberedbriefly, and then
mysteriously vanishing into a drawer (or the trash) the moment you get home.
A macro pad business card flips that script by becoming something people actually use: a tiny keypad that triggers shortcuts,
controls media, or runs presentations. It’s part calling card, part productivity gadget, and part “wait… you made this?” conversation starter.
And in a world where inboxes are crowded and attention spans are fragile, “useful” is the ultimate branding.
Why Turn a Business Card Into a Macro Pad?
A typical card communicates who you are. A macro pad business card communicates who you are and proves itwith a physical object that shows design
taste, engineering judgment, and a little bit of delightful mischief (the good kind: shortcuts, not chaos).
The “keep me” factor: utility beats novelty
PCB business cards have been popular for years because they’re eye-catching. But a macro pad does something even better: it earns a permanent spot on a desk.
When your card becomes someone’s daily “mute button” or “next slide” knob, your contact info is no longer a suggestionit’s a constant.
Macro Pad 101: What You’re Actually Building
A macro pad is a small input device that pretends to be a keyboard (and sometimes a mouse or media controller). Press a key, spin a knob, and your computer
receives a commandlike Ctrl+C, Alt+Tab, volume up/down, or a custom shortcut that triggers a workflow.
Most macro pad business cards share a few core ingredients:
- 3–12 keys (mechanical switches are common because they feel great and last a long time)
- A rotary encoder (the “scroll wheel” style knob that can control volume, scrub timelines, or step through slides)
- A microcontroller (the brain that speaks USB or Bluetooth)
- Visual feedback (an RGB LED or small indicator to show the current mode/layer)
- A PCB that doubles as the “card” and carries your name/contact info on the exposed side
Design Constraints: The “It Has To Fit in a Wallet” Problem
Size, thickness, and the tyranny of pockets
The classic North American business card is about 3.5 × 2 inches. If you want to stay in “business card territory,” that footprint is your
target. Thickness is where reality starts negotiating. A “normal” card is around 1 mm thick, but once you add switches, an encoder, and a battery, you’re
basically building a tiny gadget that resembles a card and politely asks pockets for forgiveness.
The trick is to decide what you’re optimizing for:
flat and wallet-friendly (fewer/lower-profile parts) or
delightfully usable (clicky keys, a knob you can actually grab, and a case that protects everything).
USB vs Bluetooth: two good options, two different vibes
A wired macro pad business card plugs in and works instantlyno pairing, no battery management. Wireless feels more magical and desk-friendly (no dangling cable),
but it adds complexity: charging, power saving, and pairing behavior.
If you go wireless, you’ll likely design around a Bluetooth-capable microcontroller board and a small rechargeable battery. If you go wired, you’ll design around
a USB-native microcontroller and a connector strategy (USB-C, micro-USB, or even a USB “edge” connector built into the PCB).
Hardware Choices That Make or Break the Build
Microcontroller/dev board options
You can build a macro pad in a dozen ways, but business-card-sized builds tend to cluster around a few “known good” choices:
- USB-native boards (great for wired cards): classic keyboard-friendly microcontrollers can emulate a USB HID keyboard reliably.
- RP2040-class boards (great for wired and flexible builds): lots of community examples, fast development, and friendly tooling.
-
nRF52840 boards (great for wireless): Bluetooth Low Energy support, keyboard firmware ecosystems, and power-saving features that matter when you
want “desk gadget” battery life.
For a “business card that’s actually a wireless macro pad,” a popular pattern is using a Pro Micro–compatible wireless board (for example, a board designed as a
drop-in replacement that adds BLE and battery charging). That keeps the footprint manageable while unlocking Bluetooth and rechargeable power.
Keys, encoder, and feedback
A macro pad business card doesn’t need a full keyboard matrix. Even three buttons plus an encoder can feel surprisingly powerful if you design
the interaction wellespecially if the knob does the “heavy lifting” (scroll, switch, scrub, step) and the buttons change modes.
Add one RGB indicator and you get instant clarity: “I’m in productivity mode,” “I’m in presentation mode,” “I’m controlling music,” etc. That tiny bit of feedback
prevents the classic macro pad problem: pressing a key and realizing you’re on the wrong layer… right after you accidentally muted yourself mid-sentence.
Battery and charging (wireless builds)
Wireless is awesome until your device becomes a paperweight because nobody knows how to charge it. If you include a battery, design the experience like a product:
clear on/off behavior, obvious charging method, and sensible sleep modes. The goal is “lasts long enough that people forget it needs charging,” not “needs attention
more often than a houseplant.”
Firmware: Turning Hardware Into Shortcut Magic
HID basics without the headache
At a high level, macro pads work because computers understand standard input device classes. Your device announces itself as a keyboard (and optionally media keys),
then sends key events when buttons are pressed or the encoder rotates. Many beginner-friendly ecosystems make this approachable, including beginner-focused scripting
environments and keyboard firmware projects.
One friendly approach is using high-level HID libraries that let you send keypresses with straightforward codegreat for quick iteration and rapid prototyping. It’s
especially useful when you want to ship a “demo unit” to yourself before committing to a batch.
QMK/VIA vs ZMK vs scripting environments
Your firmware choice depends on your goals:
- Keyboard firmware ecosystems are ideal when you want layers, combos, and a “keyboard-first” mental model.
- Wireless-first keyboard firmware shines when Bluetooth and power management matter.
- Scripting environments are great when you want to prototype quickly or customize behavior without building a full firmware toolchain.
A clever pattern for a tiny macro pad business card is mode switching by chorded keyspressing two keys at once to enter “music mode” or
“presentation mode,” then letting the encoder and keys behave differently depending on that mode. It’s simple, memorable, and fits the limited surface area of a
card-sized device.
Shortcut design that feels “premium” (even with just a few controls)
The best macro pad layouts aren’t about cramming in actions. They’re about picking a few actions people do constantly and making them frictionless. Here are some
concrete, real-world-friendly examples that work well on a three-keys-plus-encoder layout:
- Productivity layer: knob rotates through windows or tabs; press knob to select; keys jump between “window,” “virtual desktop,” and “tabs.”
- Music/media layer: knob controls volume; knob press toggles mute; keys handle previous/play-next. (Boring? Yes. Useful? Every day.)
- Presentation layer: knob steps slides; knob press toggles presenter tools; keys start/stop presentation and blank screen.
Want role-specific versions? Consider:
- Video editor: knob scrubs timeline; keys cut, ripple delete, and toggle playback.
- Designer: knob changes brush size/zoom; keys sample color, undo, and toggle layers.
- Developer: knob switches tabs; keys run tests, format code, and toggle terminal.
- Support/ops: knob scrolls through dashboards; keys open incident template, copy status update, and mute alerts.
Rotary Encoders: Why the Knob Feels So Good
The rotary encoder is the star of the “tiny macro pad” show because it provides fast, analog-feeling control while still being digital. Turn it one click at a time
for precise steps, or spin it quickly to fly through options.
Under the hood, many encoders provide two signals that shift relative to each other as you rotate. That phase relationship is how firmware can determine direction
(clockwise vs counterclockwise) and count steps reliably. Translation: the knob knows which way you meant to go, not just that you moved.
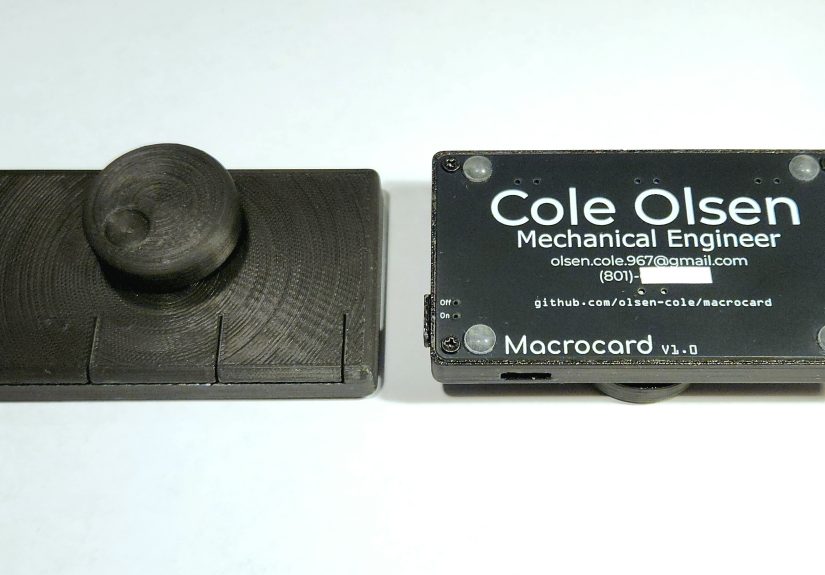
PCB and Enclosure: Making It Look Like a Card (and Not a Science Project)
PCB layout tips for business-card builds
In a card-sized PCB, every millimeter matters. Some practical layout habits help a lot:
- Put your contact info on the exposed face with high contrast silkscreen and a scannable QR code.
- Keep moving parts centered and protected so keys and the encoder don’t snag in a bag.
- Design for hand assembly if you’re making a small batch: minimize tiny components unless you enjoy tweezers and suspense.
- Add test points for power and key lines so you can debug quickly without rework drama.
3D-printed case: the difference between “prototype” and “product”
A simple shell does three important things: it protects parts, improves ergonomics, and makes the device feel intentional. Even a minimalist cover that hides the
switch bodies while exposing the key positions can transform the experience. If you’re handing these out, “feels solid in the hand” matters as much as “works.”
Branding without looking like a billboard
Your best branding is restraint. Put your name, role, email/site, and maybe a small logo. Then let the device itself do the flexing. If you include a QR code,
label it clearly (e.g., “Portfolio” or “Contact”). Nobody wants to scan “mysterious square” even when it’s harmless.
Assembly and Cost: What It Takes to Build a Batch
One macro pad business card is a fun weekend project. Ten is a process. Fifty is a small manufacturing operation you will accidentally start in your kitchen.
(Suddenly you’re tracking screws like they’re rare gemstones.)
Batch-building strategies that save your sanity
- Standardize parts (same switches, same encoder, same battery) to reduce mistakes.
- Use jigs for consistent soldering and alignment, especially for encoders and connectors.
- Test early: validate power, then firmware flashing, then each input. Don’t wait until the case is closed.
- Label revisions on the PCB so you can track what changed when you inevitably improve version two.
What it “costs” beyond money
The hidden cost is time: sourcing parts, assembling, flashing, packaging, and answering the inevitable “how do I pair it?” messages. The upside is that each unit
is a mini portfolio piece that keeps working for you long after a networking event ends.
Security and Social Friction: The Elephant in the USB Port
Let’s be honest: asking someone to plug a mystery device into their computer is a tough sell in 2026, especially in corporate environments. Many organizations
have strict policies for removable devices and unknown peripherals. And they’re not being dramaticthis is a real risk category.
The solution isn’t to ignore the concern. It’s to design around it:
- Offer a “safe preview” path: include a QR code to a page explaining what it is, what it does, and how it works.
- Make pairing intentional for wireless builds: require a button combo to enter pairing mode, and ship it “idle” by default.
- Be transparent: describe the firmware, the intended functions, and how to reset it.
- Accept “no” gracefully: the coolest card is still a card if someone never plugs it in.
Your goal is trust. If the device feels trustworthy, it gets used. If it feels suspicious, it becomes an expensive coaster with great typography.
Who Should Make a Macro Pad Business Card?
This format shines for people whose work benefits from a tangible demo:
- Mechanical/electrical engineers showcasing design, layout, and manufacturability
- Embedded developers demonstrating firmware, power management, and HID behavior
- Product designers showing interaction design in a tiny form factor
- Creators and makers building a memorable “signature artifact”
It’s also fantastic for targeted opportunities. You don’t need to hand these out like candy. A handful given to the right people is often more effective than a
hundred generic cards that never leave the pocket they were tossed into.
Conclusion: A Business Card People Actually Use
Building a macro pad into a business card is less about novelty and more about thoughtful utility. Done well, it becomes a daily toolswitching windows, guiding
presentations, controlling musicand quietly reminding someone that you’re the kind of person who ships real, usable things.
The secret sauce is balance: keep the functions practical, the interaction intuitive, the branding clean, and the trust story rock-solid. If you nail those,
your “business card” stops being a throwaway artifact and starts being a tiny product people keep on purpose.
Experiences: What It’s Like to Build (and Hand Out) a Macro Pad Business Card
The first time you assemble a macro pad business card, it feels like you’ve hacked the social contract. You’re holding a “card” that clicks, glows, and does
something. It’s a deeply satisfying momentright up until you realize you now have to explain it to a human being who didn’t spend three hours choosing the
world’s most sensible encoder footprint.
1) People love the idea, but they love trust more
The most common reaction I’ve seen (and heard makers report) is a two-step emotional journey: “That’s amazing!” followed immediately by
“I am not plugging that into my work laptop.” This isn’t a rejection of you; it’s a sign that security awareness is finally a mainstream skill.
Once you treat that concern as valid and build a clear explanation pathQR code, simple one-page overview, obvious reset instructionspeople relax. Some still
won’t use it on corporate machines, but they’ll happily try it at home. And home use still means your card lives on a desk instead of in a drawer.
2) The best macros are “boring” in the best way
When you’re designing the keymap, it’s tempting to show off. You can build layers, combos, clever chorded modes, and custom behaviors that make you feel like a
wizard. The funny thing is: the macros that get used are the ones that feel obvious. Volume. Mute. Play/pause. Next slide. Previous slide. Switch tab.
The “boring” set wins because it’s universal. Once someone trusts the device and uses it daily, then they ask about the fancy stuff.
3) Packaging matters more than you think
A macrocard-style device is tiny, which means it can look fragile even when it isn’t. A simple sleeve, a small card insert with “what it does” and “how to
charge/pair,” and a clean label for the QR code dramatically changes how people perceive it. Without instructions, recipients guess. With instructions, they try.
Also: if it’s wireless, include a one-sentence pairing note like “Hold the encoder for pairing mode.” That single line can save you from answering the same DM
twelve times.
4) Build for repair, because you will meet gravity
Anything that lives on a desk will eventually be knocked onto the floor by a coffee mug, a backpack strap, or a mysterious force known as “Monday.”
Encoder knobs pop off. Cases crack. Solder joints get tested. The best “experience upgrade” is designing the enclosure so it opens without destroying itself and
choosing parts that can be replaced without microscope-level rework. Even if you never repair one, knowing you can makes you more confident handing
them out.
5) The unexpected payoff is how it starts conversations
The device is not just a tool; it’s a story. People ask why you built it, what firmware it runs, and how you decided on the layout. That conversation often
reveals the most important thing: how you think. A normal business card tells someone your title. A macro pad business card shows your approachhow you balance
usability with constraints, how you think about human factors, and how you ship something that works.
If you’re doing this for career opportunities, that’s the win: the card isn’t just contact info. It’s a compact demonstration of product thinking, engineering,
and taste. And even if the recipient never uses it, they still remember it. Whichlet’s be realis already a massive upgrade over the ketchup packet.