Table of Contents >> Show >> Hide
- Why These Cookie Dough Truffles Work
- Ingredients
- Step 1: Heat-Treat the Flour (Don’t Skip This)
- Step 2: Make the Cookie Dough Filling
- Step 3: Scoop, Roll, and Chill
- Step 4: Dip in Chocolate Like a Pro
- Step 5: Set, Store, and Serve
- Variations (Because Dessert Should Have Options)
- Troubleshooting: Fixes for the Most Common Cookie Dough Truffle Problems
- Food Safety Notes (Quick, Important, and Not Buzzkill-y)
- Real-World Experiences and Lessons from Making Cookie Dough Truffles
- Conclusion
If chocolate chip cookie dough and truffles had a tiny, adorable baby, this would be it: a no-bake,
bite-sized treat with a soft “cookie dough” center and a glossy chocolate shell. The best part?
You get all the nostalgia of sneaking cookie dough from the bowlwithout playing roulette with raw eggs or raw flour.
This guide walks you through a foolproof, safe-to-eat cookie dough truffles recipe, plus the little
test-kitchen tricks that make the difference between “pretty good” and “where have you been all my life?”
Why These Cookie Dough Truffles Work
Classic cookie dough has two ingredients that can be a problem when you plan to eat it raw:
eggs and flour. For truffles, we skip eggs entirely and
heat-treat the flour so the filling is safer to eat. Then we focus on texture:
butter for that real cookie dough flavor, brown sugar for caramel-like depth, and a short chill to make
rolling and dipping easy.
Flavor and texture goals
- Center: soft, scoopable, and slightly chewy from brown sugar and mini chocolate chips
- Shell: a thin, snappy chocolate coating that doesn’t crack your teeth (or your spirit)
- Finish: customizable toppingssprinkles, flaky sea salt, crushed cookies, you name it
Ingredients
This recipe makes about 28–34 truffles, depending on how generous your scoop is.
(A “tablespoon-ish” cookie scoop is basically the official unit of holiday baking.)
For the cookie dough filling (egg-free)
- 1 1/4 cups all-purpose flour, heat-treated and cooled (see steps below)
- 1/2 cup (1 stick) unsalted butter, softened
- 3/4 cup packed light brown sugar
- 2 teaspoons vanilla extract
- 1/2 teaspoon fine salt
- 2–4 tablespoons milk (start with 2, add as needed)
- 3/4 cup mini semi-sweet chocolate chips (mini = better bite distribution)
- Optional: 2 tablespoons toffee bits for a little “bakery cookie” vibe
For the chocolate coating
- 12 ounces semi-sweet chocolate chips or chopped baking chocolate
- 1 tablespoon coconut oil or shortening (helps the chocolate dip smoothly)
Optional toppings
- Flaky sea salt
- Sprinkles
- Crushed mini chocolate chips or chopped nuts
- Cookie crumbs (graham crackers, wafers, or chocolate sandwich cookies)
Step 1: Heat-Treat the Flour (Don’t Skip This)
Flour is typically a raw ingredient. Heat-treating is a simple step that makes your no-bake truffles a lot safer
than using flour straight from the bag. You’re aiming to bring the flour to at least 165°F
(some recipes use 160°F; 165°F adds a little extra cushion).
Option A: Oven method (best for even heating)
- Preheat oven to 300°F.
- Spread flour on a rimmed baking sheet in a thin layer.
- Bake 8–10 minutes, stirring once halfway through.
- Check temperature with a food thermometer; aim for 165°F.
- Cool completely, then whisk to break up any clumps.
Option B: Microwave method (fast and convenient)
- Place flour in a microwave-safe bowl.
- Microwave in 30-second bursts, stirring well each time.
- Continue until the flour reaches 165°F.
- Cool completely and whisk smooth.
Pro tip: Heat-treated flour can taste slightly “toasty” if overheated. Keep the temperature goal in mind,
and don’t blast it into oblivion.
Step 2: Make the Cookie Dough Filling
-
Cream butter + sugar: In a large bowl, beat softened butter and brown sugar until smooth and fluffy,
about 1–2 minutes. -
Add vanilla + salt: Mix in vanilla extract and salt. Your kitchen should now smell like a bakery’s
greatest hits album. - Add flour: Add the cooled, heat-treated flour and mix until combined. The mixture will look sandy at firsttotally normal.
-
Adjust with milk: Add 2 tablespoons milk and mix. Add more milk, 1 tablespoon at a time, until the dough
holds together when pinched and feels scoopable (not wet). - Fold in chocolate chips: Stir in mini chocolate chips (and toffee bits, if using) until evenly distributed.
Texture checkpoint
- Too dry/crumbly? Add 1 tablespoon milk, mix, and reassess.
- Too soft/sticky? Chill the dough for 10–15 minutes, or mix in 1–2 tablespoons more flour.
Step 3: Scoop, Roll, and Chill
- Line a baking sheet with parchment paper.
-
Scoop dough into 1-tablespoon portions. Roll into smooth balls and place on the sheet.
If the dough sticks to your hands, lightly butter your palms or chill the dough for 10 minutes first. -
Chill in the freezer for 20–30 minutes (or refrigerate for 1 hour) until firm.
You want them solid enough to dip without turning into cookie dough soup.
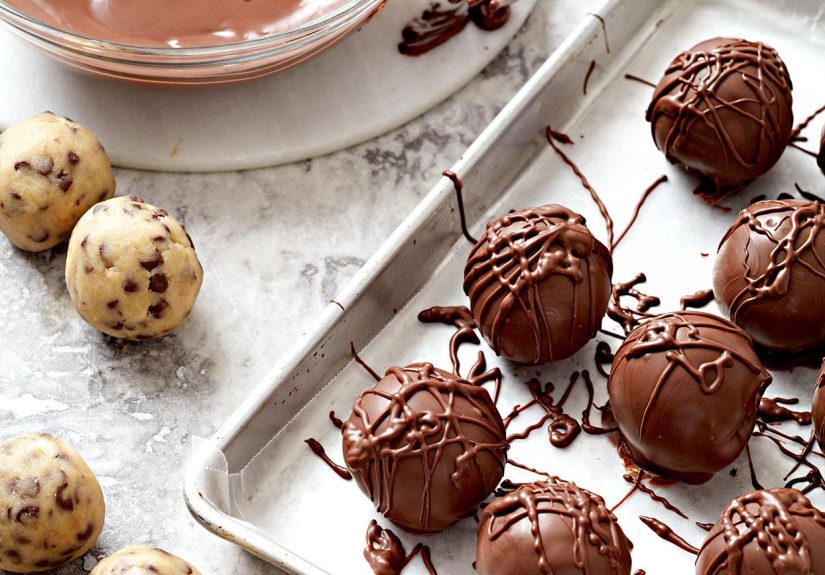
Step 4: Dip in Chocolate Like a Pro
Smooth dipping is mostly about two things: temperature control and thin, fluid chocolate.
Adding a small amount of coconut oil or shortening helps the coating glide on instead of clumping.
Melt the chocolate
- Combine chocolate and coconut oil (or shortening) in a microwave-safe bowl.
-
Microwave in 20–30 second intervals, stirring well each time, until smooth.
(Chocolate hates being rushed. Stirring is your peace treaty.)
Dip the truffles
- Working with a few truffles at a time (keep the rest cold), drop one into melted chocolate.
- Use a fork or dipping tool to lift it out, tap gently to remove excess chocolate, then slide it back onto the parchment.
- Add toppings immediately before the chocolate sets.
Optional fancy finish: Drizzle with melted white chocolate or a second chocolate shade for that “I totally bought these at a boutique chocolatier”
look. (No one needs to know your chocolatier is a microwave.)
Step 5: Set, Store, and Serve
- Refrigerate the dipped truffles for 15–20 minutes to set the coating.
- Serve chilled for a firm bite, or let sit at room temp for 5–10 minutes for a softer center.
Storage
- Refrigerator: Store in an airtight container up to 5–7 days.
- Freezer: Freeze up to 1 month. Thaw in the fridge overnight.
Variations (Because Dessert Should Have Options)
1) “Bakery-style” extra rich
Add 2 tablespoons heavy cream (instead of milk) and a pinch of espresso powder to the dough.
It won’t taste like coffeejust deeper chocolate chip cookie flavor.
2) Cream cheese cookie dough truffles
Swap 2 tablespoons butter for 2 ounces softened cream cheese. This makes the center slightly tangy and very truffle-like.
Chill a bit longer before rolling because cream cheese softens faster.
3) Peanut butter chocolate chip
Replace 1/4 cup of the butter with peanut butter. Add crushed peanuts on top for crunch.
4) Gluten-free friendly
Use a 1:1 gluten-free baking flour blend and heat-treat it the same way. Texture may be slightly softer,
so plan on an extra chill before dipping.
5) Holiday “cookie tray MVP”
Add festive sprinkles, a pinch of flaky salt, or drizzle with white chocolate. These truffles play nicely with
cookie swaps, gift boxes, and party platters.
Troubleshooting: Fixes for the Most Common Cookie Dough Truffle Problems
My dough won’t stick together
- Add milk 1 tablespoon at a time and mix thoroughly.
- Make sure your butter is softened, not cold and stubborn.
- Whisk heat-treated flour after coolingclumps can make dough seem drier than it really is.
My dough is too sticky to roll
- Chill dough for 10–15 minutes, then try again.
- Use a cookie scoop and roll quickly with cool hands.
- If needed, mix in 1–2 tablespoons more flour (heat-treated if you still have it).
My chocolate coating is thick and gloppy
- Add 1/2 teaspoon more coconut oil or shortening and re-stir.
- Don’t overheat chocolate; warm it gently in short intervals.
- Use good-quality chocolate or melting wafers for smoother results.
My truffles are cracking
- If truffles are frozen solid, let them sit 2–3 minutes before dipping so the coating sets more gently.
- Chilling is great; deep-freezing for ages can increase cracking when dipped in warm chocolate.
Food Safety Notes (Quick, Important, and Not Buzzkill-y)
The whole reason edible cookie dough recipes exist is that raw dough can carry risk. Flour is generally a raw ingredient,
and raw eggs can also pose food-safety concerns. This truffle recipe is designed to be safer by omitting eggs
and using heat-treated flour. Keep your workspace clean, wash hands and utensils after handling ingredients,
and store finished truffles chilled.
Real-World Experiences and Lessons from Making Cookie Dough Truffles
Cookie dough truffles are one of those desserts that feel “effortless” right up until you’re holding a slightly sticky dough ball
and wondering how it became attached to your soul. The good news: most of the typical hiccups are predictable, fixable, and honestly
part of what makes this recipe a repeat favorite for home bakers.
One common experience is discovering that texture is everything. Two tablespoons of milk might be perfect in one kitchen,
while another needs four. Why? Humidity, how tightly the brown sugar was packed, the exact flour brand, and even how soft the butter got
can all shift the dough. Bakers who get the best results usually treat milk like a “dial,” not a “rule.” They add it gradually, stop when
the dough holds together, and resist the temptation to keep mixing until it looks like frosting. Cookie dough should be scoopable and cohesive,
not glossy-wet.
Another frequent lesson: mini chocolate chips are the unsung hero. People often start with regular chips because that’s what’s
in the pantry. It works, but the dough balls can crumble a little more when large chips create weak spots. Mini chips distribute more evenly,
roll more smoothly, and create a better bite. If you only have regular chips, a quick chop makes the texture closer to the “mini chip” effect.
Dipping is where most “first batch” stories are born. Home bakers learn that temperature timing matters:
if the dough balls are too soft, they smear; if they’re rock-solid frozen, the chocolate can set too quickly or even crack later.
Many people land on a sweet spot: freeze the balls just until firm (around 20–30 minutes), dip quickly, and keep the rest chilled.
It also helps to dip in smaller batches so you’re not wrestling with an entire tray that’s warming up while you’re still perfecting
your fork-tap technique.
There’s also the “chocolate choice” experience. Some bakers swear by candy coating for ease, others prefer baking chocolate for flavor.
In practice, both can be greatespecially if you add a tiny bit of fat (coconut oil or shortening) to keep the coating thin and smooth.
A thinner coating usually looks nicer and makes the truffle easier to bite, while a thicker coating can be sturdier for gifting.
If gifting is the goal, people often learn to let the coating set fully before packing, and to use parchment between layers
so the truffles don’t scuff each other like impatient shoppers in a crowded aisle.
If you’re making these for parties, bake sales, or cookie swaps, another shared experience is realizing that “one-inch” means wildly different
things to different humans. A cookie scoop solves that instantly. It also standardizes the chill time and the dipping rhythm, which keeps the
process calmer. And calmer is good, because the final lesson is the biggest: cookie dough truffles are meant to be fun.
They’re forgiving, flexible, and basically built for customization. People toss in crushed cookies, swap in holiday sprinkles, add flaky salt,
or drizzle contrasting chocolate and suddenly the exact same base recipe looks brand-new. That’s why these truffles show up every year:
they’re a reliable crowd-pleaser that still leaves room for creativityand a little kitchen comedy.