Table of Contents >> Show >> Hide
- Quick Snapshot
- What Are Chocolate Crinkle Cookies (and Why Are They So Extra)?
- Ingredients
- Step-by-Step: How to Make Chocolate Crinkles
- Why the Crinkles Happen (Cookie Science Without the Boring Part)
- Pro Tips for Big, Beautiful Cracks
- Flavor Variations (Same Crinkle, Different Personality)
- Make-Ahead, Freezing, and Storage
- Troubleshooting: When Cookies Get Dramatic (in a Bad Way)
- Serving Ideas (Beyond “Standing Over the Sink”)
- FAQ: Chocolate Crinkles Recipe Questions People Actually Ask
- Chocolate Crinkles Recipe: Real-World Baking Experiences (The 500-Word “What It’s Actually Like” Section)
- Conclusion
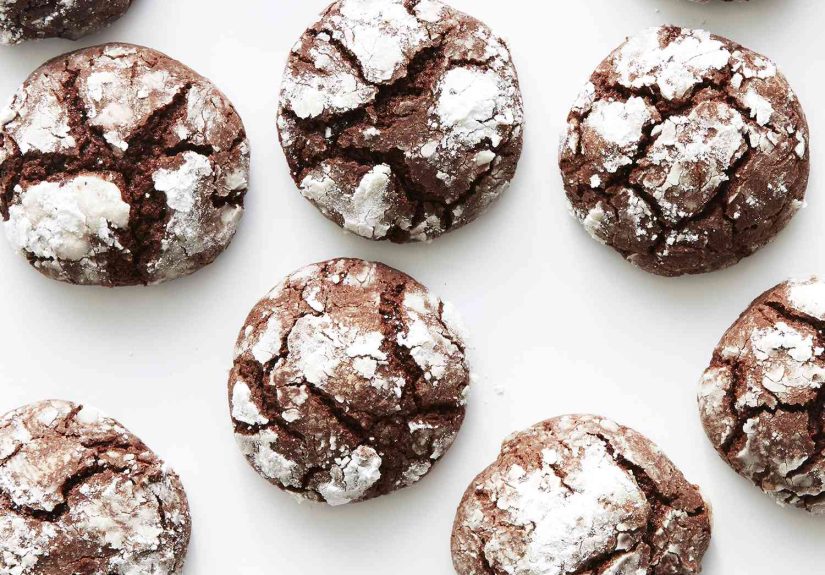
If brownies and cookies had a holiday party, chocolate crinkles would show up wearing powdered sugar like a snow-dusted tuxedo.
They’re rich, fudgy, dramatic (in a good way), and somehow both nostalgic and “how did I eat six already?” at the same time.
This chocolate crinkles recipe is built for big cracks, soft centers, and maximum cookie-tray charisma.
Quick Snapshot
- Yield: About 22–26 cookies (depending on scoop size)
- Prep time: 20 minutes
- Chill time: 2–4 hours (or overnight)
- Bake time: 10–12 minutes per batch
- Texture: Crackly outside, brownie-soft inside
- Main keyword: Chocolate crinkles recipe
The secret to those signature crinkles isn’t magicit’s a simple combo of a thick, chilled dough and a hot oven.
The outside sets fast, the inside keeps puffing, and the powdered sugar “snow” splits into beautiful cracks.
In other words: science, but make it cute.
What Are Chocolate Crinkle Cookies (and Why Are They So Extra)?
Chocolate crinkle cookies (sometimes called chocolate crackle cookies) are classic American holiday cookies known for:
- a deep chocolate flavor
- a soft, fudgy center (think “brownie cookie” vibes)
- a thick powdered sugar coating that splits into dramatic cracks while baking
They’re also perfect for cookie swaps because they look fancy even if you’re baking in sweatpants. (No judgment. That’s the uniform.)
Ingredients
This recipe uses pantry basics plus cocoa and a little chocolate for extra richness. Measurements are in U.S. volume with grams for consistency.
Dough
- 4 oz (113g) semisweet chocolate, chopped (or about 2/3 cup semisweet chips)
- 1/2 cup (113g) unsalted butter
- 1 cup (200g) granulated sugar
- 2 large eggs, room temperature if possible
- 2 tsp vanilla extract
- 1 1/4 cups (156g) all-purpose flour
- 1/2 cup (45–50g) unsweetened cocoa powder (natural or Dutch-process; see notes)
- 1 tsp baking powder
- 1/2 tsp fine salt
- 1/2 tsp espresso powder (optional, but highly recommended for “more chocolate without adding more chocolate”)
For Rolling
- 1/3 cup granulated sugar (optional first roll, helps powdered sugar stick)
- 1 cup confectioners’ sugar (powdered sugar)
Ingredient Notes That Actually Matter
Cocoa powder: If your cocoa options are “mystery tub from 2019” and “brand-new,” pick the brand-new.
Flavor fades over time. If you have both natural cocoa and Dutch-process cocoa, either works here because the recipe uses baking powder.
Natural cocoa tastes a bit sharper and lighter; Dutch-process tends to taste smoother and looks darker.
Chocolate: Using a little melted chocolate alongside cocoa gives a richer, fudgier cookie.
It’s the difference between “nice chocolate cookie” and “I need to sit down for a second.”
Step-by-Step: How to Make Chocolate Crinkles
Don’t let the sticky dough scare you. That stickiness is part of the planchilling turns it from “cookie soup” into scoopable dough that bakes up thick.
1) Melt the chocolate and butter
-
In a microwave-safe bowl, combine the butter and chopped chocolate.
Microwave in 20–30 second bursts, stirring between, until smooth.
(Or melt gently over a double boiler if you’re feeling fancy.) - Let the mixture cool for 5–10 minutes so it’s warm, not hot.
2) Whisk the wet ingredients
- In a large mixing bowl, whisk the sugar, eggs, and vanilla for about 60–90 seconds until glossy and slightly thickened.
- Pour in the melted chocolate-butter mixture and whisk until fully combined.
3) Add the dry ingredients
- In a separate bowl, whisk together the flour, cocoa powder, baking powder, salt, and espresso powder (if using).
- Stir the dry ingredients into the wet ingredients until no dry streaks remain. The dough will be thick and sticky.
4) Chill the dough (don’t skip this)
- Cover the bowl tightly and refrigerate for at least 2 hours, ideally 3–4 hours, or overnight.
- If you’re short on time, you can chill in the freezer for 30–40 minutes, but refrigerator chilling gives more reliable texture.
5) Roll and coat
- Preheat the oven to 350°F. Line baking sheets with parchment paper.
- Set up your coating station: one bowl with granulated sugar (optional), one with confectioners’ sugar.
-
Scoop dough into 1 to 1 1/2 tablespoon portions (a cookie scoop is your best friend here).
Roll into balls quicklywarm hands melt the dough, so work fast. -
For the boldest look: roll each ball in granulated sugar first, then roll generously in powdered sugar.
For extra “snowstorm” coverage, dunk in powdered sugar twice. - Place cookies about 2 inches apart on the prepared sheets.
6) Bake
- Bake for 10–12 minutes, until the tops are crackled and the edges look set.
- The centers should still look slightly soft. Overbaking steals the fudgy magic, and nobody invited dry cookies to this party.
- Cool on the baking sheet for 5 minutes, then move to a wire rack to finish cooling.
Why the Crinkles Happen (Cookie Science Without the Boring Part)
The classic crackle comes from contrast. A cold, thick dough goes into a hot oven.
The outside sets quickly and forms a shell, while the inside expands from heat and leavening, pushing upward and outward.
That tension breaks the powdered sugar coating into those bright white fissures.
Translation: chill your dough, preheat your oven properly, and let physics do the decorating.
Pro Tips for Big, Beautiful Cracks
Chill like you mean it
If the dough is warm, it spreads too fast and the cracks look shy. Chilling also makes the dough easier to handle,
so you’re rolling cookie balls instead of conducting a chocolate finger-painting class.
Use the double-roll trick
Rolling in granulated sugar first helps powdered sugar cling better, especially in humid kitchens.
A second roll in powdered sugar right before baking can boost that high-contrast “snowy crackle” look.
Sift the powdered sugar if it’s clumpy
If your powdered sugar looks like it has emotional baggage (aka lumps), sift it.
You’ll get a more even coat and prettier cracks.
Don’t overbake
Chocolate crinkle cookies are supposed to be soft in the center.
Pull them when they look slightly underdone in the middlethey’ll finish setting as they cool.
Size matters (for consistency)
If you want a uniform bake (and a uniform cookie tray), use a cookie scoop.
Example: a 1 1/2 tablespoon scoop usually lands you in that classic crinkle-cookie sweet spot.
Flavor Variations (Same Crinkle, Different Personality)
Peppermint Mocha Crinkles
Add 1/4 teaspoon peppermint extract (go easypeppermint can shout) and keep the espresso powder.
Optional: sprinkle the warm cookies with crushed peppermint candies for holiday sparkle.
Orange-Chocolate Crinkles
Add 1 teaspoon orange zest to the sugar-and-egg mixture.
Orange plus chocolate tastes like you meant to be sophisticated.
Spiced Hot Cocoa Crinkles
Add 1/2 teaspoon cinnamon plus a pinch of cayenne. It won’t make the cookies “spicy,”
but it will make people say, “Wait… what is that?!” (the good kind of confusion).
Extra-Chocolate Crinkles
Fold in 1/2 cup mini chocolate chips after the dough comes together.
You’ll get melty pockets insidelike a bonus level.
Gluten-Free(ish) Adaptation Note
Many bakers have success swapping a good 1:1 gluten-free baking blend for the flour.
Because results vary by brand, treat the first batch as a test run and chill the dough well.
Make-Ahead, Freezing, and Storage
Make-ahead win: This dough actually benefits from chilling, so it’s perfect for prep.
- Refrigerate dough: 1–2 days, tightly covered.
-
Freeze dough balls: Scoop and roll into balls, then freeze on a sheet until firm and store in a freezer bag.
Freeze uncoated (no powdered sugar yet) for best results. -
Bake from frozen: Thaw overnight in the fridge for easiest coating, or bake from frozen and add 1–2 minutes.
Roll in powdered sugar right before baking. - Store baked cookies: Airtight container at room temp for about 4–6 days.
- Freeze baked cookies: Up to 2–3 months; bring to room temp before serving.
If your powdered sugar coating dulls after storage, a light fresh dusting can revive the “freshly fallen snow” look.
Troubleshooting: When Cookies Get Dramatic (in a Bad Way)
“My cookies turned out flat.”
- Dough wasn’t chilled long enough.
- Oven wasn’t fully preheated (or runs cool). Consider using an oven thermometer.
- Butter/chocolate mixture was too hot and loosened the dough.
“I didn’t get enough cracks.”
- Dough may have been too warm when it went in the oven.
- Not enough powdered sugar coating (be generous).
- Cookies may have been underbaked at too low a temperatureyour oven might need calibration.
“The powdered sugar disappeared.”
- Try the granulated sugar first-roll method, then powdered sugar.
- Roll twice in powdered sugar right before baking.
- Very humid kitchens can melt the coatingwork quickly and keep dough cold.
“They’re dry, not fudgy.”
- They likely baked too long. Pull them when centers look slightly soft.
- Measure flour carefully (spoon and level, don’t pack).
Serving Ideas (Beyond “Standing Over the Sink”)
- Cookie exchange MVP: Stack in a clear bag with a ribbon. Instant bakery vibes.
- Hot cocoa upgrade: Serve alongside cocoa or coffeechocolate crinkles love a warm drink.
- Ice cream sandwich: Two cookies + vanilla ice cream = a very good decision.
- Dessert board: Pair with strawberries, salted nuts, and marshmallows for a winter-themed snack board.
FAQ: Chocolate Crinkles Recipe Questions People Actually Ask
Do I really have to chill the dough?
Yes. Chilling is what turns sticky dough into something you can roll and what helps the cookies bake thick with defined cracks.
If you skip it, you’ll likely get thinner cookies with less dramatic crinkles.
Natural cocoa or Dutch-process cocoawhat’s better?
Either works in this recipe because it uses baking powder.
If you want a darker color and smoother flavor, Dutch-process is a great choice.
If you prefer a classic, slightly sharper cocoa taste, go natural.
Can I make these without espresso powder?
Absolutely. Espresso powder doesn’t make the cookies taste like coffee; it just deepens the chocolate flavor.
If you skip it, the cookies are still deliciousjust slightly less “wow.”
Why are my hands getting covered in dough?
Sticky dough is normal. Keep the dough chilled, work quickly, and if needed, lightly dampen your hands for rolling.
A cookie scoop also helps you avoid turning into the Cookie Monster in real time.
Chocolate Crinkles Recipe: Real-World Baking Experiences (The 500-Word “What It’s Actually Like” Section)
Here’s the honest truth about making chocolate crinkle cookies: the first time, most people think they did something wrong.
The dough looks suspiciously soft. It clings to the spoon like it pays rent. And it has the overall vibe of “brownie batter that refuses to behave.”
That’s normal. In fact, it’s practically a rite of passage.
A common kitchen moment goes like this: you chill the dough for two hours, open the fridge, poke it, and discover it’s still a little tacky.
You wonder if you mis-measured flour. You consider adding more. Then you remember: adding flour is how good cookies become “fine, I guess” cookies.
Instead, you give it another hour and suddenly the dough is cooperativestill soft, but rollable.
That extra chill time is often the difference between cookies that gently crack and cookies that look like a magazine cover.
Then there’s the powdered sugar situation. People often roll the dough balls once, bake them, and get a lovely cookie…
except the sugar coating fades into the background like it’s camera-shy. This is where the double-roll experience pays off.
When bakers try rolling in granulated sugar first (then powdered), they usually notice two wins:
the powdered sugar sticks better, and the cracks show up brighter. And if you do a second dunk in powdered sugar right before baking,
the cookies come out with that bold, snowy contrast that screams “holiday cookie tray” even if it’s July.
Another real-life lesson: ovens have personalities. Some run hot and turn “10 minutes” into “why do these smell toasty?” in the blink of an eye.
Others run cool and keep cookies pale and under-cracked. Many bakers discover that chocolate crinkles are the cookie that convinces them to buy an oven thermometer.
Once you know your oven’s quirks, your crinkle consistency improves fast. If your cookies keep spreading, chilling longer and checking oven temperature is often the fix.
Texture preferences show up loudly with crinkles. Some people love a more cake-like bite; others want maximum brownie-fudge energy.
In practice, “fudgy” bakers tend to pull cookies a little earlier and let carryover heat finish the centers.
“Cakier” bakers leave them in a minute longer. Both camps are right. The cookie is flexible; your snack standards are the only law here.
Finally, there’s the emotional experience: crinkles are surprisingly generous cookies.
They look special without requiring piping bags, frosting skills, or artistic ability beyond “roll a ball.”
And the moment you pull a tray out of the oven and see those crackly tops, it feels like you just nailed a baking trick
because you did. The cookies did some of the work, sure. But you were the brains of the operation.