Table of Contents >> Show >> Hide
- Why Concrete Garden Globes Work So Well Outdoors
- Quick Planning: Pick Your Size, Style, and Placement
- Materials and Tools You’ll Actually Use
- Concrete Mixing: The Secret Is “Stiff but Workable”
- Method 1: The Two-Bowl “Half Sphere + Join” Globe
- Method 2: The Inflatable Ball “Layered Shell” Globe
- Method 3: The Glass Globe Mold (Thrift Store Treasure Edition)
- Curing: Where Most DIY Globes Win or Lose
- Finishing Your Concrete Garden Globe
- Troubleshooting: Fixes for the Most Common Orb Problems
- Design Ideas to Make Your Garden Globes Look Custom
- Cost and Time: What to Expect
- Cleanup and Eco-Friendly Disposal (Because Your Drain Pipes Deserve Love)
- Real-World Experiences & Lessons DIYers Share (Extra Notes That Save Projects)
- Conclusion
Some garden decor whispers. Concrete garden globes don’t. They sit there like little stone planets, quietly judging
your mulch choices and somehow making everything around them look more “intentional.” The best part? You can make
DIY concrete garden globes with basic supplies, zero fancy forms, and exactly as much artistic drama as you’re in
the mood for (from “minimalist zen orb” to “mossy enchanted cannonball”).
This guide walks you through multiple proven methods, the why behind the steps (so you’re not just following a
recipe), and the small details that keep your concrete sphere from turning into a crumbly regret-ball. Let’s make
something that looks expensive, survives the weather, and doesn’t require a kiln, a welder, or a mysterious uncle
named Rick.
Why Concrete Garden Globes Work So Well Outdoors
A globe shape is basically nature’s cheat code: it looks good from every angle, fits modern and cottage gardens,
and plays nicely with plants (hostas love a good backdrop). Concrete adds a few practical perks:
- Weight and stability: Your orb won’t topple in wind or get “relocated” by a playful pet.
- Weather resistance: When mixed and cured properly, concrete handles sun, rain, and seasons.
- Design flexibility: Smooth, textured, stained, painted, inlaid with glass, or left raw and stoic.
- Budget-friendly scale: Bigger statement pieces cost more in stores; DIY lets you go bold for less.
The only “catch” is that concrete rewards patience. Rushing the mix or cure is how you get cracks, weak spots, or a
surface that looks like dried oatmeal. (Oatmeal has its place. Your garden orb is not that place.)
Quick Planning: Pick Your Size, Style, and Placement
Size ideas (and what they’re good for)
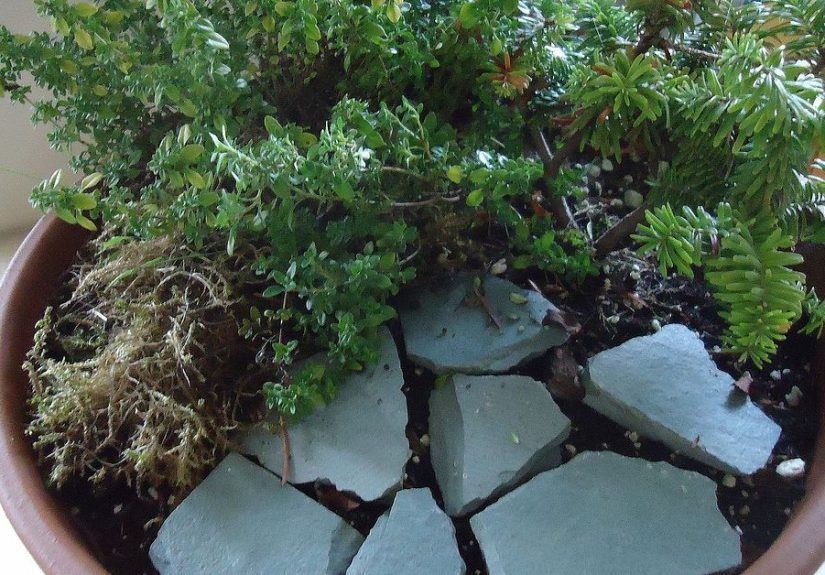
- 6–8 inches: Tuck into pots, fairy gardens, or small beds. Easy first project.
- 10–14 inches: The “classic” DIY concrete garden globe sizenoticeable but still manageable to move.
- 16–24 inches: Statement orb. Also a statement workout. Plan for a dolly or a helper.
Placement tips that look designer-level
- Odd numbers: Groups of 3 or 5 globes look more natural than perfect pairs.
- Vary heights: Nestle one partially into mulch, prop one slightly higher on a flat stone.
- Use repetition: Repeat the same finish in different areas (front bed + patio corner) for cohesion.
- Think “moon phases”: Mix a smooth orb with one textured orb for contrast.
Materials and Tools You’ll Actually Use
Concrete and additives
- Bagged concrete mix (good for larger globes)
- Sand/topping mix or mortar mix (smoother finish for smaller globes)
- Water (measure itdon’t eyeball it like pancake batter)
- Optional: acrylic fortifier or plasticizer (helps flow and surface finish for some mixes)
Mold and shaping supplies (choose your method)
- Inflatable ball (play ball or exercise ball)
- Two matching bowls (plastic mixing bowls = easy half-sphere molds)
- Glass globe shade (thrift store light fixture globegreat shape, handle carefully)
- Chicken wire / hardware cloth (support for layered builds)
- Plastic wrap, petroleum jelly, or cooking spray (release layer)
Basic tools
- Mixing tub or bucket, stirring stick/hoe, trowel or putty knife
- Disposable gloves, safety glasses
- Dust mask or respirator (especially while handling dry mix)
- Drop cloth or cardboard (concrete will “decorate” your floor permanently)
- Sandpaper or rubbing stone (for smoothing edges after demolding)
Concrete Mixing: The Secret Is “Stiff but Workable”
For DIY concrete garden globes, you want a mix that holds its shape but still packs smoothly into a mold. Too wet and
it’s weaker (and more likely to crack or slump). Too dry and it won’t bond well, leaving voids and crumbly spots.
Practical mixing rules
- Add water slowly: You can always add more; you can’t un-soup a soup.
- Mix thoroughly: No dry pockets, no powdery corners.
- Aim for “cookie dough”: Moldable, not pourable, for most orb methods.
Pro tip: mix smaller batches than you think
Many ready mixes start setting faster than your motivation on a Monday morning. If you’re coating an inflatable ball
or working in layers, mix smaller batches so you’re not racing the clock.
Method 1: The Two-Bowl “Half Sphere + Join” Globe
This is one of the cleanest methods for smooth, round concrete spheres. You cast two halves in matching bowls, then
join them with mortar or a slightly wetter concrete mix.
What you’ll need
- Two identical bowls (10–15 inches is a sweet spot)
- Release layer (plastic wrap or petroleum jelly)
- Concrete mix or mortar mix
- Optional reinforcement: small strip of fiberglass mesh or a ring of wire
Steps
- Prep the bowls: Line each bowl with plastic wrap (smooth it as much as possible) or coat with a thin release layer.
- Pack the mix: Press concrete into each bowl to form a half sphere. For a solid orb, fill deeper; for a lighter orb, keep walls about 1–2 inches thick.
- Tap out bubbles: Gently tap the bowl on the ground and press the surface to reduce air pockets.
- Initial set: Let the halves firm up until they hold shape (often overnight, depending on conditions).
- Demold carefully: Pop each half out. If edges are rough, lightly smooth them so the seam meets well.
- Join the halves: Spread a layer of mortar or slightly wetter mix along the rim, press halves together, and gently rotate to “seat” the seam.
- Support while curing: Nest the joined orb in a ring of towels or a bucket of sand so it doesn’t roll or shift.
Seam-hiding trick: Once the seam is stable, skim a thin layer of mortar over it with a damp gloved hand.
Blend outward. After curing, a light sanding makes it disappear like it was never there.
Method 2: The Inflatable Ball “Layered Shell” Globe
This method is popular because the mold is cheap, the size options are endless, and you can create cool textures.
You’re basically building a concrete shell over a ball, often supported with wire.
What you’ll need
- Inflatable ball (play ball for small, exercise ball for large)
- Chicken wire or hardware cloth (especially for bigger globes)
- Concrete mix (slightly on the stiff side)
- Release layer (petroleum jelly works well on rubber/plastic)
Steps
- Inflate and stabilize: Inflate the ball and nest it in a bucket, tire, or ring of towels so it won’t roll.
- Apply release: Coat the ball lightly with petroleum jelly (especially where you’ll remove it later).
- Add support: Wrap with chicken wire (tape sharp ends down so they don’t puncture the ball).
- First coat: Press on a 1/2–1 inch layer. Work from the bottom up. Pat and compress rather than smear.
- Let it firm up: Wait until the surface is “thumbprint hard” (firm but not fully cured).
- Second coat: Add another layer, aiming for 1–2 inches total thickness for durability.
- Create a small opening: Leave a small hole near the bottom (or create one later) so you can deflate and remove the ball.
- Remove the ball: After the shell has set enough to hold its shape, deflate and pull the ball out through the opening.
Design bonus: Press leaves, fern fronds, or textured fabric against the surface while it’s still workable.
Remove carefully. Instant “garden fossil” vibes.
Method 3: The Glass Globe Mold (Thrift Store Treasure Edition)
If you’ve ever seen a perfect sphere at a yard sale and thought, “That would look incredible in my garden,” you’re
not wrong. Glass light fixture globes create a super round shape with a nice openinggreat for small to medium
concrete orbs.
How it works
- Choose thick glass: Avoid ultra-thin or cracked globes.
- Use a release layer: A thin coat of petroleum jelly helps.
- Pack the concrete: Work slowly to avoid trapping big air pockets.
- Let it set: Give it time before attempting demolding.
- Remove the mold safely: If the glass doesn’t release, don’t force ittap gently and consider leaving the glass in place as part of the “look,” or ask an adult for help.
Reality check: Glass molds can be beautiful, but they’re less forgiving than plastic. If you want the lowest-stress
route, start with bowls or an inflatable ball first.
Curing: Where Most DIY Globes Win or Lose
Concrete doesn’t “dry” like paint. It cures through a chemical reaction (hydration). Keeping it from losing moisture
too fast helps it gain strength and reduces cracking. Translation: your orb wants a little spa time.
Easy curing routine
- First 24 hours: Keep it undisturbed. If it’s hot or windy, loosely cover with plastic to slow moisture loss.
- Next 3–7 days: Keep it slightly damp. Mist it and re-cover, or keep it shaded and wrapped.
- Up to 28 days: It keeps gaining strength. You can place it earlier, but avoid harsh scrubbing or sealing too soon.
Pro tip: If you’re curing outdoors, keep the orb out of direct blazing sun and away from freezing temps. Extremes can
cause surface issues and cracking.
Finishing Your Concrete Garden Globe
You can leave concrete raw (modern and minimal), or you can dress it up. Either way, wait until it’s well cured so
your finish lasts.
Finish options (from subtle to “wow”)
- Sand and smooth: Light sanding removes sharp bits and makes it feel finished.
- Stain: Concrete stain deepens color without hiding texture.
- Paint accents: Dab greens and grays for a faux-moss look (it ages nicely outdoors).
- Seal: A concrete sealer can reduce staining and help with weather resistance.
- Mosaic detail: Add tile pieces or glass gems around a band for a “garden planet” effect.
Should you seal outdoor concrete globes?
If your climate has freeze-thaw cycles, heavy rain, or you want easier cleaning, sealing is worth considering.
Acrylic sealers are common DIY options and are generally straightforward to apply (thin, even coats). If you prefer a
natural look, choose a sealer marketed as “clear” or “matte” rather than a high-gloss “wet look.”
Troubleshooting: Fixes for the Most Common Orb Problems
1) Cracks
- Likely causes: mix too wet, curing too fast in sun/wind, shell too thin.
- Fix: For hairline cracks, rub in a cement slurry (cement + water) and cure damp for a few days.
2) Air pockets (“pockmarks”)
- Likely causes: not tapping the mold, mix too stiff, rushed packing.
- Fix: Patch with mortar, then blend with a damp sponge before it sets.
3) Sticking mold
- Likely causes: not enough release, demolding too early.
- Fix: Wait longer. Try gentle tapping. Don’t pry aggressivelyespecially with glass molds.
4) Chalky surface
- Likely causes: too much water, surface dried too fast.
- Fix: Brush off loose dust, consider a sealer after full cure.
Design Ideas to Make Your Garden Globes Look Custom
Classic modern
- Smooth sphere, natural gray, placed in gravel with ornamental grasses.
- Three sizes clustered like a mini solar system.
Cottage garden charm
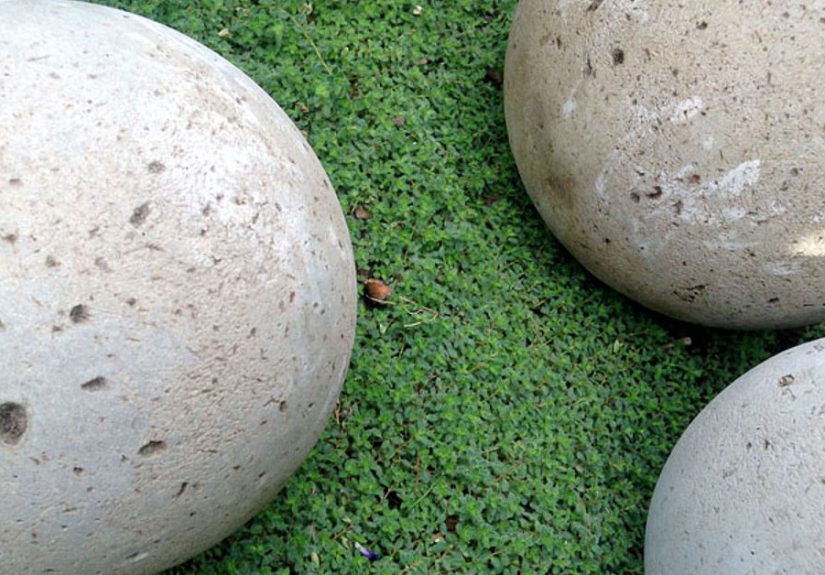
- Soft mossy paint dabs and a slightly rough texture.
- Partly “buried” among creeping thyme or sedum.
Statement art piece
- Paint a bold band around the equator (deep charcoal, terracotta, or white).
- Embed small stones or glass gems in a spiral pattern.
Functional twist
- Make a hollow orb with a side opening and use it as a small lantern cover (solar light inside).
- Create a concrete “orb planter” by widening the top opening and planting trailing succulents.
Cost and Time: What to Expect
- Materials cost: Often lowmainly the mix and a mold item you may already have.
- Hands-on time: 45–120 minutes depending on method and size.
- Cure time: Several days for careful handling; up to 28 days for full strength and best finishing results.
If you’re making multiple globes, it’s efficient to set up an assembly line: prep molds first, mix in batches, and cure
them together under plastic.
Cleanup and Eco-Friendly Disposal (Because Your Drain Pipes Deserve Love)
Concrete residue is alkaline and can be rough on plumbing and waterways. A simple approach:
- Rinse tools in a bucket, not under a running faucet.
- Let the sediment settle; pour off clearer water where it won’t run into storm drains.
- Let leftover sludge harden, then dispose of it like solid construction waste (local rules vary).
Real-World Experiences & Lessons DIYers Share (Extra Notes That Save Projects)
DIY concrete garden globes look simplemix, mold, cure, donebut crafters and gardeners tend to report the same
“aha” moments once they’ve made one or two. Here are the most useful experiences people share, translated into
practical advice you can actually use.
The “less water” moment
A lot of first-timers start with a mix that’s too wet because wet concrete feels easier to spread. It is easier to spread.
It’s also more likely to slump on curved surfaces, trap air pockets, and dry weaker. DIYers often say their best orb
happened when they finally treated water like hot sauce: add it slowly, taste-test the texture (with your eyes, not your
mouth), and stop before it turns into soup. Once you hit that moldable “cookie dough” feel, the mix stays where you put it.
Patience beats panic
People regularly mention that the hardest part isn’t the mixingit’s waiting. The orb looks solid after a day, so it’s
tempting to sand aggressively, paint immediately, or plop it into the garden like a proud parent. The better experience:
give it time. A globe that cures slowly tends to feel denser and ring a little more when tapped (yes, some people do
“orb percussion testing,” and honestly, respect). If you can wait a few more days before heavy handling and a few
weeks before sealing, you usually get fewer chips and a stronger surface.
Texture is forgiving (and sometimes the point)
Smooth finishes are beautiful, but they can be fussyevery tiny air pocket shows up like it’s trying to get discovered by
NASA. Many DIYers end up liking slightly textured globes more because they look natural outdoors, hide small flaws,
and pair nicely with plants. One common trick: instead of obsessing over perfection, choose a “planned” texturepress a
leaf, stipple with a stiff brush, or add a subtle swirl pattern. Suddenly, what could have been a mistake becomes “artisan.”
Small molds are confidence builders
Makers often recommend starting with an 8–10 inch orb even if your dream is a huge centerpiece sphere. Smaller globes
teach the timing: how long your mix stays workable, how your weather affects cure, and what “ready to demold” actually
feels like. After that, scaling up is less stressful because you already know your rhythm. Plus, smaller orbs make great
“practice planets” you can tuck into pots or gift to a friend.
The seam is not the enemy
If you’re joining two halves, DIYers often say the seam looks scary at first… and then it basically disappears with a skim
coat and light sanding. Some people even turn the seam into a feature: a raised “equator” band, a mosaic ring, or a painted
stripe. It’s a nice mindset shift: you don’t have to hide every construction detail. You can design around it.
Weather matters more than you think
Hot, windy days dry the surface fast, which is why people report more cracking in summer when they skip covering or
misting. On the flip side, cool damp weather can slow everything down, which is annoying but often results in a strong cure.
The shared lesson: your cure plan should match your conditions. If it’s hot and dry, cover and mist. If it’s cool, give it extra time.
Either way, rushing rarely improves the orb’s personality.
The most consistent “experience takeaway” is this: your first concrete garden globe teaches you how concrete behaves in
your space, your climate, and your schedule. After that, the second one feels easierand by the third, you start planning a
whole constellation. (Welcome to the club. We have… dust masks.)