Table of Contents >> Show >> Hide
- What Are “Fake Bakes,” Exactly?
- Before You Start: A Quick “Don’t Lick the Ornament” Note
- Supplies Checklist
- Method 1: Polymer Clay Cinnamon Roll Ornaments (The “Wait, Is That Real?” Version)
- Step 1: Mix Dough Color That Looks Baked, Not Beige
- Step 2: Make the Cinnamon “Filling” Layer
- Step 3: Build the Classic Spiral
- Step 4: Shape Like Dough That Rose
- Step 5: Add “Baked” Texture (Without Overdoing It)
- Step 6: Make It an Ornament (Two Reliable Hanging Options)
- Step 7: Bake/Cure the Clay Correctly (This Is Where Durability Happens)
- Step 8: Add Frosting That Looks “Drippy,” Not “Spackly”
- Step 9: Toasted Edges and “Sticky” Shine
- Step 10: Optional Sealing (When and Why)
- Method 2: Air-Dry or Foam Clay Cinnamon Roll Ornaments (Fast + Beginner-Friendly)
- Method 3: Cinnamon-Applesauce Dough Cinnamon Roll Ornaments (Scented + Nostalgic)
- Realism Tips That Make People Squint at Your Tree
- Care, Storage, and Long-Term Durability
- FAQ
- Conclusion
- Extra: Common Crafting Experiences (and Lessons) When Making Cinnamon Roll Ornaments
If your holiday vibe is “cozy bakery, but make it evergreen,” welcome home. Fake bakes are the crafty love child of miniature food art and seasonal decorsweet-looking treats that will never go stale, get squished, or mysteriously disappear when your cousin “just needed a little snack.” Today we’re making cinnamon roll ornaments: swirly, frosted, and convincingly delicious… while being 100% non-edible. (Please do not eat your crafts. I believe in you.)
This guide covers three popular approachespolymer clay (most realistic and durable), air-dry/foam clay (fast and no oven), and cinnamon-applesauce dough (smells amazing, looks charmingly rustic). You’ll also get realism tips, finishing tricks, and the “oops-I-made-it-too-perfect” fixes that separate a cute ornament from a cinnamon roll that makes guests do a double-take.
What Are “Fake Bakes,” Exactly?
Fake bakes are decorative faux desserts made from non-food materials (clay, foam, paint, sealers). The goal is visual realism: dough tones, toasted edges, glossy icing, and texture that reads as “fresh from the oven” even when it’s been hanging on a tree for three years.
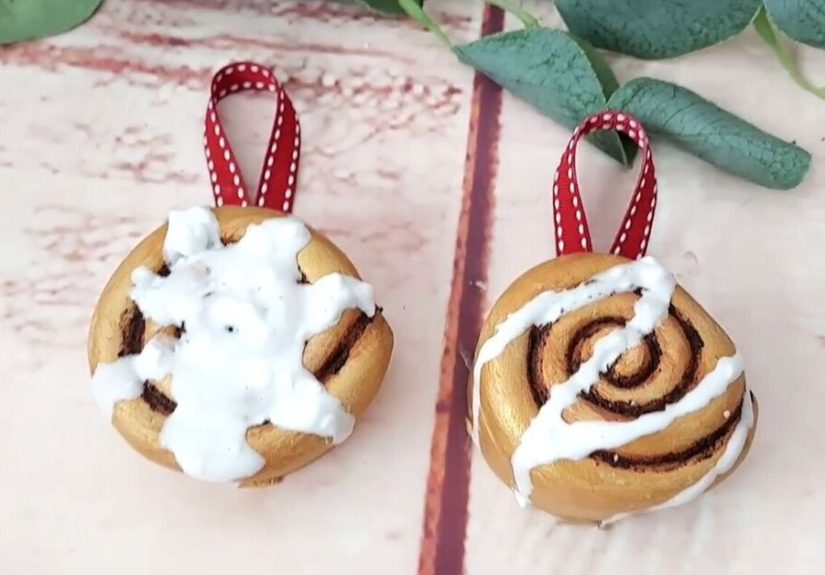
Cinnamon rolls are a perfect starter fake bake: the spiral is forgiving, the frosting covers a multitude of tiny sins, and the whole thing is basically a cozy vibe you can hang from a branch.
Before You Start: A Quick “Don’t Lick the Ornament” Note
Even if you use real cinnamon or applesauce in one method, these ornaments are not food. Craft materials can include glues, sealers, pigments, and finishes that are not safe to ingest. Treat them like decorkeep them away from pets, toddlers, and that one adult who will absolutely try to “just smell it” with their mouth.
Supplies Checklist
Core Tools (Helpful for Any Method)
- Craft knife or blade (for clean slices and trimming)
- Rolling tool (acrylic roller, rolling pin, or a smooth bottle)
- Toothpicks or dotting tools (for texture and frosting swirls)
- Optional: soft brush or old toothbrush (for subtle texture)
- Hanging hardware: ornament hooks, ribbon, or twine
Option A: Polymer Clay (Most Realistic + Durable)
- Polymer clay in: warm beige/tan (dough), medium brown (cinnamon filling), and a tiny amount of darker brown (toasting)
- Liquid polymer clay or bakeable gel (for glossy “icing”)
- Oven-safe work surface (tile/ceramic, parchment, or cardstock on a baking tray)
- Aluminum foil (for a loose “tent” while baking)
- Optional: chalk pastels for shading, acrylic paint for tiny details, gloss/satin glaze
- Optional for hanging: eye screws or a wire loop (22–24 gauge craft wire)
Option B: Air-Dry Clay or Foam Clay (No Oven)
- Air-dry clay or foam clay in dough tones (or white clay + paint)
- Acrylic paint (tan, brown, off-white) + brush
- Dimensional paint/puffy paint for “icing” (or a homemade puffy paint)
- Clear varnish/topcoat (water-based, non-yellowing if possible)
- Optional: lightweight spackle for whipped frosting texture
Option C: Cinnamon-Applesauce Dough (Smells Like the Holidays)
- Unsweetened applesauce
- Ground cinnamon (you’ll use more than you think)
- Optional: a small amount of white glue (adds strength in many recipes)
- Straw or skewer (for hanging holes)
- Parchment + baking sheet (if oven-drying)
Method 1: Polymer Clay Cinnamon Roll Ornaments (The “Wait, Is That Real?” Version)
Step 1: Mix Dough Color That Looks Baked, Not Beige
Real cinnamon roll dough isn’t one flat colorit’s warm, slightly golden, and often a little darker in creases. Start with a tan/beige clay and condition it until soft. If it looks too “printer paper beige,” blend in a tiny pinch of yellow ochre or a warm brown. Tiny pinch. We’re crafting pastries, not building a mud huts ’R’ Us franchise.
Step 2: Make the Cinnamon “Filling” Layer
Roll a thin sheet of medium brown clay. If you want extra realism, marble in a fleck of darker brown so the filling looks like cinnamon sugar clumping in places. You can also add a whisper of translucent clay if you like a “gooier” look.
Step 3: Build the Classic Spiral
- Roll your dough clay into a rectangle, about 2–3 mm thick for small ornaments (thicker for chunky, bakery-style rolls).
- Lay the brown filling sheet on top. Trim edges so it’s neat-ish (real rolls are imperfectembrace it).
- Starting from one short end, roll the rectangle into a tight log. Go slow to keep the spiral clean.
- Chill the log for 10–15 minutes if it feels squishy. Firmer clay slices cleaner.
- Slice with a blade. Aim for 8–15 mm thickness depending on how bold you want your ornament.
Step 4: Shape Like Dough That Rose
Freshly sliced clay cylinders can look a little like… deli meat. Fix that by gently pressing the top so it domes slightly. Add a shallow indentation in the center spiral with a dotting tool. Real cinnamon rolls puff and settleyours should too.
Step 5: Add “Baked” Texture (Without Overdoing It)
Use a soft brush or toothbrush to lightly tap texture onto the dough areas. Keep it subtlethink “soft bread,” not “pumice stone.” For deeper creases between layers, gently press in a few lines with a needle tool.
Step 6: Make It an Ornament (Two Reliable Hanging Options)
Option A: Embedded Wire Loop (strongest)
- Cut a 2–3 inch piece of craft wire.
- Form a small loop at the top (like a lollipop shape).
- Insert the straight tail down into the roll’s side or back, hiding it in the swirl seam.
- Smooth clay over the entry point so it looks like a natural fold.
Option B: Eye Screw (clean look)
Eye screws can be added after baking (with a tiny pilot hole) or set into raw clay (depending on your hardware and preferred method). If you set it into raw clay, make sure it’s seated deep enough and aligned so the ornament hangs straight.
Step 7: Bake/Cure the Clay Correctly (This Is Where Durability Happens)
Polymer clay strength depends on proper curing. Bake according to your clay brand’s instructions; many clays cure around 275°F, with timing based on thickness. Use an oven thermometer if you have one, and consider tenting your pieces with foil to reduce browning and shiny hot spots.
Step 8: Add Frosting That Looks “Drippy,” Not “Spackly”
The icing is the moment. The icing is the glow-up. You’ve got a few great options:
Frosting Option 1: Liquid Polymer Clay “Icing” (glossy + bonded)
- Mix a small amount of liquid polymer clay with a dab of white clay or a tiny touch of white pigment to get an opaque, creamy look.
- Apply with a small brush or toothpick. Let it pool slightly in the spiral creases.
- For classic cinnamon roll frosting, drag a toothpick in a loose spiral from center outward.
- Heat-set briefly if your product supports it, then cure fully in the oven per instructions.
Frosting Option 2: Dimensional/Puffy Paint (easy, no second bake)
If you want a raised, piped look, dimensional paint gives you that “bakery drizzle” vibe fast. Apply after baking and cooling your clay roll. Let it dry fully before sealing (if you seal at all).
Step 9: Toasted Edges and “Sticky” Shine
Want that “fresh from the pan” realism? Add gentle shading:
- Chalk pastel shading: Scrape a little warm brown pastel into powder and brush it onto edges and high spots. Seal lightly if needed.
- Acrylic dry-brush: Use nearly-dry paint to warm up ridges and define layers. Go lightpaint can sit on the surface and may wear if handled a lot.
- Gloss accents: Add a touch of gloss glaze in “goo zones” where cinnamon filling would look sticky.
Step 10: Optional Sealing (When and Why)
Polymer clay itself doesn’t need sealing for protection from water, but sealers can change the look (more shine, less chalk rub-off, protection for paint). If you used paint/pastels heavily, a compatible glaze or varnish can helptest first if you’re combining brands and finishes.
Method 2: Air-Dry or Foam Clay Cinnamon Roll Ornaments (Fast + Beginner-Friendly)
Step 1: Shape the Roll
- Roll a “snake” of clay (about pencil thickness for small ornaments).
- Flatten it slightly, then roll it up into a spiral like a cinnamon roll.
- Pinch and smooth the outer edge into the coil so it looks like dough, not a coiled rope.
- Add light texture with a brush or fingertip taps.
Step 2: Create a Hanging Point
While the clay is wet, insert a small loop of wire into the back/top or press in a hanging hook. Make sure it’s anchored deep enough to hold the ornament’s weight.
Step 3: Dry Completely
Air-dry clays need time. Drying times vary by brand, humidity, and thickness; thicker pieces can take 24–48 hours. If it feels cool to the touch, it may still be damp insidegive it more time before painting or sealing.
Step 4: Paint for Realism
- Base coat: warm tan.
- Creases: thin brown wash (paint + water), dabbed into spiral grooves.
- Toasted ridges: dry-brush deeper tan or light brown on high spots.
- Optional “sugar sparkle”: a tiny dab of gloss + micro glitter (use sparingly).
Step 5: Add Icing
Dimensional paint is your best friend here. Pipe a spiral drizzle, then nudge it with a toothpick to create natural drips. Let dry fully. If you prefer a homemade option, DIY puffy paint recipes can create that raised frosting look without special supplies.
Step 6: Seal (Recommended for Air-Dry)
Air-dry clay is more porous than polymer clay, so a protective topcoat helps with durability and moisture resistance. Choose a finish that fits your aesthetic: satin for a fresh-baked look, gloss for “extra gooey,” matte if you’re going for rustic bakery vibes.
Method 3: Cinnamon-Applesauce Dough Cinnamon Roll Ornaments (Scented + Nostalgic)
This method is the cozy-classroom classic: mix applesauce and cinnamon into a dough, shape, then dry. It smells like the holidays and looks delightfully homemade. It’s less “hyper-realistic fake bake” and more “I am a festive woodland baker who lives in a cardigan.”
Step 1: Make the Dough
- Mix ground cinnamon and applesauce until a thick, non-sticky dough forms. If it’s wet, add more cinnamon. If it’s crumbly, add a tiny bit more applesauce.
- Optional: mix in a small amount of white glue to help the ornament dry sturdier.
- Let the dough rest 5–10 minutes so the cinnamon hydrates and firms up.
Step 2: Shape Cinnamon Rolls (Two Easy Shapes)
Shape A: Coiled Rope
- Roll dough into a rope (like making a tiny cinnamon “snake”).
- Coil into a spiral. Press gently to flatten the base.
- Use a toothpick to deepen spiral lines.
Shape B: Swirl Disc (simpler, flatter ornaments)
- Roll dough out between parchment or plastic wrap to about 1/4 inch thick.
- Cut a circle, then press a spiral groove into it using a skewer.
- It reads as “cinnamon roll” in a cute, graphic wayespecially once you add faux icing.
Step 3: Add the Hanging Hole
Use a straw or skewer to punch a hole near the top before drying. If you’re making the thicker coiled roll, you can also press in a small wire loop (gently!) while the dough is soft.
Step 4: Dry the Ornaments
You can air-dry for several days (turning occasionally) or oven-dry at a low temperature on parchment until firm. Drying times vary; the goal is fully hardened ornaments that don’t feel cool or damp in the center.
Step 5: Add Icing + Finish
Once fully dry, add dimensional paint “icing” in a spiral. For extra scent longevity, some crafters refresh the aroma with a drop of cinnamon oil on the back (keep it off painted/finished areas if you’re unsure how it will react).
Realism Tips That Make People Squint at Your Tree
1) The Secret Is Color Variation
Bakery goods are never one color. Add subtle gradients: darker edges, lighter centers, deeper brown in creases. Even if you’re using colored clay, a touch of shading makes the spiral pop.
2) Imperfection Is a Feature
If your spiral is too perfect, it can look like a toy. Slight unevennessone thicker layer, a tiny squish on one sidereads as hand-rolled dough. Nature is messy. Bakers are tired. Honor that tradition.
3) Icing Should Look Like It Settled
Real icing softens and sinks into creases. Make your frosting slightly translucent at edges, a little thicker in the center, and allow it to “pool” in a few spots. A perfect pipe is great for cupcakes; cinnamon rolls look best when the icing relaxed a bit.
4) Think in “Layers,” Not Lines
Cinnamon rolls have laminated-ish layers. Add tiny ridges, crease shadows, and occasional little gaps where filling peeks through. That layered complexity is what makes the brain say, “Food!”
Care, Storage, and Long-Term Durability
- Store gently: Wrap ornaments individually (tissue paper or bubble wrap) so frosting details don’t get crushed.
- Avoid heat: Don’t leave polymer ornaments in hot cars or near heat vents.
- Handle by the hanger: Oils from hands can dull finishes over time, especially on glossy areas.
- Keep away from pets: Faux pastries look like chew toys to animals. (They are wrong, but determined.)
FAQ
Do I have to use liquid polymer clay for icing?
Nope. Liquid clay is great for a bonded, slightly translucent glaze look, but dimensional paint, spackle frosting, or even layered acrylic gel can work. Match your method to your patience level.
Do polymer clay ornaments need a sealer?
Not for waterproofing. Sealers are mainly for appearance (shine/matte) and to protect paint or pastel shading. If you use a sealer, test it on a scrap first so you don’t end up with a sticky surprise.
Why did my clay darken in the oven?
Oven temps can run hot, and polymer can darken if exposed directly to heat or if the temperature spikes. Use an oven thermometer if possible and tent pieces with foil to buffer heat.
How do I make them look like “Cinnabon-level” gooey?
Go heavier on gloss where filling would meltinside creases and at the base. Add a thicker, slightly translucent icing layer, then a few intentional drips. The goal is “sticky delicious,” not “white plaster accident.”
Conclusion
Cinnamon roll ornaments are the perfect DIY fake bake: cute, cozy, beginner-friendly, and customizable enough to match any holiday aestheticclassic, kitschy, minimalist, or “I decorated my tree like a pastry case.” Choose polymer clay for maximum realism and durability, foam/air-dry for speed and simplicity, or cinnamon-applesauce dough for that warm holiday scent that makes your home feel like a Hallmark movie set (minus the awkward small-town love triangle).
Make a batch in different “flavors,” tie them with ribbon, and gift them as tiny edible-looking keepsakesjust remember to include a gentle note that they are ornaments, not snacks. Your friends are smart. But frosting is persuasive.
Extra: Common Crafting Experiences (and Lessons) When Making Cinnamon Roll Ornaments
If you’ve never made fake bakes before, your first cinnamon roll ornament will teach you one important truth: realism is less about perfection and more about believable chaos. A lot of crafters start out aiming for a swirl so crisp and symmetrical it could be printed on currency. The result often looks adorablebut also slightly like a toy. The “aha” moment usually happens when you gently squish one edge, deepen a crease, or let the frosting drift into a groove and suddenly the piece looks like something that came from an actual pan. The best fake bakes have tiny flaws that say, “a human made this,” which is exactly what real baked goods say too.
Another common experience: the frosting journey. The first attempt is often either too thin (it disappears into the texture) or too thick (it looks like toothpaste doing its best). The sweet spot is a frosting that sits on top, catches light, and settles naturally. People who use liquid polymer clay often love the glossy, bonded finishbut they also learn quickly that a little goes a long way. Too much can make your cinnamon roll look like it took a bath in glaze. On the flip side, those who use dimensional paint discover it’s wonderfully easy, but it requires patience: touch it too soon and you’ll leave fingerprints that scream, “I poked the icing because I lack impulse control.” (Relatable.)
Color is another “experience tax.” At first, it’s tempting to grab the closest tan and call it dough. Then you compare it to a real cinnamon roll photo and realize dough is warm, golden, and variedespecially around edges and folds. Many makers eventually switch to a base clay color that’s slightly lighter than they want, then build depth with shading. That way, the roll doesn’t look overbaked, but it still has dimension. And yes, most of us learn the hard way that “dark brown everywhere” reads as burnt, not toasted. Toasting is selective. Cinnamon is dramatic, but it has boundaries.
There’s also the “hardware lesson.” Ornaments get tugged, bumped, and yanked off branches by curious hands. If your hanger isn’t secure, the roll will eventually do a slow-motion betrayal and tumble into the tree skirt like a fallen pastry. After one or two heartbreaks, makers become passionate about strong loops: embedding wire, seating eye screws properly, and letting adhesives cure fully (if used). It’s not glamorous, but neither is re-hanging the same cinnamon roll twelve times while whispering, “Please stay.”
Finally, the most charming experience: once you make one cinnamon roll ornament, you will immediately want to make a “collection.” A classic iced roll. A maple glaze version. A pecan-topped one. A tiny “burnt edge but still delicious” roll for realism. Some people even do themed setsgingerbread + cinnamon roll + hot cocoa mug ornamentsbecause fake bakes are basically holiday joy you can mass-produce while watching movies. And that’s the real win: you’re not just making decor. You’re building little memories that smell (or look) like comfortand they’ll still be here next year, no stale leftovers required.