Table of Contents >> Show >> Hide
- Why a Granny Cart Laundry Hamper Is Low-Key Brilliant
- Pick the Right Cart (Because Not All “Granny Carts” Are Created Equal)
- Materials & Tools
- Build It: Step-by-Step DIY Granny Cart Laundry Hamper
- Step 1: Clean, check, and de-squeak
- Step 2: Add a “flat” base (optional but nice)
- Step 3: Create the removable liner (three good options)
- Step 4: Attach the liner so it stays put (but still lifts out)
- Step 5: Add sorting without turning it into a science project
- Step 6: Make it bathroom-friendly (optional upgrades)
- Keep It Fresh: Odor, Ventilation, and Cleaning
- Safety & Ergonomics: Save Your Back (and Your Mood)
- Cost Breakdown (Realistic, Not Fantasy DIY)
- Troubleshooting (Because Laundry Will Test Your Patience)
- Real-Life Experiences: What It’s Like to Actually Use a DIY Granny Shopping Cart Laundry Hamper (500+ Words)
- Conclusion: Your New Favorite “Why Didn’t I Do This Earlier?” DIY
If your laundry pile has started getting its own ZIP code, you’re in the right place. A “granny cart” (that classic folding shopping cart) can be
turned into a rolling laundry hamper that looks surprisingly intentional, saves your back, and glides to the laundromat like it pays rent.
This guide walks you through choosing a cart, building a removable liner, adding smart upgrades, and using it safelywithout turning your bathroom
into a hardware store aisle.
The best part? This is a real-life kind of DIY: flexible, budget-friendly, and totally customizable. You can make it “cute enough for guests,”
“tough enough for towels,” or “small enough to live behind the door without starting arguments.”
Why a Granny Cart Laundry Hamper Is Low-Key Brilliant
1) It turns “carrying” into “rolling”
Traditional hampers are basically awkward plastic hugs for your arms. A rolling hamper means less lifting, fewer clumsy trips, and less of that
dramatic doorframe collision that makes you question your spatial awareness. Rolling options are popular for good reasonreviewers consistently
praise the convenience of wheels and removable bags. (Translation: laundry day becomes slightly less rude.)
2) It’s a small-space superhero
Granny carts are naturally slim and verticalperfect for apartments, dorms, RVs, or bathrooms where the floor plan was clearly designed by someone
who never owned jeans. Many small-space laundry tips recommend upright, wheeled, or collapsible solutions because they’re easy to store when not in use.
3) It can handle the “laundromat commute”
If you haul laundry down a hallway, across a parking lot, or up/down stairs, a cart with stable wheels changes everything. Some shopping carts are
even designed to manage stairs with multi-wheel “stair climber” setupshandy if you live in a walk-up and your building’s elevator is basically a myth.
Pick the Right Cart (Because Not All “Granny Carts” Are Created Equal)
Option A: Fabric-bag folding shopping cart (the classic)
This is the iconic granny cart: a lightweight frame with a removable bag. For laundry, it’s great because the bag can become your washable hamper liner
or a template for one. Look for a sturdy frame, a handle that feels comfortable, and wheels that don’t wobble like they’re auditioning for a cartoon.
- Best for: laundromat trips, narrow spaces, everyday clothes
- Watch-outs: some bags aren’t washable; some frames tip if overloaded
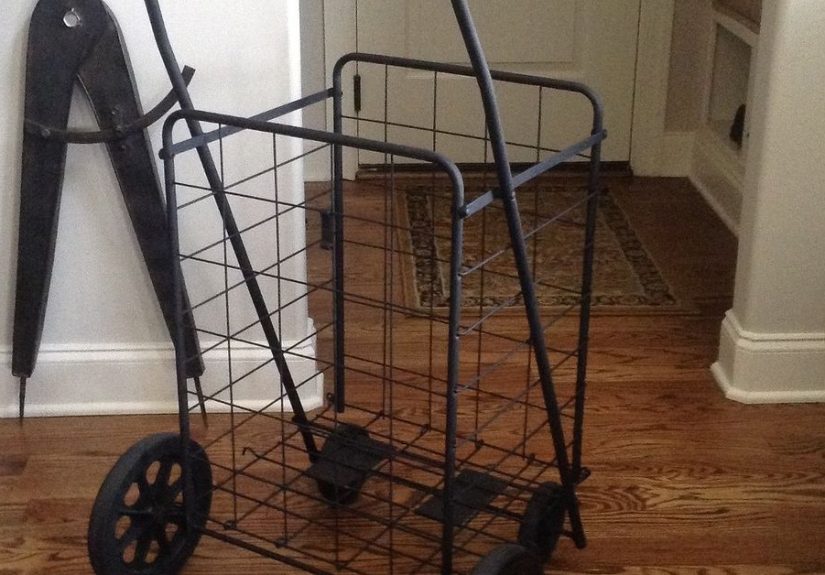
Option B: Wire basket utility cart (more “laundry butler,” less “grandma chic”)
A wire basket cart is sturdier and often holds more, but it may be wider and less bathroom-friendly. It’s great if you want a “drop and go” hamper that
can also hold detergent, dryer sheets, and that single sock that keeps showing up like a ghost.
Wheels matter more than you think
If you deal with cracks, curbs, or stairs, consider a cart designed for uneven terrain. Product testers often highlight stair-climbing wheel designs as
useful for walk-ups. If you’re mainly rolling on flat indoor floors, you can prioritize quieter wheels and stability.
Quick checklist before you buy (or thrift)
- Does it stand upright without you holding it?
- Does it roll smoothly when loaded (not just empty)?
- Does it have brakes or lockable wheels (nice on tile)?
- Is the frame solidno cracks, bent joints, or “mystery squeaks”?
- Is there an easy way to attach or remove a liner bag?
Materials & Tools
You can do this as a no-sew, some-sew, or full-sew project. Pick your adventure.
Core materials (choose what matches your cart)
- Granny cart or folding shopping cart
- Laundry liner bag (store-bought or DIY)
- Fasteners: heavy-duty zip ties, hook-and-loop straps, or small carabiners
- Optional: bungee cord or elastic strap (for light tension, not heavy “load securing”)
- Optional: washable fabric (canvas/duck cloth) if sewing a custom liner
Helpful tools
- Measuring tape
- Scissors (and a seam ripper if sewing)
- Pliers (for tightening fasteners)
- If sewing: sewing machine, pins/clips, thread, iron
- If drilling (optional): drill + bit (ask an adult for help if you’re not comfortable)
Build It: Step-by-Step DIY Granny Cart Laundry Hamper
Step 1: Clean, check, and de-squeak
If your cart is thrifted, give it a quick spa day. Wipe down the frame, check screws, and test the wheels. Tighten anything loose.
If the wheels squeak, a tiny bit of lubricant can help (wipe away excess so it doesn’t collect lint).
Step 2: Add a “flat” base (optional but nice)
Some carts have an open metal grid base that can snag softer bags. A flat base makes the liner sit better and keeps delicate items from poking out.
Easy base ideas:
- Plastic cutting board trimmed to size (wipes clean easily)
- Plywood sealed with a wipeable finish
- Corrugated plastic sheet (lightweight, water-resistant)
Secure the base with zip ties or short straps so it can be removed later for cleaning.
Step 3: Create the removable liner (three good options)
Option A: Use a removable cart bag as your hamper liner (fastest)
If your cart already has a removable bag, you may be done. The “DIY” here is simply making it laundry-friendly:
- Wash it if the material allows, or wipe it down regularly.
- Add a simple inner mesh laundry bag for delicates so small items don’t get lost.
- Clip a small deodorizing sachet to the inside (optional).
Option B: No-sew liner using a pillowcase or large tote bag (quick and charming)
For a no-sew liner, grab a sturdy pillowcase, canvas tote, or oversized drawstring bag. The goal is simple: a bag that fits the cart and lifts out easily.
- Slide the bag into the cart and fold the top edge over the rim like a cuff.
- Use small clips, hook-and-loop straps, or a few zip ties (loosely) to keep it from sliding down.
- If it’s floppy, add two strips of cardboard or plastic along the sides (inside the bag) for structure.
Option C: Sew a custom drawstring liner (best fit, most “finished” look)
A drawstring liner is ideal because you can cinch it closed for transport and remove it like a trash-can liner. Many sewing guides use a simple channel
at the top for cord/ribbon and recommend durable fabrics like canvas or duck cloth for structure.
Simple measuring method:
- Measure the cart’s interior width, depth, and height.
- Add a little ease so clothes can drop in (think “comfortable hoodie,” not “skinny jeans”).
- Add extra at the top for a drawstring channel and a fold-over cuff.
Basic build idea:
- Cut a main body panel (or two panels to sew into a tube) and a bottom panel.
- Sew sides and bottom; reinforce seams (laundry is heavier than it looks).
- Create a drawstring channel at the top by folding the edge down and stitching.
- Thread cord or ribbon through the channel; knot ends.
If you want a more structured “hamper inside a hamper” look, you can add a stiff outer sleeve (like a soft box) and keep the inner bag removablesimilar
to common removable-liner hamper designs.
Step 4: Attach the liner so it stays put (but still lifts out)
You want the liner secure during daily use, but easy to remove on laundry day. Here are three attachment styles:
- Carabiner clips: Clip loop tabs on the liner to the cart frame. Fast and removable.
- Hook-and-loop straps: Wrap straps around the rim and liner cuff. Great if you dislike permanent ties.
- Strategic zip ties: Use a few ties as “stops” on the rim rather than cinching the liner permanently.
Note: Zip ties come in different tensile strengths, so choose heavier-duty ones for anything that takes daily tugging. Also, if you use bungee cords,
keep them for light tension onlymany bungees aren’t designed as load-rated tie-downs, and hooks can snap back if overstretched. Use common sense and keep
faces and fingers out of the “snap zone.”
Step 5: Add sorting without turning it into a science project
Sorting can be as simple or as dramatic as you want.
- Two-bag system: Clip two smaller liners side-by-side (lights/darks).
- Mesh divider: Hang a mesh bag inside for delicates or socks.
- Tag it: Use washable labels or fabric tags so future-you doesn’t “accidentally” mix whites and red hoodies.
Step 6: Make it bathroom-friendly (optional upgrades)
- Wheels on tile: If your cart rolls too easily, consider a cart with lockable wheels or add a simple wedge/stop.
- Handle comfort: Wrap the handle with grip tape or a sewn sleeve (especially if you pull it long distances).
- Pocket power: Add a small pocket for stain stick, quarters, or dryer sheets.
- Lid hack: A fabric flap with snaps can keep visuals tidy without trapping odors.
Keep It Fresh: Odor, Ventilation, and Cleaning
Laundry hampers are basically temporary homes for sweaty gym shirts and “I wore it once, it’s fine” jeans. To keep odors under control, prioritize a
washable liner and occasional wipe-downs. Many cleaning and product-testing sources recommend removable, washable liners because they’re easier to keep
fresh over time.
- Wash the liner regularly (weekly if it gets funky fast).
- Let damp items dry before tossing them in (especially towels).
- Wipe the cart frame occasionallylint builds up like it’s trying to pay you rent.
Safety & Ergonomics: Save Your Back (and Your Mood)
A rolling hamper helps, but “rolling” doesn’t mean “infinite capacity.” Laundry gets heavy quicklyespecially when it’s wet. Workplace laundry safety
guidance emphasizes avoiding heavy, bulky lifts, keeping loads manageable, and using safer body mechanics.
Simple rules that actually work
- Don’t overload: Make two lighter trips instead of one heroic trip that ends in regret.
- Keep the load close: When lifting the liner out, keep it near your body and avoid twisting.
- Use the cart for transport, not stair stunts: If you must do stairs, look for stair-friendly wheels or remove the liner and carry smaller bundles.
- Watch the tipping point: Tall, narrow loads can tip; heavier items should go lower in the cart.
If you share laundry duty with kids/teens
Keep the setup simple: a lighter liner bag, clear labels, and a cart that doesn’t roll away on its own. If power tools are involved in your build,
adult supervision is a smart ideabecause nobody wants a DIY story that starts with “So I thought I could freehand this drill bit…”
Cost Breakdown (Realistic, Not Fantasy DIY)
- Thrifted cart: often budget-friendly; inspect wheels and frame carefully
- New cart: costs more but can be sturdier and smoother rolling
- Liner bag: free (repurposed) to moderate (sewn canvas/duck cloth)
- Fasteners: low cost, high impact
If you want a premium “forever” vibe, heavy-duty canvas rolling carts exist and are known for durability. If you want “I made this from a garage-sale find,”
this DIY is exactly your lane.
Troubleshooting (Because Laundry Will Test Your Patience)
Problem: The liner collapses into the cart
Add a stiffer cuff (fold-over top), clip the liner at 4 points, or slide thin plastic sheets inside the liner sides for structure.
Problem: The cart tips when I pull it
Distribute weight lower, avoid stacking everything on top, and slow down on turns. If the cart is very narrow, consider a slightly wider base style.
Problem: It smells like “gym day” permanently
Wash the liner more often, wipe the frame, and don’t trap damp towels in the bag. Ventilation mattersclosed, humid spaces invite odors.
Problem: Wheels are loud (my neighbors know my schedule)
Check for hair/lint in wheel axles, tighten hardware, and consider softer wheels if you ever upgrade carts.
Real-Life Experiences: What It’s Like to Actually Use a DIY Granny Shopping Cart Laundry Hamper (500+ Words)
The first time you roll your laundry instead of carrying it, you’ll wonder why you didn’t do this soonerright up there with “buying a second phone charger”
and “finally labeling the spice jars.” But like any DIY that graduates from “cute idea” to “daily routine,” the granny cart hamper teaches you a few things
the hard way (in the most harmless, slightly annoying way possible).
For starters: weight sneaks up on you. In your head, laundry is soft. In reality, a week’s worth of hoodies is basically a pile of damp sand
disguised as fabric. The cart helps a lot, but the biggest improvement comes from how it nudges you into smaller, more manageable loads. When the hamper has a
removable liner, it’s tempting to fill it to the brim like you’re starring in a detergent commercial. After one overloaded trip where the cart wobbles and you
suddenly develop a deep respect for physics, you’ll start doing what the smart sources recommend: lighter loads, more trips, less strain.
Second: the liner makes or breaks the whole setup. My favorite version wasn’t the one with the fanciest frameit was the one with the liner
that fit perfectly and didn’t slouch. A good liner has three qualities: (1) it stays open for easy toss-in, (2) it lifts out without snagging, and (3) it’s
washable. If you skip washable, your future self will eventually be standing over the bag thinking, “Is that… a smell, or a personality?” A simple drawstring
channel is also a game-changer. Cinching the top means socks don’t jump out mid-trip, and you can carry the bag separately when you hit stairs.
Third: stair strategy matters. If you live in a walk-up, the cart either needs stair-friendly wheels or you need a plan B. What worked best was
treating the cart like the “transport base” and the liner like the “carry module.” Roll to the stairs, lift the liner out (in smaller loads), then carry it up.
This avoids that awkward moment where you’re dragging a cart like it owes you money. If you do have a stair-climbing cart, it still helps to keep heavy items low
and go slow. The cart can be capable and still be dramatic if you corner too fast.
Fourth: the cart becomes a laundry command center. Once it’s in your home, you start adding little upgrades almost without thinking. A pocket for
quarters (or a laundry card) is shockingly useful. A small hook for a delicates bag saves time. A clip for a stain stick means you actually treat stains when you
notice them instead of remembering them 48 hours later. And if you have a shared household, labels reduce the classic “Is this clean or dirty?” debate to a simple
“It’s in the cart, so it’s dirty. No court, no jury.”
Fifth: it looks better than you expect. There’s something oddly charming about a granny cart in the bathroom when it’s styled on purposeespecially
if you choose a neutral liner, add a tidy flap, or coordinate it with your towels. It reads less like “utility” and more like “European apartment vibes,” even if
your actual vibe is “I own three mismatched baskets and a dream.”
The biggest lesson? This DIY isn’t about building the world’s most complicated hamper. It’s about creating a system that makes laundry easier, faster, and less
annoying. If your cart rolls smoothly, your liner lifts out cleanly, and your load stays manageable, you’ve built the perfect hampergranny-approved, back-approved,
and honestly… you-approved.
Conclusion: Your New Favorite “Why Didn’t I Do This Earlier?” DIY
A DIY granny shopping cart laundry hamper is one of those rare projects that’s both practical and kind of delightful. It’s easier on your back, friendlier to
small spaces, and customizable enough to match your home (or at least not offend it). Keep the liner removable and washable, avoid overloading, and add small
upgrades that fit your routineand laundry day becomes less of a chore and more of a smooth, rolling victory.