Table of Contents >> Show >> Hide
Have you ever looked at a photo on Instagram and thought, “That would make a perfect coaster?” If so, you’re not alone! DIY Instagram photo coasters are a fun, creative, and personalized way to showcase your favorite moments and transform them into practical, stylish accessories. Whether you’re a beginner or a seasoned crafter, this simple project will add a personal touch to your home decor. In this guide, we’ll walk you through how to create your very own Instagram photo coasters that you can use at home or gift to a loved one.
What You’ll Need for DIY Instagram Photo Coasters
Before you dive into the project, it’s important to gather all the necessary materials. Luckily, the supplies are simple and easy to find:
- Instagram photos (printed or digital, see steps below for options)
- Blank coasters (wooden, cork, or ceramic)
- Mod Podge or another craft adhesive (glossy or matte finish)
- Scissors
- Paintbrush
- Craft sealer (optional, for extra protection)
- Acrylic paints (optional, for coaster customization)
Step-by-Step Instructions for Creating Instagram Photo Coasters
Step 1: Choose Your Favorite Instagram Photos
The first step in making your Instagram photo coasters is choosing which memories you want to display. Do you want to showcase travel adventures, your favorite pet, or a special event? If you’re printing your Instagram photos, you can use a photo-editing app to resize them to fit the coasters, ensuring they look great once placed.
Step 2: Print Your Photos
You can print your Instagram photos at home on photo paper, or use an online service like Shutterfly or Walgreens for high-quality prints. If you’re printing your own, make sure to print on glossy or matte photo paper for the best result. Choose the size of the photos based on the size of your coasters. A 4×4 inch square works well for most coaster sizes.
Step 3: Prepare Your Coasters
Next, you’ll need to prep the coasters. If you’re using wooden or cork coasters, consider painting them with a base coat of acrylic paint to create a solid background color. This step is optional but adds a nice, customized touch. Let the paint dry completely before moving on to the next step.
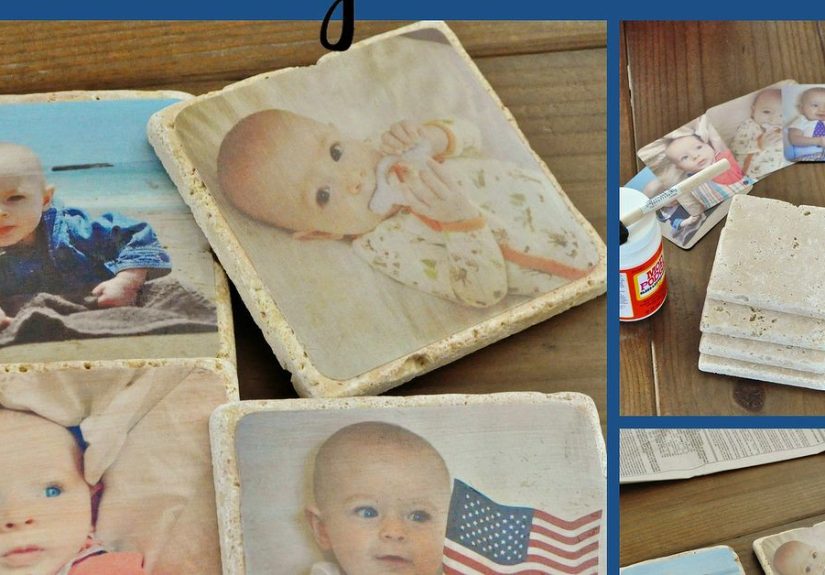
Step 4: Apply Mod Podge
Now comes the fun part – applying your Instagram photos to the coasters! Begin by applying a thin layer of Mod Podge or your preferred adhesive to the coaster’s surface. Be sure to spread it evenly using a paintbrush.
Step 5: Attach the Photos
Carefully place your printed Instagram photo onto the coated coaster. Gently press it down to remove any air bubbles or wrinkles. Use your fingers or a soft cloth to smooth it out for a clean, flat surface.
Step 6: Seal the Photo
Once your photo is attached, it’s time to seal it. Apply another layer of Mod Podge on top of the photo to protect it. Allow it to dry for about 20-30 minutes. If you want additional protection, you can add a couple more coats of Mod Podge, letting each layer dry completely before adding the next.
Step 7: Finishing Touches
If you’d like to add extra flair, consider painting the edges of your coasters with acrylic paint. This step can help make your photo pop and add a neat, finished look to the coasters. You can also add a layer of craft sealer to make the surface waterproof and durable for long-term use.
Why DIY Instagram Photo Coasters Are So Popular
DIY Instagram photo coasters have become a popular trend because they combine creativity, personalization, and functionality. It’s a simple project that allows you to express your unique style while making something practical for everyday use. Plus, they make fantastic gifts for friends and family!
Perfect for Gift Giving
These personalized coasters are ideal gifts for birthdays, holidays, or any occasion. You can create a set of Instagram photo coasters for someone special, featuring their favorite memories captured on Instagram. Imagine gifting a set of coasters with vacation photos or family moments – it’s a thoughtful, meaningful present that’s sure to be appreciated.
Budget-Friendly and Customizable
Another reason DIY Instagram photo coasters are so loved is that they’re affordable. You don’t need to spend much on supplies, especially if you already have a collection of Instagram photos saved on your phone. The customization options are endless – you can choose the background color, the type of photo, and even the design of the coaster itself. This means no two coasters will ever be the same!
Experience: My DIY Instagram Coaster Journey
I’ve tried my hand at creating Instagram photo coasters, and let me tell you, the experience was both fun and rewarding. I started by choosing a few of my favorite travel photos – mostly from a recent trip to Paris – and printed them in square form. I found some simple cork coasters that were perfect for the project.
The most challenging part was cutting the photos to fit the coasters. I didn’t have a photo cutter, so I had to use scissors. While it wasn’t perfect, it added to the handmade charm. I used a matte Mod Podge finish for that smooth, elegant look, and after sealing the photos with a couple of coats, the coasters turned out beautifully. I even painted the edges with a pop of gold to give them a touch of glamour!
They’ve since become conversation pieces whenever I host dinner parties. It’s incredible how something as simple as a coaster can carry so much meaning when it’s customized with personal photos. Plus, I always get compliments on them! I plan on making more sets for gifts this holiday season, and I highly recommend giving this DIY project a try.
Conclusion
DIY Instagram photo coasters are an easy and enjoyable craft project that lets you bring your favorite moments to life in a functional way. Whether you’re creating them for yourself or as gifts for friends and family, these personalized coasters are sure to add a touch of personality and style to your home decor. Plus, they’re a perfect conversation starter and a wonderful way to preserve your most cherished memories.
So, grab some Mod Podge, pick your favorite Instagram photos, and get crafting! You’ll be amazed at how such a simple project can bring so much joy and personality to your space.