Table of Contents >> Show >> Hide
- Why Little Tikes Cars Make the Perfect Makeover Project
- Choose a Makeover Theme That Makes You Smile
- Materials and Tools
- Step-by-Step: The Makeover That Actually Holds Up
- 1) Disassemble What You Can (Without Starting a Mystery Puzzle)
- 2) Deep Clean Like the Plastic Is About to Be Interviewed on TV
- 3) Lightly Scuff the Surface (Don’t Sand It Into a New Shape)
- 4) Mask Like a Patient Person, Not a Panicked Person
- 5) Decide: Plastic-Specific Paint vs. Adhesion Promoter
- 6) Spray Paint in Thin Coats (This Is Not the Time for “One and Done”)
- 7) Let It Dry, Then Let It Cure (Yes, Both)
- 8) Optional Clear Coat: The Protective “Topper”
- 9) Add Decals and Details Without Bubbles
- 10) Reassemble and Do a Final Check
- Make It Look Next-Level With Simple Upgrades
- Durability Tips for Outdoor Life
- Common Mistakes (And How to Avoid the DIY Sad Trombone)
- Safety Checklist
- FAQ
- Real-World “Experience” Notes (The Stuff DIY Guides Don’t Always Admit)
- Conclusion
That classic Little Tikes car (aka the beloved driveway chariot) doesn’t “get old” so much as it gets
sun-kissed. One day it’s bright and shiny. The next, it’s giving “vintage… but not on purpose.”
The good news: a Little Tikes car makeover is one of the most satisfying DIY upgrades you can do in a weekend.
It’s affordable, it’s customizable, and it turns a faded toy into something that looks shockingly legitlike a
tiny showroom model with snacks in the cupholder.
In this guide, you’ll learn how to prep plastic the right way, choose kid-safe finishes, avoid the most common
peeling-and-chipping heartbreak, and add details (decals, faux lights, racing stripes, even a custom “license
plate”) that make your makeover look intentionalnot accidental.
Why Little Tikes Cars Make the Perfect Makeover Project
Little Tikes ride-on cars are made to survive toddler driving skills, which is to say: they’re engineered to
withstand chaos. The plastic is tough, the shapes are simple, and most parts can be removed or masked off.
What usually looks “worn out” is cosmeticUV fading, scuffs, sticker residue, and that mysterious sticky spot
that appears the moment you blink.
The main challenge is also the main lesson: plastic can be picky. Some plastics are slick, some have leftover
mold-release residue from manufacturing, and outdoor toys are basically magnets for sunscreen, dirt, and driveway
dust. The secret to a makeover that lasts is not “more paint.” It’s better prep.
Choose a Makeover Theme That Makes You Smile
Before you touch a roll of painter’s tape, pick a vibe. A theme helps you choose colors, decals, and details
without spiraling into the “Should I add flames?” question at 11:47 p.m.
Classic Vintage Cruiser
Think creamy white body, black “trim,” and a simple round number decal. Add a faux chrome look with metallic
vinyl accents. This style looks clean, timeless, and oddly expensive for a toy that has been parked in the mud.
Mini Race Car
Bold color + stripes + a big number on the door. Add “sponsor” style decals (you can make them sillylike
“Snack Team Racing” or “Pit Stop Cookies”). It’s playful, photogenic, and easy to touch up later.
Taxi, Food Truck, or Ice Cream Wagon
A yellow “taxi” look is adorable and simple. Or go full pretend-play with an ice cream truck themepastel body,
sprinkle decals, and a “menu” sticker on the side. Instant imagination upgrade.
Off-Road Adventure (Tiny SUV Energy)
Earthy colors, matte finish, and bold black accents. Add “utility” style decals and a pretend “spare tire”
graphic on the back. It’s ruggedlike it’s headed to the sandbox wilderness.
Materials and Tools
You don’t need a fancy workshopjust the right supplies and a little patience. Here’s a practical list that
fits most Little Tikes car models.
Cleaning and Prep
- Dish soap, warm water, sponge, and a soft brush (old toothbrush for crevices)
- Microfiber cloths or lint-free rags
- Isopropyl alcohol (rubbing alcohol) for final wipe-down
- Fine-grit sandpaper (around 220–320) or a sanding sponge
- Painter’s tape and masking paper (or paper grocery bags cut open)
Painting and Finishing
- Plastic-friendly spray paint (or paint + primer formulated to bond to plastic)
- Optional but helpful: adhesion promoter or plastic-bonding primer for tricky plastic
- Clear coat (choose an outdoor-rated clear spray for extra durability)
Details and Upgrades
- Vinyl decals (store-bought or DIY cut vinyl) + transfer tape (if using cut vinyl)
- New stickers to replace old ones (or printable waterproof sticker paper)
- Optional comfort upgrade: thin outdoor cushion foam + weather-resistant fabric or a washable pad
Kid-safety note: Use coatings intended for household use, follow label directions, and allow
full curing time before kids ride. Paint may feel dry quickly, but “dry” and “fully cured” are not the same.
Step-by-Step: The Makeover That Actually Holds Up
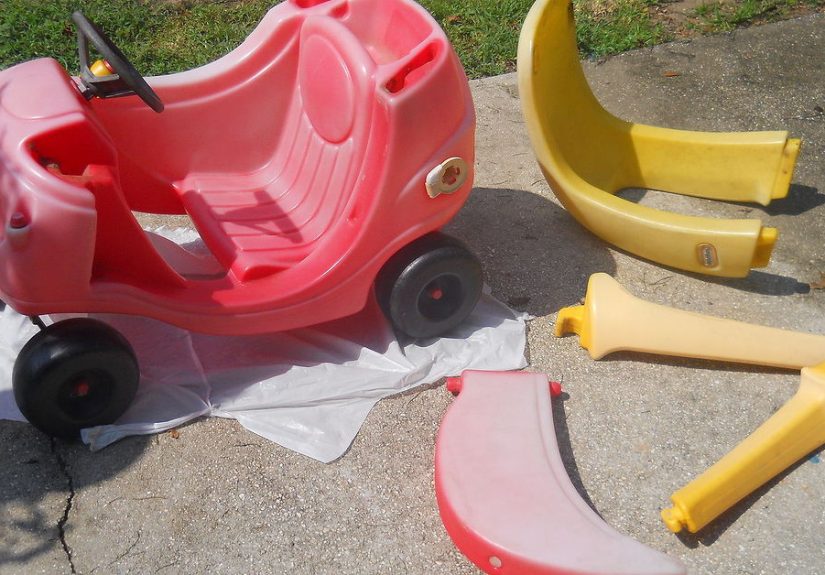
1) Disassemble What You Can (Without Starting a Mystery Puzzle)
Remove easy parts: wheels (if removable), any accessory pieces, and decals you don’t want to keep. Take quick
photos as you go so reassembly doesn’t become a true-crime documentary titled Where Did This Screw Come From?
2) Deep Clean Like the Plastic Is About to Be Interviewed on TV
Wash everything with dish soap and warm water. Scrub the grooves, steering wheel area, and seams. Rinse well and
let it dry completely. If the toy has been outside, assume it’s wearing an invisible layer of grime.
Once dry, do a final wipe-down with rubbing alcohol on a clean cloth to remove leftover oils and fine residue.
This step is a big deal for adhesion.
3) Lightly Scuff the Surface (Don’t Sand It Into a New Shape)
Glossy plastic is paint’s enemy. You’re not trying to remove materialyou’re just creating a slightly “toothy”
surface so coatings can grip. Use fine grit (around 220–320) and lightly scuff large areas. Wipe away dust.
4) Mask Like a Patient Person, Not a Panicked Person
Cover anything you don’t want painted: steering wheel center details, interior areas, decals you’re keeping, and
any moving parts. Press tape edges firmly so paint doesn’t creep underneath.
5) Decide: Plastic-Specific Paint vs. Adhesion Promoter
Some spray paints are designed to bond to plastic without sanding or priming. They can work great for outdoor
toys, especially if the plastic is clean and properly prepped. But if the surface is very slick, or if you want
maximum durability, an adhesion promoter (or plastic primer) can give you extra insurance.
6) Spray Paint in Thin Coats (This Is Not the Time for “One and Done”)
Shake the can well. Test spray on cardboard. Hold the can roughly 8–12 inches away and apply light coats using
smooth, overlapping passes. Your first coat should look a little “see-through.” That’s good.
Wait the recommended time between coats (check the label). Add 2–4 light coats until coverage looks even.
Rushing causes runs, texture, and the dreaded “I touched it and now it has my fingerprint forever” moment.
7) Let It Dry, Then Let It Cure (Yes, Both)
Paint can be “dry to the touch” relatively quickly, but curing takes longer. For a ride-on toy that gets kicked,
bumped, and parked in the sun, curing time is where durability is born. If you can, give it extra time before
reassembly and play.
8) Optional Clear Coat: The Protective “Topper”
A clear coat can help with scuffs and UV wearespecially for bright colors. Use light coats, just like paint.
Make sure your clear coat is compatible with your paint (same brand system is a safe bet).
9) Add Decals and Details Without Bubbles
Vinyl decals can take your makeover from “nice repaint” to “how did you DO that?” Clean the surface, position
the decal carefully, then press it down from the center outward to avoid bubbles. Transfer tape helps keep cut
vinyl designs aligned. Take your timethis is the “eyebrows” stage of the makeover.
10) Reassemble and Do a Final Check
Reattach parts carefully and avoid overtightening screws (plastic can strip). Then do a quick inspection for
sharp edges, peeling tape, or paint on moving parts. The goal is adorable and safe, not “race car with a squeaky
wheel that sounds like a haunted door.”
Make It Look Next-Level With Simple Upgrades
Paint is the main event, but the little touches are what make people do a double take.
License Plate Magic
Print a custom “plate” on weather-resistant paper or vinyl sticker paper. Use the kid’s nickname, a pretend
number, or something silly like “VROOM-07.” It’s a tiny detail with huge charm.
Faux Headlights and Taillights
Use reflective vinyl shapes or durable outdoor stickers. You get the “real car” look without messing with wiring
or anything complicated.
Steering Wheel Refresh
A simple wrap with grip tape (applied neatly) or a snug, removable cover can update the look and feel. Keep
materials smooth and kid-friendly.
Seat Comfort Upgrade
If your model has a basic plastic seat, add a removable cushion pad. Choose something washable. The best DIY
upgrades are the ones you can throw in the laundry without emotional damage.
Durability Tips for Outdoor Life
- Give it shade breaks: UV exposure fades colors over time. A covered porch helps.
- Clean gently: Mild soap and water is enough. Avoid harsh chemicals that can dull finishes.
- Expect touch-ups: Ride-on toys are basically bumper cars. Save a little paint for quick fixes.
- Let it cure before heavy play: This is the #1 way to prevent early chips and scuffs.
Common Mistakes (And How to Avoid the DIY Sad Trombone)
Painting Over Dirt or “Invisible Oils”
Paint sticks to whatever is on the surface. If that surface is sunscreen residue and snack fingerprints, your
paint job is basically attached to a removable layer. Clean thoroughly and do a final alcohol wipe.
Skipping Scuffing on Very Glossy Plastic
Some plastics are so slick they practically whisper, “Good luck.” Light sanding helps create grip. You’re not
sanding for dramajust for adhesion.
Heavy Coats That Run
Spray paint rewards patience. Thin coats dry better, look smoother, and chip less. If you do get a run, let it
dry fully, sand it smooth, and repaint lightly.
Putting Kids Back in the Driver’s Seat Too Soon
“Dry to touch” is not “ready for a toddler demolition derby.” If possible, cure longer than you think you need.
Your future self will thank you.
Safety Checklist
- Paint outdoors or in a very well-ventilated space.
- Keep all sprays and solvents away from flames and heat sources.
- Follow product label directions for dry time, recoat time, and full cure time.
- Allow full curing before kids use the toyespecially for surfaces they touch often.
- Store leftover materials out of reach of children.
FAQ
Do I have to sand a Little Tikes car before painting?
Not always. Some plastic-bonding spray paints are designed to adhere without sanding or priming. But if the
plastic is glossy, weathered, or you want maximum durability, a light scuff sand is a smart move.
Can I use regular wall paint or craft paint?
You can, but it’s usually not the best for outdoor toys. Many craft paints aren’t built for UV, moisture, and
constant friction. Spray coatings formulated for plastic tend to hold up better outdoors.
What if the old stickers won’t come off?
Try warming them gently (like with warm air) and peeling slowly. For residue, use a mild adhesive remover
appropriate for plastics, then wash and wipe down again. Always test in a hidden spot first.
How long does this DIY take?
Hands-on time is usually just a few hours across a day. The real timeline depends on dry and cure time. The best
paint jobs are the ones you let rest.
Real-World “Experience” Notes (The Stuff DIY Guides Don’t Always Admit)
Here’s what people tend to experience when they do a DIY Little Tikes car makeoveraka the emotional journey
from “This will be quick!” to “Why am I emotionally invested in a tiny vehicle?”
First, the cleaning stage is almost always more intense than expected. You’ll start with confidence and a sponge,
then discover that every groove is storing a historical archive of dirt. The steering wheel area is especially
impressivelike it has been collecting snacks since 2009. Many DIYers end up doing two rounds: an initial wash,
then a second “detail clean” once the toy dries and the missed spots reveal themselves in the sunlight.
Next comes the moment of truth: the first coat of paint. This is where patience gets tested. The first coat
often looks too light, too patchy, and slightly suspiciouslike it’s not working. This is normal. A good first
coat is more like a handshake than a hug. It’s there to introduce paint to plastic without overwhelming it.
People who panic and go heavy usually meet the same villain: drips. Drips are not the end of the world, but they
do demand that you stop touching everything and let it dry properly before fixing it.
Then there’s the “wind factor.” If you’re spraying outdoors (which is ideal for ventilation), the environment
becomes a character in your story. A light breeze can blow overspray onto areas you didn’t expect, or push dust
onto fresh paint like it’s auditioning for the role of permanent texture. The sweet spot is a calm, dry day with
mild temperatures. Many people create a simple spray zone using cardboard shields or a tucked-away corner of a
patio to block wind without trapping fumes.
The most joyful part is usually decals and details. This is when the makeover stops looking like “a repainted
toy” and starts looking like “a tiny customized car.” DIYers love adding a number decal, a little nameplate, or
a pretend badge that matches the theme. It’s also the stage where perfectionists learn to breathe. If a decal is
slightly crooked, the audience is a toddler who will immediately drive it into a bush. Aiming for “adorable and
durable” beats “museum-grade straight lines.”
Finally, there’s the big reveal momentoften followed by the immediate realization that kids want to ride it
right now. This is where planning pays off. People who set expectations (“It needs to rest so it stays
strong”) tend to get a better long-term result. And almost everyone agrees on one thing: the first time a kid
climbs into the “new” car and acts like it’s the coolest thing on Earth, the entire project suddenly feels
ridiculously worth iteven if you have paint on your shoe and a suspiciously sticky roll of tape stuck to your
elbow.