Table of Contents >> Show >> Hide
- Why a Vinyl Record Wall Clock Is the Perfect DIY Project
- What You Need to Make a DIY Vinyl Record Wall Clock
- Step-by-Step: How to Make a Vinyl Record Wall Clock with Decoupage
- Step 1: Choose the Right Record
- Step 2: Prep the Surface
- Step 3: Prepare Your Decoupage Image
- Step 4: Apply the First Layer of Decoupage Medium
- Step 5: Place the Napkin or Paper
- Step 6: Wrap the Edges
- Step 7: Seal with Additional Coats
- Step 8: Drill or Enlarge the Center Hole (If Needed)
- Step 9: Install the Clock Mechanism
- Step 10: Add Numbers and Hanging Hardware
- Design Ideas for Your Vinyl Record Decoupage Clock
- Common Problems (and How to Fix Them)
- Where to Hang Your DIY Vinyl Record Wall Clock
- Real-Life Tips and Experiences with Vinyl Decoupage Clocks
- Lesson 1: Thin Layers Are Your Best Friend
- Lesson 2: Napkins Are Drama Queens (Handle with Care)
- Lesson 3: Always Test the Clock Mechanism First
- Lesson 4: Don’t Skip Drying and Curing Time
- Lesson 5: Experiment with Backgrounds and Edges
- Lesson 6: Clocks Make Surprisingly Great Gifts
- Lesson 7: Perfect Is Overrated
- Conclusion
Have a box of old vinyl records lying around, silently judging you for streaming everything on Spotify now?
Good news: you can turn those dusty LPs into a funky, functional DIY vinyl record wall clock using the
decoupage technique. It’s part upcycling, part art project, and part “wow, you actually made that?!”
In this guide, we’ll walk through everything you need to know to transform a simple record into an
eye-catching wall clock, inspired by popular Hometalk DIY projects and classic decoupage tutorials.
We’ll cover materials, step-by-step instructions, design ideas, troubleshooting, and then wrap up with
some real-life tips from people who’ve actually wrangled napkins, Mod Podge, and clock hands into submission.
Why a Vinyl Record Wall Clock Is the Perfect DIY Project
There are plenty of reasons crafters love vinyl record clocks:
- Cheap materials: Thrift-store records and affordable clock kits keep this budget-friendly.
- Beginner-friendly technique: Decoupage is forgiving. Wrinkles? You can often fix or disguise them.
- Endless designs: From florals to maps to abstract art, the surface is a blank canvas.
- Eco-conscious: You’re upcycling instead of throwing old records away.
- Instant decor upgrade: One piece can add personality to a boring wall.
Whether your style is vintage, boho, minimalist, or full-on maximalist, a DIY record clock can be customized
to match your space.
What You Need to Make a DIY Vinyl Record Wall Clock
Before you dive in, gather your supplies. You don’t need a full art studiojust a few basic tools and
a little patience.
Core Materials
- 1 old vinyl record (12-inch LPs work best)
- Clock mechanism kit (movement + hands + nut/washer set)
- AA battery (for the clock kit)
- Decoupage medium (like Mod Podge – matte or gloss)
- Decorative napkin, decoupage paper, or thin printed image
- Acrylic paint (optional, for base coat and edges)
- Fine-grit sandpaper (220–320 grit)
- Soft paintbrush or foam brush
- Clear acrylic sealer or spray varnish (for durability)
Helpful Extras
- Craft knife or scissors
- Plastic wrap or a silicone brayer (to smooth out wrinkles)
- Painter’s tape (to protect the center hole or label)
- Numbers or stickers for the clock face (optional)
- Sawtooth hanger and hot glue (if your clock kit doesn’t have a hanger)
Most clock kits can be found online or at craft storesjust make sure you choose one with a
shaft long enough to go through the thickness of the vinyl record.
Step-by-Step: How to Make a Vinyl Record Wall Clock with Decoupage
Step 1: Choose the Right Record
First, pick a record you’re okay with never listening to again. Avoid rare or valuable albums (no matter how
much that old jazz record “matches your aesthetic”). Scratched, unloved discs from thrift stores or flea
markets are perfect.
Also check:
- The record is mostly flat (a little warp is okay, a potato chip is not).
- The label isn’t peeling or flaking apart.
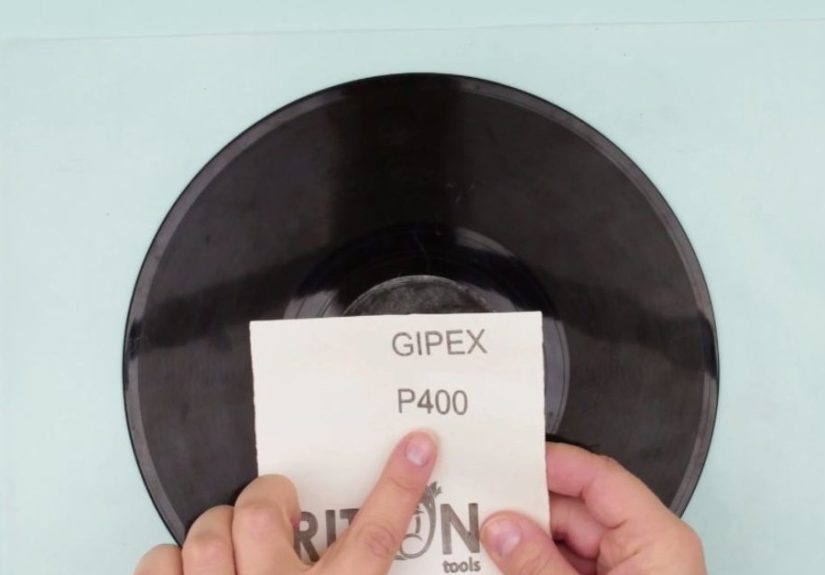
Step 2: Prep the Surface
Vinyl is slick, which means your decoupage medium needs a little help to grip.
- Clean the record with a soft, slightly damp cloth to remove dust and oils.
- Once dry, lightly sand the surface with fine-grit sandpaper in circular motions.
- Wipe again to remove any sanding dust.
If you want a solid colored background under your napkin or paper, add a thin coat of acrylic paint and let it dry
completely before moving on.
Step 3: Prepare Your Decoupage Image
This is where your decoupage technique comes in. Popular choices include:
- Printed floral or botanical napkins
- Vintage maps or music sheets (on thin paper)
- Abstract patterns or geometric designs
If you’re using napkins:
- Carefully separate the printed top ply from the plain white backing layers.
- Cut or tear the napkin slightly larger than the record so it can wrap around the edges.
If using decoupage paper or printed images, trim them to fit the record surface. Thinner paper works best to
avoid heavy creases and bubbles.
Step 4: Apply the First Layer of Decoupage Medium
Brush a thin, even layer of decoupage medium (like Mod Podge) onto the surface of the record. Work quickly but
don’t panicthis stuff doesn’t dry instantly.
Focus on:
- Covering the entire area where the napkin or paper will go.
- Keeping the layer thintoo much glue invites wrinkles.
Step 5: Place the Napkin or Paper
Gently place your napkin or paper onto the wet surface. Start at the center (around the record hole) and lay it
outwards to the edges.
To smooth:
- Use plastic wrap over your fingers to lightly press from the center outward.
- Or, use a soft brayer or sponge, rolling very gently to avoid tearing.
Small wrinkles are normal and can add charm. Huge, mountain-range wrinkles? Those you can carefully lift and re-smooth,
as long as the glue hasn’t fully dried.
Step 6: Wrap the Edges
If your design extends beyond the rim of the record, gently wrap the excess napkin or paper around the edge
and onto the back.
- Add a little extra decoupage medium along the rim.
- Press the paper down in small sections, smoothing as you go.
- Trim any bulky or overlapping areas once the glue gets tacky.
This wrapped edge gives a polished, finished look instead of having a visible paper cutoff at the outer circle.
Step 7: Seal with Additional Coats
Once the first layer is dry to the touch (check your decoupage medium’s instructions for drying time), brush a
second thin coat on top. This seals the design and protects it.
You can:
- Use one coat for a soft, paper-like look.
- Add 2–3 coats for a smoother, more durable finish (let each coat dry fully).
For an extra professional touch, finish with a clear acrylic spray sealer once everything has cured.
This helps protect your vinyl record wall clock from humidity and fingerprints.
Step 8: Drill or Enlarge the Center Hole (If Needed)
Most clock mechanisms are designed to fit through pre-drilled holes, but some vinyl record holes are a little tight.
- If the shaft doesn’t fit, use a craft knife or a small drill bit to slightly widen the center hole.
- Work slowly and gently to avoid cracking the vinyl.
Test-fit the clock movement before full assembly to make sure it sits flat and secure.
Step 9: Install the Clock Mechanism
- Slide the clock movement shaft through the center hole from the back of the record.
- Add any included washer and nut on the front, tightening by hand.
- Attach the hour hand, minute hand, and second hand in that order (gently press each into place).
- Insert the AA battery and test the movement.
If the hands touch or get stuck on each other, lightly bend them apart so they can spin freely.
Step 10: Add Numbers and Hanging Hardware
You can leave your clock minimalist or add numbers for easier time-telling:
- Use adhesive numbers or vinyl decals.
- Paint simple dashes or dots at 12, 3, 6, and 9.
- Use small embellishments like rhinestones, wooden shapes, or flat-backed beads.
Most clock kits have a built-in hanger. If yours doesn’t:
- Hot glue a sawtooth hanger to the back of the clock mechanism or onto the vinyl.
- Make sure it’s centered at the 12 o’clock position so the clock hangs straight.
Design Ideas for Your Vinyl Record Decoupage Clock
The fun part of a DIY vinyl record wall clock is making it match your personalityand your decor.
1. Floral & Cottagecore Vibes
Use floral napkins or botanical prints, a soft pastel base coat, and a matte finish. Add delicate numbers or just
gold dots at each quarter hour for a subtle, cozy look.
2. Bold, Graphic, and Modern
Try black-and-white geometric patterns or abstract art. Use a gloss finish and sleek metallic hands
for a modern, gallery-style clock.
3. Vintage Maps or Sheet Music
Decoupage old map prints or music sheets on the record for a nostalgic lookespecially fun if the
record’s original label used to be a classic album. Add antique brass clock hands for extra vintage charm.
4. Themed Gifts
Make themed clocks as personalized gifts:
- A world map for a travel lover
- Comic-book-style art for a superhero fan
- Coffee-themed graphics for a kitchen clock
Common Problems (and How to Fix Them)
Wrinkles and Bubbles
Small wrinkles are normal, but large folds can be annoying. If you catch them while the glue is still wet:
- Gently lift the paper and smooth it back down.
- Use plastic wrap or a brayer to flatten from the center outward.
Once dry, minor wrinkles can sometimes be disguised with a little dry-brushed paint or strategic embellishments.
Cloudy or Streaky Finish
Decoupage medium often looks milky while wet but dries clear. If it stays cloudy:
- You may have applied very thick coats. Let it cure longer.
- Consider a light sanding with ultra-fine sandpaper, then add a thin top coat.
Hands Getting Stuck
If the clock hands stop randomly:
- Check that they’re not touching each other or scraping the surface.
- Ensure the center nut is tight enough to hold everything stable.
Where to Hang Your DIY Vinyl Record Wall Clock
Once your masterpiece is done, show it off!
- Above a desk: Perfect for a home office or teen room.
- In a music corner: Pair it with a record wall or guitar rack.
- Kitchen or dining area: A great conversation starter while serving brunch.
- Entryway: Practical and stylish, so you can check the time on your way out.
Keep it away from steamy bathrooms or spots that get direct sun all day to help the finish last longer.
Real-Life Tips and Experiences with Vinyl Decoupage Clocks
Theory is great, but nothing beats lessons learned the hard waylike discovering that
“I’ll just use regular school glue” can end in a lumpy, peeling disaster.
Lesson 1: Thin Layers Are Your Best Friend
One of the biggest surprises for first-time decoupagers is how little glue you actually need. Thick, goopy layers
of decoupage medium almost guarantee wrinkles, bubbles, and a finish that takes forever to dry. Think of it like
sunscreen: a thin, even coat is plenty, and you can always add another later.
Many experienced crafters swear by a “less is more” approachespecially when working with napkins.
Napkins are incredibly delicate, so a heavy, wet coat underneath them can make them tear if you touch them too much.
Lesson 2: Napkins Are Drama Queens (Handle with Care)
Decorative napkins look innocent, but they’re easily ripped. Separating the plies gently and using
light pressure when smoothing can save you from unnecessary patch jobs.
A handy trick: after laying the napkin down, place a piece of plastic wrap on top and smooth with your fingers
or a soft cloth. The plastic gives you some protection against tearing the paper while still allowing you to
push out air bubbles.
Lesson 3: Always Test the Clock Mechanism First
Nothing kills the joy faster than finishing your gorgeous clock and realizing the hands won’t move.
Many DIYers now make it a rule to:
- Assemble the clock mechanism on the bare record first.
- Check that the shaft fits through the center hole and the hands spin freely.
- Only then move on to gluing, painting, and sealing.
This quick test can save you from having to redo your design, enlarge the hole awkwardly, or buy another clock kit.
Lesson 4: Don’t Skip Drying and Curing Time
It’s tempting to rush and hang your new DIY vinyl record wall clock the second it looks dry.
But decoupage and sealers continue to cure even after they’re no longer tacky. If you hang the clock too soon,
dust and fingerprints can imprint into the finish, and in some cases the paper can still shift slightly.
A good rule of thumb is:
- Let each coat of decoupage medium dry completely before adding another.
- Give the finished piece at least 24 hours (or per product instructions) before sealing with spray varnish.
- Allow the full project to cure for a day or two before hanging in a prominent spot.
Lesson 5: Experiment with Backgrounds and Edges
A lot of people start by covering the entire record face with one napkin design. After a project or two,
they start experimenting:
- Painting the rim of the record in a coordinating color before decoupaging the center.
- Leaving a narrow band of the original vinyl exposed for a cool “record frame” effect.
- Blending the decoupage edges with dry-brushed paint so the paper seems to “fade” into the background.
These small tweaks can make your clock look more polished and intentionallike a piece of art, not just a craft experiment.
Lesson 6: Clocks Make Surprisingly Great Gifts
Once people see your first vinyl clock, be prepared to hear, “Can you make one for me?”
Personalized clocks make great housewarming, birthday, or holiday gifts. You can tailor the design
to the recipient’s favorite colors, hobbies, or even locations (think city maps or sheet music from a beloved song).
Bonus: because the basic technique is the same, you’ll get faster and more confident each time you make one.
By the third or fourth clock, you’ll probably have your own go-to tricks and shortcutsand you may even
start to enjoy the decoupage process as a relaxing, almost meditative ritual.
Lesson 7: Perfect Is Overrated
Finally, seasoned DIYers will tell you that handmade pieces are allowed to look handmade. A tiny wrinkle in the paper,
a slightly off-center number, or a visible brushstroke doesn’t ruin your projectit gives it character.
This isn’t a factory-made clock; it’s a one-of-a-kind piece of upcycled art you created from something that
might have ended up in the trash.
So if your decoupage vinyl record wall clock isn’t absolutely flawless, hang it up anyway.
Every time you check the time, you’ll see a piece that tells more than just hours and minutesit tells a story about
creativity, experimentation, and giving old things a new life.
Conclusion
Turning an old record into a DIY vinyl record wall clock using the decoupage technique is an
approachable, budget-friendly way to create personalized home decor. With a bit of sanding, gluing, smoothing,
and clock-assembling, you can take something outdated and turn it into a statement piece that fits your style perfectly.
Whether you follow a look you saw on Hometalk or invent a completely new design, this project is all about playful
creativity and clever upcycling. So grab a record, pick your favorite pattern, and let time (literally) be on your side.