Table of Contents >> Show >> Hide
- Why a "GATHER" Sign Works in Almost Any Home
- Gather Your Supplies (Pun Absolutely Intended)
- Step-by-Step: How to Make a Burlap & Galvanized "GATHER" Sign
- Design Variations for Your DIY "GATHER" Sign
- Tips for Working with Burlap and Galvanized Letters
- Where to Hang and How to Style Your "GATHER" Sign
- Troubleshooting Common DIY Issues
- Care and Longevity
- Real-Life Experiences: Living with a DIY "GATHER" Sign
- Bring Everyone Together with One Simple DIY
If your kitchen or dining room wall is looking a little bare and your budget is saying, “Please, not another $80 big-box-store sign,” this easy DIY burlap and galvanized letter “GATHER” sign is your new best friend. It’s rustic, a little industrial, totally farmhouse, and simple enough to finish in an afternoonno fancy tools, workshop, or art degree required.
Inspired by popular farmhouse wall décor you’ll see on Hometalk-type DIY boards, farmhouse blogs, and big retailers, this project combines three trending elements: burlap, galvanized metal letters, and meaningful word art. The result is a custom “GATHER” sign that looks boutique but costs more like takeout.
Why a "GATHER" Sign Works in Almost Any Home
Word art gets a mixed reputation, but designers still use it because it adds personality and a focal point to spaces like kitchens and dining rooms. A “GATHER” sign is especially perfect for:
- Dining rooms where you host family dinners, potlucks, or game nights.
- Farmhouse-style kitchens that already feature shiplap, open shelves, and vintage-inspired pieces.
- Entryways that double as a warm “welcome in, stay awhile” message.
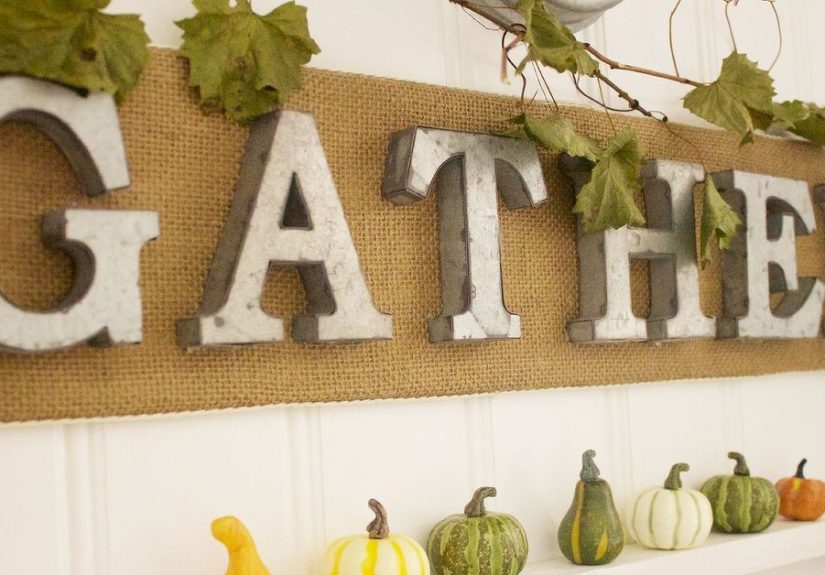
Galvanized letters give that slightly industrial, vintage market vibe, while burlap softens everything with texture and warmth. Together, they hit that sweet spot between cozy and coolideal for modern farmhouse, rustic, cottage, and even boho interiors.
Gather Your Supplies (Pun Absolutely Intended)
Before you start, decide how big you want your DIY "GATHER" sign to be. Most galvanized letters sold at craft stores or online are between 5 and 12 inches tall, so your backing board or canvas should fit six letters comfortably with a little breathing room on each side.
Basic Supply List
- Galvanized metal letters spelling G-A-T-H-E-R
- Burlap (by the yard or a burlap roll, depending on your sign size)
- Backing:
- Wood board, pallet board, or pine shelf board or
- Stretched canvas or MDF sign blank
- Adhesive:
- Strong construction or multi-surface glue (for metal to wood) and/or
- Hot glue (for burlap and embellishments)
- Staple gun & staples (for wrapping burlap around wood or canvas)
- Scissors or a rotary cutter and cutting mat
- Measuring tape or ruler
- Pencil and straightedge (for layout and alignment)
- Picture hanging hardware (sawtooth hangers, D-rings, or wire)
Optional Extras
- White, black, or stain for the wood backing
- Small greenery stems, faux eucalyptus, or seasonal florals
- Twine, ribbon, or mini wood beads
- Stencil or paint for adding subtle patterns to your burlap
You can find galvanized letters at craft chains, online marketplaces, or even discount stores. The nice thing about this project is that it’s very forgivingmixing letters from different brands still works as long as they share a similar finish and approximate size.
Step-by-Step: How to Make a Burlap & Galvanized "GATHER" Sign
Step 1: Prep Your Backing Board
Measure your letters laid out in a row, leaving about 0.5–1 inch of space between each letter and a small margin on both sides. Add an extra inch or so on all four sides for a comfortable border. That measurement is your ideal backing size.
- Sand the board lightly if it’s raw wood to remove splinters.
- Finish or paint it if desired: white for farmhouse, black for modern, or stain for a rustic look. Let it dry completely.
If you’re using canvas, you can skip the sanding and staining and move straight to the burlap step.
Step 2: Cut and Attach the Burlap
Burlap is like the jeans of the craft world: goes with everything, but can fray if you look at it wrong. Cut it slightly larger than your board so you can wrap it around the backusually 2–3 inches of overlap on each side is plenty.
- Lay the burlap flat on your work surface, then center the backing board or canvas face-down on top.
- Pull one long edge of burlap up and over the back of the board and staple it in the center. Work your way out to the corners, keeping the burlap snug but not warped.
- Repeat on the opposite side, smoothing out wrinkles as you go.
- Fold the corners like you’re wrapping a present, then staple the shorter ends.
Flip your sign over and smooth the burlap on the front. A few uneven fibers are part of the charm, but if anything looks lumpy or too loose, tug gently and adjust before you glue on the letters.
Step 3: Plan Your Letter Layout
This is where a little measuring prevents a lot of regret. Place the galvanized letters on the burlap without glue and play with spacing. You want them centered both horizontally and vertically.
- Measure the width and height of the usable burlap area on the front.
- Measure the combined width of all six letters plus the gaps you’d like between them.
- Mark a light horizontal guideline with a pencil or tape as your baseline.
- Find the center of the sign and place the letter “H” or “T” there first, then work outward for balanced spacing.
Don’t overthink itthis is farmhouse décor, not aerospace engineering. If the letters are roughly straight and evenly spaced, you’re winning.
Step 4: Attach the Galvanized Letters
Once you’re happy with the layout, attach each letter permanently.
- Lift one letter at a time, apply a generous amount of strong adhesive to the back (around the edges and a few spots in the center).
- Press it firmly onto the burlap, lining it up with your guideline.
- Hold it in place for a few seconds to make sure it grips. Heavier letters may benefit from a couple of discreet dabs of hot glue to “tack” them while the main adhesive cures.
- Repeat for all letters, double-checking alignment as you go.
Let the glue cure as directedthis is the hardest step because you have to just stare at your beautiful sign and not poke it.
Step 5: Add Embellishments (If You Want to Get Fancy)
Now that the basic burlap & galvanized “GATHER” sign is done, you can keep it simple or go full Pinterest.
- Glue a small faux greenery swag above or below the word.
- Layer twine or ribbon along the top or bottom edge and tie a bow off to one side.
- Add tiny seasonal touches like mini pumpkins in fall, greenery sprigs at the holidays, or cotton stems for year-round farmhouse style.
Step 6: Attach Hanging Hardware
Turn the sign over and add sawtooth hangers or D-rings with wire, depending on the weight. For a lightweight canvas, one sawtooth hanger in the center is usually enough. For a heavier wood-and-metal sign, use two D-rings and picture wire for better stability.
Hang your DIY “GATHER” sign where people actually gatherover a dining table, near a kitchen banquette, or on a living room gallery wall.
Design Variations for Your DIY "GATHER" Sign
1. Classic Farmhouse White
Paint or stain the wood backing in a warm white or soft cream before adding burlap. This brightens the whole sign and makes the galvanized letters pop, especially if your kitchen has darker cabinets.
2. Dark and Moody
If your style leans modern farmhouse, skip the white and stain the wood in a rich walnut or espresso tone. The combination of dark wood, textured burlap, and metal letters feels upscale and cozy at the same time.
3. Seasonal Swap-Outs
Instead of gluing seasonal embellishments directly to the burlap, attach them with removable adhesive dots or hook-and-loop strips. That way, you can change out greenery and accents for fall, Christmas, spring, and summer without remaking the sign.
4. Different Words, Same Method
Once you’ve mastered this burlap and galvanized letter technique, you can create other signs with words like “HOME,” “BLESS,” “EAT,” or your family name. The steps are identicaljust adjust your board size to fit the letters.
Tips for Working with Burlap and Galvanized Letters
Make Burlap Behave
- Cut slowly and follow a single thread to keep edges straight.
- Seal raw edges with clear fabric glue or a quick zigzag stitch if the fraying drives you wild.
- Avoid extreme humidity while workingburlap can sag if it absorbs too much moisture.
Handle Galvanized Letters Safely
- Check for sharp edges and sand lightly if needed.
- Use a strong multi-surface glue made for metal-to-porous surfaces.
- If your letters are hollow or very light, hot glue alone may be enough, but test one letter first.
Getting Straight Lines Without Losing Your Mind
If you’re alignment-challenged (welcome to the club), painter’s tape is your best friend. Stick a strip of tape across the burlap where the letter bottoms should sit, then line each letter up to the edge of the tape. Peel the tape off when everything is glued and set.
Where to Hang and How to Style Your "GATHER" Sign
This DIY burlap & galvanized letter “GATHER” sign really shines when it’s layered into a larger vignette rather than floating alone on a wall.
- Over a console table in the dining room, with stacked cookbooks, a lamp, and a bowl of seasonal fruit underneath.
- Above a kitchen sink, paired with a small plant and a pretty dish soap bottle.
- In an entryway, surrounded by family photos and a place to drop keys and bags.
- On a gallery wall with a mix of framed art, mirrors, and other word signs for a collected look.
Because the sign combines neutral tonestan burlap, silver metal, and woodit layers easily with almost any color palette. Think of it as a grounding piece that lets your seasonal décor swap in and out around it.
Troubleshooting Common DIY Issues
The Burlap Looks Saggy
If your burlap looks like it’s had a long day:
- Flip the sign over and pull the fabric tighter, adding more staples around the edges.
- Use spray adhesive between the burlap and backing to minimize bubbling on flexible surfaces like canvas.
The Letters Won’t Stick
Metal and fabric can be a little stubborn. If your galvanized letters are trying to escape:
- Lightly rough up the back of the letters with sandpaper to give the glue something to grip.
- Make sure the burlap is dust-free and dry before gluing.
- Combine a strong construction adhesive with a few hot glue dots for instant hold plus long-term strength.
The Sign Feels Too Plain
If the minimalist look isn’t doing it for you, layer in:
- A thin border of wood trim around the edges.
- A stenciled pattern on the burlap, such as buffalo check or subtle polka dots.
- A small wreath or greenery ring around a single letter (like the “A” or “H”).
Care and Longevity
With a little care, your DIY farmhouse “GATHER” sign will look great for years:
- Dust it regularly with a soft cloth or handheld vacuum on a low setting.
- Avoid direct moisture; burlap and water are not besties.
- If hanging in a kitchen, keep it away from direct steam or grease, or give it an occasional light clean with a barely damp cloth on the metal only.
Real-Life Experiences: Living with a DIY "GATHER" Sign
Here’s where we get practicaland a little sentimental. Making an easy DIY burlap & galvanized letter “GATHER” sign is about more than decorating a bare wall. It tends to change how the room feels and how people use it.
It Becomes a Conversation Starter
People notice word art, especially when it’s clearly homemade and not something they’ve seen in every big-box décor aisle. Guests will ask, “Did you make that?”and suddenly you’re swapping DIY stories, trading tips about the best place to buy metal letters, and maybe recruiting them for your next project.
Several DIYers who’ve made similar burlap and galvanized “GATHER” signs say they’ve had friends request a custom version as a housewarming or wedding gift. That’s the beauty of this kind of project: it looks high-end enough that people assume it came from a boutique, but you know it cost a fractionand includes a lot more heart.
It Encourages Actual Gathering
No, a sign can’t magically make your teenagers put down their phones. But visual cues do influence how we use a space. When “GATHER” is hanging over the table, it feels more natural to:
- Host Sunday brunch or a casual taco night.
- Invite neighbors over for coffee.
- Turn off the TV and sit at the table for board games.
Little design decisionslike hanging a sign that literally says “GATHER”can reinforce the idea that this room is where people sit, talk, and linger.
You Start Seeing Possibilities Everywhere
Once you make your first burlap & galvanized letter project, it’s hard to stop. Suddenly that blank wall in the hallway looks like the perfect spot for a “HOME” sign. The kids want their initials in galvanized metal over their beds. The seasonal décor corner is begging for “JOY,” “NOEL,” or “FALL.”
This is how DIY can snowballin a good way. You gain confidence with each project. You learn what adhesives really work, how tight to pull burlap, and which letter sizes read best from across the room. Before you know it, you’re the person your friends message when they find a great deal on craft-store letters because they know you’ll turn them into something cool.
It’s an Accessible Project for All Skill Levels
One of the nicest things about a burlap & galvanized letter “GATHER” sign is that it doesn’t assume you own power tools or have years of crafting experience. If you can measure, cut fabric, and squeeze a glue bottle, you’re in business. That makes it a great project for:
- New homeowners who are just starting to personalize their place.
- Renters who want big style with minimal wall damage.
- Family craft nights where kids can help place letters or pick the word.
You can even adapt the project for smaller hands by using foam or lighter letters and pre-cut burlap-covered boards.
It Reminds You Decor Doesn’t Have to Be Perfect
Burlap isn’t precise. It has little slubs, uneven fibers, and edges that like to misbehave. Galvanized metal letters often have intentional dings or color variation. Together, they send a subtle message: this sign is meant to feel relaxed and lived-in, not sterile and showroom-perfect.
That’s actually ideal for a space where people gather to eat, talk, spill drinks, and laugh loudly. Your “GATHER” sign is like a visual permission slip for a slightly messy, very real, happily imperfect life. If a letter is a hair off-center or the burlap isn’t perfectly aligned? Honestly, it just adds character.
It’s Budget-Friendly but Looks Anything But
Buying a ready-made large metal-and-burlap word sign can get pricey fast. Making your own lets you control the cost by choosing letter size, backing material, and embellishments. Reclaimed wood, leftover burlap from another project, or discount-store letters all help keep expenses low.
Yet the end result still feels substantial. The texture of the burlap, weight of the galvanized letters, and custom word give major “found this at a cute little décor shop” energy. That’s the sweet spotwhen something is affordable to create but looks like a splurge.
Bring Everyone Together with One Simple DIY
Creating an easy DIY burlap & galvanized letter “GATHER” sign is more than just a craft projectit’s a way to set the tone for how your home feels. With a few basic supplies, a little planning, and minimal tools, you can make a farmhouse-style wall sign that looks right at home on Hometalk, DIY blogs, and your own walls.
Whether you hang it above the kitchen sink, in the dining room, or in the entryway, that one simple word sends a warm message: this is a place where people are welcome to come together. And honestly, that’s the best kind of décor there is.