Table of Contents >> Show >> Hide
- Why This Hack Works (And Why It’s Still Popular)
- Before You Start: A Quick Reality Check on the FROSTA Stool
- Shopping List: What to Buy
- Tools and Supplies
- Step-by-Step: Build the Side Table
- Finishing Options: Natural, Spill-Proof, or Somewhere in Between
- Design Notes: Getting the Size and Height Right
- Practical Tips So Your Table Doesn’t Become a “Learning Experience”
- Style Ideas: How to Make It Look Expensive
- Fun Variations (Same Hack Energy, Different Results)
- Frequently Asked Questions
- Real-World Experiences: What It’s Like to Live With This Hack (500+ Words)
- Conclusion
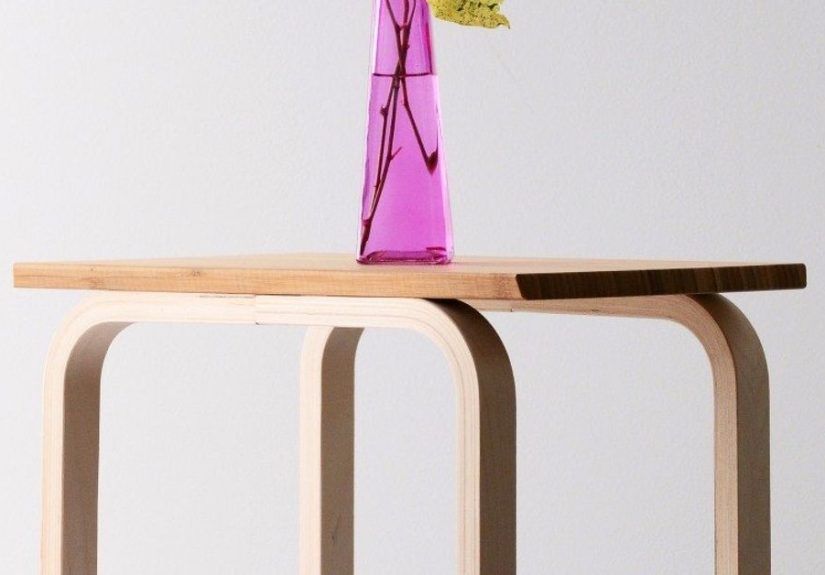
IKEA hacks are basically the adult version of LEGO: you start with two innocent-looking pieces, blink once, and suddenly you’ve built a stylish side table, questioned your life choices, and “accidentally” bought tealight candles. Today’s project is a classic for a reason: the curved, sculptural legs of the IKEA FROSTA stool paired with the warm bamboo of an APTITLIG chopping board creates a small-space-friendly side table that looks far more expensive than it has any right to.
The vibe: Scandinavian, clean, a little “I know what I’m doing” (even if you assembled it in pajama pants while watching crime documentaries). The difficulty: beginner-friendly. The payoff: a table that’s perfect for coffee, plants, books, and that one decorative object you bought because it felt like “the kind of thing people with end tables own.”
Why This Hack Works (And Why It’s Still Popular)
A great side table is a balancing actliterally and aesthetically. This hack nails both:
- Stable footprint: The tripod base of the FROSTA style is naturally sturdy, and the curved legs create a wider stance than a straight-legged stool.
- Small-space proportions: The standard APTITLIG cutting board top (about 17 ¾” × 11″) gives you usable surface area without swallowing a room.
- Warm materials: Bamboo and bentwood-style legs add texture and soften all the rectangles in a typical living room.
- Custom finish potential: You can keep it natural, stain it, paint the base, or seal it into a spill-proof workhorse.
Bonus: this combo has been featured as a go-to “cheap but chic” solution for people who want functional furniture that doesn’t look like it came from a college move-in day.
Before You Start: A Quick Reality Check on the FROSTA Stool
Depending on where you live, FROSTA may be harder to find new than it used to be. If you can’t buy it directly, don’t panicthis is IKEA, not a rare gemstone. Many DIYers find FROSTA secondhand, or substitute a similar stool base.
Easy substitutes if you can’t find FROSTA
- IKEA KYRRE (or another similarly sized stool): You’re mainly after a compact stool base with a similar height. The “look” will shift slightly, but the build logic stays the same.
- Any sturdy, three-legged stool: Three legs are forgiving on uneven floors and tend to wobble less than cheap four-legged furniture.
Shopping List: What to Buy
You only need two IKEA items to make the table, plus a few basic hardware supplies.
1) FROSTA stool (or similar stool base)
- What you’re using it for: the legs/base (you’ll swap the seat for a tabletop).
- Why it’s ideal: compact height and a sculptural silhouette that reads “designer-ish” even before coffee touches it.
2) APTITLIG cutting board (bamboo)
For the tabletop, you’ve got two strong options:
- APTITLIG Cutting Board (17 ¾” × 11″ × ¾”): classic choice; slim profile; great as a minimal side table top.
- APTITLIG Butcher Block (17 ¾” × 14 ¼” × 1 ¼”): thicker, heavier, and more substantial; better if you want a sturdier “landing zone” for lamps and heavier decor.
Both are bamboo and are typically sold pre-oiled, with care instructions recommending occasional treatment with a food-approved oil. (Important note: once you seal it with a furniture finish like polyurethane, it’s no longer a food-prep surface. More on that below.)
Tools and Supplies
You probably already have most of what you need. If not, this is a great excuse to become the kind of person who owns sandpaper “in multiple grits.”
- Drill/driver
- Measuring tape or ruler
- Pencil
- Sandpaper (120 + 180 or 220 grit)
- Clamps (helpful but optional)
- Wood screws (see sizing below)
- Washers (optional but recommended for better bite)
- Felt pads (to protect floors and reduce sliding)
- Finish of choice (oil, wax, polyurethane, etc.)
Screw length: the “don’t poke through the top” rule
Your screw should be long enough to hold the tabletop securely but short enough that it won’t burst through the top like a tiny metal surprise. As a general rule, aim for screws that bite well into the board without exceeding the board thickness. If you’re using the ¾” cutting board, this is especially importantmeasure twice, screw once.
Step-by-Step: Build the Side Table
Step 1: Assemble the stool base (but pause before attaching the seat)
Assemble the stool according to its instructions, but stop before fully committing to the original seatbecause you’re about to upgrade it. If your stool design requires the seat for structural integrity, don’t skip it; instead, plan to attach the tabletop on top of it. (Most people doing the Frosta+Aptitlig combo replace the seat with the board, but your exact approach depends on the stool’s construction.)
Step 2: Center the APTITLIG board on the base
Flip the board upside down on a soft surface (like a towel). Place the stool base upside down on top of it. Now scoot and wiggle until it looks centered. Use a measuring tape if you’re a “symmetry and peace” person; eyeball it if you’re a “close enough and coffee” person.
Step 3: Mark your attachment points
You want screws placed where the stool base has solid wood for fastening. Mark your points with a pencil. A common approach is three to four screws total (depending on the stool base design), spaced evenly.
Step 4: Pre-drill pilot holes (don’t skip this)
Pre-drilling is the secret handshake of not splitting wood. A pilot hole helps the screw go in smoothly and reduces crackingespecially important with bamboo, which is durable but can still split or delaminate if you brute-force it.
Drill pilot holes slightly smaller than the screw’s shank. If you want the screw heads to sit flush underneath, use a countersink bit. (Flush screws = less wobble and less chance your table scratches something when you move it.)
Step 5: Attach the tabletop
With pilot holes drilled, drive the screws in from the underside of the stool base into the APTITLIG board. Add washers if the screw heads are small or if you want extra grip.
Stop when it’s snug. Over-tightening can strip the hole or compress the bamboo layerstight is good; “I am wrestling a bear” is not.
Step 6: Add felt pads and level it
Stick felt pads on the bottom of each leg. This protects floors, cuts down on sliding, and can also fix minor wobble. If it still rocks, swap one felt pad for a slightly thicker oneor trim a thin shim.
Finishing Options: Natural, Spill-Proof, or Somewhere in Between
The finish is where this table goes from “cute DIY” to “this looks like a boutique find.” Choose based on how you’ll actually use it. Be honest: are we talking dainty candle + art book? Or are we talking iced coffee rings and a cat that treats furniture like an obstacle course?
Option A: Keep it simple (oil + maintenance)
IKEA recommends treating bamboo boards with a food-approved oil occasionally. If you keep the tabletop as a board-like surface, you can maintain it with a suitable oil. This creates a natural look and is easy to refresh.
- Pros: natural appearance; quick touch-ups; low-fume.
- Cons: less protection from water rings; requires re-oiling; not ideal for frequent spills.
Option B: Make it table-tough (seal with polyurethane or a durable topcoat)
If your side table will host drinks, humidifiers, plant pots, or anything that sweats, sealing is the grown-up move. A clear, protective finish can help resist water rings and stains.
- Pros: better water resistance; easier wipe-down; less ongoing maintenance.
- Cons: changes the feel of the wood; requires cure time; once sealed, it’s no longer a food-safe cutting surface.
Tip: seal all sides (top, bottom, edges). Sealing only the top can increase the chance of warping because moisture exchange becomes uneven.
Option C: Paint the base, keep the top warm
A favorite look is a painted stool base (matte black, soft white, or a muted color) paired with a natural bamboo top. If you do this, lightly sand first, prime if needed, and finish with a protective topcoat if the paint will take abuse.
Design Notes: Getting the Size and Height Right
Side tables are most useful when the top is around the same height as your sofa armideally within an inch or two. If your seating is lower, this hack can read like a “low side table,” which still works beautifully for plants and books.
If you need extra height, you can:
- Use the butcher block top (it adds thickness and visual weight).
- Add discreet furniture risers under the legs (choose stable, grippy ones).
- Use it as a bedside table where lower height can feel cozy and intentional.
Practical Tips So Your Table Doesn’t Become a “Learning Experience”
1) Protect the bamboo from water and plants
Bamboo boards can warp or split if they’re exposed to repeated moisturemany people first learn this the hard way in the kitchen. For side-table duty, coasters and plant saucers help, and a proper seal makes life easier.
2) Avoid screw blowouts
Measure your board thickness and choose screw lengths accordingly. If you’re unsure, test with a scrap piece of wood first, or stop short and switch to a shorter screw. No one has ever regretted not adding an accidental “industrial stud detail” to their tabletop.
3) Make wobble impossible
- Use felt pads or adjustable furniture feet.
- Ensure screws are snug and evenly tightened.
- Check that the tabletop is centered; off-center weight can exaggerate rocking.
4) Don’t treat it like a stool unless it’s engineered like one
The original stool seat is designed for sitting; your attached tabletop may not be. If anyone in your household is tempted to stand on anything that exists, label it with your sternest voice: “This is a table, not a ladder.”
Style Ideas: How to Make It Look Expensive
End-table styling is basically mini interior design. The best setups look intentional, not cluttered. Try these easy wins:
- Use a tray: It corrals remotes, matches, and small items so your tabletop doesn’t look like a pocket-dump zone.
- Vary heights: A lamp + shorter stack of books + small object creates a balanced silhouette.
- Add one personal item: A framed photo, a quirky ceramic, or a travel souvenir prevents “catalog energy.”
- Leave breathing room: Negative space is not wasted spaceit’s what makes the “styled” part visible.
Fun Variations (Same Hack Energy, Different Results)
1) Nesting tables
Build two at slightly different heights or with different tops (cutting board vs butcher block) and tuck one under the other. Perfect for small apartments and guests who suddenly want to set down seven beverages at once.
2) Handle it
Add a leather pull or rope handle to one side so it’s easy to move around. Bonus: it looks custom.
3) “Plant stand deluxe”
Seal the top heavily, add a drip tray, and use it as a dedicated plant stand. The tripod base looks great next to windows and reading chairs.
4) Two-tone stain
Stain the legs darker (walnut-ish) and keep the bamboo top natural, or flip itlight legs, richer top. Either way, you’ll get more contrast and a higher-end look.
Frequently Asked Questions
Is bamboo a good tabletop material?
For a small side table, yesespecially if you seal it appropriately. Bamboo is hard and durable, but like any wood product, it benefits from protection against moisture and heat.
Can I still use the APTITLIG as a cutting board after I turn it into a table?
If you seal it with furniture finishes (like polyurethane), you should consider it a furniture topnot a food-prep surface. If you want it to remain food-safe, stick with food-safe oils and accept that it’s more of a “natural patina” lifestyle.
How long does this project take?
Assembly and attachment can take under an hour. Finishing is what adds time: sanding + multiple coats + drying/curing can turn this into a weekend project.
Real-World Experiences: What It’s Like to Live With This Hack (500+ Words)
Here’s the part no one tells you in the glossy “after” photo: the difference between a DIY table you love for years and a DIY table you side-eye forever is usually one small decision. This hack is a perfect example. It’s simple enough that you can build it quicklyyet nuanced enough that your choices (top thickness, screws, and finish) completely change how it behaves in daily life.
A super common experience: someone builds the table, keeps the bamboo top natural because it looks gorgeous, and then uses it like a normal side tablemeaning it immediately meets a cold drink. Condensation happens, a faint ring appears, and suddenly you’re Googling “how to remove water stain from bamboo” at 11:47 p.m. If that’s your household, sealing the top isn’t “extra,” it’s sanity. And if you’re living in a humid climate or you run a humidifier nearby, sealing all sides matters even more because wood movement is real. (Wood doesn’t care about your aesthetic mood board.)
Another classic: the “I skipped pilot holes because I am fearless” approach. This tends to end with a tiny split along the edge of the board, and then a long period of pretending you can’t see it. Pre-drilling feels like a boring step, but it’s one of those boring steps that keeps your project from developing a personality. When DIYers do crack bamboo, the fix is usually manageablewood glue, clamp, light sanding but it’s still a detour you didn’t need. Pilot holes are basically the seatbelt of IKEA hacking.
Then there’s the stability question. In day-to-day use, tripod tables are wonderfully forgiving on slightly uneven floors. But “forgiving” doesn’t mean “invincible.” People often discover wobble when they place a heavier lamp near one edge, especially if the tabletop isn’t centered perfectly. The easy fix is almost always felt padssometimes mixing thicknesses which is strangely satisfying because you get an immediate “oh wow, that’s solid now” moment. Felt pads also make the table easier to slide when you’re vacuuming, rearranging, or performing the weekly ritual of pretending your living room is a showroom.
Styling is its own mini-adventure. A small top teaches you restraint. You can’t pile on a lamp, three candles, a plant, a bowl, a photo, and the entire remote-control ecosystem without it looking like a yard sale display. The people who love this hack long-term tend to pick a “hero” item (a lamp or plant), add one supporting item (books or a tray), and stop there. It’s the same reason capsule wardrobes work: fewer pieces, better impact. And because the base has those curved legs, even a minimal top still looks designed.
Finally, the “where does it live?” question. This table often ends up being the MVP in awkward spotsnext to a reading chair, in a tight bedroom corner, beside a sofa where a full-size end table would feel bulky, or even as a plant stand near a sunny window. It’s also the kind of table you can pick up and move easily, which means it adapts as your space changes. That flexibility is the real secret sauce: you’re not just building a side tableyou’re building a small, stylish surface that can follow your life around like a loyal little piece of furniture.
Conclusion
If you want an easy DIY side table that looks modern, warm, and intentionally designed, the Frosta + Aptitlig combo is a classic for a reason. Build it in an afternoon, finish it over a weekend, and enjoy the smug satisfaction of telling guests, “Oh this? It’s an IKEA hack.” (Say it casually. Like you’re not already planning the next one.)