Table of Contents >> Show >> Hide
- Quick Primer: Which Epoxy Should You Use on Wood?
- Tools & Materials Checklist
- 15 Steps to Apply Epoxy on Wood (The Easy, Low-Drama Way)
- Step 1: Start with dry, stable wood (no surprises later)
- Step 2: Choose a “good epoxy day” in your workspace
- Step 3: Level your project like you mean it
- Step 4: Sand the wood for a clean, toothy surface
- Step 5: Clean it like you’re about to eat off it
- Step 6: Mask edges, build dams, and plan for drips
- Step 7: Do a dry run (yes, really)
- Step 8: Measure accuratelyepoxy is not a “vibes” craft
- Step 9: Mix slowly and thoroughly (scrape the sides and bottom)
- Step 10: Transfer to a second cup (optional, but super helpful)
- Step 11: Apply a thin seal coat first (your bubble insurance policy)
- Step 12: Pour the flood coat in controlled passes (don’t dump and pray)
- Step 13: Let it self-level, then babysit bubbles for the first 20–30 minutes
- Step 14: Recoat at the right time (and sand only when you must)
- Step 15: Cure fully, then finish for durability and UV resistance
- Troubleshooting: Common Epoxy-on-Wood Problems (and Fixes That Work)
- Safety Notes (Because “Emergency Room Chic” Isn’t a Finish)
- Real-World Lessons DIYers Learn the Hard Way (So You Don’t Have To)
- Conclusion
Epoxy on wood is basically the “liquid glass” glow-up: it can turn an ordinary tabletop, bar top, or
DIY project into something that looks like it belongs in a boutique showroom (or at least like you
totally meant to make it that shiny). But epoxy is also the kind of material that will happily humble
you if you skip prep, eyeball the mix ratio, or pour on a day when the weather is acting like a drama queen.
This guide walks you through a beginner-friendly, low-stress processplus the “why” behind each move
so you can get a clear, smooth finish without bubbles, bald spots, weird sticky patches, or that one hair
that shows up like it paid rent. Let’s do it right the first time (or at least make your second time legendary).
Quick Primer: Which Epoxy Should You Use on Wood?
Not all epoxies are built for the same job. Choosing the right type is half the battleand it’s the half
that prevents a lot of “why is it smoking?” moments.
Common epoxy types for wood projects
-
Tabletop / bar-top epoxy: Self-leveling, designed for thin-to-medium pours, usually
used for clear protective coatings on tabletops and counters. - Deep-pour epoxy: Formulated for thicker pours (like river tables). It typically cures slower to reduce overheating.
- Coating/laminating epoxy: Often used in boatbuilding and shop applications. Great for sealing wood and building durable layers, but may need a UV-protective topcoat if exposed to sunlight.
Tools & Materials Checklist
- Epoxy resin + hardener (correct type for your project)
- Graduated mixing cups or a scale (depending on the brand’s instructions)
- Mix sticks (flat stir sticks are easier to scrape with)
- Foam brush or bristle brush for a seal coat
- Notched spreader or plastic squeegee/spreader
- Foam roller (optional for certain coating systems)
- Painters tape or tuck/packing tape (for dams and drip control)
- Sandpaper (80–120 for prep, 180–320+ for between coats and finishing)
- Tack cloth or lint-free rags
- Denatured alcohol or acetone for cleanup (check epoxy brand guidance first)
- Level (seriouslyuse it)
- Heat source for bubbles: small torch is common (use carefully)
- Nitrile gloves, safety glasses, and good ventilation
- Dust cover (clean plastic bin or cardboard “tent”)
15 Steps to Apply Epoxy on Wood (The Easy, Low-Drama Way)
-
Step 1: Start with dry, stable wood (no surprises later)
Epoxy and moisture do not have a cute rom-com relationship. If wood is wet, oily, or still moving (warping/cupping),
your finish can turn cloudy, release bubbles, or fail to bond. Use well-dried lumber and let slabs acclimate to your shop
before you coat. -
Step 2: Choose a “good epoxy day” in your workspace
Epoxy is picky about temperature. Too cold and it’s thick, won’t self-level well, and holds bubbles. Too hot and it can cure
too fast (or overheat in the cup). Aim for a stable room temperature and avoid big swings. -
Step 3: Level your project like you mean it
Epoxy self-levels… which means it will self-level right off your table if your surface isn’t flat. Check level in both directions.
Shim your workbench if needed. This one step prevents 80% of “why is it all on the floor?” situations. -
Step 4: Sand the wood for a clean, toothy surface
For most wood tops, sand to around 120–180 grit to remove mill glaze, flatten, and create a consistent scratch pattern.
If the surface is too smooth, epoxy can struggle to bite; too rough, and you may see scratches telegraph through.
Vacuum the dust thoroughly. -
Step 5: Clean it like you’re about to eat off it
Dust, oil from hands, silicone from old polishes, and leftover sanding debris can cause fisheyes or bonding issues.
Vacuum first, then wipe with a lint-free cloth. If you use a solvent wipe, let it fully evaporate before epoxy touches the wood. -
Step 6: Mask edges, build dams, and plan for drips
Decide whether you want epoxy to “waterfall” over the edges or stay only on top.
Use painter’s tape or packing tape underneath edges to catch drips, or create a dam if you’re pouring within a mold.
Tape is cheap. Sanding hardened drips off your elbows is not. -
Step 7: Do a dry run (yes, really)
Set out your cups, sticks, spreader, torch, gloves, and dust cover. Once epoxy is mixed, the clock starts.
A two-minute dry run saves you from doing the “where are my gloves?!” dance with sticky hands. -
Step 8: Measure accuratelyepoxy is not a “vibes” craft
Follow the manufacturer’s mix ratio exactly (some are 1:1 by volume, others 2:1, and some use weight ratios).
Use graduated cups for liquids or a scale when the brand recommends it. Incorrect ratio is a top cause of soft or sticky cures. -
Step 9: Mix slowly and thoroughly (scrape the sides and bottom)
Mix with intention, not aggression. Stirring like you’re trying to summon a storm whips air into the epoxy, creating bubbles.
Mix for the time recommended, scraping the cup walls and bottom so unmixed material doesn’t end up as sticky spots on your project. -
Step 10: Transfer to a second cup (optional, but super helpful)
Many DIYers use a “double-cup” method: after mixing, pour into a clean cup and mix again briefly.
This reduces the chance that unmixed resin/hardener clinging to the first cup ends up on your surface.
It’s a tiny extra step that can prevent a big sticky mess. -
Step 11: Apply a thin seal coat first (your bubble insurance policy)
Wood is porous and holds air. When epoxy starts curing, that trapped air can expand and rise into your pour as bubbles.
A thin seal coat (brushed or spread thin) creates a barrier so bubbles don’t percolate into your thicker “flood coat.”
Let the seal coat get tacky before the next layer if your product allows.Pro move: If your shop warms up during the day, apply coatings when the wood temperature is dropping (later in the day)
to reduce outgassing bubbles. -
Step 12: Pour the flood coat in controlled passes (don’t dump and pray)
For a tabletop finish, pour the mixed epoxy onto the surface in ribbons or puddles and spread with a notched spreader or squeegee.
Keep within your product’s recommended thickness per coat. Thick, high-build layers can trap bubbles and generate more heat. -
Step 13: Let it self-level, then babysit bubbles for the first 20–30 minutes
Epoxy usually releases bubbles early in the cure. Watch your surface from multiple angles under good lighting.
If bubbles appear, gently pass a small torch over the surface (keep it moving; don’t hover like a marshmallow enthusiast).
The goal is a quick kiss of heat, not a long hug. -
Step 14: Recoat at the right time (and sand only when you must)
Many systems allow a chemical bond if you recoat while the previous layer is still tacky but firm enough to support the next coat.
If you miss that window and it cures hard, you’ll typically need to wash and sand for mechanical adhesion.
Between coats, a light scuff sand can help flatten dust nibs and improve bonding. -
Step 15: Cure fully, then finish for durability and UV resistance
“Dry to the touch” isn’t the same as “fully cured.” Give your epoxy time to cure as directed before heavy use.
If your piece will see sunlight, consider a UV-protective topcoat (like a compatible varnish or polyurethane),
because many epoxies can yellow or degrade under UV over time.
Troubleshooting: Common Epoxy-on-Wood Problems (and Fixes That Work)
Bubbles that keep coming back
- Cause: Outgassing from porous wood, thick pours, or aggressive mixing.
- Fix: Always do a seal coat, mix slowly, pour within recommended thickness, and use brief, moving heat passes.
- Pro tip: Coat when wood temperature is dropping to reduce outgassing.
Sticky spots that never fully cure
- Cause: Incorrect mix ratio or incomplete mixing (especially along cup walls/bottom).
- Fix: Scrape off uncured epoxy, wipe per product guidance, sand, and recoat with correctly measured, thoroughly mixed epoxy.
Cloudy or blushed surface
- Cause: Moisture/humidity interaction, or amine blush on some epoxy systems.
- Fix: Wash with water (amine blush is typically water-soluble), dry thoroughly, sand, and recoat if needed.
Fisheyes or craters
- Cause: Contamination (silicone, oil, wax, polish residue) or dusty surface.
- Fix: Stop, let it cure, sand back the defect, clean thoroughly, and recoat. Prevention is all about cleaning and avoiding silicone-based products nearby.
Safety Notes (Because “Emergency Room Chic” Isn’t a Finish)
- Wear nitrile gloves and avoid skin contactepoxy sensitization is real and can develop over time.
- Ventilate your workspace and follow the product’s safety data guidance.
- Use torches carefully: Keep flame moving, clear the area of solvents, and don’t aim heat at tape edges like you’re trying to start a campfire.
- Mix smaller batches when you’re learninglarge batches can heat up fast, cure too quickly, and become unworkable.
Real-World Lessons DIYers Learn the Hard Way (So You Don’t Have To)
Here’s the truth nobody puts on the front of the epoxy box: the technique is easy, but the timing is everything.
People who get consistently great epoxy finishes aren’t “lucky”they’re just running a tighter process. And they’ve made the same mistakes
you’re trying to avoid right now (respect).
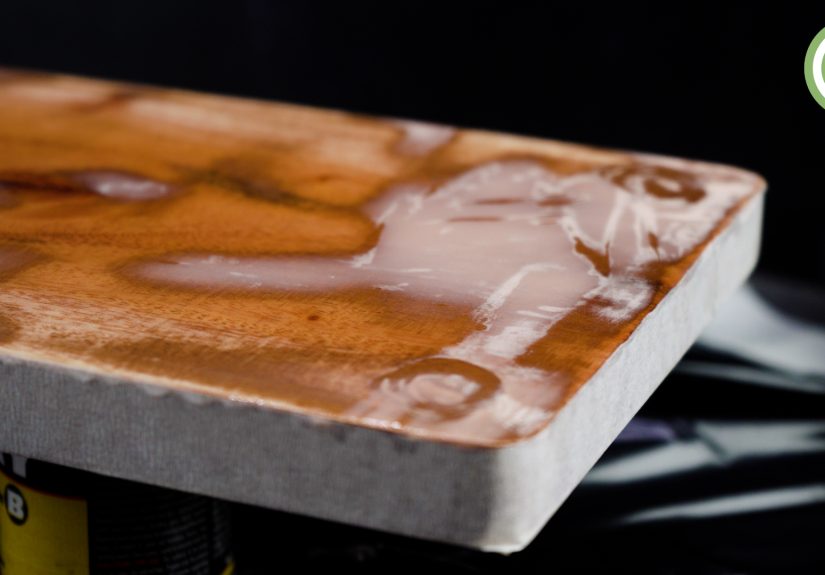
One of the most common “aha” moments is how much wood behaves like a sponge full of tiny air pockets. On the first attempt, many DIYers
pour a beautiful thick coat and then watch bubbles rise like they’re auditioning for a soda commercial. The fix is almost always the seal coat.
Once you brush on that thin first layer and let it set up properly, the flood coat suddenly acts civilized: fewer bubbles, better clarity,
and less frantic torch-waving.
Another frequent lesson: epoxy punishes multitasking. People who try to “just mix real quick” while also answering a text, moving a clamp,
and looking for their spreader tend to end up with unmixed epoxy stuck to the cup wallthen transferred to the project as soft, tacky streaks.
The best habit is boring but effective: measure carefully, mix slowly, scrape the sides and bottom, and (if you’re nervous) pour into a second cup
and mix again. It’s not glamorous, but neither is sanding gummy epoxy at midnight.
Dust is the sneakiest saboteur because it feels like it shouldn’t matteruntil it does. Many makers learn to love the “dust tent”:
a clean plastic tote, a cardboard box, or a simple frame draped with plastic. The point isn’t to seal it airtight; it’s to block that one
floating hair that appears precisely when the epoxy is perfectly smooth. If you want to level up without buying fancy equipment, controlling dust
is the easiest win.
Temperature and timing also separate “pretty good” from “wow.” Some shops are warm in the afternoon and cold at night; that swing can change viscosity,
bubble release, and cure time. DIYers who dial in a stable temperature (even with simple space heating) often notice their epoxy spreads smoother and
stays workable longer. They also learn to pour when the wood is cooling rather than warmingbecause warming wood can push air out through the epoxy
and create fresh bubbles just when you thought you were done.
Finally, there’s the finishing lesson: epoxy can look finished when it’s merely “set.” People put a heavy lamp on it, stack tools on it, or reinstall hardware
too soon and end up with dents or impressions. The experienced move is patience: let it cure fully, then do your final sanding/polish or add a protective topcoat
if the piece will live in sunlight. The payoff is hugebecause the best epoxy finish doesn’t just look good today; it stays good after real life happens on it.
Conclusion
Applying epoxy on wood doesn’t have to be complicatedjust consistent. If you prep the surface well, keep your project level, measure and mix accurately,
seal the wood before the flood coat, and manage bubbles early, you can get a clear, durable, pro-looking finish without losing your weekend (or your sanity).
Take your time, control your environment, and remember: epoxy rewards calm, not chaos.