Table of Contents >> Show >> Hide
- 1) Think in Layers, Not Fixtures: The “3-Light Recipe” Pros Use
- 2) Start With Your Workflow: Light the Zones You Actually Use
- 3) Master Task Lighting: Under-Cabinet Lights Are Non-Negotiable (Almost)
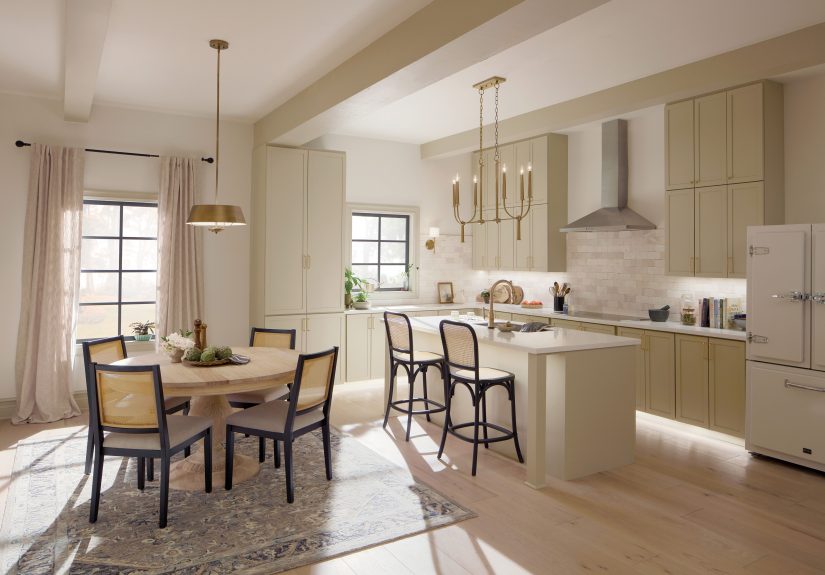
- 4) Pendant Lights Over Islands: Get Height, Spacing, and Glare Right
- 5) Recessed Lighting Layout: Avoid the “Shadow Chef” Problem
- 6) Bulbs and LEDs: Color Temperature, CRI, and “Why Your Tomatoes Look Sad”
- 7) Controls Pros Won’t Skip: Separate Dimmers, Smart Scenes, and Motion Where It Matters
- 8) Small Kitchen, Big Impact: Tricks Pros Use to Make It Feel Brighter
- 9) Common Kitchen Lighting Mistakes Pros See All the Time (And How to Fix Them)
- 10) Safety and Practical Notes (Because Electricity Has Opinions)
- Conclusion: Your Pro-Approved Kitchen Lighting Checklist
- Pro-Level Experiences: What Really Happens When Kitchens Get Lit (About )
If your kitchen lighting currently has two modes“operating room bright” and “mysterious cave of onions”you’re not alone.
Industry pros (designers, kitchen planners, and lighting specialists) tend to agree on one big truth: the best kitchens don’t rely on a single
“big light.” They use a layered lighting plan that supports how you actually liveweekday meal prep, late-night snack missions,
homework at the island, holiday baking marathons, and those moments when you’re just standing there wondering why the fridge is open.
This guide breaks down the most practical, pro-backed kitchen lighting tips: how to layer ambient, task, and accent lighting; where to place
fixtures so you don’t cast shadows on your own cutting board; how to choose LEDs that flatter food (and faces); and how controls like dimmers
and smart switches turn a “fine” kitchen into a flexible one. Expect clear examples, a few designer-style rules of thumb, and a friendly
nudge to avoid the most common lighting regrets.
1) Think in Layers, Not Fixtures: The “3-Light Recipe” Pros Use
Pros usually start kitchen lighting design with a simple framework: ambient (overall light), task (work light),
and accent (mood + highlights). When you skip a layer, the kitchen feels “off” even if it’s technically bright enough.
That’s how you end up chopping vegetables in your own shadow while the ceiling glows like a UFO.
Ambient lighting (the base layer)
Ambient lighting is your “I can safely walk and find the coffee” light. In many kitchens, this is a ceiling fixture, a set of recessed
lights, or a well-planned combination of both. The goal is even coverage, not a spotlight in the middle of the room.
Task lighting (where the work happens)
Task lighting is the hero of meal prep: it brightens countertops, the sink, and the cooktopany place where you’re slicing, reading labels,
or cleaning. Under-cabinet lights, pendants over an island, and focused lights over the sink are common task solutions.
Accent lighting (the “why this kitchen feels expensive” layer)
Accent lighting adds depth: a soft glow above cabinets, toe-kick lighting along base cabinets, lighting inside glass-front cabinets, or a
small decorative lamp on a counter. It’s not required for function, but it’s the layer that makes a kitchen feel finishedand less like a
cafeteria.
2) Start With Your Workflow: Light the Zones You Actually Use
A pro plan typically starts with how you move through the space. Grab a sticky note and label your kitchen zones:
prep, cook, clean, store, and (if applicable) eat/work.
Then match lighting to each zone.
- Prep zone (countertops): under-cabinet lighting + nearby ambient coverage so the counter is bright without glare.
- Cook zone (range/cooktop): dedicated lighting from a hood or well-positioned ceiling lighting that doesn’t shadow the front burners.
- Clean zone (sink): a focused light over the sink (recessed, pendant, or small ceiling fixture) helps with washing and reading labels.
- Island zone: pendants or a linear fixture that brightens the work surface and doubles as visual “anchor.”
- Pantry/storage: motion-activated interior lights can make deep cabinets and pantries dramatically more usable.
This zone approach does one more helpful thing: it prevents “over-lighting” the room with too many recessed lights just because it feels like
the easiest install. Pros often prefer a balanced mix of fixtures rather than a ceiling full of cans.
3) Master Task Lighting: Under-Cabinet Lights Are Non-Negotiable (Almost)
If you could only upgrade one part of your kitchen lighting, most pros would pick under-cabinet lighting. Why? It puts light
exactly where you work and dramatically reduces shadows on countertops. LED strips, bars, or puck lights can all workthe key is placement and
diffusion.
Placement tip to reduce glare
A common pro trick is to mount strips closer to the front of the cabinet (not shoved against the wall), which helps avoid
bright hotspots reflecting off shiny counters and keeps your task light aimed at the work area.
Pick the right style for your kitchen
- LED strips/tape in a channel: cleanest look; great for continuous light. Use a diffuser to soften dots.
- LED light bars: easy install and even output; good for standard cabinet runs.
- Puck lights: can work, but may create scallops of light unless spaced carefully.
Pro-level finish details
If you want the lighting to look “built-in,” consider hiding drivers and wires, using diffusers, and choosing a color temperature that matches
nearby fixtures (more on that below). The goal is “effortless glow,” not “my cabinets are wearing a headlamp.”
4) Pendant Lights Over Islands: Get Height, Spacing, and Glare Right
Island lighting is part task light, part jewelry. But “pretty” can turn into “painful” if pendants are too low, too high, too bright, or
aimed straight into your eyeballs.
Start with the height rule of thumb
A widely used guideline is to hang pendants so the bottom of the fixture is about 30–36 inches above the countertop.
This keeps sight lines open while still delivering useful light on the surface.
Spacing that looks intentional (not accidental)
- Multiple pendants: leave enough space so fixtures don’t feel crowded; aim for visual balance across the island length.
- One linear fixture: great for long islands; often feels cleaner in modern kitchens.
- Glass shades vs. solid shades: glass spreads light and can reduce harsh shadows; solid shades can control glare but may need brighter bulbs.
Glare control, the underrated upgrade
If your pendants make you squint, swap to a softer bulb, add dimming, or choose shades that conceal the brightest point of the lamp. Pros love
“comfortable brightness”the kind that makes the kitchen feel welcoming, not interrogational.
5) Recessed Lighting Layout: Avoid the “Shadow Chef” Problem
Recessed lights are popular because they’re clean and unobtrusive. But they’re also easy to misplaceespecially when they’re centered in the
room while your actual work happens along the perimeter counters. The result? You stand at the counter and your body blocks the light.
Congratulations, you are now the villain in your own kitchen.
Use recessed lights to support zones
Instead of aiming for perfectly symmetrical rows, pros often place recessed lights so they illuminate countertop edges and key work areas,
supplementing under-cabinet lighting rather than replacing it.
Spacing rule of thumb (a starting point, not a law)
One common guideline is to space recessed lights roughly at half the ceiling height (for example, an 8-foot ceiling suggests
about 4 feet between fixtures). Then adjust based on beam spread, cabinet layout, and how much light your finishes absorb or reflect.
6) Bulbs and LEDs: Color Temperature, CRI, and “Why Your Tomatoes Look Sad”
Lighting quality isn’t just brightness. Two kitchens can have the same number of fixtures and still feel totally different because of
color temperature and color rendering.
Color temperature (Kelvin): choose the vibe on purpose
Many pros like warm white (often around 2700K–3000K) for a cozy, inviting kitchenespecially in open-plan
homes where the kitchen should blend with living areas. If you prefer a crisper, more “daylight” feel for heavy cooking tasks, you can go
slightly coolerbut try to keep it consistent across fixtures so the room doesn’t look like three different kitchens fighting for control.
A practical tip from quality programs: pick one “shade of white” for the same space and stick with it.
CRI (Color Rendering Index): make food look like food
CRI measures how accurately a light source reveals colors. A CRI of 90+ is often considered excellent color fidelityhelpful
in kitchens where you’re judging doneness, freshness, and the true color of ingredients. (Also helpful if you’d like your kitchen selfies to
stop looking like they were taken under a parking-lot lamp.)
Brightness: use dimmers instead of guessing
Rather than chasing a “perfect” brightness number, pros often recommend building flexibility: choose good-quality LEDs and put the right layers
on dimmers. That way, the kitchen can be bright for chopping and softer for dinner.
7) Controls Pros Won’t Skip: Separate Dimmers, Smart Scenes, and Motion Where It Matters
Lighting controls are the difference between “nice kitchen” and “kitchen that adapts to your life.” Industry guidance often points to
separating controls by lighting typeso task lights can be bright while accent lights stay soft.
Must-have control moves
- Separate switches/dimmers for ambient, task, and accent layers (at minimum: under-cabinet on its own control).
- Smart scenes like “Cooking,” “Cleaning,” “Dinner,” and “Nightlight” so you tap once instead of flipping six switches like a game show.
- Motion sensors for pantry/interior cabinet lighting or toe-kick lightingperfect for late-night water runs.
LED dimming compatibility (important, slightly boring, totally worth it)
LEDs don’t always dim nicely with older dimmer switches. Quality programs often advise checking compatibility information and using dimmers
designed to work with LEDs to avoid flicker, drop-out, or a dimming range that’s basically “on” and “off but moody.”
If in doubt, an electrician can help match the right dimmer to the LED product.
8) Small Kitchen, Big Impact: Tricks Pros Use to Make It Feel Brighter
In compact kitchens (or kitchens with limited natural light), layered lighting is even more essential. Pros often combine a clean ambient
source with strong task lighting and a little accent glow to prevent the space from feeling flat.
- Use under-cabinet lighting to brighten counters without adding visual clutter.
- Choose wide-beam recessed lights for more even coverage.
- Add a reflective moment: lighter backsplash tile, a slightly reflective countertop finish, or even a glossy paint can help bounce light.
- Don’t overdo cool color temperaturesa small kitchen can feel harsh if everything is too “blue-white.”
9) Common Kitchen Lighting Mistakes Pros See All the Time (And How to Fix Them)
Mistake: Only using ceiling lights
Fix: Add under-cabinet task lighting and at least one accent layer. This immediately improves function and makes the room feel designed.
Mistake: Too many recessed cans
Fix: Use recessed lights strategically and bring in pendants, flush mounts, sconces, or decorative fixtures for character and comfort.
“Bright” isn’t the same as “good.”
Mistake: Mismatched whites (2700K next to 5000K)
Fix: Standardize color temperature across the kitchen. Consistency makes everything look calmer and more intentional.
Mistake: Glare city
Fix: Add diffusers, choose better optics, relocate under-cabinet strips, and put problem fixtures on dimmers.
Your eyes will forgive you.
10) Safety and Practical Notes (Because Electricity Has Opinions)
Kitchen lighting lives in a world of steam, splashes, heat, and grease. Pros typically recommend:
- Use fixtures rated appropriately (especially near sinks or areas exposed to moisture).
- Prioritize quality LEDs that manage heat well and hold color over time.
- Hire a licensed electrician for new wiring, new circuits, or anything you’re unsure about.
- Don’t block light with your body: place fixtures so task areas are lit from in front of you or from multiple angles.
Conclusion: Your Pro-Approved Kitchen Lighting Checklist
Great kitchen lighting isn’t about chasing the trendiest pendant. It’s about building a plan that supports your day-to-day life:
layer the light, light the zones, choose LEDs intentionally, and control it all with dimmers.
Do those four things and your kitchen will feel brighter, calmer, and more “designed”even before you touch the cabinets.
- Layer it: ambient + task + accent.
- Prioritize task lighting: under-cabinet lights are the MVP.
- Hang pendants correctly: typically 30–36 inches above the countertop.
- Plan recessed lights around where you work, not just where symmetry looks cute.
- Pick the right LED: consistent Kelvin; consider high CRI for better color.
- Add controls: separate dimmers, smart scenes, and motion where useful.
Pro-Level Experiences: What Really Happens When Kitchens Get Lit (About )
Talk to enough industry pros and you’ll notice a pattern: most kitchen lighting “problems” aren’t dramatic. They’re sneaky. They show up as
tiny daily annoyanceslike squinting while you slice, or feeling oddly stressed in a room that’s supposed to be warm and welcoming.
Here are a few real-world, pro-style experiences that come up again and again when kitchens get redesigned (or rescued).
Experience #1: The “Shadow Sandwich” Countertop
A classic story: the kitchen has a row of recessed lightscentered perfectly in the ceiling. It looks tidy. It also fails the moment someone
stands at the counter. Your body becomes a solar eclipse, and suddenly the cutting board is in the dark. Pros fix this by shifting recessed
lighting closer to work zones and adding under-cabinet lighting so the countertop is lit from the front edge. The homeowner’s reaction is
usually: “Wait… I can see what I’m doing now.” It’s not glamorous. It’s life-changing.
Experience #2: The Pendant That Looked Gorgeous… Until Dinner
Another frequent one: a pendant is selected for style (fair!) but hung too low or fitted with a bulb that’s too bright and exposed.
In daylight, it photographs beautifully. At night, it feels like a spotlight aimed at everyone’s facegreat if your kitchen hosts police
interrogations, less great if it hosts tacos. Pros solve it with the boring-but-brilliant combo: correct hanging height, a shade that shields
glare, and a dimmer. Suddenly the same fixture becomes “statement lighting,” not “stage lighting.”
Experience #3: The Great Kelvin Clash (Warm vs. Cool)
Pros often walk into kitchens where the recessed lights are cool-white, the pendants are warm, and the under-cabinet strips are somewhere in
between. The room feels visually jitterylike three different timelines collided. The fix is simple: choose one general color temperature for
the kitchen and match it across layers, then rely on dimming and accent placement for mood. Homeowners are always surprised how much calmer
the space feels when the “whites” stop arguing.
Experience #4: The “My Food Looks Weird” Complaint
Lighting pros hear this in different forms: “My chicken looks gray,” “My tomatoes look dull,” “My countertops look off.” Often the culprit is
low color quality (color rendering) from cheap bulbs or strips. Upgrading to better LEDsespecially in task zonescan make ingredients look
more natural. The funny part is that people don’t realize how much they rely on color cues until the cues are wrong. Better light doesn’t just
look nicer; it helps you cook with confidence.
Experience #5: The Nighttime Kitchen That Finally Behaves
One of the most-loved pro upgrades is a subtle night scene: toe-kick lighting or a dimmed under-cabinet strip on motion. It’s the difference
between “BLINDING CEILING LIGHT at 2 a.m.” and “soft pathway glow to grab water without waking the house.” Pros like this because it uses
light precisely: low, indirect, and purpose-built. Homeowners like it because it feels luxuriouslike the kitchen is quietly helping.
The big takeaway from these experiences is reassuring: you don’t need a perfect, magazine-cover lighting plan to love your kitchen.
You need the right light in the right place, good-quality LEDs, and controls that let you shift from “work mode” to “hangout
mode” without rewiring your entire life.