Table of Contents >> Show >> Hide
- Why Upcycle a Salvaged Metal Cart Into a Bar Cart?
- Step 1: Hunt Down the Perfect Salvaged Cart
- Step 2: Prep Like a Pro – Cleaning, Sanding, and Repair
- Step 3: Prime and Paint for a Swanky Finish
- Step 4: Upgrade the Shelves – Cork, Stencils, or Tile
- Step 5: Handles, Wheels, and Hardware Details
- Step 6: Style Your Swanky Bar Cart Like a Designer
- Practical and Safety Tips for Your DIY Bar Cart
- A Real-Life Example: From Rusty Relic to Party-Ready Cart
- Lessons Learned: of Hands-On Experience With Salvaged Cart Makeovers
- 1. Prep always takes longer than you thinkbut it’s worth it
- 2. Choose paint for your lifestyle, not just your Pinterest board
- 3. Lining the shelves is a game-changer
- 4. Styling is where personality shows up
- 5. A bar cart doesn’t have to serve alcohol to be fabulous
- 6. Once you do one, you’ll see “future bar carts” everywhere
- Conclusion: Your Swanky Bar Cart Awaits
There’s something wildly satisfying about taking a rusty, forgotten metal cart and turning it into the star of your next cocktail party.
Bar carts are having a serious momentevery design blog, Pinterest board, and decor magazine is showing off a perfectly styled tray of
glassware and gin. But those chic carts can easily run well over $100, especially for unique designs.
The good news? You don’t have to spend that kind of cash. With a salvaged metal cart, a bit of elbow grease, and a few smart styling tricks,
you can create a swanky DIY bar cart that looks custom-made for your space. Inspired by the Remodelaholic makeover of an old metal supply
cart into a stylish bar station, we’ll walk through exactly how to turn “trash” into a party-ready treasurecomplete with cork-lined shelves,
jute-wrapped handles, and a finish that would make a boutique bar jealous.
Why Upcycle a Salvaged Metal Cart Into a Bar Cart?
1. It’s budget-friendly and high impact
New bar carts often cost more than the drinks you plan to put on them. Many big-box options start around $100 and climb quickly depending
on materials and finishes. By upcycling a salvaged metal cart, you’re usually paying only for the cart (often under $20
at thrift stores, yard sales, or online marketplaces) plus paint and basic supplies. The result is a custom piece that looks expensive but
costs less than a dinner out.
2. It’s eco-conscious and character-filled
Upcycling keeps old furniture out of landfills and gives worn-out pieces a second life. DIYers have turned everything from rusty plant carts
and storage trolleys into stylish serving stations and drink carts with just sanding, paint, and a bit of imagination.
Instead of a generic big-box look, you get a bar cart with real character and a story behind it.
3. It’s flexible and multi-purpose
A salvaged metal cart can become more than just a bar cart. Depending on your styling, it can double as a coffee station, a tea bar,
a mocktail hub, or even an art or craft cart when you’re not hosting. Many DIYers use the same cart as a mobile entertaining station,
rolling it from the kitchen to the patio as needed.
Step 1: Hunt Down the Perfect Salvaged Cart
Before you can start your metal cart makeover, you need the right victimuh, project. When scouting for a salvaged metal cart:
- Look for solid structure. A little rust is fine, but the frame should feel sturdy, not wobbly.
- Check the wheels. Rolling smoothly is a huge bonus, especially for a bar cart that needs to glide between rooms.
- Prioritize shelves and surface area. You’ll want space for bottles, glasses, and maybe a small tray or ice bucket.
- Don’t fear ugly finishes. Chipped paint, mismatched colors, and stains can all be fixed later with sanding and spray paint.
Ideal candidates include old medical carts, industrial office carts, plant stands, and rolling storage carts. People have successfully
converted everything from medical supply carts to rusty utility carts picked up from relatives’ garages into chic bar carts.
Step 2: Prep Like a Pro – Cleaning, Sanding, and Repair
Prep is not glamorous, but it’s absolutely the make-or-break stage of your DIY bar cart project. The original salvaged metal cart makeover
that inspired this guide emphasizes how crucial sanding and cleaning are: if you skip them, your pretty new paint job will flake off in no time.
What you’ll need
- Medium- and fine-grit sandpaper or sanding block
- Wire brush (for heavy rust)
- Paint scraper
- Degreaser or soapy water
- Rags or shop towels
- Protective gloves and mask
Prep steps
-
Remove flaking paint. Use a scraper and wire brush to get rid of loose or peeling paint, especially on shelves and edges.
The goal is a smooth, even base for your new finish. -
Sand the entire frame. Sanding scuffs the surface so primer and paint can grip better. Pay extra attention to rust spots;
you may need to sand them down to bare metal. -
Clean thoroughly. Wipe everything down with a degreaser or warm soapy water to remove dust, grease, and sanding residue.
Let it dry completely before painting. -
Make minor repairs. Tighten screws, straighten bent areas if possible, and replace any broken hardware. If a wheel is
beyond saving, now’s the time to swap it out.
It’s not glamorous, but think of this stage as your “bar cart boot camp.” Once you finish, everything that follows is pure creative fun.
Step 3: Prime and Paint for a Swanky Finish
This is where your salvaged metal cart starts to look like something you’d happily show off on Instagram. Choosing the right paint and finish
is key to getting that “swanky” vibe.
Picking your paint and color
-
Metallic finishes: Gold, brass, and champagne metallic spray paints are popular choices for bar carts, giving instant glam
without looking overdone. Many DIYers use metallic spray paint specifically for bar or drinks trolleys to avoid brush marks and get an even finish. -
Modern neutrals: Matte black, charcoal, or soft white can create a sleek, modern bar cart that fits in with contemporary
decor or industrial interiors. -
Statement colors: If you’re going for personality, rich teal, navy, or deep green can make your cart feel like a jewel
in the room.
How to paint your metal cart
-
Prime first. Use a metal-compatible spray primer to help prevent rust and ensure better paint adhesion, especially if your
cart had rust spots. -
Spray in thin coats. Hold the can 8–12 inches away, move in steady passes, and build color with multiple light coats rather
than one heavy coat. This reduces drips and gives a more professional finish. -
Try mixed finishes. Some upcyclers use stainless steel finish paint on interior surfaces for a subtle contrast while keeping
the exterior frame in a different color. -
Let it cure fully. Follow the manufacturer’s dry time instructionsrushing this step can lead to fingerprints, smudges, or
stuck bottles later.
Step 4: Upgrade the Shelves – Cork, Stencils, or Tile
Your salvaged cart may have metal, laminate, or even wire shelves. With a little creativity, those surfaces can look custom and protect your
glassware at the same time.
Add patterned cork for warmth and grip
In the original Remodelaholic-inspired makeover, patterned cork was used to line the shelves, adding both texture and function. Cork helps
absorb sound, protects glass, and keeps bottles from sliding around when you move the cart.
Stencil or paint for an artistic touch
If your shelves are solid, consider painting them a base color and then stenciling a patterngeometric shapes, Art Deco lines, or even a
faux tile design. DIYers often use stencils on trolley tops to create decorative surfaces that look like patterned inlay or tile without the
weight or cost.
Go bold with mosaic or faux stone
For outdoor bar cart use, a mosaic tile shelf or faux stone contact paper can create a durable, easy-to-clean surface. Some projects combine
wood and tile to make a durable base that stands up to condensation and spills.
Step 5: Handles, Wheels, and Hardware Details
The details are what make your salvaged metal cart feel like a high-end bar cart instead of “that thing from the garage.”
Wrap those handles
A clever detail from the Remodelaholic makeover is wrapping the handles in jute or rope. This adds texture, makes the cart more comfortable
to push, and visually warms up all that metal. You can also use leather strips or faux leather for a more modern, luxe look.
Upgrade the wheels (or just clean them up)
If your casters are rusty but still roll, clean them and spray-paint them to match the frame. If they’re too far gone, replacing them with
new casters can give you smoother rolling and a more polished appearance.
Use decorative hardware
Add hooks, rails, or S-hooks on the sides of the cart to hang bar tools, towels, or small baskets. Even simple brass or black hooks can
make the cart feel more designed and less repurposed.
Step 6: Style Your Swanky Bar Cart Like a Designer
Once the paint is cured and the shelves are dressed, it’s time to style your DIY bar cart. This is where it goes from “nice project” to
“whoa, where did you buy that?”
Start with the essentials
- A mix of spirits or your favorite wine and mixers
- Everyday glassware: tumblers, wine glasses, or coupes
- Ice bucket or small cooler
- Shaker, jigger, and basic bar tools
- Coasters and cocktail napkins
Designers often suggest stocking the top shelf with the pieces you use mostglasses, decanters, and bottlesso guests can easily serve
themselves, while the lower shelves hold extra drinks and backup supplies.
Add decor, not clutter
Styling is about balance. Bar cart guides recommend mixing functional items (bottles, tools) with decor like small plants, candles, art,
or framed photos. You want it to look curated, not like the “miscellaneous liquor” shelf in your pantry.
- Use a tray to corral bottles and keep the top from feeling busy.
- Add height with a tall bottle, a mini lamp, or a vase of flowers.
- Work in texture with napkins, woven coasters, or a small wooden board.
Change it up seasonally
For the holidays, bar cart stylists add candles, greenery, and even wrapped boxes on the lower shelf for a festive touch.
In summer, swap in citrus bowls, fresh herbs like mint for mojitos, and colorful straws for a breezy outdoor party vibe.
Practical and Safety Tips for Your DIY Bar Cart
- Distribute weight evenly. Keep heavier bottles on lower shelves to avoid tipping.
- Watch the wheels. If your cart rolls a bit too easily, consider locking casters or wheel chocks when it’s parked.
- Mind the kids and pets. If you have little ones around, store higher-proof spirits or glass decanters on the upper shelf
and keep the cart in a low-traffic area when not in use. - Use bottle bins or racks. Simple racks or bins can keep bottles from clinking or tipping when the cart moves.
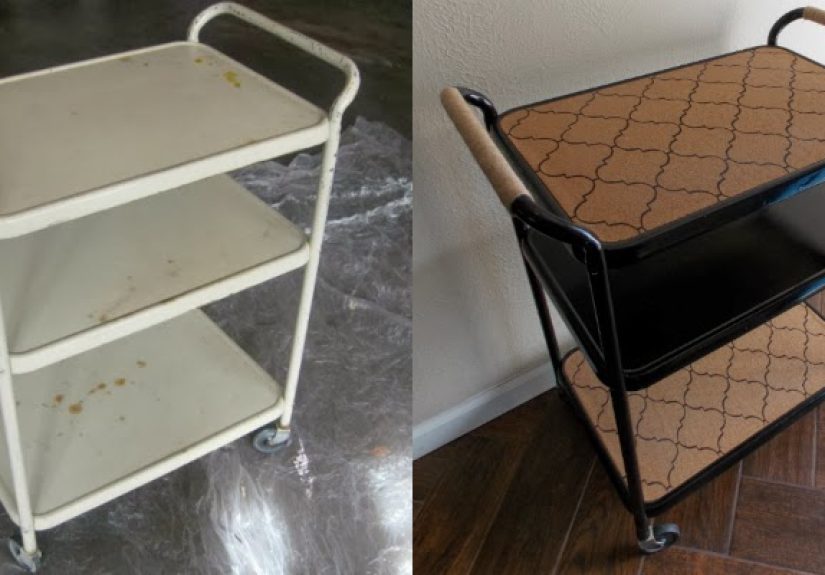
A Real-Life Example: From Rusty Relic to Party-Ready Cart
Many DIYers share stories of transforming old medical or utility carts into eye-catching bar carts. One common tale: inheriting a rusty,
forgotten utility cart from family and turning it into a sleek bar or kitchen cart with a bit of sanding, paint, and styling.
The process is almost always the same: at first, the cart looks like something that belongs in a back hallway or dusty garage. After prep,
a few coats of metallic spray paint, new shelf liners, and some carefully chosen barware, it suddenly looks like something from a boutique
home store. That transformation is exactly what makes this project so gratifying.
Lessons Learned: of Hands-On Experience With Salvaged Cart Makeovers
If you talk to people who’ve actually transformed salvaged metal carts into bar carts, a few themes come up over and over again. Think of
this as your “behind-the-scenes” guidethe things you only learn after you’ve had paint in your hair and cork dust on your floor.
1. Prep always takes longer than you thinkbut it’s worth it
Nearly everyone underestimates the prep stage. That first pass with a scraper and sandpaper feels endless, especially if the cart has
multiple layers of old paint. But the folks who end up with a smooth, durable finish are always the ones who refuse to rush this part.
They’ll tell you that an extra 30 minutes sanding rust off a corner is better than staring at a peeling patch every time you pour a drink.
2. Choose paint for your lifestyle, not just your Pinterest board
Glossy metallic gold might look stunning, but if you have kids, pets, or you plan to roll the cart in and out to the patio, you might be
happier with a satin or semi-gloss finish that hides fingerprints and small dings better. Some DIYers regret choosing super-shiny finishes
because every little scratch stands out, while others swear by them for that glam bar-cart moment. The trick is to think about how you’ll
actually use the cart: nightly cocktails, weekend gatherings, or once-in-a-while celebrations.
3. Lining the shelves is a game-changer
Shelf linersfrom cork and vinyl to removable wallpaperare one of those details people don’t realize they need until after they’ve lived
with a bare metal shelf. Unlined metal can be noisy, slippery, and a little unforgiving when glasses clink down. Adding a cushion of cork or
another material softens the sound, protects the finish, and keeps your bottles from skating around every time you move the cart. Plus, if
you ever change your decor, swapping out the liners is easier than repainting the whole piece.
4. Styling is where personality shows up
Many DIY bar cart owners admit they re-style their carts more than they actually use them to serve drinksand that’s okay. Styling is half
the fun. Some take a minimalist approach with just a few favorite spirits, neutral glassware, and a plant. Others treat their carts like
mini art installations, layering books, candleholders, fancy decanters, and seasonal decor. Over time, most people find their sweet spot:
somewhere between “Instagram-perfect” and “actually functional on a Wednesday night.”
5. A bar cart doesn’t have to serve alcohol to be fabulous
Another fun discovery: a lot of swanky bar carts never actually hold booze. They’re coffee carts loaded with syrups, mugs, and a French press;
mocktail carts with sparkling water, flavored syrups, and fresh fruit; or even dessert carts with small plates, cake stands, and a stash of
chocolate. The salvaged metal cart makeover is really about creating a mobile station for whatever you lovedrinks just happen to be one of
the most popular options.
6. Once you do one, you’ll see “future bar carts” everywhere
The last universal experience: after your first salvaged metal cart makeover, you start seeing potential bar carts everywhere. That sad
little rolling shelf at the thrift store? Future champagne station. The office supply cart no one wants anymore? Espresso bar in disguise.
It’s a side effect of creativityonce you’ve turned one salvaged cart into a swanky bar cart, you’ll never look at “junk” the same way again.
Conclusion: Your Swanky Bar Cart Awaits
Transforming a salvaged metal cart into a swanky bar cart is equal parts practical and playful. You save money, reduce waste, and end up
with a piece that feels more “you” than anything you could order off a website. With solid prep, smart paint choices, upgraded shelves, and
thoughtful styling, your cart can go from unloved metal workhorse to the life of the party.
Whether you stock it with cocktails, coffee, or mocktails, your upcycled bar cart is a rolling reminder that great design doesn’t have to
start at the storeit can start in the salvage pile.
meta_title: From Salvaged Metal Cart To Swanky Bar Cart
meta_description: Learn how to transform a salvaged metal cart into a swanky DIY bar cart with paint, cork, and styling tips inspired by Remodelaholic.
sapo: Turn a rusty salvaged metal cart into a swanky bar cart that looks straight out of a design magazine. In this in-depth guide, you’ll learn how to prep, sand, prime, and paint your old cart; upgrade the shelves with cork, stencils, or tile; and style it like a pro with glassware, decor, and seasonal touches. Inspired by Remodelaholic and other DIY bar cart makeovers, this tutorial shows you how to create a budget-friendly, eco-conscious, and totally custom bar cart that can serve cocktails, coffee, or mocktails in serious style.
keywords: salvaged metal cart, DIY bar cart, upcycled bar cart, metal cart makeover, Remodelaholic bar cart, bar cart styling, rolling drink cart