Table of Contents >> Show >> Hide
- Why You’ll Love These Granola Yogurt Cups
- Key Technique: What Makes a Granola Cup Actually Hold Together?
- Granola Cups with Yogurt and Fruit: The Core Recipe
- Step-by-Step Instructions
- Assembling Granola Cups with Yogurt and Fruit
- Flavor Variations for the Granola Cups
- Troubleshooting: Fixes for Common Granola Cup Problems
- Make-Ahead, Storage, and Food Safety
- Nutritional Notes (Without the Lecture)
- FAQ: Granola Cups with Yogurt and Fruit
- Conclusion: Your Breakfast, Upgraded
- Real-World Experiences: What It’s Like to Actually Make These (The Helpful Truth)
If breakfast had a “dress code,” these granola cups would show up in a blazer and sneakers: polished enough for brunch,
practical enough for a Tuesday, and still fun enough to make you feel like you have your life together (even if your
laundry is auditioning for a documentary series).
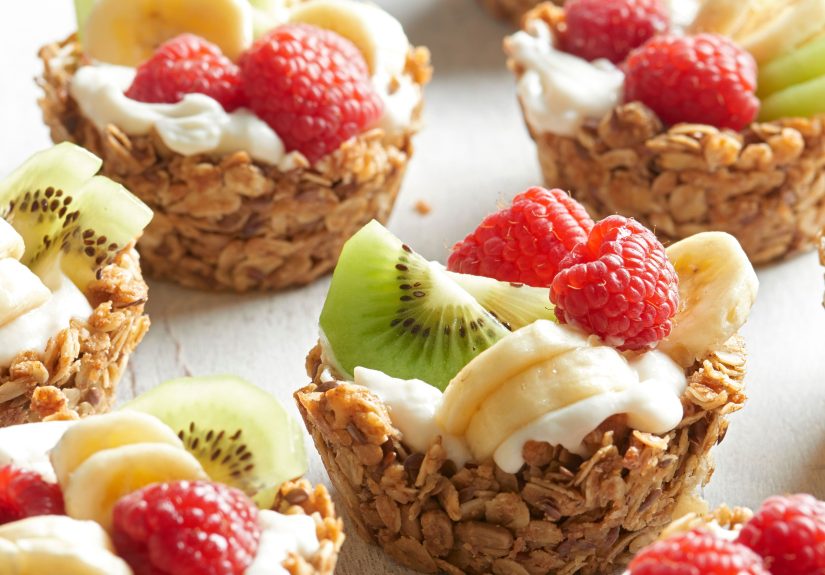
Granola cups with yogurt and fruit are exactly what they sound like: crunchy, muffin-tin “cups” made from
an oat-and-nut granola mixture, filled with creamy yogurt and topped with juicy fruit. They’re part parfait, part edible
bowl, and 100% the kind of snack that makes people say, “Wait, you MADE these?” while you casually pretend you didn’t
just press oats into a pan like you were packing sandbags.
This guide gives you an in-depth, reliable method (plus variations, troubleshooting, and storage tips) so your cups come
out crisp, sturdy, and ready for whatever fruit situation you’ve got going on in the fridge.
Why You’ll Love These Granola Yogurt Cups
- Portable breakfast: A grab-and-go option that feels like a treat.
- Customizable: Swap fruits, yogurts, nuts, seeds, and flavors easily.
- Make-ahead friendly: Bake the cups once, then mix and match fillings all week.
- Texture heaven: Crunchy cup + creamy yogurt + fresh fruit = a three-texture standing ovation.
Key Technique: What Makes a Granola Cup Actually Hold Together?
Granola cups are basically tiny architecture projects. They need:
- Dry structure: Rolled oats (and optional wheat germ, flax, chia, nuts) for “bones.”
- Sticky binder: Honey or maple syrup + nut butter acts like edible glue.
- Fat for crispness: Melted coconut oil or butter helps brown and firm the cup.
- Firm pressing + cooling: You’re not gently placing the mixtureyou’re packing it like it owes you money.
The biggest secret? Let them cool completely before removing. Warm granola cups are still soft and
negotiating their identity. Cool granola cups are confident and self-supporting.
Granola Cups with Yogurt and Fruit: The Core Recipe
Yield & Timing
- Makes: 10–12 standard muffin-tin cups (depending on how thick you press them)
- Prep time: 10–15 minutes
- Bake time: 12–18 minutes
- Total time: About 35–45 minutes (including cooling)
Ingredients (Granola Cups)
- 2 cups old-fashioned rolled oats
- 1/2 cup chopped nuts (almonds, pecans, or walnuts) (optional but excellent for crunch)
- 2 tablespoons chia seeds or ground flaxseed (optional, helps bind and adds texture)
- 1 teaspoon ground cinnamon
- 1/4 teaspoon fine salt
- 1/3 cup honey or maple syrup
- 1/3 cup creamy nut butter (almond, peanut, cashew, or sunflower seed butter for nut-free)
- 3 tablespoons melted coconut oil or melted butter
- 1 teaspoon vanilla extract
Ingredients (Filling & Topping)
- 2 to 3 cups yogurt (Greek yogurt for thickness; regular yogurt works too)
- 1 to 2 cups fresh fruit (berries, sliced strawberries, kiwi, mango, peaches, banana)
- Optional: drizzle of honey, pinch of lemon zest, mini chocolate chips, toasted coconut, or a spoon of jam
Equipment
- Standard 12-cup muffin tin
- Mixing bowl + spoon/spatula
- Measuring cups/spoons
- Nonstick spray (or liners)
- A tablespoon measure or small cup to press wells
Step-by-Step Instructions
1) Prep the pan (this is not optional)
Preheat your oven to 350°F. Grease the muffin tin generously with nonstick spray, including the sides.
If you have silicone muffin cups/liners, they make removal easier. Paper liners can work, but the cups may stick a bit
unless you grease the liners too.
2) Mix dry ingredients
In a large bowl, combine oats, chopped nuts (if using), chia/flax (if using), cinnamon, and salt. Stir until everything
looks evenly distributedlike a tiny oat festival.
3) Warm and combine the binders
Add honey (or maple syrup), nut butter, melted coconut oil (or butter), and vanilla. Stir until the mixture is evenly
coated and slightly sticky. If your nut butter is super thick and not cooperating, warm it for 10–15 seconds in the
microwave first so it blends smoothly.
4) Portion and press like you mean it
Divide the mixture among muffin cups (about heaping 1/4 cup per cup as a starting point).
Use your fingers or the back of a spoon to press the mixture firmly into the bottom and up the sides.
Then, use a tablespoon measure (or the bottom of a small glass) to press a well in the center. You want a defined cup
shape with compact wallsthink “edible nesting doll,” not “oat landslide.”
5) Bake until set and lightly golden
Bake for 12–18 minutes, until the edges are golden and the cups look set. Ovens vary, and the thickness of
your cups matters, so start checking at 12 minutes.
6) The pro move: re-press while warm
Remove the pan from the oven. While the cups are still warm and pliable, gently re-press the center wells and sides with
your tablespoon measure. This helps keep a deep cup shape and improves sturdiness.
7) Cool completely (seriously)
Let the cups cool in the tin for 15–20 minutes, then carefully twist and lift them out. If they resist,
give them a few more minutes. Once removed, cool fully on a rack. Fully cooled cups are crisper and less likely to crack.
Assembling Granola Cups with Yogurt and Fruit
You have two winning strategies:
- Serve-now crunch: Fill cups with yogurt right before eating to keep them crisp.
- Meal-prep mode: Store cups empty and pack yogurt + fruit separately; assemble when ready.
Filling ideas (a.k.a. your “choose your own adventure” section)
- Classic berry: Vanilla Greek yogurt + blueberries + strawberries + a tiny drizzle of honey.
- Tropical getaway: Coconut yogurt + mango + pineapple + toasted coconut.
- PB&J energy: Plain yogurt + swirl of peanut butter + spoon of strawberry jam + sliced banana.
- Apple pie vibes: Cinnamon yogurt + diced apple + raisins + pinch of extra cinnamon.
- Chocolate cameo: Greek yogurt + raspberries + a few mini chocolate chips (not enough to be “dessert,”
but enough to make you smile).
Flavor Variations for the Granola Cups
1) Nut-free
Use sunflower seed butter and skip chopped nuts. Add pumpkin seeds or sunflower seeds for crunch.
2) Vegan
Use maple syrup instead of honey, coconut oil instead of butter, and a plant-based yogurt (coconut, almond, soy).
3) Extra-crispy “dessert bowl” style
Add 1–2 tablespoons brown sugar to the dry mix for extra caramelization. Keep an eye on baking so edges don’t over-brown.
4) Higher-protein approach
Choose thick Greek yogurt and add toppings like chopped nuts, hemp hearts, or a spoon of chia jam. (Your granola cups won’t
suddenly become a protein shake, but they’ll show up to the gym with intent.)
Troubleshooting: Fixes for Common Granola Cup Problems
“My cups crumbled when I removed them.”
- Cause: Not enough binder, not pressed firmly, or removed too warm.
- Fix: Press harder next time; increase nut butter by 1–2 tablespoons; cool longer before removing.
“My cups are stuck to the pan.”
- Cause: Insufficient greasing or sugary binder caramelized at the edges.
- Fix: Grease more generously; use silicone liners; run a thin knife around edges after cooling 10–15 minutes.
“My cups are soft, not crunchy.”
- Cause: Underbaked or too much wet binder.
- Fix: Bake 2–4 minutes longer; cool fully; store uncovered for an hour before sealing so steam doesn’t soften them.
“They’re crunchy… but taste a little dry.”
- Cause: Too many dry add-ins (extra oats/nuts) without balancing binder.
- Fix: Add 1 tablespoon honey/maple or 1 tablespoon melted coconut oil next time.
Make-Ahead, Storage, and Food Safety
How to store the baked granola cups
- Room temperature: Store empty cups in an airtight container for 3–5 days for best crunch.
- Freeze: Freeze empty cups up to 2 months. Thaw at room temp and re-crisp in a 300°F oven for 5 minutes if needed.
How to store assembled yogurt fruit cups
Once filled, these turn into a “time-sensitive crunch situation.” Yogurt will soften the granola over time, so for the best
texture, assemble close to serving. If you must pre-assemble, plan for up to 24 hours in the fridge and
accept that the cups will be more “tender” than “crunchy.”
Food safety note (the responsible part of the fun)
Yogurt and cut fruit are perishable. Keep assembled cups refrigerated and avoid leaving them out at room temperature for
extended periodsespecially at parties, picnics, or any situation where the sun is auditioning as a heat lamp.
Nutritional Notes (Without the Lecture)
These cups can be a balanced snack or breakfast because they combine:
- Whole grains and fiber: Oats bring hearty carbs and fiber that help you feel satisfied.
- Protein: Greek yogurt boosts protein and helps the snack “stick with you” longer than a pastry situation.
- Micronutrients: Fruit adds vitamins, antioxidants, and brightness (both flavor and mood).
- Healthy fats: Nuts, seeds, and nut butter add richness and staying power.
If you’re watching added sugars, choose plain yogurt and sweeten lightly with fruit, cinnamon, vanilla, or a small drizzle
of honey. If you’re cooking for kids (or adults with kid energy), add a few chocolate chips and call it “breakfast confetti.”
FAQ: Granola Cups with Yogurt and Fruit
Can I use quick oats instead of rolled oats?
Yes, but the texture will be tighter and less “toasty.” Rolled oats usually give a better crunch and structure. If you only
have quick oats, reduce pressing force slightly (they compact fast) and watch bake time closely.
Do I have to use nut butter?
You need some binder. Nut butter is reliable because it’s sticky and fatty. Sunflower seed butter works well for
nut-free. In a pinch, tahini can work, but it has a bold flavorpair it with honey and fruit that can stand up to it.
Can I make mini granola cups?
Absolutely. Use a mini muffin tin and reduce bake time to about 8–12 minutes. Mini cups are dangerously
snackable. You’ve been warned.
What yogurt is best?
Thick yogurts (like Greek yogurt) are easiest to spoon into cups and less likely to leak/sog. Regular yogurt works, too
you’ll just want to assemble closer to eating. For extra fun, stir in lemon zest, vanilla, or a spoon of jam.
What fruit works best?
Berries are the classic because they’re juicy but not too watery when fresh. Mango, kiwi, and peaches are great. If using
bananas, slice right before serving to avoid browning. If using very juicy fruit (like oranges or pineapple), pat pieces
dry to help keep the cups crisp.
Conclusion: Your Breakfast, Upgraded
Granola cups with yogurt and fruit are one of those recipes that look fancy but are secretly simple: mix, press, bake, cool,
and then decorate like you’re building a tiny edible masterpiece. Make them for weekday breakfasts, brunch spreads, after-school
snacks, or that moment when you open the fridge and think, “I want something good… but I don’t want to cook.”
Bake a batch of cups, keep them ready, and you’ll always be five minutes away from a satisfying, customizable breakfast that
feels way more impressive than it should.
Real-World Experiences: What It’s Like to Actually Make These (The Helpful Truth)
Let’s talk about the part recipes don’t always say out loud: the first batch is often a “learning batch.” Not because the recipe
is hardbut because granola cups are a little bit like packing a suitcase. The materials are cooperative, but only if you apply
firm pressure and a tiny bit of strategy.
The most common experience people report is the “why is this falling apart?” momentusually right when you try
to lift a warm cup out of the pan. Granola straight out of the oven is still soft, and it hasn’t fully set into that crisp, cohesive
shell yet. Waiting feels annoying when you’re hungry, but cooling is where the magic happens. A good rule of thumb in most home kitchens:
if the cups feel even slightly bendy, they’re not ready to be handled like they’re ceramic.
Another frequent “aha” is discovering how much pressing matters. A light press gives you a granola pile with dreams.
A firm press gives you a cup with a future. People often find that using a tablespoon measure (or the bottom of a small glass) makes the
job easier and more consistent than using fingers alone. The sides should look compactalmost like you’re building a crustbecause, well,
you are.
Then there’s the re-press after baking step, which sounds fussy until you try it. Many home cooks notice that the centers
puff slightly during baking. If you reshape the wells while the cups are warm, you get a deeper pocket for yogurt and a sturdier wall. It’s
the difference between “cute snack cup” and “successful edible bowl that doesn’t collapse under dairy pressure.”
On the flavor side, people tend to fall into one of two camps: Team Honey and Team Maple. Honey usually yields
a slightly firmer set and a classic granola flavor; maple syrup gives a gentler sweetness and a cozy aroma. If you’re making these for a group,
honey is often the safest “crowd-pleaser” base, while maple wins points for anyone who wants a vegan option without sacrificing taste.
For toppings, the “real-life” winner is berriesbecause they’re easy, pretty, and don’t turn everything into fruit soup. When people switch to
extra-juicy fruits, they often notice the cups soften faster. The practical fix is simple: pat fruit dry, and assemble closer to eating. Meal preppers
often keep the granola cups in a container, then pack yogurt and fruit separately. That way, you get maximum crunch when it matters (which is always).
Finally, there’s the emotional experience: these make you feel oddly accomplished. Something about serving breakfast in a crunchy little cup sparks the
kind of joy normally reserved for matching socks. Kids tend to treat them like edible crafts. Adults treat them like “I’m totally a person who meal preps”
energy. Either way, they disappear fast. The most consistent real-world outcome? Someone asks for the reciperight after they say they “don’t even like
breakfast that much.”