Table of Contents >> Show >> Hide
- What Exactly Is Ground Chicken Pizza Crust?
- Why Ground Chicken Works (A Little Food Nerd Moment)
- Ingredients
- Step-by-Step: How to Make Ground Chicken Pizza Crust
- How to Keep It Crisp (Not “Chicken Puddle”)
- Topping Combos That Actually Love This Crust
- Nutrition Talk (Without the Buzzkill)
- Food Safety and Handling (Quick but Important)
- Make-Ahead, Storage, and Reheating
- Troubleshooting: Common Problems and Easy Fixes
- FAQ
- Real-Life Experiences: What It’s Like to Make This at Home (About )
Pizza night is a sacred institution. And yet, sometimes your goals (more protein, fewer carbs, “please stop letting me feel like a sleepy bread loaf after dinner”)
demand a tiny plot twist. Enter: high-protein ground chicken pizza crusta flourless, fork-and-knife (or hands, if you’re brave and crisp enough)
pizza base that’s basically the lovechild of chicken parm and a gym selfie.
This crust is not trying to be New York slice perfection. It’s trying to be delicious, sturdy, and ridiculously satisfying while keeping the
ingredient list short and the protein high. And honestly? It nails the assignment.
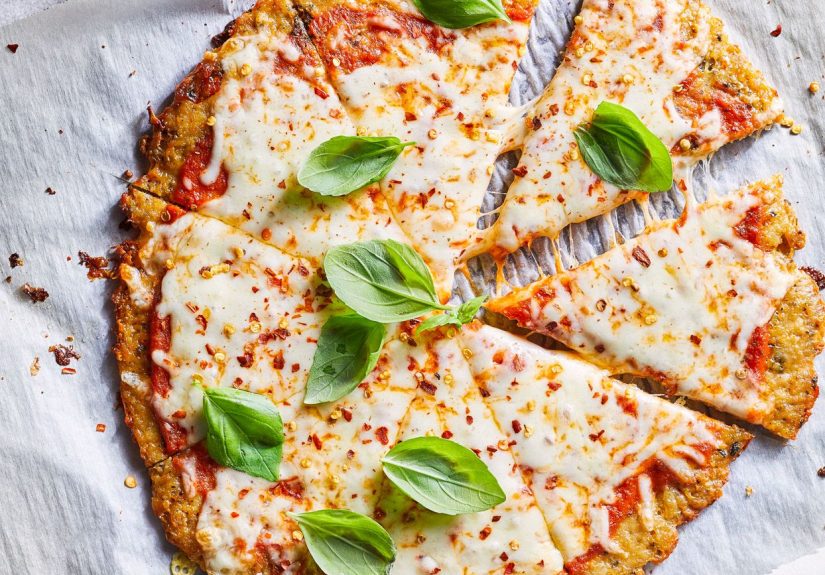
What Exactly Is Ground Chicken Pizza Crust?
Think of it as a savory “meat flatbread.” You mix ground chicken with a binder (usually egg) and a little cheese (often Parmesan and/or mozzarella) plus seasonings.
Then you press it into a thin round and bake until it firms up into a crust you can top like a regular pizza.
The flavor is naturally savorymore “Italian chicken bake” than “neutral bread.” That’s a feature, not a bug. It means you can go lighter on toppings and still feel like
you’re eating something real.
Why Ground Chicken Works (A Little Food Nerd Moment)
Ground chicken is packed with proteins that set when heated. When you spread it thin and bake it, the surface dries and browns while the inside cooks through and firms up.
Adding egg helps bind everything together, and cheese contributes both structure and that “I’m here for a good time” flavor.
Lean vs. not-so-lean
Leaner ground chicken usually gives you a sturdier crust with less grease. Slightly fattier chicken can be juicier, but may need extra blotting and bake time to avoid a soft center.
Either way, the technique (thin, even, and well-baked) matters more than perfection.
Ingredients
For the crust (the “pizza base” part)
- Ground chicken (about 1 pound is a common batch size)
- Egg (binder that helps the crust hold together)
- Parmesan cheese (adds saltiness and structure)
- Mozzarella (optional, but adds stretch and helps firm the crust)
- Seasonings: garlic powder, onion powder, Italian seasoning or oregano, salt, pepper, and a pinch of red pepper flakes if you like heat
For topping (choose your own adventure)
- Pizza sauce (use a thicker one, or use less than you think)
- Low-moisture mozzarella (melts well without turning into soup)
- Favorite toppings: pepperoni, cooked sausage, mushrooms (pre-cooked), peppers, onions, olives, basil, etc.
Step-by-Step: How to Make Ground Chicken Pizza Crust
The biggest secret is simple: pre-bake the crust until it’s genuinely set before you add sauce and toppings. The crust is your foundation. Treat it with respect.
1) Preheat and prep
- Heat your oven to around 400°F.
- Line a sheet pan or pizza pan with parchment paper. (Parchment is the MVP. Foil is risky. Bare pan is chaos.)
- If you have a wire rack that fits over a sheet pan, you can use it for extra airflowbut parchment alone works great.
2) Mix the crust
In a bowl, combine ground chicken, egg, Parmesan, and seasonings. If you’re adding mozzarella to the crust, mix it in now.
The mixture will be stickybecause chicken is not dough and it did not sign up to behave like dough.
3) Shape it thin (this matters)
- Spoon the mixture onto parchment.
- Use damp hands or the back of a spoon to press it into a round, about 1/4-inch thick (thin and even = crisp and sturdy).
- Smooth the edges so you don’t get little “raw corners” that cook slower than the center.
4) Bake until set and lightly golden
Bake until the crust looks cooked through and feels firm when you tap it gently. Depending on thickness and your oven, this often lands somewhere in the
20–30 minute zone.
5) Blot, flip, and/or broil for maximum crisp
Ground chicken releases juices as it cooks. That’s normal. You have options:
- Blot: If you see moisture pooling, dab it carefully with paper towels.
- Flip: Place another piece of parchment on top, invert onto a second pan, peel off the original parchment, and bake a few more minutes.
- Broil: A short broil at the end can boost browning fastjust watch it like it owes you money.
6) Add toppings, then bake again
- Add a thin layer of sauce (thick sauce works best).
- Top with cheese and toppings that won’t dump water all over your hard work.
- Bake until cheese is bubbly and toppings are hot, then broil briefly if you want that browned top.
How to Keep It Crisp (Not “Chicken Puddle”)
If someone tells you their chicken crust was soggy, they are not a bad cook. They just haven’t learned the three laws of chicken crust physics:
moisture is real, thickness matters, and sauce is sneakier than it looks.
Crispness checklist
- Go thin: A thick crust stays soft in the center. A thin crust firms up and browns.
- Use parchment: It prevents sticking and helps lift the crust for blotting or flipping.
- Pre-bake longer than your instincts want: “Set” is not the same as “done.” Aim for firm and lightly browned.
- Blot excess juices: It feels dramatic, but it works.
- Reduce watery toppings: Sauté mushrooms, drain pineapple, pat tomatoes, and pre-cook veggies that release water.
- Use low-moisture mozzarella: Fresh mozzarella is delicious, but it’s also basically cheese-flavored rain.
- Cool for a few minutes before slicing: A short rest helps the crust set so it cuts cleaner.
Topping Combos That Actually Love This Crust
Because the crust already tastes savory and “Italian-adjacent,” toppings that pair with chicken tend to shine. Here are some crowd-pleasers:
1) Classic Pepperoni (but smarter)
- Thick-ish marinara (go light)
- Low-moisture mozzarella
- Pepperoni (optional tip: blot or pre-crisp to reduce grease)
- Crushed red pepper + oregano
2) Chicken Parm Vibes
- Marinara + mozzarella
- Extra Parmesan
- Fresh basil after baking
- A drizzle of olive oil for “restaurant energy”
3) Buffalo Ranch (Game Day Approved)
- Buffalo sauce (or hot sauce + a little melted butter)
- Mozzarella + a sprinkle of cheddar
- Cooked onions
- Ranch drizzle after baking
4) BBQ Chicken, Meal-Prep Edition
- BBQ sauce (use a thicker one)
- Cooked red onion + bell pepper
- Mozzarella
- Cilantro after baking
5) “Fridge Clean-Out Veggie” (But Make It Delicious)
- Pesto or marinara
- Sautéed mushrooms
- Roasted peppers
- Olives, spinach (wilted and squeezed dry), and a little feta
Nutrition Talk (Without the Buzzkill)
A ground chicken crust is naturally high in protein and low in carbs compared to traditional flour-based dough.
That can be helpful if you’re building protein-forward meals, managing blood sugar, going gluten-free, or simply trying to stay full longer.
The exact macros depend on your chicken, how much cheese you add, and your toppings. If you want to keep it lean, choose a leaner ground chicken and use a lighter hand with cheese.
If you want it more indulgent (and still protein-packed), add mozzarella to the crust and go full “bubbly cheese blanket” on top.
Food Safety and Handling (Quick but Important)
- Use clean surfaces and wash hands well after handling raw poultry.
- Avoid rinsing raw chicken (it can spread bacteria around the sink area).
- Cook poultry until it reaches a safe internal temperature and looks fully cooked throughout.
Make-Ahead, Storage, and Reheating
This crust is surprisingly meal-prep friendly if you treat it like a real cooked protein (because it is).
Make-ahead options
- Pre-bake the crust, cool it, then refrigerate. Add toppings later and bake when ready.
- Freeze a baked crust between sheets of parchment, then thaw in the fridge and re-crisp in the oven.
Reheating for best texture
- Oven or toaster oven: Best for crispness.
- Air fryer: Great for slices (watch the cheese near the heating element).
- Microwave: Works in a pinch, but expect a softer crust.
Troubleshooting: Common Problems and Easy Fixes
“My crust is soft and wet.”
- Make it thinner next time.
- Pre-bake longer and blot moisture.
- Use less sauce and pre-cook watery toppings.
“It stuck to the pan.”
- Use parchment paper every time.
- Let it cool a few minutes before peelingwarm crust releases more cleanly.
“It’s falling apart when I slice.”
- It likely needs a longer first bake to set.
- Let it rest before slicing.
- Make sure you included a binder (egg) and enough finely grated cheese to help structure.
“It tastes bland.”
- Season the crust like you mean it: garlic, oregano, salt, pepper, and Parmesan are your friends.
- Add flavor layers: crushed red pepper, smoked paprika, or a pinch of fennel seed for “pizza shop” vibes.
FAQ
Can I use ground turkey instead?
Yes. Ground turkey behaves similarly. Lean turkey can dry out a bit faster, so keep an eye on bake time and don’t skip sauce/cheese if you like it juicy.
Can I make it dairy-free?
You can, but texture may be a little less crisp and sturdy. Consider using a dairy-free grated alternative and leaning hard on seasonings.
You can also top it dairy-free and bake until hot and set.
Can I cook it in a skillet?
You can start it in a skillet for browning, but finishing in the oven makes it easier to cook through evenly and firm up like a real crust.
Is it actually “pizza”?
It’s pizza enough to satisfy the cravingand protein-forward enough that you won’t be raiding the pantry an hour later. That’s a win in most households.
Real-Life Experiences: What It’s Like to Make This at Home (About )
The first time most people try a ground chicken pizza crust, there’s a moment of doubt that feels very human: you look at a bowl of sticky chicken, egg, and cheese and think,
“I am about to press this into a circle and call it dinner?” Yes. Yes, you are. And it usually turns out way better than expected.
Here’s the most common “aha”: wet hands change everything. The mixture is stickybecause it’s protein, not flour-based doughso lightly dampening your hands
(or the back of a spoon) makes shaping smoother and less frustrating. People also find that aiming for a thin, even layer is the difference between “sliceable pizza” and
“tasty chicken casserole that happens to be round.” Thin edges and a slightly thicker center can work, but if it’s thick everywhere, it tends to steam instead of crisp.
Another relatable experience: the crust releases juices during baking, and it can look alarming. This is where the crust earns its reputation.
Home cooks often report that simply blotting the moisture once mid-bake makes the final texture noticeably firmer. It feels extra, like you’re doing skincare for pizza,
but it works. The next “level up” move is flipping the crust for a few minutes so both sides get direct heat. The first time you flip it, you’ll do it slowly,
like you’re defusing a bomb. After that, you’ll wonder why you ever hesitated.
Toppings are where people really learn the personality of this crust. Heavy sauce and watery veggies can undo crispness fast, so many home cooks naturally start using a
lighter hand with sauce and choosing lower-moisture toppings. One popular adjustment is sautéing mushrooms and peppers first, or patting sliced tomatoes dry.
It’s not “extra cooking.” It’s moisture managementand your crust will thank you by staying sliceable.
The fun part is how customizable it becomes once you trust the method. Some families treat it like a weekly protein dinner template:
bake the crust, let everyone top their own section, and suddenly pizza night becomes interactive without needing separate doughs.
People who meal prep often like it because a pre-baked crust can live in the fridge and turn into a fast lunchtop, bake, done.
And if you’re feeding picky eaters, the “chicken parm” topping path (marinara + mozzarella + basil) tends to win hearts because it tastes familiar.
The biggest emotional victory? That moment when you pick up a slice and it holds. It’s oddly satisfyinglike you just proved a point to bread.
Even if your first attempt isn’t perfect, most cooks find the learning curve is short: make it thinner, bake it longer, blot moisture, and don’t drown it in sauce.
After one or two tries, it stops feeling like a viral experiment and starts feeling like a legitimate, craveable dinner that just happens to be high-protein.