Table of Contents >> Show >> Hide
- First: Is This a “DIY Splinter” or a “Call for Backup” Splinter?
- Set Yourself Up for Success: The 2-Minute Prep That Saves 20 Minutes of Stress
- Tried-and-True Home Methods for Splinter Removal
- 1) The Tweezers Method (Best for a Splinter That’s Sticking Out)
- 2) The Needle + Tweezers Method (When the Splinter Is Just Under the Surface)
- 3) Warm Water Soak (The “Softening” Move)
- 4) Sticky Tape Lift (For Very Small, Shallow Splinters)
- 5) The White Glue Peel (A Gentle Option for Tiny Surface Slivers)
- 6) Epsom Salt Soak (Popular “Draw-It-Out” Remedy)
- 7) Honey + Bandage (A Sticky, Traditional Option)
- 8) Baking Soda Paste (Use CautionCan Irritate Skin)
- Methods to Skip (Because They Create More Problems Than They Solve)
- Aftercare: What to Do Once the Splinter Is Out
- What About Tetanus?
- When to See a Clinician for Splinter Removal
- FAQs: Quick Answers to Common “Splinter Panic” Scenarios
- Real-Life Splinter Experiences (and What People Learn the Hard Way)
Splinters are nature’s way of saying, “Nice job touching that wooden deck / garden stake / craft stick / mysterious picnic table.”
The good news: most splinters are small, shallow, and totally handleable at home. The bad news: the more you poke at one like it
owes you money, the more likely it is to break, hide, and turn into a tiny, dramatic problem.
This guide walks you through home remedies to remove a splinter safely (with the least fuss), plus aftercare and
clear red flags for when it’s time to call a clinician. We’ll focus on realistic, skin-friendly methods you can do with common
household itemsno medieval tools, no “just dig harder,” and definitely no rage-removal.
First: Is This a “DIY Splinter” or a “Call for Backup” Splinter?
Home splinter removal works best when the splinter is small, visible, and close to the surface.
Consider getting medical help instead if it’s deep, large, near the eye, under a nail and you can’t reach it, or if you’ve tried
for 10–15 minutes and you’re not making progress (that’s your sign to stop before you turn it into a bigger wound).
Quick “Don’t DIY” checklist
- Near or in the eye (don’t mess around here)
- Deeply embedded or you can’t see the end
- Under a fingernail/toenail and you can’t access it
- The splinter keeps breaking into smaller pieces
- Increasing redness, warmth, swelling, drainage, or worsening pain
- You have conditions that make infections riskier (for example, immune suppression or poorly controlled diabetes)
Set Yourself Up for Success: The 2-Minute Prep That Saves 20 Minutes of Stress
The best splinter removal is boring. You know: clean hands, good lighting, calm vibes. Here’s the setup that makes
how to get a splinter out easier and less irritating for your skin.
- Wash your hands with soap and water.
- Clean the area around the splinter with soap and warm water. Pat dry.
- Bright light + magnification helps (a phone flashlight and reading glasses count).
- Clean your tools (tweezers and, if needed, a small needle) with rubbing alcohol and let them dry.
- If it’s tender, numb it briefly with an ice cube wrapped in a cloth for a minute or two.
One more rule that saves a lot of grief: pull the splinter out in the same direction it went in.
Twisting or yanking sideways is how splinters snap and become stealth fragments.
Tried-and-True Home Methods for Splinter Removal
Think of these as your “splinter toolkit.” Start with the simplest method and move down only if needed. The goal is
remove splinter safelynot “win a wrestling match against your fingertip.”
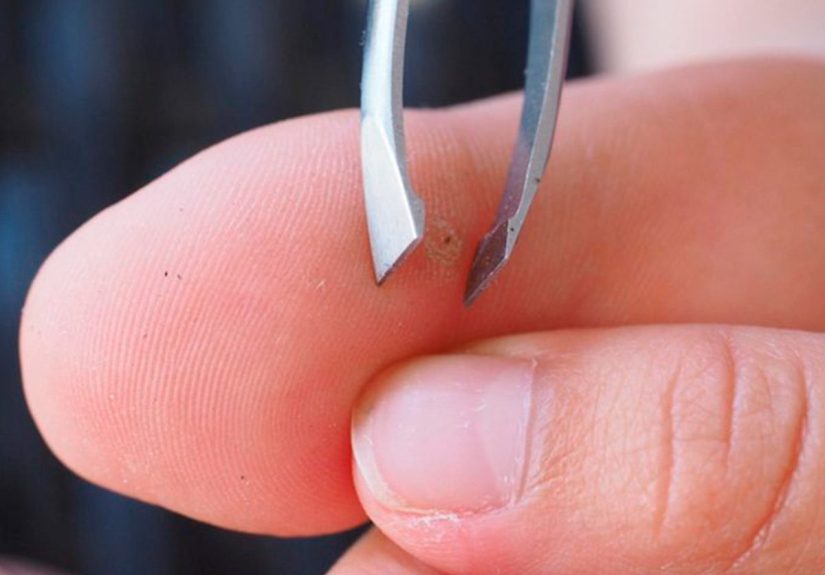
1) The Tweezers Method (Best for a Splinter That’s Sticking Out)
- Make sure the tweezers tips are clean and aligned (no “chewing” the skin).
- Grip the splinter as close to the skin as possible.
- Pull gently in the same direction it entered.
- If it slides out: celebrate quietly, wash the area again, and jump to aftercare.
Tip: Avoid squeezing or pinching the surrounding skin hard. Pressure can snap the splinter into smaller pieces and
make removal harder.
2) The Needle + Tweezers Method (When the Splinter Is Just Under the Surface)
If the splinter is under a thin layer of skin (visible but not grabbable), this method can help you expose the tip.
Keep it gentlethis is a “careful lift,” not a “dig a tunnel.”
- Clean the needle and tweezers with rubbing alcohol and let them dry.
- Use the needle to gently lift or open the top layer of skin at the end of the splinter.
- Once an end is exposed, switch to tweezers and pull it out along the entry path.
- Wash again with soap and water when finished.
3) Warm Water Soak (The “Softening” Move)
A warm soak won’t magically teleport a splinter out, but it can soften skin and make the tip easier to grabespecially
for tiny splinters in hands and feet.
- Soak the area in warm (not hot) soapy water for 10 minutes.
- Pat dry, re-check the splinter under good light, then try tweezers again.
- Repeat once more if it seems close to the surface.
4) Sticky Tape Lift (For Very Small, Shallow Splinters)
If the splinter is more like a “surface sliver” than a buried shard, tape can sometimes lift it out without poking.
- Dry the skin completely.
- Press a piece of strong tape (packing tape works well) over the splinter.
- Peel back slowly in one direction.
- If the splinter doesn’t move after a couple tries, stop and switch methods.
5) The White Glue Peel (A Gentle Option for Tiny Surface Slivers)
This is basically “tape, but craftier.” It’s best for shallow splinters where the tip is near the surface.
Do not use if the skin is broken, bleeding, or irritated.
- Clean and dry the area.
- Apply a thin layer of white school glue over the splinter site.
- Let it dry fully (the hardest step for impatient humans).
- Peel it off slowly. If it works, the sliver may come with it.
6) Epsom Salt Soak (Popular “Draw-It-Out” Remedy)
Some first-aid sources suggest Epsom salts may help bring a splinter closer to the surface by creating an osmotic effect.
Evidence isn’t perfect, but it’s generally low-risk for intact skin.
- Dissolve Epsom salt in warm water (follow package directions).
- Soak the area for 10 minutes.
- Dry, inspect, and try tweezers again.
7) Honey + Bandage (A Sticky, Traditional Option)
Honey is often described as soothing and may help soften the skin. This is a “try it if you have it” method, not a guaranteed
fixand it’s best for intact skin and minor splinters.
- Clean the area, pat dry.
- Apply a small amount of honey over the splinter site.
- Cover with a bandage for a few hours.
- Remove, wash, inspect, and try tweezers.
8) Baking Soda Paste (Use CautionCan Irritate Skin)
Baking soda paste is a common “home remedy to remove a splinter” idea. Some people feel it helps draw out shallow slivers,
but it can also irritate sensitive skin. Keep expectations modest and stop if it stings or reddens the area.
- Mix baking soda with a small amount of water to make a paste.
- Apply over the splinter area and cover with a bandage for up to a few hours.
- Rinse off, dry, and re-check the splinter.
- If the tip is exposed, use clean tweezers to remove it.
Methods to Skip (Because They Create More Problems Than They Solve)
- Deep digging with sharp objects. If you can’t see it, don’t excavate your own skin.
- Squeezing hard around the splinter. This can break it and push it deeper.
- Harsh chemicals as “soaks” (for example, using strong disinfectants directly on skin repeatedly). Clean skin is good; irritated skin is not.
- Ignoring worsening symptoms. A stubborn splinter plus increasing redness/warmth is not a “wait it out” situation.
Aftercare: What to Do Once the Splinter Is Out
After you remove a splinter, your job becomes “help the skin heal and keep it clean.” Simple works.
- Wash the area with soap and water, then pat dry (don’t rub).
- Apply a thin layer of petroleum jelly or an over-the-counter antibiotic ointment if you tolerate it.
- Cover with a clean bandage if it might get dirty or rubbed.
- Check it daily for splinter infection signs: increasing redness, warmth, swelling, tenderness, or drainage.
What About Tetanus?
Splintersespecially from dirty outdoor materialscan count as “wound exposure,” and tetanus protection depends on your vaccine history
and the type of wound. In general, people are advised to stay up to date on tetanus vaccination. For wound management, a booster may be
recommended if it’s been 10+ years since the last tetanus vaccine for a clean minor wound, or 5+ years for
a dirty/major wound. If you’re unsure, ask a clinicianthis is a quick question with a clear answer.
When to See a Clinician for Splinter Removal
There’s no prize for suffering. Seek medical care if:
- You can’t remove it after 10–15 minutes of gentle attempts
- The splinter is deep, large, or broken into pieces
- It’s under a nail, near the eye, or in a sensitive area
- You notice infection signs (increasing redness, warmth, swelling, drainage, or worsening pain)
- You’re unsure about your tetanus vaccination status
FAQs: Quick Answers to Common “Splinter Panic” Scenarios
How do I remove a splinter from a child?
Keep it calm and quick. Use good light, consider numbing with a brief ice pack, and try tape or tweezers first.
If the child is distressed or the splinter is deep, it’s reasonable to get help rather than turning it into a wrestling match.
What if the splinter is under a fingernail?
Sub-nail splinters can be tricky and painful. If you can’t grasp the end easily or you’re not confident you can remove it cleanly,
it’s often best handled by a clinician to avoid pushing it deeper or injuring the nail bed.
Can I leave a tiny splinter alone?
Sometimes a very small, painless surface sliver can work its way out as the skin naturally sheds. But if it’s causing pain,
redness, or you suspect a fragment is retained, it’s better to remove it or get it checked.
What if it’s glass or metal?
If you suspect glass or metal and you can’t see or grasp it easilyor you feel a sharp sensation with pressuredon’t dig.
Medical evaluation may be needed to ensure it’s fully removed.
Real-Life Splinter Experiences (and What People Learn the Hard Way)
If you’ve ever gotten a splinter and thought, “This is fine, I’ll deal with it later,” you’re in excellent company.
Here are some common real-world splinter situations people run intoand the practical lessons that usually follow.
The Deck Board Surprise: Someone brushes their hand along an older wooden railing and picks up a splinter that’s
visible but not quite sticking out enough to grab. The first impulse is to squeeze the skin and “pop it out.” That almost always
backfirespinching can snap the splinter or press it deeper. What tends to work better is boring-but-effective: a warm soapy soak,
bright light, and clean tweezers. People often say the soak is what turned an impossible splinter into a “finally, I can grab it” moment.
The Gardening Thorn Situation: Gardeners frequently get small plant spines or wood slivers that feel bigger than they are.
The lesson here is timing: wood and plant material can irritate tissue quickly, so early removal is easier than “I’ll do it after I finish
planting these 47 things.” People who delay often end up with more tenderness and swelling, which makes it harder to see and grasp the splinter.
A quick pause to wash, sterilize tweezers, and remove it gently can save a lot of annoyance later.
The Craft Stick Incident (Usually Involving Kids): Little hands + popsicle sticks = tiny splinters that are shallow but dramatic.
Parents often find that tape is the best first attempt because it feels less scary than tweezers. If tape doesn’t work, icing the area briefly can
help with discomfort, and then a simple tweezer pull does the job. The biggest takeaway: it’s okay to stop after 10–15 minutes. If a child is upset,
trying harder rarely helpsswitching to professional help can be the kinder (and faster) option.
The Barefoot Problem: Foot splinters (especially from patios, docks, or sand + wood debris) can be stubborn because the skin is thicker.
People often report that soaking and then using tweezers is more effective than going straight in with a needle. Aftercare matters more on feet, too:
keeping the spot clean and covered reduces irritation from walking. When a foot splinter is deep, breaks, or causes increasing redness, people are usually
happiest when they stop DIY efforts and let urgent care handle itbecause walking on a problem is a great way to keep it a problem.
The “I Used Glue and It Worked!” Story: Some folks swear by the white glue peel for tiny surface slivers. When it works, it’s usually
because the splinter is very shallow and close to the surfacemore like a sliver caught in the top layer than a true embedded splinter. The key lesson is
choosing the right method for the right splinter: glue and tape are for shallow situations, while deeper splinters need careful exposure and tweezersor a
clinician if you can’t reach it safely.
Across these stories, the pattern is pretty consistent: clean first, go gently, pull the same direction, and stop before you start digging.
Most splinters aren’t medical emergencies, but they do reward patienceand they punish improvisation. If you treat splinter removal like a calm,
well-lit mini project instead of a high-stakes showdown, your skin will usually cooperate.