Table of Contents >> Show >> Hide
- Why Choose Cooked Mayonnaise Instead of Raw?
- Ingredients for Homemade Cooked Mayonnaise
- Step-by-Step Homemade Cooked Mayonnaise Recipe
- Troubleshooting Cooked Mayonnaise
- Flavor Variations for Cooked Mayonnaise
- How to Use Your Homemade Cooked Mayonnaise
- Food Safety Tips for Cooked Mayonnaise
- Real-Life Experiences with Homemade Cooked Mayonnaise
If you’ve ever stared at a jar of store-bought mayo and thought, “I can do better than this,” you’re absolutely right. Homemade mayonnaise is richer, silkier, and endlessly customizable. But if you’re nervous about raw eggs, there’s a tasty solution: a homemade cooked mayonnaise recipe that gives you that same dreamy texture with an extra layer of food safety and peace of mind.
In this guide, we’ll walk through exactly how to make cooked mayo at home, why it’s safer, and how to fix it if things go sideways. We’ll also share real-life tips, flavor variations, and experiences so you can confidently whip up your own cooked mayonnaise like a pro.
Why Choose Cooked Mayonnaise Instead of Raw?
Classic mayonnaise is an emulsion of egg, oil, and acid. Traditional recipes use raw egg yolks, which is delicious but can be risky because fresh eggs may carry Salmonella, a bacteria that can cause food poisoning. U.S. food safety agencies note that egg mixtures are safest when heated to at least 160°F (71°C), which is hot enough to kill harmful bacteria while still preserving a smooth texture in custard-style recipes like ice cream, eggnog, and sauces.
Cooked mayonnaise uses a gently heated egg base (often called a “cooked custard base”) before emulsifying the oil. When done properly, the egg mixture reaches that 160°F sweet spot, offering:
- Better safety for kids, older adults, pregnant people, and anyone with a weakened immune system.
- A slightly thicker, more stable texturegreat for sandwiches, salads, and dips.
- A flavor you can tweak endlessly with herbs, spices, and different oils.
You can also start with pasteurized eggs, which have already been heated to destroy bacteria while staying liquid. But combining pasteurized eggs with a cooked base gives you even more peace of mind.
Ingredients for Homemade Cooked Mayonnaise
This recipe makes about 1½ to 2 cups of cooked mayonnaise, enough for a week’s worth of sandwiches, potato salads, and dipping adventures.
Core Ingredients
- 2 large egg yolks (pasteurized if possible)
- 2 tablespoons water (helps the yolks cook more gently)
- 2 tablespoons lemon juice or white wine vinegar
- 1 teaspoon Dijon mustard (for flavor and emulsion stability)
- ½ teaspoon fine salt (plus more to taste)
- 1 teaspoon sugar (optional, but rounds out the flavor)
- 1 to 1¼ cups neutral oil such as canola, grapeseed, avocado, or light olive oil
Choosing the Right Oil
Oil isn’t just a background player here; it’s most of your mayonnaise. A strongly flavored extra-virgin olive oil can make mayo taste bitter or heavy in large amounts. Many homemade mayo recipes recommend:
- Neutral oils (canola, grapeseed, sunflower) for classic, mild flavor.
- Avocado oil for a slightly buttery, modern twist.
- Light-tasting olive oil if you want a hint of olive flavor without overpowering the sauce.
You can also blend oilshalf neutral, half light olive oilfor a nice balance of flavor and smoothness.
Equipment Checklist
- Small saucepan plus a heatproof bowl (for a makeshift double boiler), or a very heavy-bottomed small pot.
- Instant-read thermometer (highly recommended to ensure you reach 160°F).
- Whisk, or an immersion blender/food processor.
- Clean glass jar or airtight container for storage.
Step-by-Step Homemade Cooked Mayonnaise Recipe
Step 1: Set Up Your Cooking Station
Fill a small saucepan with about 1–2 inches of water and bring it to a gentle simmer over low to medium-low heat. Place a heatproof bowl on top to form a double boiler; the bottom of the bowl should not touch the water. This gentle heat is key to cooking the eggs without scrambling them.
Step 2: Make the Egg Base
In the heatproof bowl (off the heat at first), whisk together:
- Egg yolks
- Water
- Lemon juice or vinegar
- Mustard
- Salt and sugar
Whisk until the mixture looks smooth and slightly lighter in color. This early whisking introduces air and helps the yolks cook evenly.
Step 3: Gently Cook the Egg Mixture
Place the bowl over the simmering water. Keep the heat low. Whisk constantly as the mixture slowly warms and thickens. You’re aiming for 160°F, measured with an instant-read thermometer. If you don’t have a thermometer, heat until the mixture is noticeably thicker and coats the back of a metal spoon in a thin, even film.
Take your time hererushing and overheating can scramble the yolks. If you see any tiny cooked bits, don’t panic; you can strain the mixture before emulsifying.
Step 4: Cool the Base Slightly
Once the mixture hits 160°F, remove the bowl from the heat. Whisk for another 30–60 seconds off the heat to cool it a bit and keep it smooth. Let it stand for a few minutes until it’s warm, not hot. If it’s too hot when you add the oil, the mayo can separate.
Step 5: Slowly Emulsify with Oil
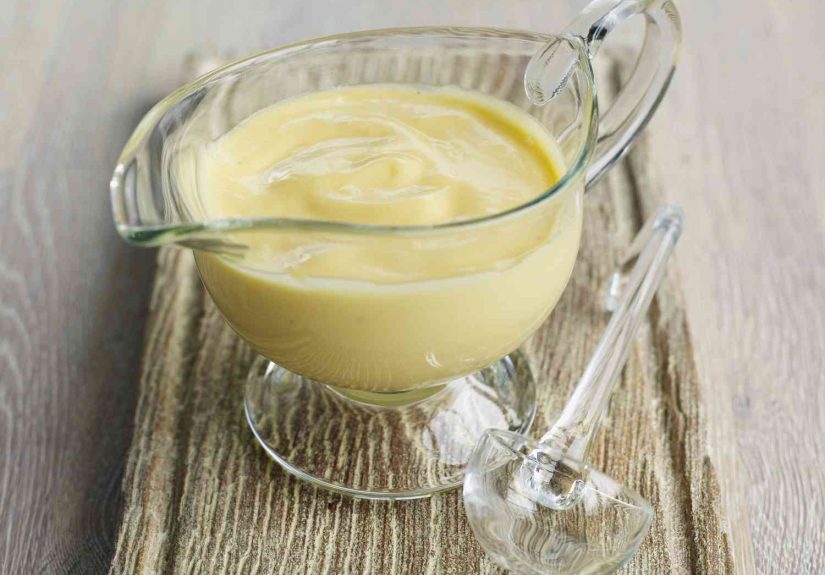
Now the magic: turning your cooked egg base into thick, glossy cooked mayonnaise.
By hand with a whisk: Start by adding the oil drop by drop while whisking vigorously. Once the mixture begins to thicken and look creamy, you can increase to a thin, steady stream, whisking the entire time.
With an immersion blender or food processor: Turn the blender to low and drizzle the oil in a very thin stream. The emulsion usually forms quickly. Stop and scrape down the sides occasionally to keep everything smooth.
You’ll see the mixture transform from thick custard to a pale, fluffy mayonnaise. If it looks too thick to blend smoothly, you can mix in a teaspoon of water or lemon juice to loosen it slightly.
Step 6: Taste and Adjust
Once all the oil is incorporated, taste your cooked mayo. Add a pinch more salt if it needs punch, extra lemon juice or vinegar for more tang, or a sprinkle of sugar if it feels too sharp. This is your house mayonnaisemake it taste like you.
Step 7: Cool and Store Safely
Transfer the cooked mayonnaise to a clean, airtight container. Let it cool to room temperature, then refrigerate. Because the egg base is cooked and the mayo is kept cold, most home cooks treat it like other homemade sauces and aim to use it within about 4–7 days. Always use a clean spoon and toss it if it smells off, looks separated and funky, or you’re unsure how long it has been in the fridge.
Troubleshooting Cooked Mayonnaise
If Your Mayo Is Too Thick
Thick mayo is usually a good problemit means the emulsion is strong. To thin it, whisk in:
- 1 teaspoon of water, lemon juice, or vinegar at a time.
- Stop when you reach your ideal texture.
Acidic liquids (lemon juice or vinegar) brighten the flavor while loosening the mayo, so they’re often the best choice.
If Your Mayo Is Too Thin
This often means you haven’t added enough oil or the emulsion didn’t fully form. You can try:
- Blending or whisking for longer to see if it thickens.
- Whisking in a little more oil, very slowly.
Remember, mayonnaise can only hold a certain amount of oil. If you’ve added way too much, it can eventually break.
If Your Mayo Breaks (Separates)
A “broken” mayo looks grainy or oily, like the sauce suddenly gave up. Don’t throw it outyou can often rescue it. A common chef trick is to start a fresh base and use the broken sauce as the “oil.” Here’s how:
- In a clean bowl, whisk 1 egg yolk (or a tablespoon of your cooked base if you reserved some) with a teaspoon of water or lemon juice.
- Slowly whisk in the broken mayo a spoonful at a time until it thickens and comes back together.
You can also sometimes revive a borderline emulsion by whisking in a teaspoon or two of cold water or adjusting the temperature slightly. The key is patience and very slow additions.
Flavor Variations for Cooked Mayonnaise
Once you’ve mastered the basic homemade cooked mayonnaise recipe, you can customize it for just about any dish.
Garlic & Herb Cooked Mayo
- Add 1–2 finely grated garlic cloves (or roasted garlic for milder sweetness).
- Stir in chopped fresh parsley, dill, or chives.
- Great for potato salad, grilled vegetables, or sandwiches.
Smoky Chipotle Mayo
- Add 1–2 teaspoons minced chipotle in adobo sauce.
- Mix in a pinch of smoked paprika.
- Perfect for burgers, tacos, or sweet potato fries.
Lemon-Dill Seafood Mayo
- Increase lemon juice by 1 tablespoon.
- Add chopped dill and a tiny pinch of Old Bay or celery salt.
- Serve with crab cakes, salmon, or shrimp.
Lighter Greek Yogurt Cooked Mayo
To lighten things up, you can replace up to one-third of the finished cooked mayo with thick Greek yogurt. Stir it in gently at the end. You’ll get extra tang and a bit fewer calories, but note that it may not keep quite as long.
How to Use Your Homemade Cooked Mayonnaise
Once you have a jar of cooked mayo in the fridge, it becomes your secret weapon for quick, flavorful meals:
- Sandwiches & wraps: Spread it on bread for turkey, chicken, BLT, or veggie sandwiches.
- Salads: Turn it into dressing by thinning with a little milk or buttermilk and adding herbs.
- Dips: Mix with ketchup, hot sauce, or mustard for easy fry sauce or burger sauce.
- Slaw: Toss with shredded cabbage, carrots, and a bit of vinegar for a creamy coleslaw.
- Potato or pasta salad: Cooked mayo holds up beautifully in chilled salads.
Once you realize how fast it comes together and how good it tastes, store-bought mayo will suddenly look a lot less exciting.
Food Safety Tips for Cooked Mayonnaise
Even though we’re using a cooked base, it’s still important to handle your mayonnaise with care:
- Start with clean tools and containers. Contaminated utensils can introduce bacteria.
- Don’t leave mayo out for long. Keep it refrigerated and limit time at room temperature, especially in warm kitchens or at picnics.
- When in doubt, throw it out. If your cooked mayonnaise smells sour in a bad way, looks watery and separated, or you can’t remember when you made it, it’s safer to toss and start a fresh batch.
- Consider pasteurized eggs plus a cooked base if serving high-risk groups like very young children, older adults, pregnant people, or those with chronic illness.
Real-Life Experiences with Homemade Cooked Mayonnaise
Let’s talk about what actually happens in a home kitchen, beyond the perfectly written recipe. Making a homemade cooked mayonnaise recipe is one of those projects that’s simple on paper but feels “advanced” the first time you try it.
Most people have the same two fears:
- “I’m going to scramble the eggs.”
- “The mayo will break and I’ll waste all that oil.”
Here’s the good news: with cooked mayo, the process is actually forgiving once you understand what’s going on.
The First-Time Experience
The first time many home cooks try cooked mayonnaise, they’re surprised by how slowly things move at the beginning and how fast they come together at the end. Standing over a double boiler, whisking yolks and watching a thermometer inch up to 160°F, feels like babysitting. But once you reach that temperature, you’re past the scary partno raw egg worries, just a thick, glossy base waiting for oil.
The second surprise usually comes when you add the oil. At first, it seems like nothing is happeningjust a thin sauce. Then, suddenly, it thickens, lightens in color, and transforms into real mayonnaise. That moment feels a bit like kitchen magic and is very satisfying.
Common Mistakes People Make
Overheating the egg base: This is the classic “scrambled egg mayo” mistake. If the heat is too high or you stop whisking, little curds can form. The fix? Strain the mixture through a fine mesh sieve before adding oil. You’ll lose a bit of volume, but the base is usually still usable.
Adding oil too quickly: When people are in a hurry, they pour the oil in a big splash instead of a thin stream. The emulsion doesn’t have time to build, and the mixture can separate. The emotional reaction: “I ruined it!” The reality: you almost never ruin it permanently. You can restart with a fresh yolk and slowly whisk the broken batch back in, turning disaster into proof that you know what you’re doing.
Under-seasoning: Store-bought mayo is usually quite salty and tangy, so a homemade version can taste flat if you don’t add enough acid and salt. A little extra lemon juice and a pinch more salt often transform “meh” into “wow.”
How Cooked Mayo Changes the Way You Cook
Once you get comfortable making cooked mayonnaise, you start to see other dishes differently. Potato salad becomes an opportunity: you can fold in herb-packed mayo for a bright, fresh flavor instead of relying on a jarred dressing. Grilled chicken sandwiches get an upgrade with smoky chipotle mayo or lemon-dill mayo instead of plain condiment.
You might also notice that your grocery list changes. Instead of buying multiple specialty sauces, you can keep basic pantry items on handoil, eggs, acid, mustardand transform them into a range of flavored spreads. Cooked mayo becomes a base you can customize for whatever you’re cooking that week.
Confidence Builds Quickly
By the third or fourth time you make cooked mayonnaise, the steps feel natural:
- Yolks, water, acid, mustard in a bowl.
- Whisk over gentle heat to 160°F.
- Cool a bit, then blend in oil.
- Adjust seasoning and chill.
At that point, the anxiety fades and is replaced by “Okay, what flavor do I want this time?” And that’s when cooking really becomes fun: when techniques like homemade cooked mayo stop feeling like a chemistry experiment and start feeling like a creative, everyday tool.
So if you’ve been hesitating, consider this your sign: grab some eggs, oil, and a whisk. Safe, silky, homemade cooked mayonnaise is absolutely within your reachand your sandwiches will never be the same again.