Table of Contents >> Show >> Hide
- Why Creeper Soap Works So Well
- The Easiest Method: Melt-and-Pour Soap
- Supplies You’ll Need
- Plan the Creeper Face (Keep It Simple)
- Step-by-Step: Homemade Minecraft Creeper Soap
- Pro Tips for Crisp Pixels and Fewer Bubbles
- Fun Variations (Because Minecraft Has Skins)
- Troubleshooting
- Kid-Friendly Craft Notes
- A Quick Word on Selling or Gifting
- Conclusion
- Real-World Experiences & Lessons from Making Creeper Soap (Extra Tips)
If you’ve ever watched someone sprint across a Minecraft landscape like they’re late for a dentist appointment,
you already know the Creeper is basically the game’s unofficial jump-scare mascot. So why not turn that iconic
pixel face into something surprisingly wholesomelike a bar of soap?
This “Homemade Minecraft Creeper Soap” project is a Hometalk-style crowd-pleaser: bright, blocky, and way easier
than it looks. It’s also the rare craft that pulls double dutyparty favor and practical hygieneso you can
hand kids a Creeper without anyone losing sleep (or diamonds).
Why Creeper Soap Works So Well
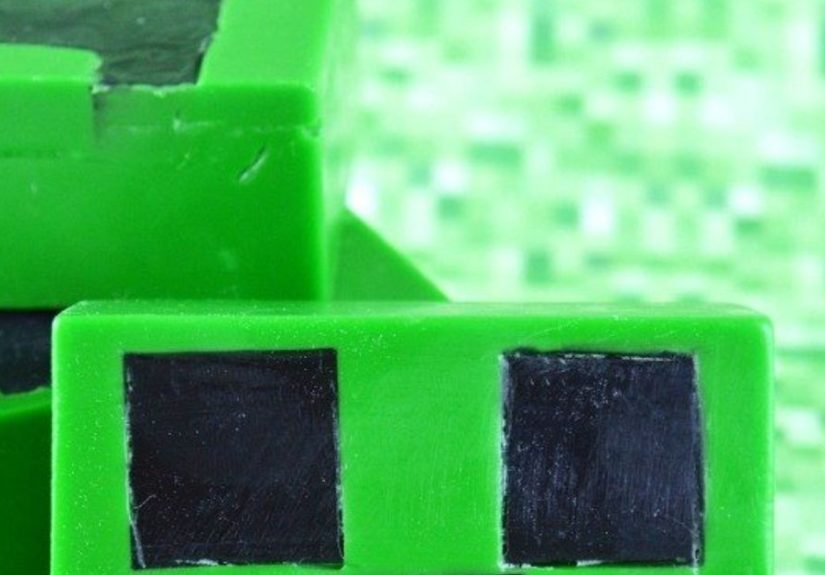
The Creeper’s face is essentially pixel art, which translates perfectly to soap. You don’t need fancy carving
skills or a steady-hand worthy of brain surgery. You’re just building a simple grid of squareslike a tiny
“crafty spreadsheet,” but greener and less emotionally taxing.
Best Use Cases
- Minecraft birthday party favors that guests actually use
- Bathroom-themed gag gift for gamers (yes, that’s a category)
- Stocking stuffer with a “handmade” flex
- Craft night project that finishes in one session
The Easiest Method: Melt-and-Pour Soap
For DIY soap projectsespecially ones involving crisp designsmelt-and-pour soap base is the MVP. You melt it,
color it, scent it (optionally), and pour it into a mold. No lye handling, no curing for weeks, no “I swear
it’s supposed to look like that” phase.
Melt-and-pour is also ideal if you’re crafting with teens, kids (with supervision), or anyone who wants a fun
result without turning the kitchen into a chemistry lab.
Supplies You’ll Need
You can keep this budget-friendly and still get clean, bold results. Here’s a reliable supply list:
Soap & Color
- Clear or white melt-and-pour soap base (clear makes colors pop; white looks more “cartoony”)
- Green soap colorant (skin-safe mica, pigment, or melt-and-pour color blocks)
- Black soap colorant (or a small amount of pre-colored black melt-and-pour soap)
- Optional: fragrance oil or essential oil rated skin-safe for soap
Tools & Setup
- Silicone mold: square cavity molds or a loaf mold you’ll cut into bars
- Microwave-safe measuring cups (glass works well)
- Cutting board + soap-safe knife
- Small spatula or spoon for stirring
- Spray bottle of isopropyl alcohol (helps remove surface bubbles and improves layer bonding)
- Paper towels, gloves (optional), and a little patience (required)
Plan the Creeper Face (Keep It Simple)
A Creeper face looks detailed, but it’s basically a handful of black squares on a green background. You have two
main ways to build it:
Option A: “Pixel Tile” Method (Most Accurate)
You’ll create black soap tiles (little squares), then place them into the mold like a mosaic before pouring the
green soap around them. This gives the crispest, most pixel-perfect Creeper face.
Option B: “Pour + Embed” Method (Fastest)
You pour a green base first, let it set slightly, then embed black pieces for the face. This is faster, but you
may get softer edges if your temperature control is chaotic.
Below, we’ll use the Pixel Tile Method because it reliably creates clean linesaka the difference
between “Creeper” and “mysterious green abstract art.”
Step-by-Step: Homemade Minecraft Creeper Soap
Step 1: Prep Your Mold and Workspace
Set your silicone molds on a flat tray or cutting board so you can move them without bending. Wipe them clean
and dry. If your mold has tiny details or dust, it will absolutely show up in the finished soap (soap is
judgmental like that).
Step 2: Make a Thin “Black Sheet” for Pixel Squares
Cut a small amount of melt-and-pour base into cubes (about the size of dice). Melt in short microwave bursts,
stirring between bursts so you don’t scorch it. Add black colorant until opaque. Then pour a thin layer (about
1/8–1/4 inch) into a small silicone tray, shallow container, or any flat mold you can peel off later.
Let that black soap layer fully harden. This becomes your “pixel tile” sheet.
Step 3: Cut Black Pixel Squares
Once hardened, pop out the black sheet and slice it into small squares. The exact size depends on your mold,
but aim for consistent tiles. If your final bar is about 2.5–3 inches wide, squares around 1/4–3/8 inch tend
to read well as “pixels.”
Tip: Line up a few cuts, stack strips, and cut multiple pieces at once. This part feels like craft prep, but it
pays off when your Creeper face looks crisp instead of “melty.”
Step 4: Arrange the Creeper Face in the Mold
Place black squares into the mold in a Creeper face pattern. If you’re freehanding, here’s a simple guide:
- Eyes: Two blocky squares/rectangles near the top
- Nose bridge: A small vertical block in the center
- Mouth: A wider, stepped shape beneath the nose
Don’t stress about perfect symmetry. Minecraft itself is a world where someone can build a cathedral out of
dirt. Your soap can handle a little personality.
Step 5: Melt and Color the Green Soap Base
Cut enough soap base to fill your mold(s). Melt gently in short bursts, stirring between bursts. Add green
colorant gradually and mix well. Go brighter than you think you needsoap can look slightly lighter once it
cools and hardens.
If you’re adding fragrance, use only skin-safe scents intended for soap, and keep the scent level moderate.
(In other words: do not turn your bathroom into a chemical watermelon factory.)
Step 6: Pour Carefully and Lock In the Pixel Look
Before you pour, spritz the mold lightly with isopropyl alcoholthis can help reduce bubbles and improve bonding.
Pour a small amount of green soap into the mold first, just enough to “seal” the black squares in place.
Spritz the surface again to pop bubbles.
Then slowly fill the mold the rest of the way. Pouring slowly helps prevent your black tiles from floating,
shifting, or flipping like tiny soap rafts.
Step 7: Let It Set, Then Unmold
Allow the soap to cool and harden until it feels firm (often 1–2 hours depending on mold depth and room
temperature). Once fully set, pop it out gently. If your mold bends too much, support it from underneath.
If you used a loaf mold, unmold the loaf and slice into bars with a clean knife.
Pro Tips for Crisp Pixels and Fewer Bubbles
Use Alcohol Like a “Bubble Eraser” (Safely)
A light spritz of isopropyl alcohol helps eliminate surface bubbles and can help layers bond. Keep the spray
away from flames, hot burners, candles, or anything that’s auditioning to become a fire hazard. Use it in a
well-ventilated area, and cap it when you’re done.
Control Heat to Avoid “Melting Your Creeper”
If your green soap is too hot when you pour, it can slightly melt the black tiles and blur edges. Let the
melted base cool a bit before pouringwarm and fluid is good; volcanic is not.
Choose the Right Base for Your Look
- Clear base: bright, gem-like color; can show bubbles more easily
- White base: softer “cartoon” look; hides bubbles better
- Shea butter or goat milk base: creamier look, usually opaque
Fun Variations (Because Minecraft Has Skins)
Glow Creeper Soap
Add a skin-safe glow pigment to the green base for an “it glows in the dark” surprise. Great for party favors
and kids who love anything mildly magical.
Biome Packs
Make a small set: “Swamp Green,” “Ocean Blue,” “Nether Red,” and “End Purple.” Same technique, different colors.
Suddenly you have a collection that looks intentional and gift-worthy.
Confetti “XP” Soap
Chop extra green and black soap scraps into tiny cubes and sprinkle them into the mold like confettiyour soap
becomes a mini “loot drop” bar.
Troubleshooting
My Black Squares Floated
Next time, pour a thin green layer first, let it set slightly, then place black squares and pour the rest.
You can also pour in two stages: a small “anchor pour,” then the full fill.
The Pixels Look Blurry
Your base was likely too hot, or you stirred/poured too aggressively. Let the melted soap cool slightly before
pouring, and pour slowly along the side of the mold.
My Soap Has “Sweat” or Dew Drops
Melt-and-pour soap can attract moisture (especially in humid environments). Wrap finished bars tightly in plastic
wrap or place in sealed bags once fully cooled to keep them looking fresh and giftable.
Kid-Friendly Craft Notes
This is a fantastic “older kid + adult” project. Adults should handle melting and pouring (hot soap is hot,
even when it’s cute). Kids can help with:
- Arranging the pixel squares
- Choosing the shade of green
- Picking a safe scent (or deciding to skip scent)
- Packaging and labeling party favors
A Quick Word on Selling or Gifting
If you’re gifting these, you can keep it simple: list ingredients if you know them (especially if recipients
have sensitive skin), and avoid making medical or “kills germs” claims. Once you start claiming your soap treats
conditions or acts like a disinfectant, regulations can change based on intended use. For casual gifting, stick
to fun and clean.
Conclusion
Homemade Minecraft Creeper soap is one of those projects that looks impressively “extra” but is actually very
doableespecially with melt-and-pour soap base and a simple pixel-tile approach. You get bold, recognizable
Creeper faces, a fun activity for game-loving families, and party favors that won’t end up forgotten in a drawer.
Make a few bars, wrap them up, and watch the reactions. Because nothing says “I care” like a handmade gift that
simultaneously screams “Minecraft!” and whispers “please wash your hands.”
Real-World Experiences & Lessons from Making Creeper Soap (Extra Tips)
If you’ve never made melt-and-pour soap before, the first batch is usually a mix of excitement and mild suspicion.
The soap base looks like a block of something you’d find in a science lab refrigerator. Then you melt it, and
suddenly it becomes a glossy liquid that feels like it should come with a safety narrator: “Do not attempt to
juggle while hot.” The good news is that Creeper soap is one of the most forgiving “designed” soaps because the
pixel look actually benefits from small imperfections. A tiny air bubble here and there doesn’t ruin the vibe.
It just makes your Creeper look… more animated.
One of the biggest “aha” moments people report is how much prep matters. Cutting the base into
small cubes speeds melting and prevents overheating. Pre-cutting those black squares (and making more than you
think you need) avoids the classic scenario where you’re halfway through arranging the face and realize you’ve
built a Creeper with one eyebrow and no mouth. If you’re crafting with kids, having a little pile of extra tiles
is a lifesaverbecause someone will absolutely decide the Creeper needs “angry eyes,” and you’ll want the freedom
to roll with it.
Another common experience: the temperature dance. Melt-and-pour soap is happiest when it’s melted
enough to pour smoothly but not so hot that it melts what it touches. When the base is too hot, edges blur and
the black pixels can soften into the green. That’s not a disasteryour soap will still work and still look fun
but if you’re aiming for that crisp Creeper face, let the melted soap cool a little. People often describe it as
waiting until it’s “warm like bath water,” not “hot like fresh coffee.” Pouring slowly also helps; fast pours can
push tiles around like tiny boats in a storm.
Then there’s the rubbing alcohol spritza trick that feels oddly magical the first time. You pour,
spritz, and the bubbles pop like they got embarrassed and left. The best “experienced maker” habit is keeping the
bottle capped, spraying lightly (not soaking), and making sure you’re not spritzing near heat. People also notice
that alcohol helps with layering: if you ever decide to do a two-tone green background (light green + dark green)
or add a thin “shadow” layer, that quick spritz can improve adhesion so your layers don’t peel apart later.
Packaging is another real-world learning curve. Many makers discover that melt-and-pour soap can “sweat” in humid
climates, especially glycerin-rich bases. The fix is simple: once bars are fully cool and dry, wrap them snugly
in plastic wrap or tuck them into sealed bags. If you’re making party favors, consider a label that leans into
the joke“Creeper Clean Bar” or “Explosively Fresh”and include basic ingredients if you have them. It’s also
common to learn that fragrances can be strong fast; “a little” goes a long way. The goal is “pleasantly scented,”
not “this bathroom now smells like an entire orchard moved in.”
Finally, the most consistent “experience” people share is how much kids and gamers love the reveal. Unmolding
the first finished bar is the moment you find out whether you made a Creeper, a green robot, or something that
looks like pixelated toast. And even when it’s not perfect, it still landsbecause it’s handmade, it’s themed,
and it’s playful. That’s the sweet spot for DIY: a craft that feels special without requiring you to become a
full-time artisan with a dedicated workshop and a dramatic apron collection.