Table of Contents >> Show >> Hide
- Step 1: Do a Ruthless Closet Edit
- Step 2: Make a Simple Closet Game Plan
- Step 3: Maximize Vertical Space for Maximum Storage
- Step 4: Choose Closet Organizers That Actually Help
- Step 5: Arrange Your Closet Like a Pro
- Step 6: Add Finishing Touches the Pros Swear By
- Step 7: Maintain Your Pro-Level Closet
- Real-Life Closet Makeover Experiences & Lessons Learned
If opening your closet door feels like playing wardrobe Jenga, it’s time for a pro-level reset.
Professional organizers don’t just “make it look pretty”they squeeze every inch of storage
out of a closet while making it easier (and faster) to get dressed every day. The good news?
You don’t need custom built-ins or a celebrity budget to get similar results. You just need a plan,
a little ruthlessness, and maybe a box of matching hangers.
This guide walks you through how to arrange your closet like a professional organizer, from
ruthless decluttering to clever storage tricks that double (or triple) your usable space.
We’ll cover how to edit your clothes, use vertical space wisely, choose organizers that actually
help, and set up systems that stay organized instead of falling apart in a week.
Step 1: Do a Ruthless Closet Edit
Empty the closet completely
Every pro organizer starts the same way: they pull everything out. Not just some things.
Everything. Clothes, shoes, bags, belts, that random bag of hangers from 2012out. It might look
worse before it looks better, but it’s the only way to see what you actually own and how much
storage you truly have to work with.
Create clear “keep, donate, toss, sell” piles
Once everything is out, do a fast, honest edit. Many organizing and decluttering experts recommend
simple categories: Keep, Donate, Sell, and Toss. Ask yourself:
- Fit: Does it fit you right now, not “when I lose 10 pounds”?
- Condition: Is it stained, pilled, faded, or torn beyond rescue?
- Frequency: Have you worn it in the last year (or season) it’s appropriate for?
- Feeling: Do you actually like it, or is it just expensive guilt hanging on a hanger?
If something fails most of these questions, it’s stealing space from items you love and wear.
Let it go. Donate gently used pieces, toss items that are damaged beyond repair, and consider
selling high-quality or designer pieces to recoup a little cash.
Separate off-season and special-occasion items
Pro organizers rarely keep every single item of clothing front and center all year round.
Instead, they rotate:
- Store off-season items in vacuum-seal bags, lidded bins, or under-bed storage.
- Move formalwear and sentimental pieces to less accessible areas, like high shelves.
This instantly frees up space for what you actually reach for every week.
Step 2: Make a Simple Closet Game Plan
Measure and map your space
Before you run out and buy twenty bins that don’t fit, grab a tape measure. Measure:
- Width of the closet
- Height from floor to ceiling
- Depth of shelves
- Door style (swinging, bifold, or sliding)
Jot down where the hanging rod is, how many shelves you have, and how much empty wall or door space
is currently unused. This helps you decide what type of closet organizers will actually work
instead of guessing in the aisle at the store.
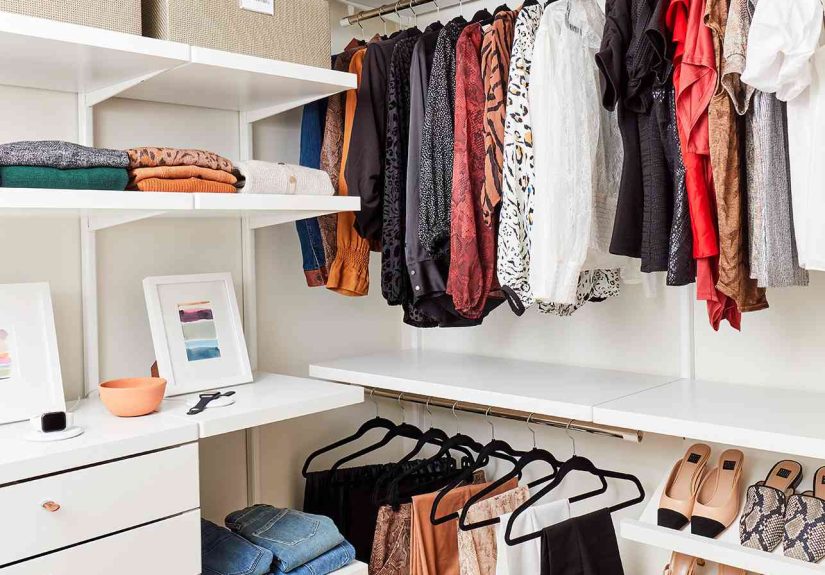
Assign zones like a pro
Think of your closet as a tiny boutique. Pros create “zones” so everything has a logical home:
- Prime real estate: Eye-level hanging space for everyday tops, pants, and dresses.
- Secondary zones: Slightly higher or lower spots for less-used but still accessible items.
- Deep storage: High shelves or out-of-the-way corners for off-season, formalwear, or keepsakes.
When you know which items deserve the best spots, you’ll make smarter decisions about what goes where.
Step 3: Maximize Vertical Space for Maximum Storage
Add a second hanging rod
Most closets waste a ton of vertical space. If you have only one rod across the top, adding a
second rod below it can almost double your hanging capacity. Use:
- Upper rod for blouses, jackets, and shorter dresses.
- Lower rod for pants, skirts, and shorter tops.
If you’re in a rental or can’t drill, look for adjustable tension rods or hanging rod expanders that
hook onto your existing rod.
Install high shelves and stackable drawers
Pro organizers love to push shelves higher to free up floor and mid-level space. That top zone is perfect for:
- Clearly labeled bins with off-season clothes.
- Suitcases, extra blankets, or bulkier items.
Below hanging space, consider stackable drawers or a slim dresser for folded items like
workout wear, pajamas, or tees. Drawers keep visual clutter down and make it easy to put things away.
Use your walls and doors like bonus storage
Walls and doors are prime real estate that often go unused. Professional organizers commonly add:
- Hooks for hats, bags, scarves, or robes.
- Peg rails or rails with S-hooks for handbags and accessories.
- Over-the-door organizers for shoes, small bags, or accessories.
The key is to store lighter, non-bulky items on the wall so they don’t feel visually heavy.
You’ll gain storage space without crowding shelves.
Step 4: Choose Closet Organizers That Actually Help
Invest in matching slim hangers
One of the fastest visual upgrades you can make is swapping random dry-cleaner and bulky plastic
hangers for matching slim hangers. They:
- Save space thanks to their slim profile.
- Help clothes hang at the same level, making everything look more orderly.
- Reduce slipping (if you choose velvet or non-slip styles).
Pros often recommend assigning a specific hanger type to each category (for example, all coats on
wooden hangers, everyday clothes on slim velvet hangers) for a boutique-like look.
Use bins, baskets, and shelf dividers
Open shelves can quickly turn into fabric avalanches. That’s why organizers rely on:
- Fabric or plastic bins: Great for items like handbags, seasonal accessories, or sweaters.
- Shelf dividers: Keep stacks of jeans or sweaters from toppling over.
- Clear bins: Ideal if you like to see exactly what’s inside at a glance.
Stick to a simple color palette so your closet looks cohesive instead of chaotic.
Give shoes their own system
Shoes are space hogs if they’re just tossed in a heap. Try:
- Shoe shelves or tiered racks on the floor.
- Over-the-door shoe organizers for flats and sandals.
- Clear shoe boxes for delicate or special-occasion pairs.
Group shoes by type (sneakers, heels, flats, boots) and, if you’re feeling extra, by color within the type.
Step 5: Arrange Your Closet Like a Pro
Group by category, then color
Once your organizers are in place, it’s time to put everything back in a way that makes sense.
Pros typically:
- Hang clothes by category: tanks, short-sleeve tops, long-sleeve tops, blazers, dresses, pants.
- Then arrange each category by color from light to dark.
Not only does it look satisfying, but it also helps you see instantly what you have too much of
(hello, black t-shirts) and what you might truly need.
Use file-folding and drawers wisely
Drawer chaos is where good closets go to die. Many pros use a “file-folding” method for items like
t-shirts, leggings, and pajamasfolded and stored upright instead of stacked. That way you:
- See every item without digging.
- Mess up fewer stacks when you pull one piece out.
Use drawer dividers or smaller boxes inside drawers to separate categories: underwear, socks,
workout gear, swimwear, and so on. When everything has a defined little “parking spot,” it’s easier
to put things away.
Keep everyday items front and center
Think about your typical week. Comfy work-from-home clothes? Office outfits? Gym gear? Whatever you
reach for most should be:
- At eye level or just below.
- Within easy reach without needing a step stool.
Less-used itemsfancy dresses, ski clothes, occasional shoescan be stored higher or in less convenient spots.
Step 6: Add Finishing Touches the Pros Swear By
Label everything
Labels may feel extra, but they’re one of the reasons pro-organized closets stay looking good long-term.
Label:
- Bins and baskets (“Sweaters,” “Workout Sets,” “Winter Accessories,” etc.).
- High shelf boxes (“Off-Season Shoes,” “Holiday Outfits”).
- Shared closets by person or category.
You can use clip-on label holders, adhesive labels, or even a label maker. Labels tell everyone
in the household where items belong, so you’re not the only one maintaining the system.
Upgrade your lighting and add small comforts
A dark closet feels cramped and chaotic even when it’s technically organized. Consider:
- Battery-powered stick-on LED lights under shelves.
- A brighter overhead bulb in a warm (not harsh) color temperature.
- A small sachet or diffuser so your closet smells fresh.
When your closet looks and feels inviting, you’re more likely to keep it in good shape.
Step 7: Maintain Your Pro-Level Closet
Do a quick 5-minute reset daily
Even professional systems fall apart if daily habits don’t support them. Aim for a quick reset:
- Hang up what you wore that day (or drop it straight into the laundry basket).
- Return shoes to their assigned spots.
- Refold any items that got messy.
Five minutes a day prevents a weekend-long clean-up session later.
Schedule monthly mini-edits
Once a month, scan your closet with a critical eye:
- Are there items you keep skipping over?
- Have new clothes arrived but nothing left?
- Are certain bins overflowing?
Pull a few items for donation, tidy your bins, and adjust your zones if your lifestyle has changed
(new job, new hobbies, different climate).
Rotate seasonally
At the start of a new season, bring forward appropriate pieces and move off-season items to
deeper storage. This keeps your day-to-day closet focused and uncluttered, even if you own
a lot of clothing overall.
Real-Life Closet Makeover Experiences & Lessons Learned
Professional organizers will tell you: every closet has a personality. And every makeover teaches
something new about how people really live with their stuff. Here are some experience-based lessons
that can help you get pro-level results faster and avoid common mistakes.
Experience 1: The “I Wear 20% of My Clothes” Closet
One typical case looks like this: a bursting wardrobe rod, but the owner wears the same handful of
outfits on repeat. When the closet was emptied and we sorted items, we found:
- Duplicates of the same black jeans in multiple sizes.
- “Someday” clothes from three jobs ago.
- Impulse-sale pieces still with tags.
The fix wasn’t complicatedbut it was emotional. We created a clear set of rules: only keep items
that fit now, felt comfortable, and matched the person’s current lifestyle. Once those standards
were applied, nearly half the closet was released. The result? The client felt like they had a
brand-new wardrobe, even though we didn’t buy a single new item. The lesson: your storage problem
might actually be a decision problem.
Experience 2: The Tiny Closet in a Busy Household
Another scenario: a small reach-in closet shared by a busy parent with limited time. The biggest
pain point wasn’t sizeit was maintenance. Clothes piled on chairs, shoes in a heap, and kids borrowing
things and “returning” them to random places.
Instead of focusing on perfection, we focused on speed and simplicity. We:
- Added labeled bins at kid height for “borrowed” items and accessories.
- Used an over-the-door organizer for shoes so they couldn’t disappear under the bed.
- Created a “laundry landing zone” inside the closet with a divided hamper.
The system wasn’t magazine-perfect, but it was easy enough for everyone in the family to follow.
The lesson: the best closet system is the one the least organized person in the house can maintain.
Experience 3: The Over-Accessorized Fashion Lover
In this closet, clothes were relatively under controlbut accessories were the chaos zone. Belts, scarves,
hats, jewelry, and bags took over every surface. The client kept buying organizers but nothing seemed to stick.
The breakthrough came when we stopped treating accessories as an afterthought and gave them their
own designated zones:
- Wall-mounted hooks for frequently used bags and hats.
- Drawer inserts for jewelry, organized by type.
- Clear bins for scarves and belts, each labeled and stored at eye level.
Suddenly, outfits were easier to put together, and the client started wearing more of what they owned.
The lesson: if a category is important to you (like accessories), it deserves prime space and a thoughtful system.
Experience 4: The “All or Nothing” Organizer
Some people avoid starting because they think they need an entire free weekend and a massive budget
for a closet makeover. One client delayed for months waiting for the “perfect time.” When we finally dug in,
we did the entire transformation in a series of short sessions:
- Day 1: Declutter tops and dresses only.
- Day 2: Tackle pants, skirts, and activewear.
- Day 3: Organize shoes and accessories, then label everything.
By viewing the project as a series of small steps instead of one overwhelming mountain, the client
finally got their “after” photo. The lesson: you don’t have to do everything at onceprogress in
stages still adds up to a pro-level closet.
Whether your closet is a tiny rental or a walk-in that got out of control, these real-world experiences
all point to the same truth: a great closet isn’t about having more space, it’s about using the space
you have with intention. Start small, stay consistent, and design systems that work with your habits,
not against them. That’s exactly how professional organizers turn chaos into calmand how you can, too.