Table of Contents >> Show >> Hide
- First: Know Which Air Filter You’re Changing
- When Should You Replace Your Car’s Air Filters?
- What You’ll Need (Tools, Parts, and a Tiny Bit of Patience)
- DIY Step-by-Step: How to Change the Engine Air Filter
- DIY Step-by-Step: How to Change the Cabin Air Filter
- Cost Reality: DIY vs. Paying Someone Else
- Common Mistakes (and How to Avoid Them)
- Quick Pro Tips for a Smoother DIY
- FAQ: Real Questions People Actually Ask
- Real-World DIY Experiences and Lessons Learned (Extra 500+ Words)
If your car could talk, it would politely ask for two things: snacks (gas) and clean breathing air (filters).
The good news? Swapping most car air filters is one of the easiest DIY maintenance winsoften a “no jack stands,
no grease under your fingernails” job. The even better news? Doing it yourself can save you labor costs and help
your engine and HVAC system work the way they were designed to.
This guide walks you through changing both common types of air filters:
the engine air filter (your engine’s lungs) and the cabin air filter
(your car’s “tiny room air purifier”). You may have one, the other, or bothmost modern vehicles have both.
We’ll keep it simple, thorough, and driveway-friendly.
First: Know Which Air Filter You’re Changing
Engine air filter (under the hood)
The engine air filter cleans incoming air before it mixes with fuel for combustion. A clean filter helps your engine
get steady airflow. A dirty one can contribute to sluggish acceleration and other performance annoyances (and can even
trip warning lights in some cases).
Cabin air filter (inside the car)
The cabin air filter traps dust, pollen, smog particles, and debris before air enters your vents. If your vents feel weak,
the air smells “old gym bag-ish,” or allergies flare up every time you turn on the fan, the cabin filter is a prime suspect.
Quick reality check: these filters are inexpensive compared to most car parts. Which is exactly why it’s painful when a shop
charges you “$70 worth of labor” to replace something that takes 7 minutes and a mild sense of determination.
When Should You Replace Your Car’s Air Filters?
Your owner’s manual is the boss here. That said, many manufacturers and major automotive resources point to common ranges:
-
Engine air filter: often around 15,000–30,000 miles depending on vehicle and conditions.
(Dusty roads, construction zones, and off-roading shorten that timeline.) -
Cabin air filter: commonly 15,000–30,000 miles, and sometimes annually depending on your environment
and allergy tolerance.
If you drive in heavy dust, wildfire smoke, sand, or stop-and-go city grime, it’s smart to check more often.
Filters don’t “fail dramatically”they just slowly turn into a compacted blanket of sadness.
Signs it’s time (engine air filter)
- Sluggish acceleration or reduced engine responsiveness
- Noticeably worse fuel economy
- Check engine light (not always, but it can happen)
- Filter looks dark, packed with debris, or warped when you inspect it
Signs it’s time (cabin air filter)
- Weak airflow from vents even on higher fan settings
- Musty odor when the HVAC runs
- More dust on the dashboard than seems reasonable
- Sneezing fits that start the moment the fan comes on
What You’ll Need (Tools, Parts, and a Tiny Bit of Patience)
- Correct replacement filter(s): engine, cabin, or both (match year/make/model/engine)
- Basic tools (maybe): Phillips screwdriver, flathead screwdriver, or a small socket (some cars use clips only)
- Gloves: optional but helpful if you dislike “mystery dust”
- Small vacuum or microfiber cloth: for cleaning the housing area
- Flashlight: because filters hide like they owe money
Pro tip: If your filter box has sensors or wiring nearby (common), treat them gently. You’re changing a filter, not performing
an engine bay trust fall.
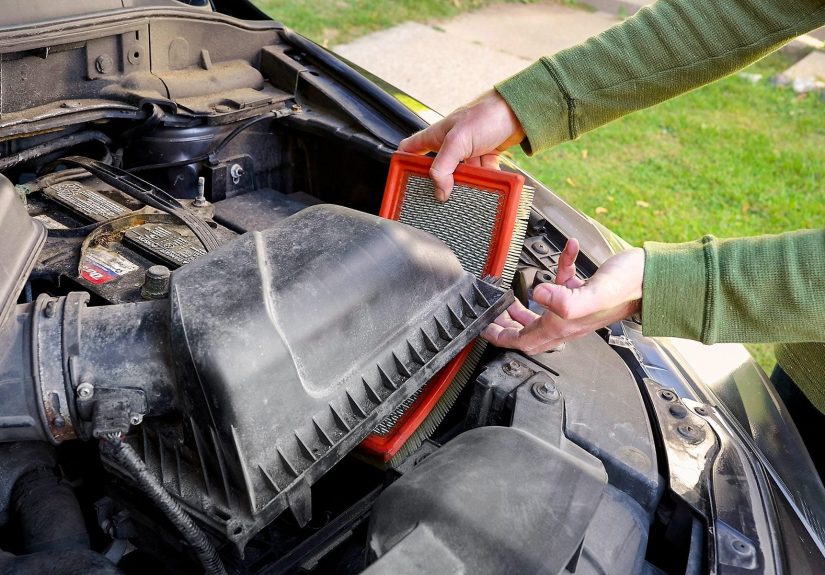
DIY Step-by-Step: How to Change the Engine Air Filter
Most engine air filters sit inside a black plastic “airbox” under the hood. Many are held by metal clips or a few screws.
The whole job often takes 5–15 minutes.
1) Park safely and open the hood
Turn off the engine, set the parking brake, and pop the hood. Let things cool if you just drovenobody wins a prize for touching
hot engine parts.
2) Find the airbox
Look for a black plastic box connected to a large intake tube. If you’re not sure, your owner’s manual or a quick search for your
model’s air filter location will point you right to it.
3) Open the airbox
Unclip the retaining clips or remove the screws. Keep screws in a cup so they don’t teleport to the Shadow Realm of the driveway.
If a hose or connector is attached to the lid, don’t yanksee if the lid can hinge open without disconnecting anything.
4) Remove the old filter (and note its orientation)
Lift the filter out carefully. Notice which side faces up and how the seal sits in the housing. This is important because a filter
installed crooked can let unfiltered air bypass the edges.
5) Inspect and clean the airbox (gently)
Use a vacuum or dry cloth to remove loose debris in the airbox. Don’t let dirt fall into the intake tube. This is not the time to
“shake it out” like a dusty welcome mat over your engine.
6) Install the new filter
Seat the new filter exactly the way the old one sat. Ensure the rubber edge seal sits flat all the way around.
If there’s an “UP” marking, believe it.
7) Close the airbox and secure it
Reattach the lid, fasten clips/screws evenly, and make sure everything is snug. A poorly sealed airbox is like leaving your front door
open during allergy seasondefeats the point.
8) Quick sanity check
Confirm no tools are left inside the engine bay (classic DIY plot twist). Start the car. You typically won’t “feel” an immediate difference,
but you’ve reset the airflow baseline, which is the whole goal.
DIY Step-by-Step: How to Change the Cabin Air Filter
Cabin filters are often behind the glove box, under the dash, or (less commonly) under the hood near the cowl.
The glove box location is the most commonand the most satisfying, because it looks complicated but isn’t.
1) Empty the glove box
Take everything out. Yes, even the emergency ketchup packets. You don’t want them falling behind panels and becoming a fossil record.
2) Lower or remove the glove box (depends on your car)
Many vehicles use a “stop arm” or side tabs that limit glove box travel. You’ll usually:
- Disconnect the glove box damper/strap (a small arm on one side),
- Press in the glove box sides to clear the stops,
- Let it swing down to reveal a small rectangular filter access door.
3) Open the cabin filter access door
The door often has simple clips. Press the tabs and remove the cover.
4) Slide out the old cabin filter
Pull the filter straight out. Expect leaves, dust, and maybe evidence your car once dated a tree.
Note the airflow direction arrow printed on the filter frame.
5) Clean the compartment area
Lightly vacuum loose debris in the compartment if accessible. Don’t go spelunking into ducts with random toolsjust remove what you can see.
6) Install the new cabin filter (arrow matters!)
Match the airflow direction arrow to the way the old one sat (or follow the arrows/markings on the housing).
If it’s backwards, it may still “fit,” but performance won’t be what it should be.
7) Reassemble the glove box
Snap the access door back on, lift the glove box, reattach the damper/strap, and click the stops back into place.
Put your glove box contents backideally in a less chaotic way than before. (Or not. I’m not your supervisor.)
8) Test airflow
Turn on the fan. If your cabin filter was overdue, airflow may feel stronger and the air may smell cleaner within a drive or two.
Cost Reality: DIY vs. Paying Someone Else
The filter itself is often affordable. Many drivers pay a lot more for labor and “shop fees” than for the filter.
Estimates vary by vehicle and region, but a shop replacement commonly lands in the tens of dollars (or more),
while DIY usually costs you the price of the filter and a few minutes of effort.
- Engine air filter (shop estimate): Repair estimates commonly fall in roughly the $69–$99 range for many vehicles, depending on labor rates and parts.
- Cabin air filter (filter cost): the filter itself is often around $20–$50, with labor depending on how easy it is to access.
Translation: the “DIY discount” is real, especially when your car’s design makes access simple.
Common Mistakes (and How to Avoid Them)
Installing the filter backwards
Cabin filters usually have airflow arrows. Engine filters may have “UP” or shaped edges that only seal correctly one way.
Always match orientation.
Not sealing the airbox or filter door
If the housing isn’t sealed, air (and dirt) can bypass the filter. Double-check clips, screws, and gasket seating.
“Cleaning” a disposable filter and calling it good
Some reusable performance filters are designed to be cleaned and re-oiledbut most OEM-style paper filters are not.
Tapping it out helps you feel productive, but replacement restores proper filtration and airflow more reliably.
Dropping debris into the intake
When the engine filter is out, avoid letting dirt fall into the intake tract. Clean the housing carefully and keep things tidy.
Quick Pro Tips for a Smoother DIY
- Check your manual’s service schedule: it will give you the correct interval for your exact model.
- Take a photo before removal: especially for cabin filter airflow direction and glove box straps.
- Inspect during oil changes: it’s an easy routine that prevents “how long has it been?” surprises.
- Drive conditions matter: dust, smoke, and pollen can shorten filter life significantly.
- Don’t over-tighten screws: airbox plastic is tough until it isn’t.
FAQ: Real Questions People Actually Ask
Do I really need to change both filters?
Not always at the same time, but both matter. Engine filters support engine airflow; cabin filters support interior air quality and HVAC performance.
If one is overdue, it’s a great moment to check the other.
Will a new engine air filter improve gas mileage?
A clean filter helps maintain proper airflow, which supports efficient operation. If your old filter was severely clogged, you might notice improvement.
If it was only mildly dirty, the difference may be subtlestill worth doing for long-term maintenance.
What if I can’t find my cabin filter?
Some vehicles put it under the dash, behind a panel, or under the hood near the base of the windshield. Your manual (or a model-specific guide)
will point you to the right spot. If it truly doesn’t have one, you’re not imagining thingssome older models were built that way.
How long does this DIY take?
Many engine filters take 5–15 minutes. Cabin filters often take 10–20 minutes the first time (faster after you’ve done it once).
Real-World DIY Experiences and Lessons Learned (Extra 500+ Words)
Most people don’t wake up craving an air filter replacement the way they crave brunch, but the DIY experience tends to follow a predictable arc:
confidence, mild confusion, then victory (sometimes with a bonus “why didn’t I do this sooner?” moment). Here are some real-world patterns
DIYers commonly run intoand what they learn from them.
Experience #1: The “This is way easier than I expected” surprise.
The engine air filter is often the gateway DIY project because the airbox is right there under the hood, usually held by a few clips.
Many first-timers expect a puzzle box guarded by dealership magic. Instead, they find something that opens like a lunch container.
The lesson: routine maintenance is frequently more approachable than it soundsespecially when you’re replacing a part designed to be serviced regularly.
Experience #2: Cabin filter dust confetti (aka: the glove box avalanche).
The cabin air filter tends to bring the drama. People lower the glove box and suddenly discover leaves, crumbs, and dust that look like the
“before” photo of a cleaning commercial. Sometimes there’s a little pile of debris sitting on the filter door like it’s been paying rent.
The lesson: your cabin filter is doing real work, especially if you park under trees, drive in dusty areas, or live somewhere with heavy pollen seasons.
When the new filter goes in, many DIYers notice the HVAC smells fresher and the fan feels less strainedparticularly if the old filter was overdue.
Experience #3: The airflow arrow debate.
Cabin filters often come with a big airflow arrow that seems obvious until you’re upside down in the passenger footwell thinking,
“Wait… is air flowing up, down, left, or emotionally?” Many people solve this by taking a photo of the old filter before removing it,
or by looking for markings on the housing itself. The lesson: photos are your friend, and so is slowing down for 10 seconds to confirm orientation.
A correctly installed filter matters because it keeps the pleats working as intended and reduces the chance of whistling, rattling, or poor airflow.
Experience #4: The “I was about to get upsold” feeling.
A common driver story goes like this: the car gets an oil change, and suddenly there’s a recommendation for a pricey filter replacement.
Once someone tries it at home, they realize the job is straightforward. The lesson: shops aren’t evil for charging labor
but it’s smart to know what a job involves so you can choose when DIY makes sense. Many drivers decide to DIY filters and wipers,
then pay professionals for work that truly requires lifts, specialized tools, or deeper mechanical skills.
Experience #5: The “why does my airbox not close?” mini-panic.
This happens when the new engine filter isn’t seated flat, or the airbox lid is slightly misaligned. DIYers often think they bought
the wrong filter, but the fix is usually simple: remove it, reseat it carefully, check the gasket edge, then close the lid evenly.
The lesson: don’t force plastic parts. If something doesn’t line up, it’s usually a seating issuenot a “break out the power tools” situation.
Experience #6: Building a maintenance rhythm.
After doing filters once, many people start checking them at regular intervalsoften around oil changesbecause it’s fast and gives a clear visual.
Some keep a note in their phone with the mileage and date, which prevents the classic “I changed that… sometime in the last decade?” uncertainty.
The lesson: small habits compound. Filters are a low-stress way to build confidence and keep your car feeling consistent year-round.
The big takeaway from these DIY experiences is that air filter changes are less about mechanical genius and more about
paying attention: noticing orientation, seating, and how your car behaves before and after. Once you’ve done it once,
it becomes one of those maintenance tasks that feels almost unfairly easylike finding money in a jacket pocket you forgot you owned.