Table of Contents >> Show >> Hide
- Why Motherboard Cleaning Matters
- What You Need Before You Start
- How to Clean a Desktop PC Motherboard: 7 Steps
- Step 1: Shut Everything Down and Make the Area Safe
- Step 2: Open the Case and Inspect the Mess Honestly
- Step 3: Blow Out Loose Dust the Smart Way
- Step 4: Clean Around Fans, Heatsinks, and Tight Motherboard Areas
- Step 5: Spot-Clean Sticky Dirt Carefully
- Step 6: Recheck Connections and Reassemble the PC
- Step 7: Keep It Clean So You Do Not Have to Do This the Hard Way Again
- Common Mistakes to Avoid
- When You Should Not DIY the Cleaning
- Real-World Experiences and Lessons From Cleaning Motherboards
- Conclusion
Your desktop PC motherboard is the command center of your build. It is the traffic cop, the power distributor, the translator, and sometimes the silent hero taking the blame for problems actually caused by a dust bunny the size of a hamster. When that board gets coated in dust, pet hair, oily grime, or the occasional mystery fuzz from life itself, airflow suffers and your whole system can start acting grumpy.
The good news is that cleaning a desktop PC motherboard is not difficult. The better news is that it does not require wizard-level skills, a hazmat suit, or a dramatic movie montage. What it does require is patience, the right tools, and a clear understanding of what not to do. In other words: this is not the time to blast everything with random household cleaner and hope for the best.
In this guide, you will learn how to clean a desktop PC motherboard safely in seven practical steps. We will also cover what tools to use, what mistakes to avoid, and what real-world cleanup experiences can teach you before you pop the side panel and go to war with dust.
Why Motherboard Cleaning Matters
A dirty motherboard does not just look sad. Dust collects around RAM slots, PCIe slots, VRM heatsinks, fan headers, rear I/O areas, and tiny crevices around capacitors and connectors. Over time, that buildup can restrict airflow, trap heat, and make fans work harder than they should. If the rest of the system is also dusty, temperatures may rise, fan noise may increase, and long-term reliability can suffer.
Cleaning your motherboard also gives you a chance to inspect the rest of the PC. You may catch loose cables, clogged filters, swollen dust mats in heatsinks, or a fan that has been spinning like it is auditioning for a helicopter role. Regular maintenance is one of the simplest ways to help a desktop PC stay cooler, cleaner, and more stable.
What You Need Before You Start
- Compressed air or an electric air duster
- An anti-static wrist strap if you have one
- A soft anti-static brush
- A microfiber cloth
- 70% to 75% isopropyl alcohol for spot cleaning stubborn grime
- Cotton swabs or foam swabs for tiny areas
- Good lighting
- Patience and self-control, especially if you are the type who says, “I’ll just quickly remove the cooler too”
Avoid paper towels, household sprays, abrasive cloths, and random old rags. They can leave lint, scratch surfaces, or create static. Also avoid using your mouth to blow dust. Your motherboard deserves better than surprise humidity.
How to Clean a Desktop PC Motherboard: 7 Steps
Step 1: Shut Everything Down and Make the Area Safe
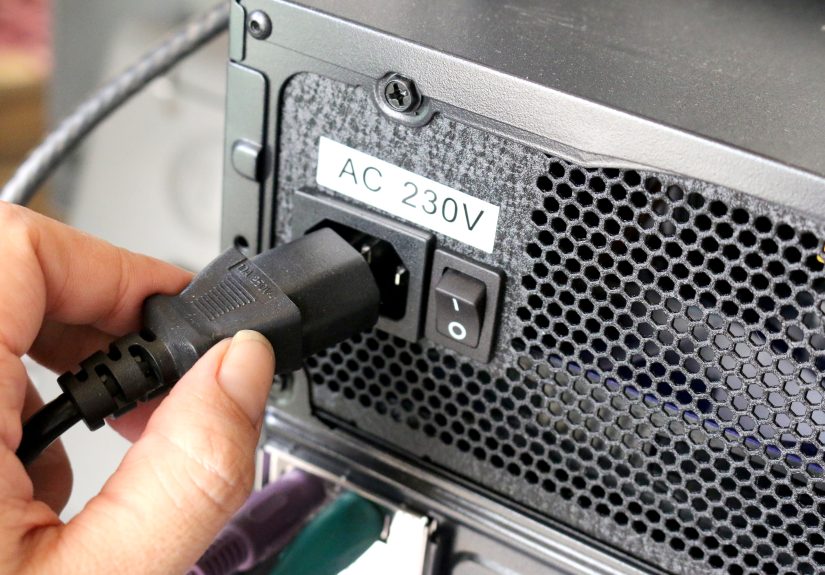
Start by fully turning off the desktop PC. Unplug the power cable and disconnect peripherals. If your power supply has a rear switch, flip it off. Press the power button once after unplugging to help discharge leftover power from the system.
Move the PC to a clean, well-lit workspace with a hard surface. Carpet is a static electricity factory, so it is not ideal. If you have an anti-static wrist strap, use it. If not, ground yourself periodically by touching unpainted metal on the case before handling anything inside.
This prep step is easy to rush, but do not. Safe cleaning starts with a dead, unplugged system and a low-static environment. That alone helps prevent the kind of avoidable mistake that turns a five-minute cleaning session into a forum post titled “Help, now my PC won’t boot.”
Step 2: Open the Case and Inspect the Mess Honestly
Remove the side panel and take a moment to inspect the interior before touching anything. Look for heavy dust on the motherboard surface, RAM sticks, GPU, CPU cooler, case fans, and power supply vents. Check whether dust is sitting loosely or packed into heatsink fins like it moved in and signed a lease.
This is also a good time to snap a few photos with your phone. That may sound excessive, but it is extremely helpful if you accidentally nudge a cable, forget where a connector sat, or later decide to remove a component for deeper cleaning. Photos are cheap insurance.
Do not start with liquids. Do not start yanking parts. First figure out whether you are dealing with normal dust, sticky grime, nicotine residue, pet hair, or signs of liquid damage and corrosion. Plain dust is a standard DIY cleaning job. Corrosion or spill damage is where professional help starts looking very attractive.
Step 3: Blow Out Loose Dust the Smart Way
Use compressed air or an electric duster to remove loose dust from the motherboard and surrounding components. Work from the top of the case downward so the dust falls out instead of relocating from one part of the system to another like a bad roommate.
Use short bursts, not a continuous hurricane. Keep the compressed air can upright, and do not spray so close that moisture or propellant becomes an issue. A little distance is your friend. Aim dust out of the case, not deeper into slots and corners.
Pay special attention to these areas:
- Motherboard surface around heatsinks and chipset covers
- RAM slots and the space around memory modules
- PCIe slots and the area beneath the graphics card
- Rear I/O area and USB port edges
- Fan headers, front-panel connectors, and cable-heavy corners
One more important point: hold fan blades still while blowing air at them. Letting fans free-spin at high speed from compressed air is a classic DIY mistake. It can stress bearings and is completely unnecessary. Your fans are cooling parts, not training for NASCAR.
Step 4: Clean Around Fans, Heatsinks, and Tight Motherboard Areas
Once the loose dust is gone, use a soft anti-static brush to gently loosen stubborn debris around tight motherboard areas. This is especially useful near VRM heatsinks, corners of the board, cable routing channels, and around the base of large air coolers where dust likes to hide and build a tiny kingdom.
Brush lightly and follow with more compressed air. Do not scrub. Do not jab. The goal is to encourage the dust to leave, not to start a physical confrontation with tiny surface-mounted components.
If your graphics card blocks access to part of the motherboard and you are comfortable removing it, you can take it out carefully and clean the exposed area more thoroughly. If not, no shame. You can still do a very solid motherboard cleaning job without fully disassembling the system.
This is also the best time to clean case filters, fan grills, and vents. A clean motherboard inside a case with clogged filters is like washing your car and parking it in a mud pit.
Step 5: Spot-Clean Sticky Dirt Carefully
If your motherboard has sticky residue, fingerprints, or grime that air cannot remove, use a cotton swab or lint-free swab lightly dampened with 70% to 75% isopropyl alcohol. The swab should be slightly damp, never dripping. Do not spray liquid directly onto the motherboard.
Gently wipe only the affected non-delicate surface area. Good targets are flat, exposed sections with visible residue. Be extra careful around sockets, slots, connectors, and tiny solder points. If you are cleaning near the CPU socket or expansion slots, go slow and use minimal pressure.
Do not use household glass cleaner, bleach-based products, ammonia cleaners, or scented multi-surface spray. Your motherboard does not need to smell like a lemon kitchen countertop. It needs to remain alive.
After spot cleaning, give the board time to air dry completely before reassembly or power-up. Even a small amount of leftover moisture is not a gamble worth taking.
Step 6: Recheck Connections and Reassemble the PC
Before closing the case, inspect everything carefully. Make sure RAM sticks are fully seated, GPU power cables are firmly attached, front-panel cables were not knocked loose, and CPU cooler fan cables are still connected. It is surprisingly easy to clean perfectly and then spend an hour troubleshooting a PC that “mysteriously” will not start because a fan header came loose.
Look over the motherboard for anything unusual:
- Debris still trapped in slots
- Residual moisture
- Loose screws in the case
- Cables brushing against fan blades
- Dust still packed into heatsinks
Once you are satisfied, reinstall the side panel, reconnect the power cable and peripherals, and boot the system. Listen for normal fan behavior and watch for anything odd during startup.
Step 7: Keep It Clean So You Do Not Have to Do This the Hard Way Again
The easiest motherboard cleaning job is the one that never turns into a deep-cleaning project. Try these habits to reduce dust buildup over time:
- Clean dust filters regularly
- Keep the PC off the floor if possible
- Leave breathing room around intake and exhaust vents
- Manage cables to improve airflow
- Check the interior every few months
- Use a slight positive airflow setup when possible
If you live with pets, smoke indoors, or keep the PC in a dusty room, you will likely need more frequent cleaning. A light maintenance routine two or more times per year is a lot easier than discovering a furry felt blanket wrapped around your heatsink in August.
Common Mistakes to Avoid
Even careful people make weird choices when holding a can of compressed air near expensive hardware. Here are the big mistakes to avoid when cleaning a desktop PC motherboard:
- Using a household vacuum directly on components: static risk makes this a bad idea for sensitive electronics.
- Letting fans spin wildly: always hold fan blades still during air cleaning.
- Spraying liquid directly on the motherboard: apply alcohol to the swab or cloth, not the board.
- Cleaning while the PC is plugged in: this is an excellent way to create unnecessary drama.
- Opening the power supply: do not do it. Clean PSU vents from the outside only.
- Using abrasive materials: lint, scratches, and damage are not part of good PC hygiene.
- Getting too ambitious: if you are not comfortable removing the CPU cooler, do not turn a dust cleanup into a full rebuild.
When You Should Not DIY the Cleaning
Sometimes motherboard maintenance goes beyond a normal dust cleanup. You may want professional service if you see corrosion, evidence of a liquid spill, burnt areas, broken fan headers, bent socket pins, or sticky contamination across large sections of the board. The same goes for systems that shut off under load, show electrical instability, or start behaving worse after cleaning.
DIY cleaning is great for dust and light grime. It is not the best solution for mystery goo, flood damage, or “I may have accidentally sprayed something fizzy into the case last year.” There is a limit, and respecting that limit can save hardware.
Real-World Experiences and Lessons From Cleaning Motherboards
One of the most common experiences people report after cleaning a desktop PC motherboard is simple surprise. They open the case expecting a light dusting and instead discover a full ecosystem: dust mats in the CPU cooler, fan blades coated in fuzz, pet hair caught in filters, and a motherboard that looks like it has been gently breaded. The lesson is obvious but important: dust tends to build up gradually, so people stop noticing it until airflow is already compromised.
Another common experience is that the motherboard itself often is not the dirtiest part. The real trouble spots are usually the fans, vents, filters, and heatsinks around it. Someone may spend ten careful minutes blowing off the motherboard surface, then wonder why temperatures are still high. Later they discover the rear exhaust fan is clogged, the front intake filter is blocked, or the CPU cooler fins are packed so tightly that air barely passes through. In other words, motherboard cleaning works best when it is part of full desktop PC cleaning, not a tiny island of cleanliness surrounded by chaos.
People also frequently learn how easy it is to knock something loose. A RAM stick can shift slightly. A GPU power cable can wiggle out just enough to cause a boot problem. A front-panel connector can loosen without looking disconnected. That is why experienced DIY users often say the cleaning itself is not the risky part; the risky part is bumping hardware during the process and not double-checking connections before closing the case.
There is also the classic compressed-air learning curve. The first time many people clean a motherboard, they either spray from too far away and barely move any dust, or too close and blast debris into awkward corners. Some discover the can gets cold fast and may spit propellant if tilted. Others forget to hold the fan blades still and watch them spin with the enthusiasm of a game show prize wheel. After one cleanup session, most people become much better at short bursts, good angles, and controlled airflow.
Sticky grime is another eye-opener. In homes with smokers, kitchens nearby, open windows, or long neglect, motherboard dust may cling to surfaces instead of blowing away cleanly. That is when gentle spot cleaning with isopropyl alcohol becomes useful. The experience teaches a valuable distinction: loose dust is an air job, but residue is a precision job. Mixing those up is where trouble starts.
Many users also notice an immediate payoff after a proper cleaning. Fans may become quieter. Temperatures may drop. The PC may feel more stable under load. Even when performance does not magically transform, the system often runs more smoothly simply because airflow is restored. That is not magic. It is just what happens when your motherboard, fans, and cooling hardware are no longer wearing a winter coat indoors.
Finally, the most useful long-term lesson is this: regular light cleaning beats heroic deep cleaning every time. A ten-minute check every few months is far easier than a full teardown once a year. Experienced PC owners usually end up with a simple rule: if you can see dust on the filters, you can safely assume the motherboard is no longer living its best life either.
Conclusion
Cleaning a desktop PC motherboard is one of those maintenance jobs that sounds intimidating until you do it properly once. Power down the system, reduce static, use compressed air the right way, clean gently, avoid overdoing the liquids, and inspect your work before rebooting. That is really the formula.
The bigger win is not just a cleaner motherboard. It is a healthier desktop PC overall: better airflow, less dust in critical cooling areas, fewer surprise temperature spikes, and a much better chance that your hardware keeps running happily instead of sounding like it needs an exorcist. A little care goes a long way, and your motherboard will thank you by continuing to do its job quietly, which is really the motherboard version of a standing ovation.