Table of Contents >> Show >> Hide
- Why You Should Clean Your Washer and Dryer
- What You’ll Need
- How to Clean a Washer and Dryer: 11 Steps
- Step 1: Unplug the appliances and let everything cool down
- Step 2: Empty both machines completely
- Step 3: Clean the washer detergent dispenser
- Step 4: Wipe the washer drum, door, lid, and gasket
- Step 5: Run the washer’s cleaning cycle
- Step 6: Clean the washer filter, drain area, hoses, and exterior
- Step 7: Empty and deep-clean the dryer lint screen
- Step 8: Vacuum the lint trap housing and clean the dryer drum
- Step 9: Wipe the dryer exterior and clean around and behind it
- Step 10: Clean the dryer vent and exhaust duct
- Step 11: Reconnect, test, and set a cleaning routine
- Common Mistakes to Avoid
- How Often Should You Clean a Washer and Dryer?
- Experience: What Cleaning a Washer and Dryer Really Teaches You
- Conclusion
- SEO Metadata
Your washer and dryer work hard. Really hard. They handle sweaty gym shirts, muddy socks, mystery crumbs, pet hair, detergent drips, and the occasional tissue that explodes like a tiny paper blizzard. So if your laundry room has started to smell a little funky or your dryer is taking forever to finish a load, your machines are probably asking for a spa day.
The good news is that cleaning a washer and dryer is not difficult. It mostly takes a little time, a few basic supplies, and the willingness to face the lint monster hiding behind the dryer. This guide walks you through how to clean a washer and dryer in 11 practical steps, with tips for both front-load and top-load washers, plus smart ways to help your appliances stay cleaner, safer, and more efficient over time.
Why You Should Clean Your Washer and Dryer
It sounds backward, but laundry appliances get dirty precisely because they clean other things. Washers collect detergent residue, body oils, hard-water buildup, and moisture that can lead to odors. Dryers collect lint, dust, and film from dryer sheets, and that buildup can reduce airflow and performance.
When you clean your washer and dryer regularly, you may notice fresher-smelling laundry, shorter drying times, lower energy waste, and fewer annoying problems like streaks, residue, and musty odors. Regular maintenance can also help you spot trouble early, such as cracked hoses, blocked vents, or a worn gasket, before those little issues become expensive ones.
What You’ll Need
- Microfiber cloths or soft rags
- Mild dish soap
- Warm water
- Soft brush or old toothbrush
- Vacuum with hose attachment
- Washer cleaner approved for your model, if needed
- Bucket or small bowl
- Gloves
- Screwdriver, if needed to access vent clamps
Before you start: Always check your appliance manual. Some manufacturers prefer a washer-cleaning tablet or a self-clean cycle, while others allow specific cleaners. That manual may not be thrilling beach reading, but it does know your machine better than your neighbor’s cousin who “fixes stuff.”
How to Clean a Washer and Dryer: 11 Steps
Step 1: Unplug the appliances and let everything cool down
Safety first. Unplug both machines before doing any deep cleaning, especially when you are cleaning behind the dryer, near the lint trap housing, or around the vent. If you have a gas dryer, use extra caution. If you need to disconnect anything beyond the basic vent connection and you are not comfortable doing it, call a qualified technician.
This step is not glamorous, but neither is getting shocked while holding a vacuum hose. Start smart.
Step 2: Empty both machines completely
Remove all clothing from the washer and dryer. Check the washer drum, the dryer drum, the dispensers, and the lint trap. Empty pockets from anything still hanging around in laundry baskets nearby. A forgotten lip balm in the dryer is not a plot twist you want.
Take a quick look around and behind both machines too. Dust, lint, and detergent spills around the appliances can make the whole laundry area feel dirtier than it really is.
Step 3: Clean the washer detergent dispenser
The dispenser drawer is one of the easiest places for detergent slime and fabric-softener residue to build up. If your washer has a removable dispenser drawer, take it out according to the manual. Wash it with warm water and mild soap, then use a soft brush to scrub corners and small channels where goo likes to hide.
If the drawer is not removable, pull it out as far as it goes and wipe it thoroughly. Dry it with a clean towel before putting it back. This small step can make a surprising difference, especially if your washer has been leaving behind a sour smell.
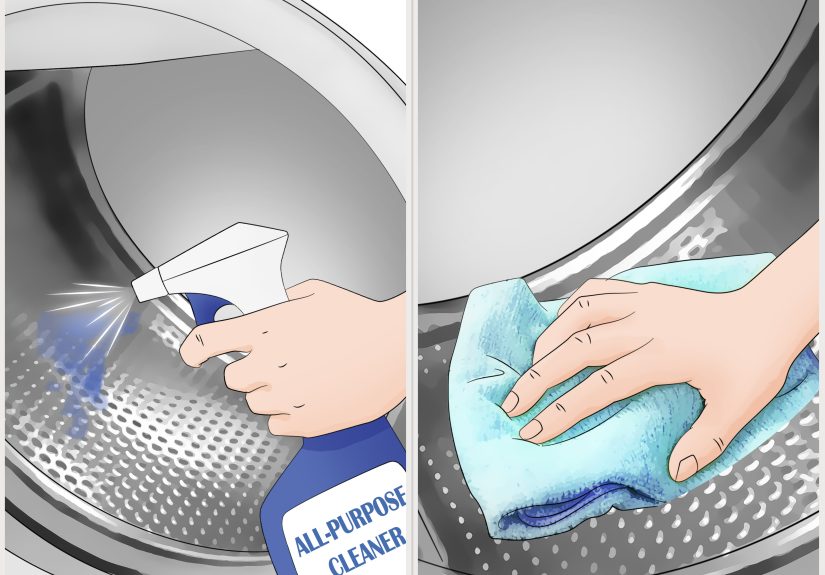
Step 4: Wipe the washer drum, door, lid, and gasket
Use a damp microfiber cloth to wipe the inside of the washer drum. For a front-load washer, pay special attention to the rubber door gasket. Gently pull it back and wipe inside the folds, where moisture, lint, hair, and detergent residue tend to collect. For a top-load washer, clean around the lid and under the rim if you can safely reach it.
This is also the time to inspect for visible mold, slime, or residue. If you spot buildup, use mild soap and a soft brush. Avoid harsh scrubbing tools that could damage the surface or seal.
Pro tip: If you use mostly cold water washes, buildup can happen faster. Running an occasional warm or hot cycle, if appropriate for your laundry and machine, may help reduce residue over time.
Step 5: Run the washer’s cleaning cycle
Now that the visible grime is gone, clean the inside of the washer properly. If your machine has a Clean Washer, Self Clean, or similar cycle, use that setting. If not, follow your owner’s manual for the recommended cleaning method.
In many cases, the best option is a manufacturer-approved washer cleaner or another product specifically labeled for washing machines. Some brands allow diluted bleach or other cleaners in certain models, while others discourage ingredients that may wear down hoses, gaskets, or seals over time. That is why checking the manual matters so much here.
Once the cycle finishes, leave the door or lid open so the interior can dry. If you still notice residue or odor, run an additional rinse or cleaning cycle.
Step 6: Clean the washer filter, drain area, hoses, and exterior
Some washers have a filter or drain-pump access panel, especially many front-load machines. If your model does, follow the manual carefully. Place a towel or shallow tray underneath first, because a little water may spill out. Remove debris, rinse the filter, and reinstall it securely.
Next, wipe down the exterior with a soft cloth and mild cleaner. Avoid abrasive products. Check the hoses and connections for bulging, cracking, or leaks. Also look underneath the washer or at the drip pan, if you have one, for signs of moisture.
This step turns you into the kind of responsible adult who notices things before they become a puddle on the floor. Congratulations, even if nobody throws a parade.
Step 7: Empty and deep-clean the dryer lint screen
Remove lint from the dryer screen. This should happen after every load, but during a deep clean, go further. Wash the lint screen with warm water, a little liquid soap, and a soft brush if you use dryer sheets or fabric softener regularly. These can leave behind a nearly invisible film that blocks airflow.
Dry the screen completely before putting it back. Never run the dryer without the lint filter in place, and do not use the machine if the filter is damaged.
Step 8: Vacuum the lint trap housing and clean the dryer drum
After removing the lint screen, use your vacuum hose attachment to clean inside the lint trap housing. Lint can build up below the screen where your fingers cannot reach. This hidden area is basically a VIP lounge for dust bunnies.
Then wipe the dryer drum with a soft cloth and mild soapy water. If you see residue from dryer sheets or sticky spots from something that should not have gone in the dryer, clean those gently and dry the drum afterward.
If your dryer has moisture sensor bars inside the drum, wipe them with a soft cloth and mild soap too. Residue on these bars can cause sensor-dry cycles to end too early or behave oddly.
Step 9: Wipe the dryer exterior and clean around and behind it
Clean the outside of the dryer, including the top, knobs, buttons, and side panels. Use a damp cloth and mild cleaner. The top of the dryer often doubles as a temporary shelf, which means it tends to collect detergent drips, dust, and random objects that have no business living there permanently.
Pull the dryer away from the wall carefully and vacuum behind and underneath it. This area collects a shocking amount of lint. Cleaning behind the dryer is not just for appearances. It can help reduce dust buildup and makes it easier to inspect the vent connection.
Step 10: Clean the dryer vent and exhaust duct
This is the step people skip, and it is often the one that matters most. Disconnect the dryer vent from the back of the machine if you can do so safely. Use a vacuum or appliance brush to remove lint from the duct. Then check the outside wall cap or hood and make sure the flap opens freely and is not blocked by lint, nests, or debris.
If the vent is long, hard to access, badly kinked, or packed with lint, hiring a professional is a smart move. The goal is strong airflow. Poor airflow can mean longer drying times, extra wear on the dryer, and more heat trapped where it should not be.
If you notice foil or flimsy accordion-style ducting, it may be worth asking a professional whether a better vent material would improve safety and airflow for your setup.
Step 11: Reconnect, test, and set a cleaning routine
Reconnect the vent securely, slide the dryer back into place carefully, and plug everything back in. Run the washer empty on a rinse cycle if needed, and run the dryer for a few minutes to make sure airflow feels normal outside at the vent hood.
Then set a maintenance routine. A simple schedule works best:
- Wipe the washer door gasket and leave the door ajar after loads
- Clean the washer interior about once a month
- Empty the dryer lint screen after every load
- Wash the lint screen periodically if it has buildup
- Clean the vent and exhaust duct at least once a year
That is it. Your machines are cleaner, your laundry room smells better, and your dryer no longer sounds like it is processing a tumbleweed.
Common Mistakes to Avoid
- Ignoring the manual: Cleaning advice is not one-size-fits-all.
- Using too much detergent: More soap often means more residue, not cleaner clothes.
- Forgetting the gasket: Front-load washer odors often start there.
- Skipping the vent: Cleaning only the lint trap is not enough.
- Running the dryer with a wet or damaged lint filter: Bad idea for performance and safety.
- Mixing cleaners carelessly: Never combine chemicals unless the label specifically says it is safe.
How Often Should You Clean a Washer and Dryer?
For most homes, a monthly washer cleaning and a yearly dryer vent cleaning are good starting points. But frequency depends on how much laundry you do. A household with kids, pets, sports uniforms, work clothes, and enough towels to stock a small hotel may need more frequent attention.
If your washer smells musty, your dryer takes two cycles to finish, or lint seems to be multiplying like it pays rent, do not wait for the calendar. Clean sooner.
Experience: What Cleaning a Washer and Dryer Really Teaches You
The funny thing about learning how to clean a washer and dryer is that most people do it for a practical reason at first. Maybe the washer starts to smell a little swampy. Maybe the dryer takes forever and your towels come out with the emotional energy of a damp handshake. Maybe you pull the lint screen and realize you have been treating it like the entire job when, in reality, that was only the opening act.
In real life, the first deep clean usually comes with at least one moment of disbelief. You wipe the washer gasket and wonder how one machine can hold that much gray grime without filing a complaint. You pull the dryer away from the wall and discover a lint civilization thriving behind it. It is humbling. Educational, yes, but mostly humbling.
One of the biggest lessons people learn from this process is that laundry problems often build slowly. A washer does not usually go from fresh to foul overnight. It happens one closed door at a time, one extra splash of detergent at a time, one forgotten wet load at a time. The same goes for dryers. Drying time gets longer so gradually that it is easy to blame the weather, the towels, the moon, or anything except the vent packed with lint.
Another real-world takeaway is that small habits matter more than occasional heroic cleaning marathons. Wiping the gasket after a load takes less than a minute. Leaving the washer door cracked open costs nothing. Pulling lint off the filter becomes automatic once you connect it to faster drying and less frustration. These tiny habits are boring in the best possible way. They prevent bigger messes, bigger smells, and bigger repair bills.
There is also something satisfying about seeing immediate results. A clean washer smells better right away. A freshly cleaned dryer vent can make the machine work more efficiently almost instantly. Towels dry faster. The laundry room feels less dusty. You stop wondering why your “clean” laundry smells suspiciously like yesterday’s gym bag and start trusting your machines again.
People who clean their washer and dryer for the first time also tend to become evangelists about it. Suddenly they are the person at family gatherings saying things like, “When was the last time you cleaned your dryer vent?” This is not glamorous, but it is useful. Every home has a few maintenance tasks that quietly affect comfort, safety, and cost. Laundry appliance cleaning belongs on that list.
And perhaps the most honest experience-based lesson is this: once you have done it properly, it stops feeling intimidating. The mystery is gone. You know where the grime collects, where the lint hides, and what signs tell you it is time to clean again. What seemed like a big household task turns into a repeatable routine. Not a fun routine exactly, unless you are unusually passionate about vacuum attachments, but a manageable one.
So yes, cleaning a washer and dryer is about hygiene and maintenance. But it is also about making a very ordinary part of life work better. Cleaner machines mean fresher clothes, fewer weird smells, better efficiency, and less stress on laundry day. And in a world already full of enough chaos, getting your towels to dry in one cycle feels like a tiny domestic victory worth celebrating.
Conclusion
Knowing how to clean a washer and dryer is one of those household skills that pays off quickly. With a few tools, an hour or two, and a little consistency, you can cut down on odor, lint buildup, and poor performance while helping your laundry appliances run the way they should. Follow the 11 steps above, stay consistent with basic upkeep, and your washer and dryer will reward you with fresher laundry and fewer unpleasant surprises.
Your clothes do enough dirty work already. Your machines do not need to keep souvenirs from it.