Table of Contents >> Show >> Hide
- Why Clean Grill Grates Matter More Than You Think
- Know Your Grill Grates: Stainless, Cast Iron, and Porcelain
- Tools and Supplies: What You Actually Need
- Step-by-Step: How to Clean Grill Grates Before Your Next BBQ
- Wire Grill Brushes: Why Many People Are Ditching Them
- Natural Cleaning Methods (That Actually Work)
- Routine Maintenance: Make Future Cleanups Easier
- Common Mistakes to Avoid When Cleaning Grill Grates
- Real-World Experiences: What You Learn After Cleaning a Lot of Grills
If your grill grates could talk, they’d probably say, “Hey, maybe scrape off last summer before you invite people over again.” Clean grill grates are one of those unglamorous secrets behind great barbecue: they prevent flare-ups, keep food from sticking, and make your burgers taste like meat instead of last week’s teriyaki chicken. The good news? You don’t need fancy chemicals or a degree in chemistry to do it rightjust a few smart tools, a bit of elbow grease, and a game plan.
In this guide, we’ll walk through exactly how to clean grill grates properly before your next BBQ, with clear step-by-step methods for stainless steel, cast iron, and porcelain-coated grates. We’ll also talk about why some classic toolslooking at you, wire-bristle brushare falling out of favor, and what safer alternatives you can use instead. By the time your guests show up, your grill will be so clean you’ll almost hesitate to dirty it again. Almost.
Why Clean Grill Grates Matter More Than You Think
Sure, grill marks are sexy, but the real magic happens on a clean surface. When you skip cleaning your grill grates, a couple of not-so-fun things start to happen:
- Food sticks and tears. Built-up carbon, grease, and old marinade create a rough, uneven surface that grabs onto your food. That gorgeous salmon fillet? It’ll shred when you try to flip it.
- Flare-ups get wild. Old fat and grease ignite easily, leading to flames that char the outside of your food before the inside is done.
- Off flavors creep in. Burned sugar, sauces, and old meat residue don’t “add smokiness”they add bitter, acrid notes that ruin otherwise great ingredients.
- It’s a food safety issue. Excess buildup can harbor bacteria, especially if you’re grilling a mix of meats and veggies. Also, certain cleaning tools (like wire-bristle brushes) can leave behind dangerous little surprises if you’re not careful.
Cleaning your grates isn’t about being fussy; it’s about consistency and safety. Think of it like preheating your ovenboring but essential if you want reliable results.
Know Your Grill Grates: Stainless, Cast Iron, and Porcelain
Before you start scrubbing, it helps to know what kind of grates you’re dealing with. Different materials like different treatment.
Stainless Steel Grates
Stainless steel grates are durable, relatively rust-resistant, and can handle more aggressive scrubbing. They respond well to:
- High heat “burn-off” after cooking
- Bristle-free grill brushes or scrapers
- Baking soda and dish soap paste for stubborn gunk
<li,Vinegar-based solutions for grease and shine
Cast Iron Grates
Cast iron is the heavyweight champ of grill grates: amazing heat retention and killer sear marks. But it needs respect:
- Never leave cast iron soaking in water for long periods.
- After cleaning, dry thoroughly and rub with a thin layer of high-smoke-point oil.
- Think of it like a cast iron skillet: you’re maintaining a “seasoning,” not trying to make it look brand-new silver.
Porcelain-Coated Grates
Porcelain-coated cast iron or steel gives you the heat benefits with a smoother, easier-to-clean surface. The catch? The coating can chip or crack if you’re too aggressive.
- Avoid metal scrapers and harsh wire brushes.
- Use nylon or bristle-free tools and soapy water or vinegar solutions.
- If the coating chips badly, rust can appear underneath, which may eventually require replacement.
Tools and Supplies: What You Actually Need
You don’t need an entire aisle of grill cleaners. A simple kit will cover almost every situation:
- Bristle-free grill brush or scrub pad. Safer alternatives include coiled stainless scrubbers, pad-style steam cleaners, or rigid bristle-free heads that won’t shed.
- Grill scraper or metal spatula. Great for removing thick, carbonized buildup while the grill is hot.
- Aluminum foil ball. Crumpled foil held with tongs makes a surprisingly effective DIY scrubber on hot grates.
- Onion or lemon halves. Rubbing a hot grate with a cut onion or lemon helps loosen residue while adding a fresh smell.
- Baking soda and dish soap. A paste made from these two is excellent for stuck-on grease and carbon.
- White vinegar. Cuts through grease and can help loosen buildup without harsh chemicals.
- Bucket or large trash bag. Handy for deep soaks with a vinegar–baking soda solution.
- High-smoke-point oil. Canola, grapeseed, avocado, or peanut oil works well for seasoning and light grate oiling.
Step-by-Step: How to Clean Grill Grates Before Your Next BBQ
Step 1: Burn Off the Big Stuff
Start by preheating your grill. Turn the burners to high (for gas) or get your charcoal blazing and close the lid for about 10–15 minutes. The goal is to incinerate leftover food bits and dry out grease so it flakes off more easily.
After that time, turn the heat off or down to a safer working level. You want the grates hot enough to help loosen residue, but not so scorching that you sear your knuckles.
Step 2: Scrape While the Grates Are Still Hot
Using a bristle-free brush, scraper, or a ball of aluminum foil gripped with tongs, scrub the grates front to back. Focus on the areas where food tends to stickusually right above burners or hot spots.
- For stainless steel, medium pressure is fine.
- For cast iron, don’t be afraid to scrub, but avoid gouging the metal.
- For porcelain-coated, use a gentler toolno sharp edges.
Work section by section until loose residue is gone. This alone, done regularly, can keep your grates in very good shape.
Step 3: Deep Clean With a Soak (As Needed)
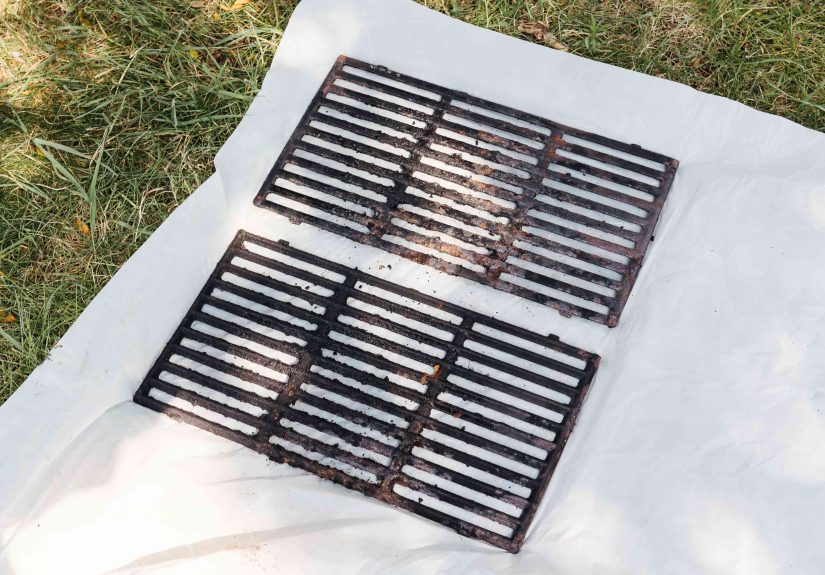
If your grill grates haven’t seen soap and water in… a while, or they’re wearing a thick coat of black crust, it’s time for the “spa day” approach.
- Remove the grates once they’re cool enough to handle.
- Mix a cleaning solution. A popular method is to put the grates in a large trash bag and pour in a mixture of white vinegar and baking soda, or to soak them in a large tub or sink with hot water, dish soap, and a cup or two of vinegar.
- Let them sit. Give the solution timeanywhere from 30 minutes for lighter buildup to overnight for heavy carbon.
- Scrub again. Use a sponge, non-scratch pad, or brush to remove softened residue.
- Rinse thoroughly. Make sure there’s no soap or baking soda left clinging to the metal.
For cast iron, dry them immediately and thoroughly after rinsing to prevent rust. A quick finish in a warm oven or on a low grill helps evaporate lingering moisture.
Step 4: Season and Oil the Grates
Once the grates are clean and dry, give them a little love before your next cookout:
- Heat the grill for a few minutes to warm the grates.
- Fold a paper towel into a small pad, dip it lightly in oil, and grab it with tongs.
- Wipe the grates with a thin, even layer of oil. You should hear a soft sizzle, not a giant flare-up.
This light oiling helps reduce sticking and, for cast iron, maintains the seasoning that protects against rust. You don’t want your grates dripping with oilthat just invites flare-ups. Think: barely shiny, not glossy.
Wire Grill Brushes: Why Many People Are Ditching Them
Wire-bristle grill brushes used to be the default tool, but they come with a serious downside: the bristles can break off, stick to your grates, hitch a ride on your food, and end up in someone’s mouth. That’s not a fun plot twist for a backyard burger night.
Medical reports and food safety agencies have documented cases where people needed emergency care or even surgery after accidentally swallowing tiny metal bristles. While incidents are relatively rare, the consequences can be severebristles can puncture the tongue, throat, or digestive tract.
Because of this, many grilling experts now recommend:
- Switching to bristle-free tools like coiled scrubbers, pumice stones made for grills, or pad-style steam cleaners.
- Inspecting grates carefully if you still use a wire brush: wipe them down with a damp towel after brushing and visually check for stray bristles.
- Regularly replacing worn brushes instead of hanging onto them for years.
If you want to eliminate the risk entirely, just skip wire brushes altogether. There are plenty of safer options that work just as welloften better.
Natural Cleaning Methods (That Actually Work)
If you’re not a fan of harsh chemical cleanersor you just like the idea of using what’s already in your pantrythese natural methods are genuinely effective.
Onion Scrub
Heat the grill, then turn it down slightly. Cut a white or yellow onion in half, stick it on a long fork, and rub the cut side across the hot grates. The onion’s natural acids and moisture help loosen stuck-on bits, and the steam softens grime.
Bonus: it smells fantastic, and any leftover onion flavor is grill-friendly. Just don’t forget to toss the used onion afterwardit’s not a snack.
Lemon and Salt Scrub
Similar idea, citrus edition. Cut a lemon in half, dip the cut side in coarse salt, and scrub the warm grates. The salt acts as an abrasive while the lemon’s citric acid dissolves grease and brightens the metal. This is especially nice before a big summer BBQ, because it leaves a fresh, clean scent.
Vinegar Spray
Fill a spray bottle with equal parts white vinegar and water. After an initial scrape, spritz the grates while they’re still warm and let the solution sit for a few minutes. Then scrub again with a brush or pad and rinse or wipe down with a damp cloth. Vinegar cuts grease without leaving behind a soapy residue.
Baking Soda Paste
For really stubborn spots, make a paste of baking soda and a little water or dish soap. Spread it on the cooled grates, let it sit for 15–20 minutes, then scrub and rinse. The mildly abrasive texture helps break down charred bits without damaging the metal.
Routine Maintenance: Make Future Cleanups Easier
The best way to avoid a dreaded “grill archaeology dig” before your next BBQ is to build a simple routine:
- After every cook: Burn off residue for 10 minutes, then scrape while the grates are still hot.
- Every few uses: Wipe grates with a vinegar solution or baking soda paste for a mini deep-clean.
- Every month or so (during heavy grilling season): Remove grates and give them a full deep-clean soak if needed.
- Before winter storage: Deep clean, dry completely, and oil cast iron grates before covering the grill.
If you follow this basic schedule, “cleaning the grill” becomes a quick, low-drama task rather than an all-day project you dread.
Common Mistakes to Avoid When Cleaning Grill Grates
- Using cold water on blazing-hot grates. Rapid temperature changes can warp metal and weaken porcelain coatings.
- Letting cast iron air-dry. That’s basically sending an open invitation to rust.
- Using oven cleaner on porcelain or aluminum parts. Many heavy-duty cleaners are too harsh for grill finishes.
- Pouring oil directly on hot grates. This usually equals instant flare-ups and sticky residue.
- Ignoring the underside of the grates. Gunk builds up there too and can flake onto your food.
A little attention to these details keeps your grill performing like new and extends the life of your grates.
Real-World Experiences: What You Learn After Cleaning a Lot of Grills
Anyone who has hosted more than a couple of cookouts learns very quickly that your grill has moods. One weekend it’s your best friend, the next it’s refusing to release a single burger without a fight. A lot of that behavior comes down to how cleanand how preparedyour grates are.
Picture this: it’s Saturday afternoon, guests are due at 5 p.m., and you open the lid to find grates that look like an archaeological layer cake of ribs, wings, and mystery kabobs. If you start cleaning at that moment with no plan, you’re in for a stressful hour. But with a routine and some experience, here’s how it typically goes for seasoned grillers:
First, they fire the grill to high, close the lid, and walk away for 10–15 minutes. That burn-off step is non-negotiable. Meanwhile, they grab their toolsusually a bristle-free brush, a scraper, a roll of paper towels, and a small bowl of neutral oil. By the time they come back, most of the old food bits are charred and dry instead of sticky and gummy.
Next, they scrape. And they scrape more than they think they need to, working each bar of the grate instead of just swiping across the surface once and calling it “good enough.” They’ll often flip the grates if possible to get the underside, especially before a big party where they don’t want flakes of burnt food dropping onto steaks.
Experienced grillers also pay attention to the type of food they’re about to cook. If they’re planning to grill skin-on fish or delicate veggies, they’re extra picky about how clean and smooth the grates are. They might wipe the grates with a vinegar-damp towel to remove any lingering residue and then go in with a thin coat of oil for a slick, nonstick surface.
Many people eventually learn the hard way about cleaning tools, too. Maybe they had a wire brush that started to look a little ragged, and one day they found a tiny metal bristle stuck in a piece of chicken. That’s usually the moment they switch to safer alternatives. Once you’ve seen that, it’s tough to un-see itand most folks retire bristle brushes for good.
Another common “aha moment” is realizing that cast iron grates need care similar to a favorite skillet. People who used to leave them soaking in a tub of soapy water for hours often end up staring at orange rust patches the next day. The recovery processscrubbing off the rust, drying thoroughly, and re-seasoning with oil over heatteaches them quickly to dry cast iron immediately and give it a protective oil coat every time.
Over time, you develop small rituals that make everything easier. Some grillers keep a spray bottle of vinegar and water right next to the grill and give the grates a spritz after scraping. Others swear by rubbing a halved onion over hot grates before the first burger of the day hits the metal. A few go minimalist: scrape, oil lightly, and let the grill’s heat do the rest. The common thread isn’t the exact methodit’s that they do something consistently.
There’s also the mental payoff. Walking out to a clean, well-maintained grill before a BBQ feels like a fresh start. You’re not wrestling with stuck-on debris or trying to guess what burned-on flavor you’re about to add to your food. Instead, you can focus on timing, seasoning, and not overcooking the chicken while you’re telling that story you’ve told a dozen times.
In the end, cleaning grill grates properly isn’t about perfection. It’s about building a simple routine you can repeat without thinking too hard: burn off, scrape, occasionally soak, dry, oil, and repeat. Do that, and your grill will reward you all season long with better-tasting food, fewer flare-ups, and fewer last-minute cleaning panics when guests are already in the driveway.
SEO JSON BLOCK