Table of Contents >> Show >> Hide
- Before You Connect Your PS3 to WiFi
- Step-by-Step: How to Connect Wireless Internet (WiFi) to a PlayStation 3
- 1. Turn on your PS3 and go to Settings
- 2. Make sure Internet Connection is enabled
- 3. Open Internet Connection Settings
- 4. Choose Easy setup
- 5. Select Wireless
- 6. Choose Scan
- 7. Select your WiFi network name
- 8. Confirm the security settings
- 9. Enter the WiFi password
- 10. Save the settings
- 11. Run the Internet Connection Test
- 12. Start using the internet on your PS3
- What to Do If Your PS3 Won’t Connect to WiFi
- Best Practices for a Smoother PS3 WiFi Setup
- Real-World Experiences With Connecting WiFi to a PlayStation 3
- Final Thoughts
Connecting a PlayStation 3 to WiFi is one of those jobs that sounds simple, feels simple, and then somehow turns into a ten-minute side quest featuring an on-screen keyboard, a suspiciously long password, and at least one moment where you ask, “Wait, is that a zero or the letter O?” The good news is that the process is still very doable. The PS3 may be a veteran of the console world, but it can still get online for game updates, streaming, PlayStation Network access, and old-school digital nostalgia.
In this guide, you’ll learn exactly how to connect wireless internet to a PlayStation 3, what settings matter, and how to fix the most common PS3 WiFi problems without throwing the controller onto the couch in dramatic slow motion. We’ll cover the standard setup method, when to use custom settings, why some routers confuse older consoles, and what to do if your PS3 refuses to see your network or keeps failing the internet connection test.
Before You Connect Your PS3 to WiFi
Before you dive into the PS3 network settings menu, make sure you have a few basics ready. This saves time and reduces the odds of wandering through menus like you’re trapped in a digital corn maze.
- Your wireless router or modem-router combo is turned on and already connected to the internet.
- You know your WiFi network name, also called the SSID.
- You know your WiFi password, security key, or WPA/WPA2 key.
- No Ethernet cable is plugged into the PS3.
- Your PS3 model supports wireless LAN. Most do, but some very early models do not.
One important detail: the PlayStation 3 is an older console, so its wireless hardware is not as flexible as what you’ll find in newer systems. If your router has separate 2.4 GHz and 5 GHz bands, the 2.4 GHz network is usually the better choice for PS3 WiFi setup. Many connection headaches come down to modern routers trying to be fancy while the PS3 just wants a stable, old-fashioned wireless handshake.
Step-by-Step: How to Connect Wireless Internet (WiFi) to a PlayStation 3
1. Turn on your PS3 and go to Settings
From the PS3 home screen, scroll to Settings. From there, go down to Network Settings. This is the control center for anything related to your console’s internet connection.
2. Make sure Internet Connection is enabled
Inside Network Settings, confirm that Internet Connection is set to Enabled. If it isn’t, switch it on. This sounds obvious, but obvious things are exactly what tend to ruin a perfectly good setup afternoon.
3. Open Internet Connection Settings
Select Internet Connection Settings. The PS3 will usually warn you that you’ll be disconnected from any current network session. Select Yes to continue.
4. Choose Easy setup
When the PS3 asks how you want to configure the connection, choose Easy. For most home users, this is the right option. It allows the console to automatically handle the standard networking details without asking you to become your household’s part-time IT department.
5. Select Wireless
Choose Wireless as your connection method. This tells the PS3 that you want to connect through WiFi rather than a wired Ethernet cable.
6. Choose Scan
Under WLAN settings, select Scan. The PS3 will search for nearby access points and display a list of available wireless networks. Think of this as the console peeking around the room and saying, “Okay, who here has internet?”
7. Select your WiFi network name
Find your network’s SSID in the list and select it. Double-check that the name is correct before moving on. If your network name is hidden or doesn’t appear, you may need to enter it manually using custom settings, but in most homes the scan method works just fine.
8. Confirm the security settings
The PS3 will either detect the router’s security mode automatically or ask you to choose the correct one. In many cases, the security type shown will already match your router. If you’re unsure, check your router’s admin panel, your ISP’s app, or the label on the router itself.
9. Enter the WiFi password
Type in your wireless password or encryption key. The PS3 masks the characters, so go slowly and enter them carefully. This is not the moment for speed. This is the moment for accuracy and emotional stability.
If you don’t know the password, you can often find it:
- On a sticker attached to the router or gateway
- In your ISP’s account app or WiFi settings page
- By logging into the router’s admin dashboard
- On a computer or phone already connected to that WiFi network
10. Save the settings
After the password is entered, the PS3 will show a summary list of network settings. Review them, then save the configuration. If everything looks correct, you’re almost there.
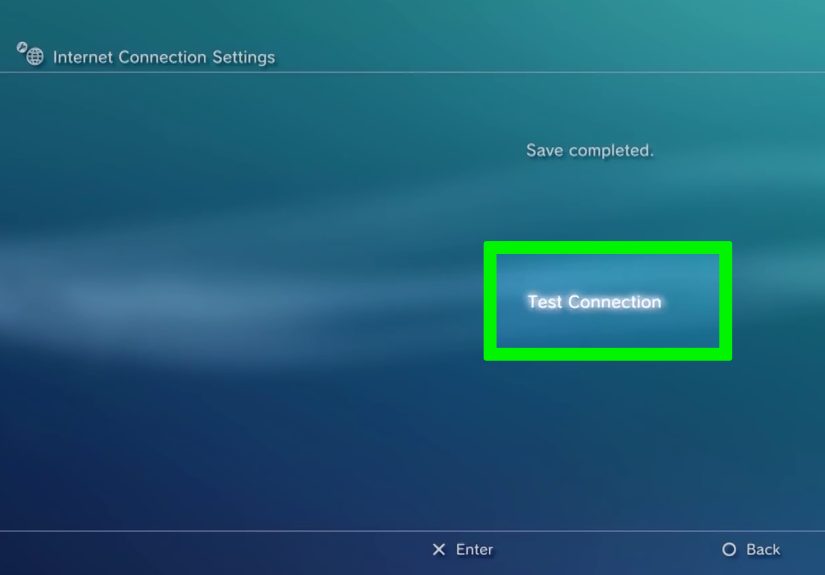
11. Run the Internet Connection Test
Select Test Connection. The PlayStation 3 will check whether it can obtain an IP address, reach the internet, use PSN, and identify the status of UPnP and NAT type. If the results say Succeeded where expected, you’re online.
12. Start using the internet on your PS3
Once the settings are saved, your PS3 should reconnect automatically when powered on in the future. At that point, you can sign in to PlayStation Network, download updates, browse supported services, or revisit your backlog with the confidence of someone who just won a polite but meaningful battle against consumer electronics.
What to Do If Your PS3 Won’t Connect to WiFi
Sometimes the setup goes smoothly. Sometimes the PS3 behaves like a retired movie star who only agrees to work under very specific lighting conditions. Here are the most common issues and how to fix them.
The PS3 can’t find your wireless network
If your SSID does not appear when you scan, start with the basics. Make sure the router is close enough to the console, and check that wireless broadcasting is enabled. Older PS3 systems work best with 2.4 GHz WiFi, so if your router separates bands, connect to the 2.4 GHz SSID rather than the 5 GHz one.
Also remember that the PS3’s wireless feature operates in a crowded radio range shared by many household devices. Microwaves, cordless gear, Bluetooth accessories, and neighboring routers can all contribute to interference. If the network appears and disappears like a shy ghost, distance and interference may be the problem.
The password keeps failing
This is the classic issue. Verify that you’re entering the correct WiFi password, not the router admin password. Those are not the same thing, and mixing them up is a surprisingly common tradition.
Check capitalization, symbols, and look-alike characters such as:
- O and 0
- l and I
- S and 5
- B and 8
If needed, temporarily change your WiFi password to something simpler, connect the PS3, then decide later whether you want to create a stronger but still human-readable password.
The connection test fails at “Obtain IP Address” or “Internet Connection”
If the PS3 finds your network but fails the connection test, restart the router and modem first. Then restart the PS3 and try again using Easy settings.
If that still doesn’t work, use Custom settings and review the following:
- IP Address Setting: Usually Automatic
- DHCP Host Name: Usually Do Not Set
- DNS Setting: Usually Automatic, unless your ISP requires manual DNS
- MTU: Usually Automatic
- Proxy Server: Usually Do Not Use
- UPnP: Usually Enable
In some environments, especially with certain ISPs, apartment complexes, or older modem setups, you may need PPPoE credentials or manual IP/DNS settings. If your internet provider gave you a username and password specifically for internet service, that is a clue that PPPoE may be required.
You get NAT Type 3
NAT Type 3 is the PS3’s way of saying, “I can sort of connect, but I’m not happy about it.” You may still reach the internet, but voice chat, multiplayer communication, and certain game features can be limited.
To improve this:
- Enable UPnP on the PS3 and in your router if supported
- Avoid using a proxy unless your network specifically requires one
- Check whether your modem is also acting as a router, which can create double-NAT issues
- In offices, dorms, and apartment networks, understand that firewall restrictions may be outside your control
The WiFi connection is slow or unstable
The PS3 is not a modern WiFi speed demon. It uses older wireless standards, and crowded 2.4 GHz environments can drag performance down. If downloads crawl, streaming buffers, or online games feel laggy, try the following:
- Move the router closer to the console
- Reduce walls and large furniture between router and PS3
- Pause other high-bandwidth devices on the same network
- Try a less congested WiFi channel on the router
- Use a wired Ethernet connection if you want the most stable result
That last tip is worth underlining. If you want the best performance for updates, streaming, and online play, a wired connection often beats wireless on an older console. WiFi is convenient. Ethernet is the grown-up in the room.
Your router uses MAC filtering or hidden SSID settings
Some networks are configured to allow only approved devices. If your router uses MAC address filtering, the PS3 may not be allowed online until its MAC address is added to the approved list. You can find the system’s MAC address under Settings > System Settings > System Information.
If the SSID is hidden, you may need to use the manual or custom setup path and type the network name yourself exactly as it appears on the router.
Best Practices for a Smoother PS3 WiFi Setup
- Write down your SSID and password before starting.
- Disconnect any Ethernet cable before configuring wireless.
- Use Easy setup first, then switch to Custom only if needed.
- Prefer 2.4 GHz WiFi for older PS3 wireless connections.
- Enable UPnP if you plan to play online or use chat features.
- Keep your system software updated for compatibility and security fixes.
Real-World Experiences With Connecting WiFi to a PlayStation 3
The experience of connecting wireless internet to a PlayStation 3 is often a mix of nostalgia, patience, and tiny victories. A lot of people aren’t setting up a PS3 because it’s the newest thing in the house. They’re setting it up because they pulled it out of storage, bought one secondhand, or decided it was time to replay a favorite game from the era when menus had that glossy, futuristic XMB look and every startup sound felt oddly important.
One of the most common experiences is the “weekend rediscovery” setup. You find the console, untangle the power cable, connect it to the TV, and realize the controller needs charging. Then you boot it up, head into network settings, and suddenly remember that older devices expect you to know your SSID, your security type, and the exact WiFi password without mercy. Modern devices often hide the complexity. The PS3 politely invites you to meet it face-to-face.
Another typical experience happens in shared homes or apartments. The console sees multiple networks, several of them with nearly identical names, and you have to guess which one is yours. Then someone says, “Try the password with the exclamation point,” and someone else says, “No, that was the old router.” At that point, the PS3 becomes less of a game console and more of a family meeting facilitator.
There’s also the very specific joy of finally passing the internet connection test. When the screen returns a successful IP address, a valid internet connection, and a usable NAT type, it feels more satisfying than it probably should. It’s not dramatic, but it is deeply rewarding in the same way that fixing a squeaky door or getting a stubborn printer back online is rewarding. You didn’t just press buttons. You restored order.
For retro gamers, the experience can be especially fun because connecting the PS3 to WiFi feels like reopening a time capsule. Suddenly system updates are downloading, old accounts might still exist, and the console starts feeling alive again instead of like a museum piece under your TV. Even the annoyances become part of the charm. Yes, typing a long WiFi password with a controller is slow. Yes, the connection may be more temperamental than a brand-new console. But once it works, the setup feels earned.
In practical terms, most people who succeed do the same few things: they switch to the 2.4 GHz network, double-check the password, restart the router, and avoid overcomplicating the setup at first. That pattern shows up again and again because older hardware usually responds best to simple, stable conditions. In other words, the PS3 doesn’t need your home network to be flashy. It just needs it to be clear, compatible, and cooperative.
Final Thoughts
If you’ve been wondering how to connect wireless internet to a PlayStation 3, the process is still straightforward once you know the right path: open network settings, choose easy wireless setup, scan for your SSID, enter the password, save, and test. The real trick is not the menu sequence. It’s understanding that the PS3 is older hardware living in a newer WiFi world.
That means the best results usually come from keeping things simple: use the correct SSID, stick with 2.4 GHz when needed, enter the right security key, and only move into custom settings if the standard setup fails. Do that, and your PS3 can still get online without much drama. Or at least without enough drama to cancel game night.