Table of Contents >> Show >> Hide
- What You’ll Need (Your Flat-Iron Curl Starter Kit)
- Before You Start: The 5 Things That Make Flat-Iron Curls Work
- The Core Technique: Classic Flat-Iron Curl (Step-by-Step)
- How to Get Different Looks With the Same Flat Iron
- Hair-Length Playbook
- Hair-Type Tips (Because One Size Never Fits All)
- Common Flat-Iron Curl Mistakes (And How to Fix Them)
- Quick FAQ: Flat-Iron Curls
- Step-by-Step Mini Recap (Print This in Your Brain)
- Real-World Experiences: What It’s Actually Like Learning Flat-Iron Curls (500+ Words)
- Conclusion
Flat irons were invented to make hair straight. And then humanity immediately said,
“Cool… but what if we made curls with it?”
The good news: curling your hair with a flat iron is absolutely doable, and once you get the wrist move down,
it’s one of the fastest ways to create everything from relaxed beach waves to bouncy curlswithout owning
three different hot tools.
This step-by-step guide walks you through the safest prep, the simplest technique, and the small tweaks
that make your curls look effortless (instead of “I wrestled a toaster and lost”).
What You’ll Need (Your Flat-Iron Curl Starter Kit)
- A flat iron (ideally 1-inch plates with slightly rounded edges for easier curling)
- Heat protectant (spray, cream, or mistuse something you’ll actually apply every time)
- Comb or brush (wide-tooth comb for detangling; brush for smoothing sections)
- Sectioning clips (the humble claw clip is a hero)
- Optional finishing products: light hairspray, texture spray, shine serum, or a small dab of styling paste
Before You Start: The 5 Things That Make Flat-Iron Curls Work
1) Start with completely dry hair
Curling damp hair with a traditional flat iron can cause unnecessary damage and doesn’t hold well anyway.
If you showered recently, blow-dry first or wait until your hair is fully dry.
2) Use heat protectant like it’s your job
Heat protectant helps reduce moisture loss and damage from high temperatures. Mist it evenly, then comb it through
so every strand gets invited to the safety partynot just the top layer.
3) Pick the right temperature (and don’t assume “hotter = better”)
Most people get better curls by using the lowest effective heat and smaller sections.
As a practical starting point:
- Fine, fragile, or color-treated hair: ~250–300°F
- Medium/“average” hair: ~300–350°F
- Thick/coarse hair: ~350–400°F (only as needed)
If your iron only has vague settings (low/medium/high), start low and increase slowly. If curls won’t form,
go up a notch or take smaller sections before you crank the heat.
4) Sectioning is not optional (unless you enjoy chaos)
Even if you’re in a hurry, divide your hair into at least three layers: bottom, middle, top.
This makes curls more consistent and helps them last longer.
5) Curls set when they cool
Heat shapes the hair. Cooling “locks” the shape. If you touch, brush, or shake out curls immediately,
you’re basically telling them, “Great worknow un-do it.”
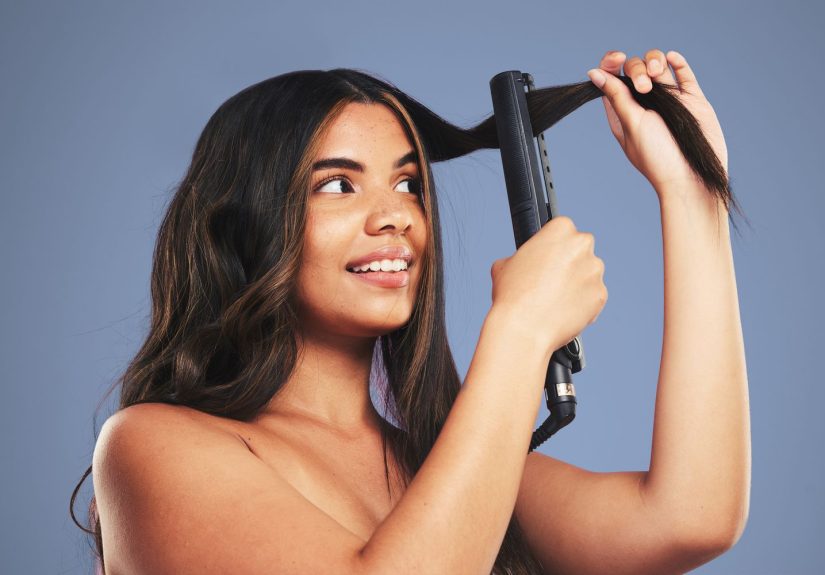
The Core Technique: Classic Flat-Iron Curl (Step-by-Step)
This is the foundational move you can adjust for looser waves or tighter curls.
Think “curling ribbon with scissors,” but with fewer arts-and-crafts supplies.
-
Prep a 1-inch section.
Smaller section = tighter curl and better hold. Larger section = looser wave and less definition.
If you’re new, start with 1 inch so your technique has a fair chance. -
Clamp near the roots (but not on your scalp).
Place the iron about 1–2 inches away from the roots. You want lift, not a surprise scalp stamp.
-
Rotate the iron 180–360 degrees.
Turn the iron away from your face for a classic “opens up the face” look. A half turn (about 180°)
gives a softer bend; a full turn (about 360°) creates a more defined curl. -
Glide down smoothlydon’t stop mid-slide.
Slowly pull the iron down the section while keeping the rotation. Continuous movement helps prevent
weird creases and “flat-iron kinks.” -
Release and let the curl cool.
Drop the curl into your palm for a second if you want more bounce, or lightly “coil” it with your fingers.
Then let it cool before touching. -
Repeat, alternating direction.
For a modern, natural look, alternate curling away from the face and toward the face.
If you want a more polished finish (like glam waves), curl most sections in the same direction.
How to Get Different Looks With the Same Flat Iron
Option A: Beach Waves (the “cool girl” wave)
Beach waves are less “ringlet” and more “I woke up like this… after eight hours of trying.”
The key is creating bends and leaving the ends straighter.
- Use 1–2 inch sections for a looser pattern.
- Clamp near the root, rotate your wrist to make a bend, then glide a few inches.
- Rotate the opposite way to create an S-shape down the strand.
- Leave the last 1 inch (or two) less curled for that effortless finish.
- When cool, loosen with fingers or a wide-tooth comb, then finish with texture spray.
Option B: Bouncy Curls (more volume, more drama)
This version is closer to a curling iron curl, but still has that flat-iron shine.
- Use smaller sections (about 1 inch or less).
- Do a full rotation (closer to 360°) before gliding down.
- Glide slower for more heat contact (without turning the temperature into lava).
- Let curls cool completely, then shake out at the roots for lift.
Option C: Soft “Bends” (quick polish for everyday hair)
If you want movement without full curls, bends are your best friend. They’re also great for first-timers
because they’re more forgiving.
- Use larger sections (1.5–2 inches).
- Make gentle wrist turns as you glide down (like you’re drawing a slow wave).
- Finish with a light hairspray or smoothing serum for shine.
Hair-Length Playbook
How to curl short hair with a flat iron
Short hair can absolutely be curled with a flat ironit just needs smaller sections and slightly faster passes.
- Choose a narrower iron (around 1 inch or smaller).
- Work with half-inch to 1-inch sections.
- Do a half-turn and glide quickly to avoid over-heating short ends.
- Finish with texture spray to keep the shape without making it crunchy.
How to curl medium-length hair
Medium hair is the “sweet spot” for flat-iron curlslong enough to form a pattern, short enough to hold it.
Alternate directions for a natural finish, and consider leaving the ends slightly straighter for modern waves.
How to curl long hair
Long hair needs two things: patience and proper sectioning. If curls fall quickly, it’s often because the sections
are too big or the curls are disturbed before cooling.
- Work in smaller sections than you think you need.
- Let each curl cool fully before you touch it.
- Use a light hairspray after curling or a flexible-hold spray between layers for extra grip.
Hair-Type Tips (Because One Size Never Fits All)
Fine or thin hair
- Keep the temperature lower, and rely on smaller sections for definition.
- Use a lightweight heat protectant so hair doesn’t get weighed down.
- Finish with a dry texture spray for hold without heaviness.
Thick or coarse hair
- You may need a higher temperaturebut try smaller sections first.
- Make sure the iron has consistent heat and smooth plates to reduce snagging.
- Work methodically in layers so each section gets an even result.
Curly or wavy hair (and you’re curling for definition)
- Start with a smooth base: blow-dry or stretch the roots first if needed.
- Use the flat iron to create polished, intentional waves rather than trying to fight your texture.
- Finish with a tiny amount of styling paste on ends to separate and define.
Common Flat-Iron Curl Mistakes (And How to Fix Them)
“My hair has weird creases.”
That usually happens when the iron pauses mid-strand or when the section is folded awkwardly between the plates.
Keep the motion continuous and make sure the hair feeds smoothly through the iron.
“My curls fall out in 20 minutes.”
- Use smaller sections.
- Make sure hair is fully dry and not overly conditioned/slippery.
- Let curls cool before brushing them out.
- Try a light hairspray or texture spray for grip.
“It looks too ‘done’.”
Loosen the look by alternating curl direction, leaving the ends a bit straighter, and breaking up the pattern
with fingers or a wide-tooth comb once everything is cool.
“I burned my fingers/ear/forehead (send help).”
First: you’re not alone. Second: slow down and keep the iron 1–2 inches away from your scalp. You can also use
a heat-resistant glove while you’re learning. Your future self will thank you.
Quick FAQ: Flat-Iron Curls
Is curling hair with a flat iron damaging?
Any heat styling can cause damage if overdone. The safest approach is using heat protectant, keeping the temperature
as low as possible for your hair type, and avoiding repeated passes over the same section.
What size flat iron is best for curls?
A 1-inch flat iron is the most versatile for curling. Wider irons can work for loose waves on long hair, but they’re
harder to maneuver for tighter curls or shorter lengths.
Should I curl toward my face or away?
Away from the face tends to open up your features and looks more “salon.” Alternating directions looks more modern
and less uniform. There’s no wrong choiceonly the choice that matches your vibe.
Step-by-Step Mini Recap (Print This in Your Brain)
- Dry hair completely.
- Apply heat protectant and comb through.
- Set the right temperature for your hair type.
- Section hair (bottom → middle → top).
- Clamp 1–2 inches from roots.
- Rotate wrist (half to full turn) and glide down smoothly.
- Let curls cool before touching.
- Finish with texture spray or light hairspray, then loosen as desired.
Real-World Experiences: What It’s Actually Like Learning Flat-Iron Curls (500+ Words)
If you’ve ever watched a 12-second tutorial and thought, “Wow, easy,” then picked up a flat iron and immediately
questioned your hand-eye coordinationwelcome. That learning curve is normal. In fact, one of the most
common experiences people share is that the technique feels awkward at first, mainly because your wrist is doing
a little choreography routine while your other hand tries to feed hair smoothly through the plates.
A typical early moment: you rotate the iron, you start gliding, and thenpanicyour hand stops moving. The result
is a sharp kink, a crease, or a curl that looks like it took a wrong turn at Albuquerque. The fix most people
discover (often after a few “practice curls”) is that continuous movement matters more than speed.
It’s not a race; it’s a smooth slide with intention. Once you focus on keeping the iron moving, creases happen
far less often, and curls start to look like curls instead of abstract art.
Another very real experience: figuring out section size. Many people begin with big chunks because
it feels fasteruntil the curls don’t hold. Then comes the lightbulb moment: smaller sections create better heat
distribution and more lasting shape. It’s a funny trade-off: you take smaller sections (which sounds slower),
but your results improve so much that you stop redoing pieces, and the whole process becomes faster overall.
People also notice a big difference in how their hair behaves depending on what day it is. Freshly washed,
super-soft hair can be slippery and may not hold curls as long. On the other hand, second-day hair often has a bit
more “grip,” which can make flat-iron curls last longer with less effort. That’s why many stylists recommend
balancing hydration with holdusing conditioning products that don’t weigh hair down, plus a light finishing spray
or texture mist when you want longevity.
There’s also the “front pieces” phenomenon. Even confident flat-iron curlers will admit the face-framing sections
can feel like high-stakes real estate. Curling away from the face tends to feel safer and more flattering, but
you might find you prefer alternating directions everywhere else for a natural finish. A common strategy is to
keep the front sections consistent (away from the face) while letting the back be more mixed. It’s the hair
equivalent of wearing matching socks in public and chaos socks at home.
And then there’s the cooling phase, which tests everyone’s patience. A lot of people instinctively want to run
fingers through curls immediatelybecause it looks cute and because hands get bored. But the experience most
people report is that waiting just a few minutes makes a huge difference. Letting curls cool fully often turns
“meh” curls into “oh, hello” curls. Some even clip curls up for a minute or two while they finish the rest of
their hair, especially if they want extra bounce.
Finally, confidence grows fast once you find your “signature settings.” Many people settle into a personal
formulatemperature range, section size, and wrist turnbased on their hair type. Once you stop experimenting
every single time and start repeating what works, flat-iron curling becomes less of an event and more of a quick
styling option. At that point, the flat iron goes from “mysterious hot rectangle” to “multi-tool I can actually
use,” and your results get consistent enough that you can do curls before school, before work, or before a night
out without turning it into a full production.
Conclusion
Learning how to curl your hair with a flat iron is mostly about mastering one smooth motionclamp, rotate, glide
and letting your curls cool before you fluff them into perfection. Start with good prep (dry hair + heat protectant),
keep your temperature reasonable for your hair type, and use smaller sections until your curls behave. With a little
practice, you’ll be able to switch between beach waves, soft bends, and bouncy curls using the same toolno extra
gadgets required.