Table of Contents >> Show >> Hide
- Before You Delete: A 10-Minute Checklist That Can Save You Hours Later
- How to Delete an Amazon Account Permanently in 6 Easy Steps
- Step 1: Sign in to the Amazon account you want to delete
- Step 2: Find the “Close Your Amazon Account” option (Data & Privacy)
- Step 3: Review the list of services connected to your Amazon login
- Step 4: Pick a reason (optional) and check the confirmation box
- Step 5: Submit the request (“Close My Account”)
- Step 6: Confirm the closure from your email (and keep the confirmation for your records)
- What Happens After You Permanently Delete Your Amazon Account?
- Don’t Want to Delete Everything? Here Are Two Cleaner Alternatives
- Quick FAQ
- Real-World Experiences: What Usually Trips People Up (and How to Avoid It)
- Conclusion
Breaking up is hard to doespecially when your ex is a website that remembers every impulse purchase you made at 2:00 a.m.
(“Why did I think a 64-pack of lint rollers was a personality?”) If you’re done with Amazon for goodprivacy concerns,
too many subscriptions, a desire to shop local, or you simply want a cleaner digital lifepermanently closing your Amazon account
is totally doable.
The key thing to know: Amazon account deletion is meant to be final. Once it’s done, you lose access to the account and most
associated services and content tied to that login. So the smartest move is to do a quick “pre-flight check,” then follow the
official closure flow and confirm the request.
Before You Delete: A 10-Minute Checklist That Can Save You Hours Later
If you skip this part, nothing catastrophic happensunless you consider losing gift card balances, digital purchases, or that one
invoice you need for taxes “catastrophic,” in which case… welcome, fellow adult.
1) Clear out anything “in progress”
- Open orders: Wait until they arrive, or cancel anything not shipped yet.
- Returns/refunds: Finish them first so you’re not trying to track a refund using an account that no longer exists.
- Subscriptions renewals: Know your billing dates (Prime, channels, apps, etc.).
2) Spend (or move) your gift card balance
Gift card balances are typically tied to the account. If you close the account, you can lose any remaining balance. So if you’ve got
$17.42 sitting there, consider using itfuture you will be weirdly grateful.
3) Back up anything you paid for digitally
Account closure can cut off access to digital purchases and Amazon-connected servicesthink Kindle content, Audible, Alexa-related data,
Prime Video purchases, and more. If you rely on any of these, decide whether you really want full deletion or just a Prime cancellation.
4) Download your Amazon data (optional, but smart)
If you want a record of your order history, addresses, and other account information, request your Amazon data export before you close your
account. Guides that walk through Amazon’s data request portal note you’ll typically confirm your request via email, then download the files
lateroften with a limited download window (commonly up to 90 days once ready).
Pro tip: Store the download somewhere secure (encrypted drive or a locked folder). Your data export can contain personal details you don’t want floating around unprotected.
5) Decide what “privacy” means for you (so you don’t overdo it)
Some people want to delete Amazon entirely. Others just want less tracking. For example, you may not be able to fully delete your purchasing
history from Amazon’s records, but you can reduce what shows up in browsing history and tighten privacy settings.
6) Watch for phishing while you do all of this
Any time you’re changing account settings or closing an account, scammers love to show up with “urgent” emails and texts. A safer habit:
navigate directly in your browser/app instead of clicking random links that claim to be Amazon.
How to Delete an Amazon Account Permanently in 6 Easy Steps
These steps focus on the standard Amazon account closure flow where you go to the “Close Your Amazon Account” area, review the warnings,
confirm you understand what you’ll lose, then finalize via a confirmation message.
-
Step 1: Sign in to the Amazon account you want to delete
Use a browser and sign in to the exact account you want to close (especially if you have multiple logins). Many walkthroughs recommend doing
this on desktop because the closure flow can be easier to find and complete there.
-
Step 2: Find the “Close Your Amazon Account” option (Data & Privacy)
Navigate to your account settings area and look for the section that references Data & Privacy or managing your data.
From there, select “Close Your Amazon Account.” If you don’t see it right away, use Amazon’s Help/Customer Service area to
search for “close account.”
-
Step 3: Review the list of services connected to your Amazon login
Amazon typically shows a warning page that highlights what account closure meansespecially the services and content you’ll lose access to.
This is where you pause and confirm you’re not about to delete the account that holds your Kindle library, gift card balance, or Prime Video purchases.
Example: If you bought digital textbooks for school or work through Kindle, you may want to download what you can and consider
whether you’d rather keep the Amazon login but cancel Prime and remove payment methods instead.
-
Step 4: Pick a reason (optional) and check the confirmation box
You’ll usually see a dropdown asking why you’re leaving (the digital equivalent of “It’s not you, it’s me”). Then you’ll check a box confirming
you want to permanently close the account and delete your data.
-
Step 5: Submit the request (“Close My Account”)
Click the button to close the account. At this point, Amazon typically sends a confirmation email (and sometimes requires you to confirm within
a specific time window). Think of this as the “Are you absolutely sure?” stepAmazon’s last attempt to keep your cart warm.
-
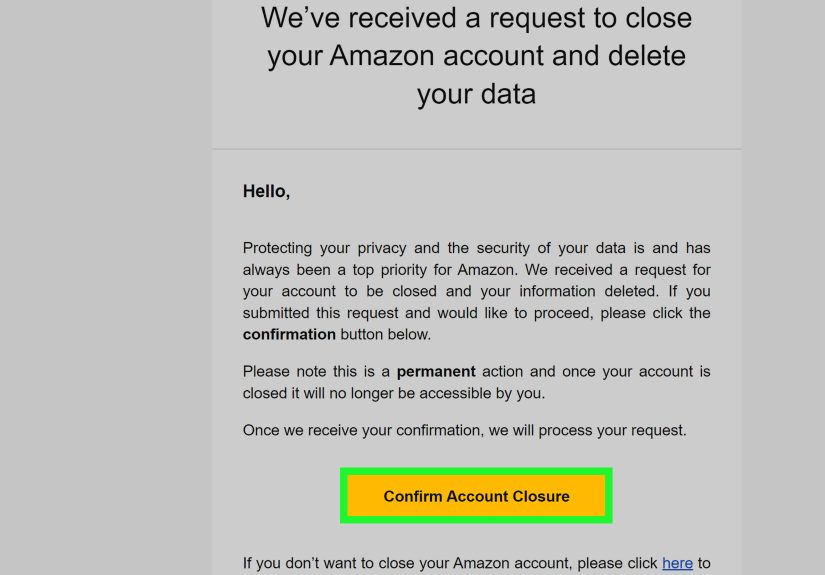
Step 6: Confirm the closure from your email (and keep the confirmation for your records)
Check your inbox for the closure confirmation and follow the instructions. Some guides note you may need to reply or click a confirmation link
within a limited window (commonly cited as five days in walkthroughs). Once confirmed, your account moves into deletion/closure processing.
If you don’t see the email: check spam/junk folders, search for “Amazon account closure,” and avoid clicking suspicious “Amazon”
messages that look off. When in doubt, go directly to Amazon in your browser/app and confirm your status there.
What Happens After You Permanently Delete Your Amazon Account?
The biggest surprise for most people is how much is tied to that one login. Closing your Amazon account can mean losing access to:
digital content (like certain purchases), account history, gift card balances, and Amazon-connected services/devices depending on how you use them.
Common “I wish I knew that” outcomes
- No more order history access: helpful for warranties, reimbursements, and returns later.
- Gift card balances can be forfeited: use them first.
- Digital purchases may be gone: including certain Kindle/Audible-related access tied to that account.
- Prime ends because the account ends: if your real goal is “stop paying for Prime,” you may not need full deletion.
Don’t Want to Delete Everything? Here Are Two Cleaner Alternatives
Option A: Cancel Prime (keep the account)
If your main motivation is cost, canceling Prime can get you 90% of the benefit without torching your entire purchase history and digital library.
Then remove saved payment methods and addresses if you want a “minimal footprint” account.
Option B: Reduce tracking without deleting your account
You can trim browsing history visibility and tighten privacy settingseven if you can’t fully erase all purchasing history. This approach is great
if you want fewer personalized recommendations without losing account access.
Quick FAQ
Can I delete my Amazon purchase history instead of deleting my account?
Fully deleting purchase history is not always offered as a simple “delete” feature. Some privacy reporting notes that the more realistic option is
limiting what’s visible to you (like managing browsing history), while account closure is the more “nuclear” approach.
What if I can’t find the “Close Your Amazon Account” page?
Use Amazon’s Customer Service/Help section and search for “close account,” “close my account,” or “delete account.” Some walkthroughs describe contacting
Amazon support (chat/phone/email) as a fallback path when the self-serve route isn’t obvious.
Should I request my data before deleting?
If you’ll ever need receipts, order history, or a record of your account info, requesting your data first is a smart move. Step-by-step privacy guides
note you typically confirm the request via email, then download your files later (often with a limited time to download once ready).
Real-World Experiences: What Usually Trips People Up (and How to Avoid It)
Most people don’t regret deleting Amazon because they miss the ability to buy paper towels in bulk at midnight. They regret it because of the
stuff attached to the accountthe quiet little “extras” you forget exist until they’re gone.
One of the most common situations goes like this: someone deletes their account and then remembers they needed an old invoice for a warranty claim,
an employer reimbursement, or a tax deduction. It’s not that the account deletion was “wrong”it’s just that adult life runs on documentation and
receipts the way toddlers run on chaos. If you think you’ll need any proof of purchase later, requesting your data export and saving key invoices
first can prevent a future headache. (Yes, this is the part where past-you becomes a hero. Try to enjoy it.)
Another common “whoops” moment: gift card balances. People treat gift cards like loose change“I’ll use it someday”and then they close the account and
discover “someday” is not a valid currency. Multiple step-by-step guides warn that balances are tied to the account, and once the account is gone, the
balance may vanish with it. The fix is simple: check your balance, spend it, and then delete. You can even do a practical “final order” like household
essentials, then hit the big red button after everything arrives.
Digital content is the next big surprise. People remember they bought physical items, sure. But they forget about Kindle books, Audible libraries,
Prime Video purchases, app subscriptions, and device connections (Echo, Kindle, Fire TV) that rely on that login. When you close the account, you may
lose access to those services and purchasesso if you’re a heavy Kindle/Audible user, decide whether you truly want “permanent deletion” or whether
canceling Prime and removing payment methods gets you the privacy and budget win without deleting your digital shelf.
Then there’s the “I did everything right… why is this taking so long?” feeling. Data requests and account closure flows often involve email confirmations
and processing time. That’s normal. The important part is confirming requests only through messages you trust. Scammers know that people expect emails
during account changes, so they time fake messages to look legit. A safer habit is to navigate directly to Amazon (type it in, use the official app),
and treat unexpected “confirm now” links like suspicious mushrooms in the woods: you don’t touch them unless you’re 100% sure.
Finally, many people discover they didn’t actually want to delete Amazonthey wanted to delete the noise. The endless recommendations,
the browsing trail, the “you looked at one toaster and now we think you’re opening a toaster museum.” If that’s you, consider a lighter approach:
manage browsing history visibility, reduce personalization where possible, and keep the account solely as a low-footprint checkout option.
Not everyone needs the scorched-earth approach; sometimes you just need fewer emails and a little more peace.
Conclusion
If you want to permanently delete your Amazon account, the process is straightforward: prepare first (orders, gift cards, digital content, data export),
then follow the “Close Your Amazon Account” flow, submit the request, and confirm it via email. Once it’s done, your account access and many Amazon-tied
services are goneso take five extra minutes upfront and save yourself the “Wait… my receipts!” moment later.