Table of Contents >> Show >> Hide
- What You’ll Need
- Before You Draw: Set Up a Simple Still Life
- Step-by-Step: How to Draw a Basket of Fruit
- Step 1: Lightly sketch a “composition box” and horizon
- Step 2: Block in the basket opening with an ellipse
- Step 3: Build the basket form (rim, sides, and base)
- Step 4: Place the fruit using simple shapes (no details yet)
- Step 5: Check proportions and alignment
- Step 6: Refine contours and add key details (stems, dimples, edges)
- Step 7: Add the handle (if your basket has one)
- Step 8: Plan your shadows (this is where realism lives)
- Step 9: Shade in layersseparate light family vs. shadow family
- Step 10: Model each fruit’s form (make it round, not flat)
- Step 11: Draw the basket weave texture (without losing your mind)
- Option A: The quick weave (fast and convincing)
- Option B: The classic weave grid (slower, more detailed)
- Step 12: Control your edges (sharp vs. soft)
- Step 13: Add texture cues (tiny hints, not a full novel)
- Step 14: Deepen the darkest darks and lift the brightest highlights
- Step 15: Clean up and simplify
- Common Mistakes (and How to Fix Them)
- Level-Up Ideas: Make It Your Own
- Quick Practice Drills (10 Minutes Each)
- Extra : Real-World Drawing Experiences (What It Feels Like to Learn This)
A basket of fruit is the ultimate “looks fancy, secretly doable” drawing subject. It’s got everything:
simple shapes (spheres and ovals), interesting textures (hello, woven basket), and a built-in excuse
to practice shading without drawing a single eyelash or kneecap. Also, if your drawing turns out amazing,
it screams artist. If it turns out a little wonky, you can call it “rustic.” Win-win.
This guide walks you through a complete processfrom setting up a reference to adding shine, shadows,
and basket weaveso you can draw a fruit basket that looks three-dimensional and believable. You’ll get
an easy beginner path and a realism path, plus fixes for the most common mistakes.
What You’ll Need
Basic supplies (great for beginners)
- Paper (sketchbook or any drawing paper)
- Pencils: HB and 2B (add 4B/6B if you like darker shadows)
- Erasers: kneaded eraser (best for lifting highlights) and a regular eraser
- Sharpener
- Tissue, blending stump, or cotton swab (optionaluse lightly)
Optional upgrades (for realism and color)
- Colored pencils (for a classic fruit look)
- White gel pen or white colored pencil (tiny highlights)
- Toned paper (tan/gray) to make lights and darks pop
Before You Draw: Set Up a Simple Still Life
You can draw from imagination, but drawing from observation levels you up fast. Here’s a quick,
no-fuss setup you can do on a kitchen table.
1) Choose your “cast” of fruit
- Easiest: apples, oranges, pears (simple forms)
- Medium: bananas (curves), peaches (soft fuzz texture)
- Spicy: grapes (many small spheres), pineapple (texture party)
2) Pick a basket (or cheat with a bowl)
A real woven basket is great, but if basket weave feels intimidating, start with a bowl. Same fruit,
less texture chaos. Then “graduate” to the basket weave once you’re feeling brave (or caffeinated).
3) Use one clear light source
Put a lamp on one side. Turn off other strong lights if you can. One light source makes shadows readable,
which makes your drawing look intentional instead of like it’s happening during a haunted eclipse.
4) Choose a viewpoint and stick to it
Sit down and don’t move your setup. Still life drawing rewards consistency. If your apple keeps “teleporting”
because you keep rotating it, your shading will look confusedlike it just heard a plot twist.
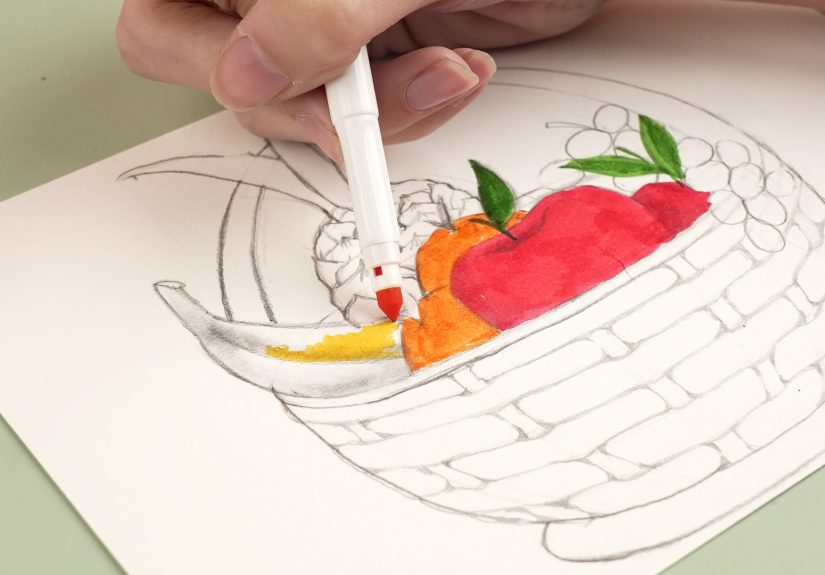
Step-by-Step: How to Draw a Basket of Fruit
We’ll build this the same way many artists do: big shapes first, details last. You’re constructing a drawing,
not writing a fruit-themed crime novel full of unnecessary twists.
Step 1: Lightly sketch a “composition box” and horizon
With an HB pencil, draw a very light rectangle or boundary to keep everything contained. Then lightly
suggest the table edge (a simple horizontal line). This helps you place the basket and shadows so they
don’t float in space like a fruit UFO.
Step 2: Block in the basket opening with an ellipse
Draw a wide oval (ellipse) where the basket opening will be. Remember: ellipses get “flatter” the more
you look at them from the side. If your ellipse looks like a perfect circle but the basket is angled,
perspective will politely ask you to try again.
Quick ellipse tip: Draw through itmeaning sketch the full oval even if fruit will cover part of it.
Step 3: Build the basket form (rim, sides, and base)
- Add a second ellipse slightly inside the first to show the rim thickness.
- From the rim, draw two gently curving lines down for the basket sides.
- Close the bottom with a soft curve (or a smaller ellipse if the base is visible).
Keep these lines faint. The goal is a clean structure you can refine, not a final outline you’re married to forever.
Step 4: Place the fruit using simple shapes (no details yet)
Now “stack” fruit shapes inside and slightly above the basket opening. Use:
- Apples/oranges: spheres (circles with slight flattening)
- Pears: a circle + a smaller oval on top (like a snowman with ambition)
- Bananas: a long curved form (two curves like a smile and its slightly grumpy twin)
- Grapes: a cluster of small circles (vary sizes!)
Use overlap to show depth: some fruit in front, some behind. Overlap is the easiest “instant realism” trick.
Step 5: Check proportions and alignment
Before you add texture or shading, pause and compare relationships:
- Is the basket wide enough to hold that heroic pile of fruit?
- Do the fruit sizes look believable (one grape should not be the size of an orange)?
- Does the fruit actually sit inside the opening, or is it balancing on the rim like circus performers?
Lightly adjust now. Fixing structure early saves you from “shading a mistake into confidence.”
Step 6: Refine contours and add key details (stems, dimples, edges)
Still keep it clean and minimal. Add only what helps the forms read:
- Apple stems, subtle top dimples
- Orange texture suggestion (tiny irregular marksnot a polka-dot sweater)
- Banana ends and a gentle ridge line
- Grape cluster silhouette (don’t outline every grape like a bubble wrap inventory)
Step 7: Add the handle (if your basket has one)
Draw the handle as two parallel curves rising from each side of the rim. Make sure it connects
convincingly to the basket. If it looks like it’s hovering, add a small attachment area and shading later.
Step 8: Plan your shadows (this is where realism lives)
Decide where the light is coming from (left, right, above). Then lightly map:
- Cast shadows on the table (the shadow the basket and fruit throw onto the surface)
- Form shadows on the fruit (the darker side of each fruit)
- Occlusion shadows (the darkest darks where objects touch: fruit against fruit, fruit against basket)
If you only do one “fancy” shading concept, do occlusion shadows. They make objects feel like they’re actually touching.
Step 9: Shade in layersseparate light family vs. shadow family
Start with your HB or 2B pencil and build values gradually. Think in two families:
lights (everything facing the light) and shadows (everything turned away).
Keep the shadow family consistently darker than the light family.
Beginner-friendly approach: Start with a light “mid-tone” over each fruit, then deepen the shadow side.
Step 10: Model each fruit’s form (make it round, not flat)
For most round fruit, a simple value pattern works:
- Highlight: small bright area (leave paper white or lift with kneaded eraser)
- Light mid-tone: around highlight
- Halftone: transitions toward shadow
- Core shadow: a darker band inside the shadow side
- Reflected light: a slightly lighter edge within the shadow side (subtle!)
- Cast shadow: on the table, darkest near contact, softer as it extends
Example: If you’re drawing an apple, keep the highlight crisp and small, make the core shadow
slightly curved, and soften the transition edges so it looks like a spherenot a sticker.
Step 11: Draw the basket weave texture (without losing your mind)
Basket weave looks complicated, but you can simplify it into a pattern of “over-under” bands.
Choose one of these approaches based on your patience level:
Option A: The quick weave (fast and convincing)
- Shade the basket as a simple form first: light side and shadow side.
- Then add horizontal bands (slightly curved to match the basket’s roundness).
- Overlay short vertical “weave blocks” that alternate: one dark, one light.
- Darken where bands tuck under (tiny shadows = instant weave illusion).
Option B: The classic weave grid (slower, more detailed)
- Lightly map a grid of horizontal rows.
- Within each row, draw repeating rectangles or curved “tiles.”
- Stagger the tiles in the next row like bricks.
- Shade alternating tiles to create the over-under pattern.
Important: Keep the pattern wrapping around the basket’s form. Lines should curve slightly,
not stay perfectly straight, or the basket will look flat.
Step 12: Control your edges (sharp vs. soft)
Edges are sneaky powerful:
- Sharper edges: rim of the basket, where fruit overlaps another fruit
- Softer edges: gentle shading transitions on round fruit
- Lost edges: where values match (like a dark grape against a dark basket shadow)
Mix edges to create depth. If every edge is equally sharp, your drawing can look cut-out and stiff.
Step 13: Add texture cues (tiny hints, not a full novel)
- Orange peel: light stippling or small irregular marks, mostly in shadow areas
- Apple shine: clean highlight plus a soft gradient around it
- Banana: subtle lengthwise strokes and gentle spots (if ripe)
- Grapes: small highlights and darker occlusion shadows in the cluster
Step 14: Deepen the darkest darks and lift the brightest highlights
This is the “final polish” step:
- Use a 4B/6B (or press slightly harder with 2B) for the deepest occlusion shadows.
- Lift highlights with a kneaded eraser (dab, don’t scrub).
- Make sure your cast shadow is darkest right under the basket and lighter as it extends.
Step 15: Clean up and simplify
Erase construction lines you don’t need. Reduce random sketch fuzz. If something feels too busy
(common with basket weave), simplify the texture in the shadow areas. Less detail can look more realistic.
Common Mistakes (and How to Fix Them)
“My basket looks crooked.”
Check the ellipses. The top opening and rim ellipses should share the same tilt. If one leans left and the other leans right,
your basket is doing the Cha-Cha. Redraw lightly and match angles.
“The fruit looks flat.”
Increase value range: darker core shadow, clearer highlight, and a smoother gradient. Also, make sure the shadow side stays
darker than the light side across the whole fruit.
“Everything looks outlined.”
Lighten outlines and let shading define edges. Use darker lines only in key overlap areas. Think “suggest,” not “trace.”
“My weave pattern looks like a checkerboard.”
Curve the rows to match the basket’s form, and add tiny shadows where strips overlap. The overlap shadows create the weave illusion.
Level-Up Ideas: Make It Your Own
Try a themed fruit basket
- Breakfast vibes: bananas, oranges, strawberries
- Autumn harvest: apples, pears, grapes, maybe a tiny pumpkin
- Tropical: mango, pineapple (texture practice), citrus
Add storytelling details
- A folded napkin under the basket (great for extra shadows and fabric practice)
- A knife and cutting board (adds hard edges and contrast)
- A label tag tied to the handle (easy win for “charming”)
Quick Practice Drills (10 Minutes Each)
- Ellipses: fill a page with basket-opening ovals at different angles
- Value scales: make a 5-step or 9-step value bar from light to dark
- Grape cluster: draw 12–20 small circles with overlap, then shade as a group
- Weave mini-strip: practice the over-under pattern on a small rectangle before the full basket
Extra : Real-World Drawing Experiences (What It Feels Like to Learn This)
If you’re learning how to draw a basket of fruit, you’ll probably have a very specific emotional journey. It usually begins with:
“This is going well!” followed by: “Why does this banana look like a boomerang?” and ends with: “Okay, actually… I’m kind of proud.”
That rollercoaster is normal. Still life drawing is basically the gym for your eyeballsawkward at first, then surprisingly satisfying.
One common experience is realizing that drawing is more about seeing than guessing. For example, most beginners
assume an apple is a perfect circle. Then they actually look and notice it’s slightly flattened, with a dip at the top, and the
stem doesn’t sit dead center. The first time you catch details like that, it’s like unlocking a secret level in a video game
suddenly your drawings start looking “real” without you doing anything extra fancy.
Another classic moment: the basket weave panic. You start confident, then you add texture and it turns into a
strange optical illusion that makes you question your life choices. Here’s the good news: basket weave doesn’t need to be perfect.
In fact, a little irregularity makes it look more believable, because real baskets are handmade and imperfect. The trick most
artists learn is to treat the weave as a texture that follows the form, not as hundreds of tiny individual shapes you must outline
with the precision of a NASA engineer.
Shading brings its own set of “aha” experiences. Many people start by smudging everything evenly because it feels like shading.
Then they learn the big secret: contrast creates form. The moment you deepen the occlusion shadow where a pear
touches the basket rim, the pear suddenly looks like it’s sitting there for real. It’s one of the most rewarding changes you can
make, and it doesn’t require fancy toolsjust a slightly darker value in the right place.
You may also notice how your mindset changes across attempts. The first drawing is often focused on “getting it right.”
The second one is about “getting it better.” By the third, you start experimentingchanging fruit, moving the light, adding a napkin,
pushing darker shadows. That’s the real growth: you stop treating the drawing like a test and start treating it like a project.
And once you do that, your confidence shows up on the page.
Finally, there’s the experience nobody warns you about: after drawing fruit for an hour, you might suddenly feel hungry.
This is not an artistic flaw. It’s proof your brain is taking the assignment seriously. Consider it method acting for still life.