Table of Contents >> Show >> Hide
- Before You Start: Choose Your Wind Deflector Style
- Tools and Supplies Checklist
- The 14 Steps to Fit Wind Deflectors
- Step 1: Park smart (and think about temperature)
- Step 2: Wash the window area like you mean it
- Step 3: Unbox and identify each piece (front/rear, left/right)
- Step 4: Do a dry test-fit (no peel, no stick, no regrets)
- Step 5: Clean the bonding surfaces with alcohol
- Step 6: If your kit includes adhesion promoter or scuff pads, use them exactly as directed
- Step 7: Create pull-tabs (the “don’t peel everything at once” move)
- Step 8: Install the front deflectors first
- Step 9: Seat it fully and apply firm pressure
- Step 10: Remove the liner slowly (tape-on), pressing as you go
- Step 11: Test the window movement carefully
- Step 12: Repeat for the rear doors (watch the shape differences)
- Step 13: Let everything cureyes, even if it “feels stuck”
- Step 14: Do a final check and maintain them properly
- Troubleshooting: Fix the Most Common Issues
- Wrap-Up: A Small Upgrade You’ll Notice Every Day
- Experiences From Real-World Installs (500+ Words)
- SEO Tags
Wind deflectors (also called window deflectors, side window deflectors, or the classic
vent visors) are one of those “tiny upgrade, big daily payoff” mods. You get fresh air without the
cabin turning into a leaf blender, rain stays mostly outside, and highway wind noise usually chills out.
The best part: most kits install with no drillingjust smart prep, correct alignment, and a little patience
while the adhesive (or window channel) settles in.
This guide covers both common styles:
in-channel (fits inside the window run channel) and tape-on (mounts to the exterior frame with
automotive-grade tape). Follow your kit’s instructions if they differmanufacturers know their own shapes best.
But if you want a clear, do-it-right-the-first-time roadmap, here it is.
Before You Start: Choose Your Wind Deflector Style
In-channel wind deflectors
In-channel styles sit inside the window channel for a clean, factory-ish look. They can be super secure,
but they’re also the ones most likely to cause the “auto-up window reversal” if not seated correctly
(your car thinks something is in the way and politely refuses to crush it).
Tape-on wind deflectors
Tape-on styles stick to the outside of the window frame using automotive tape. Installation is usually
straightforward, but prep is everything: oils, wax, dust, and “I swear it was clean” residue can weaken adhesion.
Quick decision tip
- Want the sleekest look? In-channel.
- Want the simplest fit with less chance of window interference? Tape-on.
- Live where it’s cold? Either works, but tape-on demands warmer temps (or warming the area) for best bonding.
Tools and Supplies Checklist
- Microfiber towels (a coupleone always turns into “the sacrifice towel”)
- Mild car soap and water
- Isopropyl alcohol (IPA) and water mix (or included alcohol pads)
- Plastic trim tool or your fingers (gentle is the vibe)
- Optional: masking tape (for alignment marks), hair dryer/heat gun on low (for cold installs)
- Optional: included clips or seating tool (use them if your kit provides them)
The 14 Steps to Fit Wind Deflectors
-
Step 1: Park smart (and think about temperature)
Park on a flat surface in the shade if possible. If you’re using tape-on deflectors, aim for moderate
temperatures so the adhesive can bond well. Cold installs are where “looks perfect” becomes “falls off
dramatically in a car wash” later. -
Step 2: Wash the window area like you mean it
Wash and dry the door frames and window trim. Dirt trapped under tape becomes a tiny mountain range that
prevents full contact. For in-channel visors, you’re mainly removing grit that could scratch the channel or
keep the deflector from seating evenly. -
Step 3: Unbox and identify each piece (front/rear, left/right)
Lay everything out and match each deflector to its door. Many sets are subtly different front-to-back,
and swapping them is an easy way to accidentally invent new wind noise. -
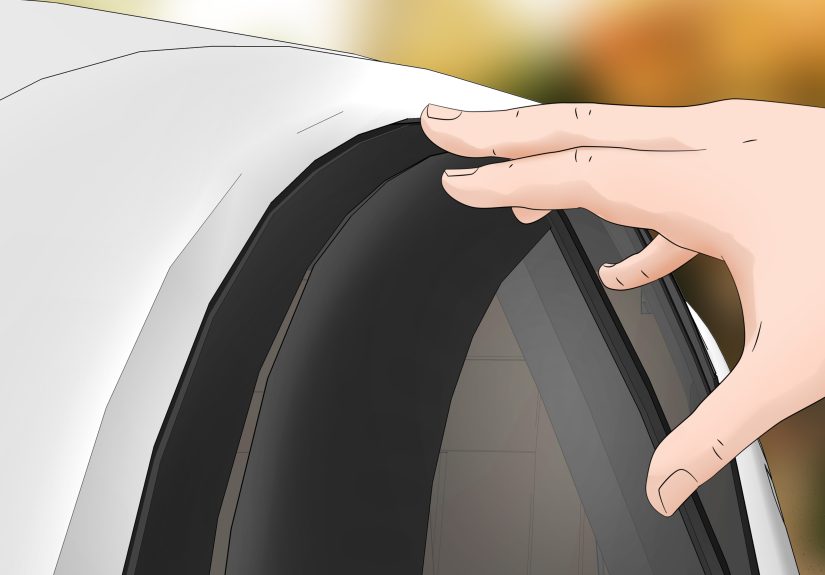
Step 4: Do a dry test-fit (no peel, no stick, no regrets)
Hold each deflector in place without removing any backing. Check that edges follow the window frame,
corners sit flush, and the “front” and “rear” ends make sense. If a piece looks wildly wrong, double-check
the part numbers before you commit. -
Step 5: Clean the bonding surfaces with alcohol
For tape-on installs: clean the mounting area thoroughly using alcohol pads or a 50/50-ish IPA-water mix,
then let it dry completely. This removes waxes and oils that soap can leave behind.For in-channel installs: wipe the inside of the window run channel where the deflector will sit,
especially the upper corners. A clean channel helps the visor seat and reduces window drag. -
Step 6: If your kit includes adhesion promoter or scuff pads, use them exactly as directed
Some tape-on kits include a small scuff pad or surface prep wipe. If yours does, follow the kit’s order
(usually: clean → prep → apply). Don’t freestyle with random chemicalsthis is not the time to experiment
with “mystery garage solvent.” -
Step 7: Create pull-tabs (the “don’t peel everything at once” move)
For tape-on deflectors, peel back just an inch or two of the tape liner at each end and fold it outward
to make a pull-tab. This lets you position the deflector perfectly before you remove the rest of the liner.If your in-channel kit has small adhesive strips, do the same: expose a little, not all of it.
-
Step 8: Install the front deflectors first
In-channel: Start by inserting one end into the window channel (often the rear end first),
then gently flex and tuck the rest into the channel, working along the length. The goal is “snug and seated,”
not “forced and stressed.”Tape-on: Align the deflector with the top of the door frame. Use masking tape as temporary
alignment marks if you like. Once it’s positioned, press the exposed tape areas in place to “anchor” it. -
Step 9: Seat it fully and apply firm pressure
Press along the entire lengthespecially corners and edges. On tape-on styles, pressure helps the adhesive
wet-out (make full contact). On in-channel styles, pressure helps the deflector sit evenly in the channel.
If your kit includes a seating tool, use it to nudge the deflector where fingers can’t reach comfortably. -
Step 10: Remove the liner slowly (tape-on), pressing as you go
With the deflector aligned and anchored, pull the liner tab slowly while pressing the visor into place
along the way. This prevents the classic mistake where the visor shifts 3 millimeters and suddenly the rear
corner looks like it’s trying to escape. -
Step 11: Test the window movement carefully
Roll the window up slowly. If you have auto-up, be ready to stop if the glass hits resistance. Some vehicles
may need a short “relearn” cycle if the window detects an obstruction. If the window reverses, lower it,
re-seat the deflector, and try againdon’t just brute-force the glass upward.Example: On many late-model trucks and SUVs, the auto-up sensor is sensitive. A visor that’s slightly
unseated in the front corner can trigger repeated reversals until it’s fully tucked into the channel. -
Step 12: Repeat for the rear doors (watch the shape differences)
Rear door deflectors are often shaped differently to match the window frame angle. Repeat the same method:
test-fit, clean, align, seat, and press. If your kit includes metal clips, install them where instructed
they’re there to improve retention, especially for in-channel sets. -
Step 13: Let everything cureyes, even if it “feels stuck”
This is the patience step that separates “installed” from “installed and stays installed.” Keep windows
closed for the cure time your kit specifies. Many instructions recommend anywhere from overnight to multiple
days depending on style and materials. During this period:- Avoid rolling windows down (especially in-channel)
- Avoid heavy rain exposure if possible (tape-on)
- Skip brush-style car washes until fully cured
-
Step 14: Do a final check and maintain them properly
After curing, confirm corners are flush and nothing is lifting. Clean deflectors with mild soap and water.
Avoid harsh solvents that can haze acrylic or weaken adhesives. Periodically check that everything is still
snugespecially if you drive through extreme heat/cold swings.
Troubleshooting: Fix the Most Common Issues
My window keeps reversing on auto-up
- Lower the window, re-seat the deflector in the channel (especially the front corner), and try again slowly.
- Make sure no adhesive strip or clip is protruding into the glass path.
- If your vehicle supports it, perform a window “relearn” (check your owner’s manual).
One corner won’t stick (tape-on)
- It’s usually surface prep or temperature. Clean again with IPA, dry fully, and apply firm pressure.
- Warm the area gently (hair dryer on low) and press for 30–60 seconds.
- If it lifted early, you may have contaminated the adhesivereplacement tape may be needed.
Whistling wind noise after install
- Check alignmenttiny gaps at the leading edge can whistle like a tea kettle.
- Confirm all edges are seated (in-channel) or fully bonded (tape-on).
- Ensure you installed the correct piece on the correct door.
Wrap-Up: A Small Upgrade You’ll Notice Every Day
If you take your time with prep, alignment, and curing, wind deflectors are a surprisingly satisfying DIY.
You’ll crack the windows in the rain without inviting the whole storm inside, reduce buffeting on the highway,
and make your cabin feel a little more “finished.” The key is simple: clean surfaces, careful seating,
and patience during cure time. Do that, and your deflectors should stay putand look good doing it.
Experiences From Real-World Installs (500+ Words)
Most people expect wind deflectors to be a “stick it on and forget it” accessoryand that’s mostly true once
they’re properly installed. The real-world experience, though, tends to follow a familiar storyline: excitement,
one tiny surprise, and then the “why didn’t I do this sooner” phase.
First, the good stuff shows up immediately. Drivers commonly notice they can crack the windows at highway speeds
without that intense thump-thump buffeting that makes your eardrums feel like they’re in a drumline.
On rainy days, you can vent the cabin to reduce fogging without letting water pour onto your switches and door
pockets. People who drive with pets often mention the cabin stays more comfortable because you can keep airflow
moving without fully lowering a window and creating a gale-force dog-ear situation.
The most common surprise is how sensitive some modern windows areespecially with in-channel deflectors. Many
vehicles have anti-pinch sensors, and a visor that isn’t perfectly seated can trigger an instant window reversal.
Installers often fix this by re-tucking the leading edge deeper into the channel and then slowly raising the
window to help “teach” the visor where it belongs. Once seated and cured, the problem typically disappears,
but it’s a reminder that “close enough” isn’t the same as “fully seated.”
Tape-on experiences usually revolve around prep. People who rush the cleaning step sometimes end up with one
corner that lifts after a few daysoften after a cold night, a rainy commute, or an enthusiastic car wash.
When installers take surface prep seriously (soap first, alcohol wipe after, full dry time), the tape tends to
hold extremely well. Another common lesson: don’t peel the entire liner at once. That’s how you end up with a
visor that’s 2 millimeters too high at the rear, which is small enough to drive you nuts every time you walk up
to the car.
Curing time is also a big “experience” factor. Many installers are tempted to roll the windows down right away
because the visors look done. But those first 12–72 hours can be the difference between a visor that stays
perfectly aligned for years and one that shifts slightly the first time the window drags across it. Real-world
tip: install when you don’t need to use those windows for a day or twolike a weekend. It’s an easy win.
Finally, there’s the long-term experience: wind deflectors tend to become one of those mods you stop thinking
about because they’re simply useful. People mention using them for quick ventilation in parking lots, reducing
heat buildup, and keeping light rain from sneaking in when the windows are cracked. The best installs are the
ones you never have to re-doso if you remember nothing else, remember this: prep and patience.
It’s not glamorous, but it’s the reason your deflectors will still look sharp long after the “new accessory”
excitement wears off.