Table of Contents >> Show >> Hide
- First: Are You Sure It’s the Faucet (and Not the Showerhead)?
- What You’ll Need (Tools & Supplies)
- Shut Off the Water Like a Responsible Adult
- Identify Your Shower Faucet Type (So You Buy the Right Parts)
- Fix #1: Replace a Cartridge in a Single-Handle Shower Valve
- Step 1: Remove the handle
- Step 2: Remove the trim plate and sleeve
- Step 3: Locate the retaining method (clip, nut, or bonnet)
- Step 4: Pull out the old cartridge
- Step 5: Clean the valve body (this matters more than people think)
- Step 6: Prep and install the new cartridge
- Step 7: Reinstall the retaining clip/nut and reassemble trim
- Step 8: Turn water back on and test
- Fix #2: Two-Handle Shower Faucet (Compression): Replace Washers and Seats
- Fix #3: Ceramic-Disc or Ball-Type Valves (Seals, Springs, and “Mystery Parts”)
- Quick Side Quest: Fix a Showerhead Leak (If That’s the Real Problem)
- Prevent the Leak from Coming Back (A Little Maintenance Goes a Long Way)
- When You Should Call a Plumber (No Shame, Just Strategy)
- Real-World Experiences: What DIYers Commonly Run Into (and How to Win Anyway)
- Conclusion
A leaky shower faucet is the kind of tiny problem that somehow manages to be loud, expensive, and emotionally draining
all at once. Drip… drip… drip… like your bathroom is auditioning for a suspense movie. The good news: most shower
faucet leaks are totally DIY-fixable with basic tools, a little patience, and the ability to not panic when you see
a mysterious “retaining clip.”
This guide walks you through diagnosing the leak, identifying your valve type, replacing the most common culprits
(cartridges, washers, O-rings), and putting everything back together without turning your bathroom into a DIY
waterpark. We’ll keep it practical, specific, and just funny enough to keep you from rage-calling a plumber.
First: Are You Sure It’s the Faucet (and Not the Showerhead)?
“Leaky shower faucet” can mean a few different things. Before you disassemble anything, take 60 seconds to play
detective. Where is the water actually coming from?
Leak type A: Dripping from the showerhead when the handle is OFF
This is the classic symptom of a worn or dirty valve cartridge (single-handle showers) or worn
washer/seat (two-handle compression-style valves). If the valve isn’t sealing, water sneaks through
and drips out of the showerhead even though you “turned it off.”
Leak type B: Water seeping around the handle or behind the trim plate
If water shows up around the handle or runs down the wall, the problem is often an O-ring or a
failing seal around the stem/cartridge. Sometimes it’s also just a loose handle/bonnet nutbut don’t count on
“tighten it and forget it” as a long-term relationship plan.
Leak type C: It only leaks while the shower is ON
If it leaks only during use, the issue may be a loose connection at the shower arm, a worn showerhead gasket, or
a cracked showerhead housing. That’s a different fix (and usually easier than a cartridge replacement).
Leak type D: Water appears in the wall or ceiling below
If you see moisture damage, bubbling paint, or dripping in the room beneath the shower, stop here. That can indicate
a leak behind the wall (piping or valve body). Cartridge swaps can’t fix a split pipe. This is a “shut off
water and get help” situation.
What You’ll Need (Tools & Supplies)
You don’t need a plumber’s truckjust a small lineup of common tools. Gather these before you start so you’re not
sprinting to the garage mid-repair with wet hands and regret.
- Flathead and Phillips screwdrivers
- Allen (hex) key set (many handles use a tiny set screw)
- Adjustable wrench or channel-lock pliers
- Needle-nose pliers (for clips and small parts)
- Utility knife (for caulk/trim edges if needed)
- Rags + small bucket
- Painter’s tape (optional, helps protect finishes)
- Silicone plumber’s grease (not petroleum jelly)
- Replacement parts: cartridge and/or O-rings/washers (more on choosing them below)
- Optional but helpful: cartridge puller (for stuck cartridges), white vinegar (for mineral buildup)
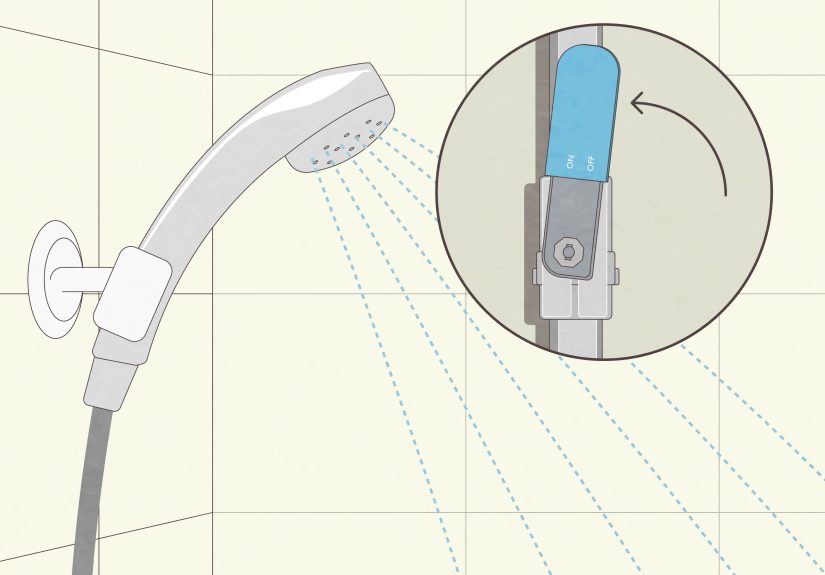
Shut Off the Water Like a Responsible Adult
Shower valves don’t always have local shutoffs. Some do, some don’t. Your job is to find out before you pull
out the cartridge and learn what “uncontrolled water feature” means.
Option 1: Shutoffs built into the shower valve (best case)
Many newer pressure-balance valves have small screwdriver stops on the valve body (you may see them after removing
the trim). Turn them off to stop water just to that shower.
Option 2: Shut off the house water (common case)
If there are no local shutoffs, turn off the home’s main water supply. Then open the shower handle to relieve
pressure and confirm water stops.
Pro tip: Put a towel over the drain or use a drain cover. Small screws and clips love the drain.
The drain loves them back. It’s a tragic romance.
Identify Your Shower Faucet Type (So You Buy the Right Parts)
Most DIY fails happen at the hardware store, not in the bathroom. “A cartridge” is not a universal cartridge.
The correct replacement depends on your valve brand and model.
Single-handle shower (most common): Cartridge valve
One handle controls temperature and flow. Leaks are commonly fixed by replacing the cartridge
(and sometimes lubricating or replacing O-rings).
Two-handle shower: Compression valve (washers & seats)
Separate hot and cold handles. Leaks are often from a worn rubber washer or a damaged seat.
Other designs: Ceramic-disc or ball-type
Less common in showers than in sinks, but they existespecially in certain trim systems. These typically use seals,
springs, or discs that can wear out.
How to confirm the brand/model: Look for a logo on the trim. Take clear photos of the handle and
escutcheon, then pull the cartridge/stem and bring it with you. Many big-box stores and plumbing supply shops can
match it quickly when you show them the part.
Fix #1: Replace a Cartridge in a Single-Handle Shower Valve
If your shower drips when “off,” this is usually the winning move. Cartridges wear over time from friction,
mineral buildup, and the general chaos of water chemistry.
Step 1: Remove the handle
- Pry off the decorative cap (if present) with a small flathead screwdriver.
- Remove the screw underneath (or loosen the set screw with an Allen key).
- Pull the handle straight off. If it’s stuck, wiggle gentlyno need to reenact a medieval siege.
Step 2: Remove the trim plate and sleeve
Unscrew the escutcheon plate (the flat cover against the wall). Some have a sleeve that slides off the valve.
Keep track of the order of parts like you’re building a tiny metal sandwich.
Step 3: Locate the retaining method (clip, nut, or bonnet)
Common scenarios:
- Retaining clip: A U-shaped metal clip on top of the valve holding the cartridge in place.
- Bonnet nut: A threaded ring or nut that must be loosened with a wrench.
- Cap assembly: Some valves have a cap you remove to access the pressure-balance unit/cartridge.
Remove the clip with needle-nose pliers (pull straight up) or loosen the nut carefully. Go slowscratching brass
inside the valve can create new leaks.
Step 4: Pull out the old cartridge
Sometimes it slides out easily. Sometimes it clings to life like it pays rent.
- Try gripping the stem and pulling straight out.
- If stuck, gently wiggle while pullingdon’t twist aggressively unless the design expects rotation.
- If it won’t budge, use a cartridge puller designed for your brand.
Step 5: Clean the valve body (this matters more than people think)
Mineral deposits or debris inside the valve can prevent the new cartridge from sealing. Wipe the inside with a rag.
If there’s buildup, use a nylon brush or an old toothbrush. For stubborn deposits, a little vinegar on a rag can help.
The goal is a smooth, clean surfaceno scraping the brass like you’re carving a pumpkin.
Step 6: Prep and install the new cartridge
- Confirm the new cartridge matches the old one exactly.
- Apply a thin layer of silicone plumber’s grease to O-rings (if applicable).
- Align the cartridge properly. Many have an “UP” mark or tabs that must seat in specific grooves.
- Push it in firmly until fully seated.
Step 7: Reinstall the retaining clip/nut and reassemble trim
Replace the clip or tighten the nut snugly (not “gorilla-tight”). Reinstall the sleeve, escutcheon, and handle in
reverse order.
Step 8: Turn water back on and test
- Turn the water supply back on slowly.
- Run the shower through hot/cold range.
- Turn it off and watch for drips for a few minutes.
If you still see a slow drip, double-check cartridge seating, O-ring condition, and whether the valve body has any
debris preventing a tight seal.
Fix #2: Two-Handle Shower Faucet (Compression): Replace Washers and Seats
Two-handle systems typically leak because a rubber washer can’t form a perfect seal anymore (it hardens, cracks,
or deforms). Sometimes the seat (the metal surface the washer presses against) gets pitted and needs attention too.
Step 1: Remove the handle and stem
- Pry off the handle cap and remove the screw.
- Pull the handle off.
- Use an adjustable wrench to remove the stem assembly (turn counterclockwise).
Step 2: Replace the washer
At the end of the stem you’ll usually find a rubber washer secured by a small screw. Replace it with the same size.
Add a tiny dab of plumber’s grease if recommended for your setup.
Step 3: Inspect/replace the seat (if needed)
If the seat is rough, pitted, or corroded, a new washer may still leak. Some seats are removable with a seat wrench.
If the seat is integral or damaged badly, it may be time for professional repair or valve replacement.
Step 4: Reassemble and test
Reinstall the stem assembly, handle, and trim. Turn water back on and test. If you can’t tell whether the hot or cold
side is the leaker, feel the drip temperature when it happensyes, the shower is now giving you clues.
Fix #3: Ceramic-Disc or Ball-Type Valves (Seals, Springs, and “Mystery Parts”)
Some valves use ceramic discs or ball assemblies with seals and springs. These systems can last a long time, but
when they leak, the fix often involves replacing a seal kit rather than one big cartridge.
- Ceramic-disc: Leaks may come from worn seals or a damaged disc. Some manufacturers sell rebuild kits.
- Ball-type: Often uses rubber seats and springs; replacing these can stop drips and improve control.
If you open the valve and see a ball assembly or disc stack you don’t recognize, search the valve brand’s support
docs or take the parts to a plumbing supply shop for matching. The right kit makes it straightforward; the wrong kit
makes it a hobby.
Quick Side Quest: Fix a Showerhead Leak (If That’s the Real Problem)
If your leak happens only while the shower runs, or the leak is around the showerhead connection, you may not need
to touch the valve at all.
Common showerhead leak fixes
- Replace the gasket: There’s usually a rubber washer inside the showerhead nut.
- Re-wrap threads: Use PTFE (Teflon) tape on shower arm threads if recommended by the manufacturer.
- Clean mineral buildup: Soak the showerhead in vinegar (or bag-and-soak method) to restore flow and sealing.
Prevent the Leak from Coming Back (A Little Maintenance Goes a Long Way)
Fixing the drip is great. Keeping it from returning is even betterespecially since household leaks add up fast.
One small drip can waste a surprising amount of water over time, and national leak estimates are huge. Translation:
that “tiny drip” is not as cute as it thinks it is.
Leak-prevention habits that actually help
- Turn handles gentlyover-tightening can damage washers and seals.
- Use silicone plumber’s grease on O-rings when installing new parts (sparingly).
- Address hard-water buildup with periodic cleaning (vinegar is a common go-to).
- If your water is very hard, consider a long-term solution (filtration/softening) to extend valve life.
When You Should Call a Plumber (No Shame, Just Strategy)
DIY is awesomeuntil it isn’t. Here’s when calling a plumber is the smarter (and cheaper) play:
- You can’t shut off the water to the shower (no main shutoff access, stuck valve, etc.).
- The cartridge is fused in place and removal risks breaking the valve body.
- You see water damage behind the wall or below the shower.
- The valve body is cracked, heavily corroded, or leaking from soldered/press connections.
- The leak persists after correct parts are installed and seated properly (could be valve body damage).
Also: if you live in a condo or multi-unit building, verify whether the shower shutoff affects neighbors or requires
building management. Surprise water outages are a fast way to meet everyone on your floor.
Real-World Experiences: What DIYers Commonly Run Into (and How to Win Anyway)
The internet makes shower faucet repairs look like a 6-minute montage: unscrew, swap, done, smile. Real life is
more like: unscrew, stare, realize the screw is stripped, go find a better screwdriver, then remember you’re hungry,
then finally swap the part… and it works. Most of the “experience” in this job is learning the handful of gotchas
that turn a simple repair into an afternoon.
One of the biggest real-world lessons is that diagnosis beats muscle. Many homeowners assume a
dripping showerhead means the showerhead is defective, so they replace itonly to discover the drip continues.
That’s because the showerhead is usually just the messenger. If the valve doesn’t fully seal, gravity does the rest.
When people finally replace the cartridge (or washers/seats in a two-handle valve), the dripping stops immediately,
and the new showerhead suddenly becomes “fixed,” too. It’s not magic; it’s upstream responsibility.
Another common experience: the cartridge that refuses to leave. Mineral buildup can essentially glue
cartridges into brass valve bodies over the years. DIYers who win this battle usually do three things: they confirm
the water is fully off, they use the correct puller tool for the brand, and they focus on controlled force rather
than frantic yanking. When the cartridge finally comes out, there’s often a ring of crusty deposits that explains
everything. Cleaning the valve body gently (rag + brush, sometimes vinegar) before installing the new cartridge can
be the difference between a perfect seal and “why is it still dripping?”
Orientation mistakes are also wildly common, especially on pressure-balance cartridges. Many
cartridges have an “UP” mark, tabs, or alignment ears that must match the valve body. If installed rotated or not
fully seated, you can get weird symptoms: temperature swings, reduced flow, or continued leaking. DIYers who take a
quick photo before removal (and compare old vs. new carefully) tend to avoid this completely. It’s a 10-second habit
that saves a 2-hour redo.
People also underestimate how often the “leak” is actually a trim seal issue. Water around the
handle isn’t always the cartridge failingit can be an O-ring on the stem or a worn seal behind the handle. In those
cases, replacing the cartridge might help, but replacing or lubricating the O-ring is what finishes the job.
That’s why many experienced DIYers keep a small variety pack of O-rings and silicone plumber’s grease on hand. It’s
inexpensive, and it turns “another trip to the store” into “done before lunch.”
Finally, there’s a quiet truth most homeowners learn after doing this once: the hardest part is buying the
right replacement. The most successful DIY repairs happen when someone brings the old cartridge/stem to the
store, checks model numbers, and avoids “close enough.” Shower valves are picky. But when you match the part exactly
and install it cleanly and correctly, the result is deeply satisfying: silence. No drip soundtrack. No wasted water.
Just a shower that behaves like it pays rent.
Conclusion
Fixing a leaky shower faucet without calling a plumber is one of the best DIY “wins” because it saves water, protects
your bathroom from moisture damage, and restores peace and quiet. Most of the time, the solution is straightforward:
identify the valve type, shut off the water, replace the cartridge (single-handle) or washer/seat (two-handle), clean
and lubricate seals, then test carefully.
If you get stuck, remember: the goal isn’t to prove you can wrestle plumbing into submission. The goal is a clean,
correct repair that stops the leak. Do that, and you’ve officially outsmarted the drip.