Table of Contents >> Show >> Hide
- First: Stop the Damage Inside (Before You Chase the Leak)
- Why Roof Leaks Are So Hard to Find
- Step 1: Find the General Leak Area From Inside
- Step 2: Check the Most Common Roof Leak Sources
- Step 3: Match the Fix to the Problem
- Fix A: Replace damaged or missing shingles
- Fix B: Address nail pops and exposed fasteners
- Fix C: Replace a cracked vent boot or reseal a vent flashing
- Fix D: Repair or replace flashing at chimneys, sidewalls, and step flashing
- Fix E: Solve skylight leaks the right way
- Fix F: Flat and low-slope roofs (seams, penetrations, and pooling)
- Temporary Roof Leak Fixes (When It’s Raining and You Need a Pause Button)
- After the Leak: Dry Everything Out and Fix the Interior
- Preventing Future Roof Leaks
- What to Ask a Roofer (So You Pay for a Fix, Not a Patch)
- Conclusion
- Real-World Experiences Homeowners Often Have With Roof Leaks (And What They Learn)
A roof leak has one special talent: showing up at the worst possible timeusually during a downpour, when every hardware store is closed, and your ceiling suddenly decides to audition for a water feature.
The good news? Most roof leak repair situations follow a predictable pattern: stop the damage, find the entry point, fix the real cause (not just the drip), then make sure it doesn’t come back for an encore.
This guide walks you through how to fix a roof leak the smart way, with clear steps, practical examples, and the kind of common-sense safety advice your future self will appreciate.
(Because gravity is undefeated, and roofs are high.)
First: Stop the Damage Inside (Before You Chase the Leak)
Protect your stuff and your ceiling
- Catch the water: Put a bucket under the drip. Add an old towel in the bucket to reduce splashing.
- Relieve a bulging ceiling: If drywall is ballooning, water may be pooling. Popping a small hole can prevent a bigger collapse. Use eye protection and be ready for a sudden gush.
- Move valuables: Electronics, rugs, furniture, and anything that can warp or stain should get out of the “splash zone.”
- Kill power if needed: If water is near lights, outlets, or ceiling fixtures, turn off the circuit at the breaker and don’t touch anything wet.
Document it (your wallet may thank you)
Take photos of the leak, stains, and any visible roof damage after the storm. If you end up filing an insurance claim, “trust me, it was wetter earlier” is not the strongest evidence.
Know when to call a pro
If your roof is steep, high, slick, or you’re not experienced working at heights, hire a licensed roofing contractor. Also call a pro if you see signs of structural rot, widespread sagging, or persistent leaks around chimneys and skylights.
A DIY roof leak fix is never worth a trip to the ER.
Why Roof Leaks Are So Hard to Find
The drip you see inside is rarely directly below the problem outside. Water can enter at one point, then travel along rafters, decking, nails, or insulation before it finally drops into your living room.
Think of your roof like a slide, and water like a kid who ignores your “no running” sign.
That’s why the best approach is part detective work, part process-of-elimination, and part accepting that water is annoyingly creative.
Step 1: Find the General Leak Area From Inside
Start in the attic (if you have one)
If it’s safe and dry enough to go up, use a bright flashlight and look for:
- Wet or compressed insulation (often the easiest clue)
- Dark stains on wood decking or rafters
- Mold or musty smells near roof penetrations
- Shiny nail tips (sometimes moisture beads on fasteners)
- Daylight peeking through tiny openings
Follow the trail “uphill.” If insulation is wet, the entry point may be a few feet above it on the roof. Mark the area with painter’s tape or a note so you can align it with the outside location later.
If you can’t find it: try a controlled water test (with caution)
A common method is a slow hose test: one person stays inside watching for fresh drips while another runs water on small roof sections, starting low and moving upward.
This can help pinpoint the leak source, but it should only be done when conditions are safe and you can control where the water goes.
Step 2: Check the Most Common Roof Leak Sources
Most roof leaks happen at “interruptions” in the roof systemplaces where something sticks through, meets a wall, or changes direction.
Here are the big culprits to inspect first.
1) Roof penetrations (vents, pipes, exhausts)
Plumbing vent stacks and rooftop vents are notorious leak points because they rely on boots and flashing to stay watertight. Rubber can crack over time, seals can fail, and fasteners can loosen.
2) Flashing around chimneys and walls
Flashing is the metal (or sometimes composite) material that directs water away from seams and transitionslike where a roof meets a chimney or sidewall.
If flashing is bent, corroded, missing, or poorly installed, water will take the invitation.
3) Valleys (where two roof planes meet)
Valleys handle a lot of runoff. Debris buildup, worn materials, or damaged valley flashing can cause water to back up and sneak underneath shingles.
4) Shingles (missing, cracked, lifted, or “nail pops”)
Wind, age, and temperature swings can break or lift shingles. “Nail pops” happen when nails back out slightly, creating a tiny entry point that becomes a big problem during heavy rain.
5) Skylights
Skylight leaks are often flashing-relatednot necessarily the skylight glass itself. Poorly sealed edges, aging gaskets, or improper integration with shingles can all lead to leaks.
6) Gutters and ice-related issues
Clogged gutters can push water where it shouldn’t go. In cold climates, ice dams can trap water on the roof edge, forcing it under shingles and into the home.
Step 3: Match the Fix to the Problem
“Roof leak repair” isn’t one single repairit’s a category. Once you’ve identified the likely source, the fix typically falls into one of these buckets.
For anything requiring climbing onto the roof, consider hiring a qualified roofer.
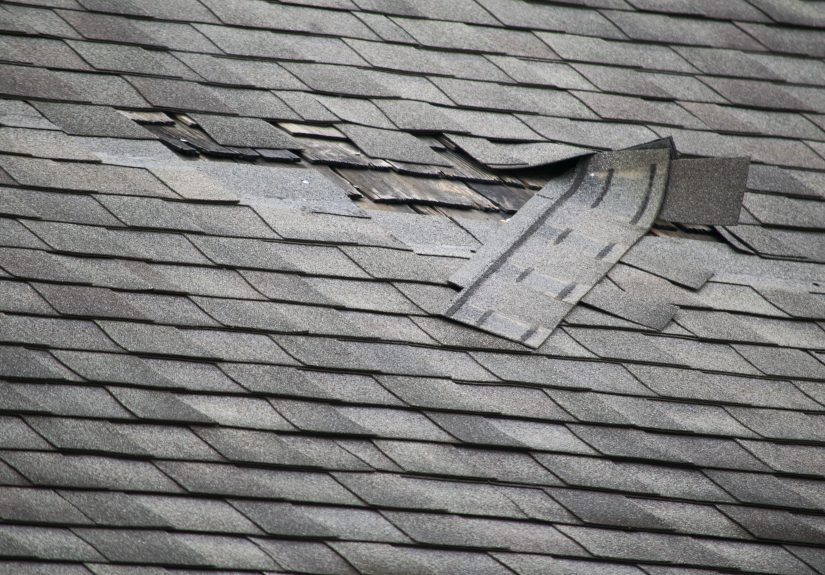
Fix A: Replace damaged or missing shingles
If shingles are cracked, broken, or gone, a permanent fix usually involves removing the affected shingle(s), checking the underlayment, and installing new matching shingles correctly.
A sloppy shingle replacement can create more leaks than it cureslike putting a bandage on upside down and acting surprised.
Example: After a windstorm, you notice a darker “patch” where shingles are missing and granules are scattered in the gutter. This often points to wind-lift damage that needs replacement shingles and a check of nearby tabs and fasteners.
Fix B: Address nail pops and exposed fasteners
Fasteners that have lifted or become exposed can let water in. A proper repair typically involves resetting or replacing the fastener and sealing correctlyplus verifying surrounding shingles still shed water as intended.
Fix C: Replace a cracked vent boot or reseal a vent flashing
Vent boots (especially older rubber styles) can split, dry out, or lose their seal. The durable fix is often replacing the boot/flashing assembly rather than smearing on more sealant and hoping for the best.
Example: A leak appears near a bathroom ceiling fan duct or near a plumbing vent line. In the attic you see dampness concentrated around a pipe penetrationthis commonly points to a worn boot or compromised flashing.
Fix D: Repair or replace flashing at chimneys, sidewalls, and step flashing
Step flashing (used where the roof meets a vertical wall) and chimney flashing must be layered correctly with shingles and underlayment.
If flashing is improperly overlapped, missing, or separated, water can slip behind itespecially during wind-driven rain.
Chimneys can also leak from cracked mortar, failed counterflashing, or gaps in sealant at the crown. A long-lasting repair may involve both roofing and masonry work.
Fix E: Solve skylight leaks the right way
Many “skylight leaks” are actually flashing problems. A permanent repair often involves reworking the skylight flashing kit, ensuring proper integration with shingles, and confirming the surrounding roof deck and underlayment are sound.
If the skylight is old or poorly installed, replacement may be more cost-effective than repeated patch jobs.
Fix F: Flat and low-slope roofs (seams, penetrations, and pooling)
Flat roofs don’t shed water the same way. Leaks commonly come from membrane seams, penetrations, edge details, or areas where water ponds.
Repairs often involve membrane-compatible patching and sealing methods. If you’re dealing with a low-slope system (like TPO, EPDM, modified bitumen), it’s smart to use a contractor who works on that specific material.
Temporary Roof Leak Fixes (When It’s Raining and You Need a Pause Button)
Temporary fixes are about reducing damage until you can make a proper repair. They’re not the “final form” of the solution.
Inside-the-house temporary steps
- Contain the leak: Bucket, towels, plastic sheeting, and a fan once the rain stops.
- Protect floors: Put down a tarp or plastic drop cloth under the bucket area.
- Reduce humidity: Run a dehumidifier to discourage mold growth after the leak is contained.
Emergency tarping (best handled by experienced adults/pros)
Tarping can prevent more water intrusion after storm damage, but it involves working at heights and anchoring materials securely.
If you can’t do this safely, call a professional. A poorly secured tarp can cause injury or additional roof damage in the wind.
After the Leak: Dry Everything Out and Fix the Interior
Once the roof leak is repaired, don’t rush to paint over stains like you’re hiding evidence from a crime scene.
Drying is the difference between “problem solved” and “why does my ceiling smell like a wet sock?”
- Dry the area completely: Fans and dehumidifiers help. Wet insulation may need to be removed and replaced.
- Check for mold: If you see mold growth or the leak lasted a while, consider professional remediation.
- Repair drywall properly: Replace sagging sections, prime stains with a stain-blocking primer, then repaint.
Preventing Future Roof Leaks
The best roof leak fix is the one you never need because you spotted the risk early.
A simple maintenance routine can extend roof life and reduce surprise drips.
Quick prevention checklist
- Inspect after storms: Look for missing shingles, bent flashing, and debris from the ground with binoculars.
- Keep gutters clear: Overflow can push water behind fascia and into the roof edge.
- Trim overhanging branches: They scrape shingles and drop debris into valleys.
- Watch roof penetrations: Vent boots and seals age faster than you think.
- Improve attic ventilation and insulation: This helps manage moisture and reduces ice-dam risk in cold climates.
What to Ask a Roofer (So You Pay for a Fix, Not a Patch)
If you hire a contractor, asking a few smart questions can help you avoid “mystery caulk solutions” that fail at the next big storm.
- Where is the exact entry point of the leak (not just where it dripped)?
- Can you show photos of the damage and the repair?
- Are you repairing or replacing the flashing (especially around chimneys and walls)?
- What materials will you use, and are they compatible with my roof type?
- Is there a workmanship warranty on the repair?
Conclusion
Learning how to fix a roof leak is mostly about good diagnosis. Start by protecting your home, trace the leak from the attic or ceiling back toward the roof, and focus on common weak points like flashing, vents, valleys, shingles, and skylights.
Temporary measures can limit damage, but a lasting roof leak repair usually means addressing the real causeoften a failed seal, worn boot, or compromised flashing detail.
And remember: the goal isn’t just to stop today’s drip. It’s to make sure the next storm doesn’t turn your ceiling into a suspense novel.
Real-World Experiences Homeowners Often Have With Roof Leaks (And What They Learn)
Roof leaks tend to come with a little dramaand a lot of “wait, how is the water getting there?” Here are common real-world scenarios homeowners run into, plus the lessons that usually follow.
1) The “It’s dripping in the hallway… but the roof is over the bedroom” mystery.
One of the most frequent experiences is discovering water in a spot that makes zero sense. A stain appears near a hallway light, but the roof above looks fine. The lesson: water travels. It can run along rafters and framing until it finds a low point, a seam, or a nail tip to drip from. Homeowners who solve this fastest are the ones who stop guessing and start tracingchecking the attic path, not just the room where the drip shows up.
2) The “I sealed it last year!” sequel.
Many people try a quick bead of roof sealant around a vent or flashing edge and feel victoriousuntil the leak returns. The lesson here is that sealant is not a substitute for correct flashing and integration. Caulk and roof cement can be helpful in the right context, but they’re rarely a permanent cure if the underlying detail is wrong or the material is failing. When homeowners switch from “covering the symptom” to “replacing the worn part,” the leak usually stops for good.
3) The vent boot heartbreak.
A surprisingly common experience: the roof looks great overall, shingles seem fine, and yet there’s a persistent leak after heavy rain. Then someone notices a cracked rubber boot around a plumbing vent. The lesson: small components fail first. Vent boots and seals age faster than shingles because they’re exposed and flexible. Homeowners who add “check all roof penetrations” to their routine often prevent repeat leaks.
4) The “chimney is innocent” plot twist.
People often blame the chimney when they see water nearby, but the actual issue might be step flashing along a sidewall, a valley channeling water toward the chimney, or deteriorated counterflashing. The lesson: chimneys have multiple leak opportunitiesroofing details and masonry details. Fixing only one side of the problem can leave the other side leaking. The most successful repairs treat the chimney area as a system, not a single seam.
5) The post-storm panicand the calm plan that works.
After a storm, many homeowners feel pressure to “do something immediately.” The best experience tends to be the one where they focus on smart triage: contain the water inside, document damage, then schedule a safe inspection and proper repair. The lesson: rushing onto a wet roof is the fastest way to turn a roof leak into a personal injury. A calm, step-by-step response protects both the house and the humans living in it.
Bottom line: Most roof leak stories end well when homeowners treat the leak like a diagnosis problem first and a repair problem second. Find the entry point, fix the detail that failed (often flashing or a penetration), and then dry and restore the interior correctly. The “quick patch forever” approach usually becomes an annual tradition nobody asked for.