Table of Contents >> Show >> Hide
- Why Grout Looks So Dirty (Even When You Clean)
- Budget Basics: What You Actually Need (for $2 or Less)
- Step 1: Give Grout a Quick, Cheap Deep Clean
- Step 2: The $2 Grout Glow-Up with Paint
- Step 3: Optional – Seal Your “New” Grout for Longer Results
- Safety Check: What Not to Use on Your Grout
- Other Cheap Tricks to Keep Grout Looking Fresh
- Real-Life Experience: What It’s Actually Like to Refresh Grout on a Budget
- Conclusion: A Big Grout Glow-Up on a Tiny Budget
If your grout lines are currently the color of “mystery gray” and you’re tired of pretending it’s a design choice, good news: you don’t need a remodel or a professional crew. You can make those grout lines look crisp and clean again for the price of a coffeeliterally $2 or lessusing simple supplies and a bit of strategy.
This guide walks you through a budget-friendly way to freshen grout that combines two ideas:
- A quick, cheap deep clean using pantry ingredients.
- A clever grout “makeup” trick that actually changes or brightens the grout color using a tiny amount of paint, inspired by DIYers who refreshed their grout with diluted latex or acrylic paint instead of pricey specialty products.
The result? Grout that looks newly installed, without the drama of scraping, regrouting, or dropping a few hundred dollars on “miracle” products.
Why Grout Looks So Dirty (Even When You Clean)
Before you attack your floors with a scrub brush, it helps to know what you’re fighting. Grout is a porous mix of cement and sand. It behaves like a sponge, soaking up spills, soap scum, body oils, kitchen grease, and muddy footprints. Over time, those tiny pores trap stains and make grout look dingy or yellow, even if you’re mopping regularly.
In kitchens, grease and food splatters deepen the discoloration. In bathrooms, moisture plus soap scum plus mildew equals dark, uneven lines that make the whole room feel dingy. Eventually, there’s a point where cleaning alone can’t restore the original colorstains are simply embedded too deep.
That’s where the “paint the grout” trick comes in. Instead of battling stains forever, you clean the surface, then give grout a fresh, uniform color coat for an instant makeover.
Budget Basics: What You Actually Need (for $2 or Less)
You might already have most of the supplies at home. The star of this method is a tiny amount of paint, plus a simple homemade cleaner:
Core supplies
- Baking soda – mild abrasive to loosen grime.
- 3% hydrogen peroxide – gentle bleaching and stain-lifting action.
- Drop of dish soap – helps cut grease, especially in kitchens.
- Small artist’s brush or old eyeliner brush – for painting grout lines.
- White or light-colored flat latex wall paint or matte white craft acrylic paint – you’ll use only a tiny amount, and a dollar-store bottle or sample pot is often under $2.
- Clean rag or paper towels – to wipe paint off tiles.
If you already have baking soda, peroxide, dish soap, and a brush, your only real “expense” is the little container of craft paint or a leftover wall paint sample. That’s your under-$2 hero.
Step 1: Give Grout a Quick, Cheap Deep Clean
Even though we’re going to paint the grout, you still want to start with a clean surface so the paint adheres and stains don’t bleed through.
Mix a DIY grout cleaner paste
Many cleaning pros and home bloggers recommend a simple combo of baking soda, hydrogen peroxide, and dish soap for brightening grout:
- 2–3 parts baking soda
- 1 part 3% hydrogen peroxide
- 1 small squirt of dish soap (especially for kitchen grout exposed to grease)
Stir into a spreadable paste. The baking soda gently scrubs, the peroxide releases oxygen to lift stains, and the dish soap breaks down oily residuean effective combo for very little money.
Apply, let it sit, then scrub lightly
- Dust or vacuum the floor first so you’re not scrubbing dirt deeper into the grout.
- Spread the paste directly onto the grout lines using a small brush or your gloved finger.
- Let it sit 10–15 minutes to do the heavy lifting for you.
- Use a stiff nylon brush or an old toothbrush to scrub each grout line in short back-and-forth strokes.
- Wipe away the paste with a damp microfiber cloth, then rinse again with clean water.
If your grout was only mildly dirty, this might be enough. But if it still looks blotchy, stained, or just permanently “blah,” you’re the perfect candidate for the $2 paint trick.
Step 2: The $2 Grout Glow-Up with Paint
Here’s the magic move: instead of scrubbing forever, you change the grout color itself. DIYers discovered that grout absorbs a thin, diluted layer of flat wall paint or acrylic craft paint beautifully, giving the look of fresh grout without ripping anything out.
Pick your paint (and color)
- Color: White or off-white brightens and makes tiles look cleaner; a soft gray or taupe hides dirt a bit better in high-traffic areas.
- Type: Flat latex wall paint or matte acrylic craft paint is ideal. You only need a tiny bottle or leftover sampleusually well under $2 if you’re buying new, and free if you already have some in your stash.
Thin the paint so it sinks into grout
To mimic the original Hometalk-inspired technique, mix equal parts flat paint and water to create a thin, stain-like liquid. This helps the mixture soak into the grout instead of sitting on top like a thick coat that can flake off.
Pour a small amount into a disposable cupyou don’t need much. It’s better to mix a little and add more than waste paint.
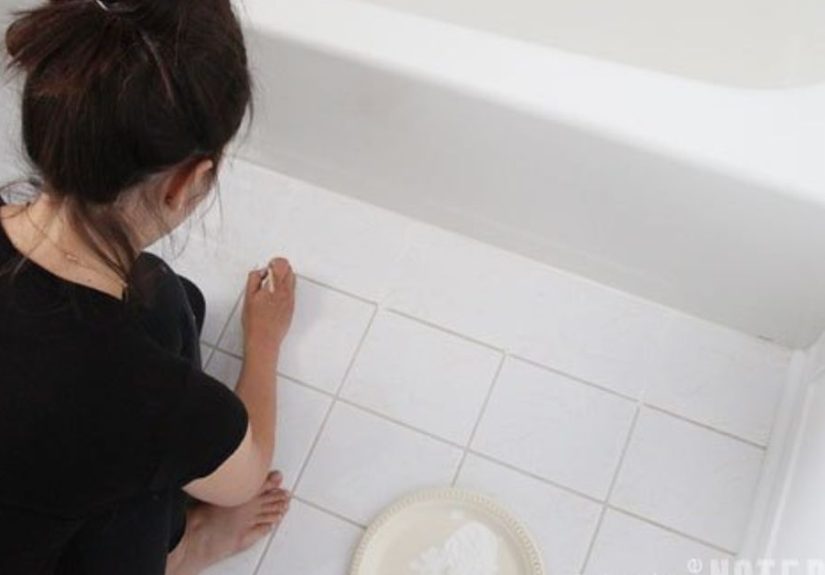
Paint the grout lines
- Work in small sections (3–4 tiles at a time) so the paint doesn’t dry on the tile surface before you wipe it off.
- Use a fine brush to trace along the grout lines, making sure to saturate the grout itself. Don’t worry if you get paint on the tile.
- Allow a brief soak timeabout 1–2 minutesso the grout can drink in the color.
- Wipe the tiles clean with a barely damp cloth or paper towel, leaving the paint in the grout line but not on the tile face.
DIYers who use this method on backsplashes and floors report a dramatic before-and-after differencedingy grout suddenly looks bright and uniform, and the whole room feels cleaner and more updated.
Let it dryand resist the urge to mop
Allow the painted grout lines to dry completely. With thinned wall or craft paint, this usually takes a few hours, but err on the side of caution and give it at least overnight before any heavy use or mopping.
If you’re using a dedicated grout colorant, many brands recommend keeping the surface dry for up to 72 hours for best durability.
Step 3: Optional – Seal Your “New” Grout for Longer Results
If your budget allows later, a simple penetrating grout sealer can help your freshened lines stay bright longer, especially in showers or busy kitchens. You can apply sealer with a tiny foam brush or applicator bottle, following the product directions.
However, the basic cleaning-plus-paint method still works even if you don’t seal. Just plan to refresh high-traffic areas every couple of yearsstill way cheaper than retiling.
Safety Check: What Not to Use on Your Grout
When you’re desperate to fix dark grout, it’s tempting to reach for the harshest cleaner you can find. Some people swear by gel toilet bowl cleaner with bleach on grout lines because it clings and whitens. But professional cleaners warn this can backfire badly:
- Toilet bowl cleaners often contain hydrochloric acid or highly concentrated bleach, which can eat away at grout and make it crumble over time.
- Repeated use of strong chlorine bleach can weaken grout and cause cracking, even if it looks clean at first.
Stick with milder, budget-friendly solutions like baking soda, hydrogen peroxide, oxygen bleach, and gentle dish soap, especially if you’re planning to paint or recolor grout afterward.
Other Cheap Tricks to Keep Grout Looking Fresh
1. Use a Magic Eraser for quick touch-ups
Melamine foam “eraser” sponges are fantastic for spot-cleaning scuffs and surface grime on grout and tile. Brands like Mr. Clean even promote Magic Erasers for whitening grout lines in bathrooms. Cut the sponge into smaller strips to precisely target grout lines and stretch your money further.
2. Oxygen bleach for heavily stained areas
Powdered oxygen bleach (not chlorine bleach) mixed with warm water is a favorite of many cleaning services for dingy white grout. It’s often safer for grout and still powerful enough to brighten it, especially when you let it sit for 10–15 minutes before scrubbing.
3. Clean smarter, not harder
- Squeegee or towel-dry shower walls after use to cut down on mildew stains.
- Use mats at entryways so less dirt reaches tile floors.
- Spot-clean spills right away before they soak into grout.
With a little prevention, that $2 refresh will stay beautiful for a long time.
Real-Life Experience: What It’s Actually Like to Refresh Grout on a Budget
The first time many DIYers tackle grout, they imagine an hour or two of light cleaning. Then reality hits: hands-and-knees scrubbing, a sore back, and grout that still looks “meh.” The paint-plus-cleaning method doesn’t magically erase the work, but it makes the payoff feel huge compared to the effort.
Here’s what the experience tends to look like in real life when you commit to doing this for $2 or less:
Phase 1: The “Why did I start this?” moment
Once you clear the room and start vacuuming, you’ll see just how much dust and loose debris was living in those grout lines. Then you mix your baking soda and peroxide paste and suddenly your floor looks like a science experiment. It’s messybut strangely satisfying.
As the paste sits, you’ll probably notice some spots already looking lighter. That little preview is what keeps you going when you’re scrubbing the fiftieth grout line with a toothbrush and wondering if this counts as cardio.
Phase 2: The “This might actually work” moment
After the first full round of cleaning, step back and take a photo. Even if your grout isn’t perfect, side-by-side comparison usually shows a big improvement. That’s when the paint trick becomes exciting rather than intimidating.
You move to a test areamaybe behind a door or in a corner. You paint a few grout lines with your thinned paint, wipe off the tiles, and suddenly those lines look new. If you chose white, the surrounding tile often looks brighter too, almost like you changed the lighting.
Phase 3: The groove
Once your technique settles in, you fall into a rhythm: paint three or four tiles’ worth of grout, wipe … paint, wipe … scroll your phone for a second … paint, wipe. Time goes quickly, especially if you put on a podcast or some music.
Most people are surprised at how little paint they actually use. A tiny bottle of craft paint or a leftover sample pot can handle a whole small bathroom, which is why the cost stays so low. The real “expense” is patience, not money.
Phase 4: The dramatic reveal
When everything is dry, walk into the room from the hallway and pretend you’re seeing it for the first time. Bright grout lines make tile look newer, cleaner, and more expensivealmost like you upgraded the floor or backsplash.
In many cases, people report that dull beige tiles suddenly feel intentional and modern once the grout isn’t a patchy, mysterious brown anymore. The whole room reads as “fresh” rather than “tired rental.”
Phase 5: Living with your “new” grout
Over the next few weeks, you’ll notice a few things:
- Daily cleaning feels easier because you’re more motivated to maintain something that looks good.
- You start spotting little drips and splashes sooner and wiping them up before they stain.
- Your brain quietly relaxes every time you walk into the room and don’t see dingy lines crisscrossing the floor.
And if a high-traffic spot starts to show wear after a year or two? You already know the system: quick clean, tiny bit of paint, fresh lines again. No big bills, no demolition, and no guilt about ignoring grimy grout for months.
In other words, this $2 grout refresh doesn’t just change your floors for a dayit gives you a simple, repeatable formula for keeping them looking great long-term.
Conclusion: A Big Grout Glow-Up on a Tiny Budget
Fresh grout lines can transform a tired floor or backsplash, making the whole space feel cleaner and more modern. You don’t need specialty products or a renovation budget. With baking soda, peroxide, a little dish soap, and a tiny bit of inexpensive paint, you can give your grout a serious glow-up for $2 or less.
Clean first, then lightly recolor the grout with thinned paint, wipe the tiles, let it dry, and enjoy the “brand-new floor” illusion every time you walk past. It’s one of those projects that feels almost unfair for how much impact you get from so little money.
sapo: Tired of dark, dingy grout making your floors and walls look dirty no matter how often you clean? This easy DIY guide shows you how to freshen up your grout lines for $2 or less using simple pantry ingredients and a tiny bit of paint. You’ll learn how to deep-clean grimy grout, then brighten or change its color with a clever, budget-friendly trick that makes tile look practically newwithout regrouting, harsh chemicals, or expensive products. Perfect for bathrooms, kitchens, and entryways that need a quick but dramatic refresh.