Table of Contents >> Show >> Hide
- Why Bond Metal with Adhesive Instead of Welding?
- Choose the Right Metal Adhesive
- Two-Part Epoxy: The Heavyweight Champion
- Acrylic / MMA Structural Adhesives: Fast, Tough, and Often Oil-Tolerant
- Cyanoacrylate (Super Glue): Tiny Parts, Tight Fits, Quick Wins
- Polyurethane Adhesives and Sealants: Flexible and Vibration-Friendly
- Anaerobic Retaining Compounds: The Secret Weapon for Round Parts
- High-Bond Tapes (Like VHB-Style): Clean, Fast, Surprisingly Strong
- Surface Prep: The Part Everyone Skips (and Then Regrets)
- Step-by-Step: How to Glue Metal to Metal (Without Welding)
- Joint Design: Make the Glue Do What It’s Good At
- Common Mistakes (and How to Avoid Them)
- Real Examples: What Works in the Wild
- Safety Tips (Because Gluing Metal Shouldn’t Require a Trip to Urgent Care)
- Conclusion
- Real-World Lessons and “Been-There” Experiences from Metal Bonding Projects
Welding is awesome… right up until it isn’t. Maybe you don’t have a welder. Maybe your “welding” looks like a sad pile of popcorn.
Maybe you’re bonding thin sheet metal and don’t want it to warp like a potato chip with a grudge.
Or maybe you’re trying to join two different metals and you’d like to avoid turning your project into a science experiment called
Galvanic Corrosion: The Musical.
Good news: modern adhesives can bond metal to metal with serious strengthoften with less mess, less heat, and fewer sparks flying toward your eyebrows.
The trick is picking the right adhesive, prepping the surface like you mean it, and giving the bond time to become the rock-solid relationship you’re hoping for.
Why Bond Metal with Adhesive Instead of Welding?
Adhesive bonding isn’t “the lazy way.” It’s a legitimate joining method used in automotive, aerospace, manufacturing, and repair work.
When you choose the right product and joint design, adhesive bonding can be tough, durable, and surprisingly forgiving.
Big reasons people skip the weld
- No heat distortion: Great for thin metals, decorative pieces, and parts that need to stay aligned.
- Stress distribution: Adhesives spread load over an area instead of concentrating it at a point.
- Corrosion protection: Many adhesives seal the joint, helping block moisture and oxygen from sneaking in.
- Dissimilar material bonding: Metal to metal, metal to plastic, metal to compositeadhesives can play matchmaker.
- Cleaner look: No weld bead, no grinding, no “I’ll paint it and pretend that didn’t happen.”
Choose the Right Metal Adhesive
“Best glue for metal” is like “best pizza topping.” The correct answer depends on the situation, and someone will argue with you anyway.
Focus on load type (shear vs peel), gap size, environment (heat, water, chemicals),
and how fast you need it to set.
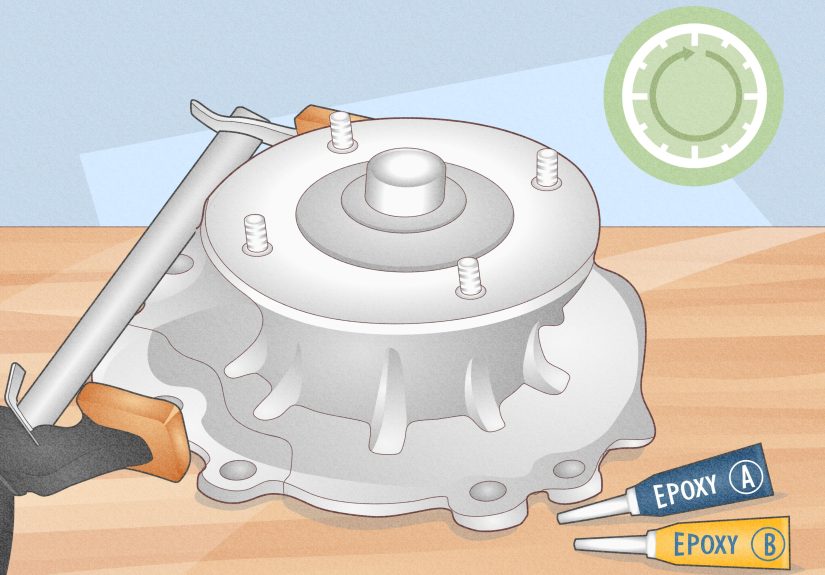
Two-Part Epoxy: The Heavyweight Champion
If you want a strong, durable bond and you can wait for curing, epoxy is usually the first stop.
Epoxies are famous for bonding metal well, filling small gaps, and handling vibration and many chemicals.
They’re also available in slow-cure “maximum strength” versions and fast-set formulas for quick repairs.
- Best for: structural-ish repairs, brackets, tools, metal furniture, automotive fixes (non-critical), gap filling
- Not ideal for: super-flexy joints, high peel stress designs, or when you need instant handling
- Pro tip: slow-cure epoxies often end up stronger than the “5-minute” typespatience pays.
Acrylic / MMA Structural Adhesives: Fast, Tough, and Often Oil-Tolerant
Acrylic structural adhesives (including MMA-style products) are popular in manufacturing because they can be strong and durable with faster cure times.
Many are more tolerant of less-than-perfect surfaces than classic epoxies, which is helpful in real shops where metal sometimes arrives with light oils.
- Best for: production work, metal fabrication, bonding coated metals, faster throughput projects
- Heads-up: these can smell… enthusiastic. Ventilation is your friend.
Cyanoacrylate (Super Glue): Tiny Parts, Tight Fits, Quick Wins
Super glue can bond metalespecially small, close-fitting parts. It grabs quickly, which is great when you need alignment
without clamping gymnastics. But it’s typically lighter-duty than epoxy/structural acrylics and doesn’t love impact or peel stress.
Toughened versions improve shock resistance.
- Best for: small hardware, trim, quick tack before switching to a stronger adhesive, temporary holds
- Not ideal for: big load-bearing joints, large gaps, high heat, or wet environments (unless specifically rated)
Polyurethane Adhesives and Sealants: Flexible and Vibration-Friendly
Polyurethanes are often used where you want a bond that can flex a bituseful for vibration, thermal expansion, or outdoor exposure.
They’re commonly used as construction adhesives or sealants. Strength varies widely by product, so read the label like it’s your new favorite novel.
Anaerobic Retaining Compounds: The Secret Weapon for Round Parts
If you’re bonding cylindrical, close-fitting metal partslike a bearing in a housing or a bushing on a shaftanaerobic retaining
compounds are purpose-built for that job. They cure in the absence of air in tight gaps between metal surfaces.
Think “liquid that turns into a precision-fit bond.”
- Best for: shafts, bearings, bushings, sleeves, press/slip fits
- Not ideal for: wide gaps, porous materials, or surfaces that aren’t close-fitting
High-Bond Tapes (Like VHB-Style): Clean, Fast, Surprisingly Strong
For signage, panels, trim, and assemblies where you want a clean bond line without squeeze-out, high-bond acrylic foam tapes are legit.
They can handle vibration well and provide a consistent bond thickness. Surface prep and proper pressure during application matter a lot.
- Best for: panels, decorative metal, mounting, signs, enclosures
- Not ideal for: small contact areas, sharp peel forces, or high-heat applications unless tape is rated for it
Surface Prep: The Part Everyone Skips (and Then Regrets)
Adhesives don’t bond to “metal.” They bond to whatever is on the metal: oil, oxide, dust, fingerprints, old paint, rust, mystery garage grime…
and occasionally the hopes and dreams of your project. If you want a strong bond, you need the adhesive touching clean, solid material.
Gold-standard prep for most metal-to-metal bonding
- Degrease first: Wipe with a suitable solvent (commonly isopropyl alcohol or acetone) using a lint-free cloth.
- Abrade for “tooth”: Sand with ~60–120 grit, use an abrasive pad, wire brush, or blast if appropriate. You want a fresh, matte surface.
- Remove dust: Blow off or wipe away sanding residue.
- Degrease again: One more solvent wipe removes fine particles and any oil you just smeared around.
- Bond soon: Metals can re-oxidize; don’t prep today and glue “sometime this week.”
For tape bonding, many manufacturers recommend cleaning with an isopropyl alcohol and water mix and escalating to stronger degreasers
if heavy oils are present. For structural adhesives, product instructions may specify abrasive grit ranges, bare-metal requirements,
and dedicated cleanersfollow those details when they’re provided.
Step-by-Step: How to Glue Metal to Metal (Without Welding)
1) Dry fit the parts
Test alignment, clamping strategy, and contact area before you open the adhesive. Once you mix epoxy, the clock starts ticking.
Dry fitting saves you from the classic mistake: “I didn’t realize I needed three hands.”
2) Prepare the surfaces
Clean, abrade, clean again. If you do nothing else, do this. A perfect adhesive applied to a greasy surface is still a grease bond.
And grease always wins.
3) Pick your adhesive based on the job
- High strength + gap filling: epoxy
- Fast structural bonding, often oil-tolerant: acrylic structural adhesive
- Small tight-fit parts: cyanoacrylate
- Flexible outdoor-ish joints: polyurethane adhesive/sealant
- Round close-fitting parts: anaerobic retaining compound
- Panels and trim: high-bond tape
4) Mix and apply correctly
For two-part products, mix exactly as directed (ratio matters). Scrape the sides, mix until color/consistency is uniform,
and don’t whip air into it like you’re making a fancy latte. Apply enough adhesive to wet the surface; for many joints,
a thin, continuous layer beats a few random blobs.
5) Assemble the joint and clamp (but don’t crush it)
Press parts together and align them. Use clamps, tape, weights, or fixtures to keep the joint stable.
Here’s the counterintuitive part: more clamping force isn’t always better.
Over-clamping can squeeze out too much adhesive and starve the joint. You want firm contact and a consistent bond line, not a dry seam.
6) Clean squeeze-out while it’s fresh
Wipe excess adhesive carefully before it cures (and before it becomes a permanent part of your personality).
Use the cleanup method recommended for the adhesiveoften a solvent wipe for uncured material and mechanical removal after curing.
7) Let it cure like it’s getting paid overtime
“Set time” and “full cure” are not the same. Many adhesives will hold position quickly but need much longer to reach full strength.
If you load the joint early, you can create tiny cracks or weak spots that show up later as a mysterious failure.
When in doubt, wait.
Joint Design: Make the Glue Do What It’s Good At
Adhesives love shear (sliding forces along the bond) and dislike peel (forces trying to pry an edge up).
If you design your joint so loads try to peel it open, you’re basically helping gravity write a breakup letter.
Stronger joint shapes
- Lap joints: overlap the metals instead of butt-joining edges.
- Bigger bonded area: more surface area usually means more strength.
- Add flanges or tabs: turn peel loads into shear loads.
- Avoid sharp edges: round corners reduce stress concentration at the bond line.
For critical applications, many industries use “belt and suspenders” designadhesive plus fasteners, rivets, or spot weldsespecially where impact
or inspection requirements are strict.
Common Mistakes (and How to Avoid Them)
Mistake: Gluing shiny, untouched metal
Smooth, oxidized surfaces reduce adhesion. Abrade to a matte finish and clean thoroughly.
Mistake: Choosing speed over strength
Fast-set adhesives are convenient, but slow-cure versions often develop higher final strength and better durability.
If the joint matters, give it time.
Mistake: Ignoring temperature and environment
Heat, moisture, fuels, solvents, and UV exposure can degrade the wrong adhesive. Choose a product rated for the environment.
A “kitchen repair” adhesive won’t necessarily survive an engine bay.
Mistake: Over-clamping
Firm pressure is good; squeezing the joint bone-dry is not. Keep a consistent adhesive layer.
Real Examples: What Works in the Wild
Example 1: Fixing a metal chair leg that wobbles
If the joint is loose and you can’t weld, epoxy can stabilize itespecially if you can roughen the inside surfaces and get good adhesive coverage.
If there are gaps or missing material, an epoxy putty can help rebuild volume before final bonding.
Clamp or brace the chair leg so it can’t shift during curing. Then wait for full cure before anyone “tests” it by flopping down dramatically.
Example 2: Bonding an aluminum bracket to steel
Dissimilar metals are a great use case for adhesives because you avoid heat and can create a sealed joint.
Prep both surfaces: degrease, abrade, degrease again. Use a structural epoxy or structural acrylic depending on your cure-time needs.
If the assembly lives outdoors, consider sealing edges and painting to reduce moisture exposure.
Example 3: Mounting a metal sign panel cleanly
High-bond tape is popular for panels because it’s neat, quick, and provides uniform thickness.
Clean thoroughly, apply tape with strong pressure, and follow recommended dwell time before loading.
Design to reduce peelmechanical edge supports help a lot.
Example 4: Securing a bushing on a shaft
A retaining compound is usually the right call here. Clean the parts, apply the compound per instructions, assemble,
and allow curing. This method can lock in close-fitting parts and help prevent loosening under vibration.
Safety Tips (Because Gluing Metal Shouldn’t Require a Trip to Urgent Care)
- Ventilation: Many adhesives and solvents produce strong vapors. Work in a well-ventilated area.
- Skin protection: Wear glovesespecially with epoxies and acrylics. Allergic reactions are real.
- Eye protection: Splashes happen. Safety glasses are cheaper than regret.
- Fire safety: Solvents can be flammable. Keep sparks and open flame away.
- Heat from curing: Some epoxies can warm up as they cureespecially in large mixed batches.
Conclusion
Bonding metal without welding isn’t a compromiseit’s a skill. Choose an adhesive that matches your load and environment,
prep the surfaces until they’re clean and roughened, clamp smart (not brutal), and let the adhesive fully cure before you flex your masterpiece.
Do those things, and your metal-to-metal bond can be strong, clean, and durableno sparks required.
Real-World Lessons and “Been-There” Experiences from Metal Bonding Projects
Let’s talk about the stuff that rarely makes it into the glossy product brochure: the little surprises that show up when you’re bonding metal in a garage,
a workshop, or that one corner of your apartment you insist is a “maker space.” These aren’t personal war stories (I don’t have a garage),
but they’re the patterns that come up again and again when people try to glue metal to metal instead of welding.
The “It Looked Clean” Trap
The most common failure isn’t the adhesiveit’s the invisible layer of oil, polish, or oxidation. Stainless steel is notorious for this because it can look
pristine while still being a poor bonding surface. People will wipe it once, apply epoxy, and feel proud… until the joint pops off like it was attached with a wish.
The fix is boring but effective: degrease, abrade to a matte finish, degrease again, and bond soon after prep. If you want a quick self-check,
watch how liquids “wet” the surfaceif cleaner beads up, you probably need more prep.
Cold Weather Makes Adhesives Moody
Adhesives have a personality, and it gets dramatically slower when the temperature drops. A product that sets “in 5 minutes” at room temperature can take
significantly longer in a chilly garage. The result is a joint that seems cured on the outside but is still soft inside. People bump it, twist it, or clamp-shift it,
and the bond gets micro-damaged before it ever reaches strength. If you’re working in cold conditions, warm the parts (gently), warm the adhesive (per label),
and give it extra time. “Overnight” is a lifestyle choice that saves projects.
Over-Clamping: When “More Pressure” Becomes “Less Bond”
Plenty of folks clamp like they’re trying to flatten a soda can. With many epoxies and structural adhesives, that can squeeze out too much material and leave a
starved joint. You want stable contact and a consistent bond line. If squeeze-out is excessive and the joint looks suspiciously dry at the seam, back off next time.
A good mental image: you’re holding the pieces together, not attempting to fuse them through sheer intimidation.
Small Bonds Fail from Peel, Not Shear
Another classic: bonding a small tab or bracket, then loading it like a crowbar. Adhesives are much happier when forces slide across the bond (shear)
rather than pry it open (peel). When a joint fails “mysteriously,” it’s often because the design turned your adhesive into an edge-peeling victim.
The practical fix is often simple: increase overlap, add a flange, round sharp corners, or add a mechanical backup like a small screw or rivet
to prevent peeling while the adhesive handles the distributed load.
The “Instant Gratification” Mistake
Even experienced DIYers get caught by the difference between handling strength and full cure. A joint might feel solid in an hour,
so it’s tempting to install it, tighten it, or put it into service. That’s when the bond can creep, shift, or crack internally. If the label says full cure is 24 hours,
treat that like a contract. One day of patience is usually cheaper than rebuilding the same part twiceand dramatically cheaper than explaining why your repair
failed right when someone decided to “just test it real quick.”