Table of Contents >> Show >> Hide
- Before You Start: Why Plaster Walls Need Special Handling
- How to Hang Things on Plaster Walls: 15 Steps
- Step 1: Identify what kind of plaster wall you have
- Step 2: Weigh the item before choosing hardware
- Step 3: Pick the right hanging method for the load
- Step 4: Gather tools and materials before touching the wall
- Step 5: Locate studs (but don’t fully trust your stud finder on lath-and-plaster)
- Step 6: Plan the placement and mark the height
- Step 7: Use a template or painter’s tape for accurate spacing
- Step 8: Protect the floor and catch dust before drilling
- Step 9: Drill a pilot hole slowly and keep the bit straight
- Step 10: Install the anchor that matches your wall and weight
- Step 11: Add screws or hooks and stop when snug
- Step 12: Hang the item carefully (two people for heavy pieces)
- Step 13: Level it and stabilize the bottom
- Step 14: Test the hold and inspect the plaster
- Step 15: Document the hardware and keep future fixes easy
- Best Hardware Choices for Plaster Walls (Quick Practical Guide)
- Common Mistakes to Avoid on Plaster Walls
- Real-World Experiences and Lessons Learned (Extended Notes)
- Conclusion
Plaster walls are charming, sturdy, and just a little dramatic. They look gorgeous in older homes, but they can crack if you treat them like drywall. If you’ve ever tapped a nail into plaster and heard that tiny “uh-oh” sound, you already know what I mean.
The good news: hanging things on plaster walls is absolutely doable. You just need the right hardware, the right technique, and a little patience. In this guide, I’ll walk you through a practical 15-step method that works for everything from lightweight frames to heavier mirrors and shelves. I’ll also share common mistakes to avoid and real-world lessons that save time, dust, and wall repairs.
Before You Start: Why Plaster Walls Need Special Handling
Plaster is typically harder and stronger than drywall, but it’s also more brittle. That means a fast, sloppy installation can chip the finish coat or create cracks around your anchor point. The solution is simple: use screws instead of nails when possible, drill carefully, and match your anchor type to the weight of the object and the wall construction behind the plaster.
Also, not all “plaster walls” are the same. Some are traditional lath-and-plaster (common in older homes), while others may be plaster over masonry. That matters because your drill bit, anchor style, and stud-finding method can change depending on what’s behind the surface.
How to Hang Things on Plaster Walls: 15 Steps
Step 1: Identify what kind of plaster wall you have
Start by figuring out what’s behind the plaster. In many older U.S. homes, plaster is applied over wood lath. In some homes, especially certain regions or additions, you may be dealing with masonry behind the plaster. This affects how you drill and what anchors you use.
If your home was built before the 1950s, assume plaster and proceed carefully. A pushpin test (gentle pressure only) can help distinguish drywall from plaster, but don’t force it. If you’re unsure, drill a tiny pilot hole in a hidden spot and inspect the dust and resistance.
Step 2: Weigh the item before choosing hardware
Never guess the weight. “It feels light” is how wall damage begins. Use a bathroom scale for mirrors, framed art, shelves, or decorative pieces. For large items, weigh yourself holding the item, then subtract your body weight.
Once you know the actual weight, choose hardware rated above that number. For valuable or breakable items, use a safety margin and avoid running right at the anchor’s maximum rating.
Step 3: Pick the right hanging method for the load
This is the most important decision in the whole process. Here’s the quick version:
- Very light décor: Adhesive strips or light-duty picture hooks (if the wall surface is suitable).
- Light to medium frames: Picture hooks designed for plaster, or screws with appropriate anchors.
- Medium to heavy items: Hollow-wall anchors, molly bolts, or toggle-style anchors.
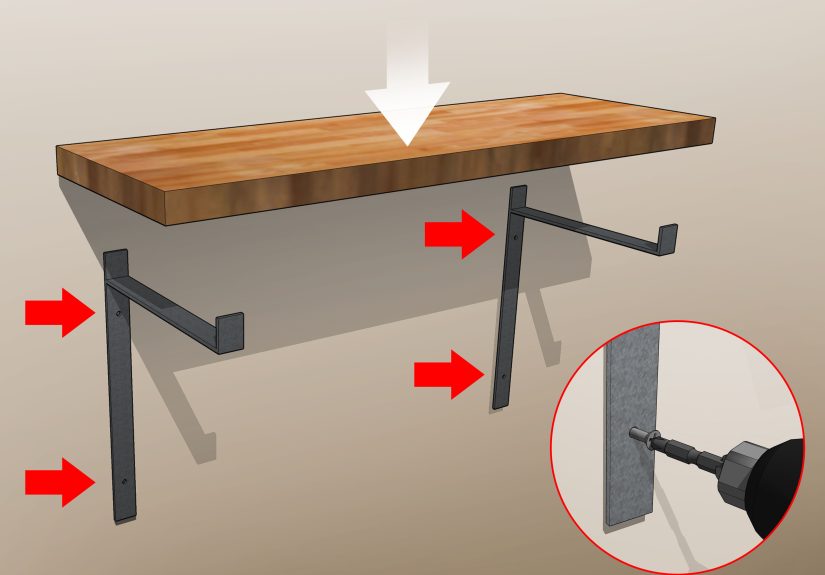
- Heavy mirrors, shelves, cabinets: Stud mounting whenever possible; otherwise use heavy-duty toggles or a cleat system.
- Historic walls / art rotation: Picture rail molding is a smart, low-damage option.
Step 4: Gather tools and materials before touching the wall
You’ll usually need a tape measure, pencil, level, drill/driver, the correct drill bit, anchors, screws or hooks, and safety glasses. Add painter’s tape and a small bag or folded sticky note for dust control (yes, that tiny trick is actually useful).
For heavier items, have a second person help. A mirror installation looks very different when you’re not trying to hold, level, and fasten everything with your elbow.
Step 5: Locate studs (but don’t fully trust your stud finder on lath-and-plaster)
Stud mounting is always the strongest option, especially for shelves, cabinets, and heavy mirrors. Use a stud finder first, but here’s the catch: on lath-and-plaster walls, density changes can confuse standard stud finders.
A better approach is to combine methods: use a stud finder, then confirm with a small pilot hole, or use a magnetic scanner to locate nails in the lath (which usually line up with studs). In older homes, this extra minute saves a lot of frustration.
Step 6: Plan the placement and mark the height
Decide exactly where the item will go before drilling. For wall art, a common design rule is to place the center of the piece around eye level (often about 57 inches from the floor). Above furniture, keep enough breathing room so the piece doesn’t look like it’s floating in another ZIP code.
Mark the top edge and hanging points lightly with pencil. If the item hangs from wire, measure from the top of the frame down to the wire when pulled taut. Transfer that measurement to the wall.
Step 7: Use a template or painter’s tape for accurate spacing
For items with two hooks or brackets, use painter’s tape or a paper template to mark multiple points. This helps you keep everything level and prevents the classic “two holes, one inch off” problem.
Painter’s tape also makes your marks easier to see on textured or older painted plaster and can reduce surface chipping when drilling through delicate paint layers.
Step 8: Protect the floor and catch dust before drilling
Plaster dust is fine, messy, and mysteriously attracted to dark rugs. Tape a small bag under the drill point, or fold a sticky note beneath the hole to catch dust. It’s a tiny step, but it keeps cleanup quick and prevents dust from settling into fabrics.
If you’re working in a finished room, cover nearby furniture. You’ll thank yourself later.
Step 9: Drill a pilot hole slowly and keep the bit straight
Drill at a controlled speed and let the bit do the work. Don’t jam the drill into the wall. A slow, steady approach helps prevent cracking and keeps the hole clean.
Match the bit size to the anchor instructions. Some anchors require a pilot hole; self-drilling anchors may not. If you’re using toggle-style anchors, you’ll usually need a larger hole than for basic expansion anchors.
Step 10: Install the anchor that matches your wall and weight
This is where a lot of DIY jobs go sideways. Use the anchor packaging instructions, and don’t improvise with a random screw from the junk drawer.
- Light-duty hanging: Picture hooks or small anchors for art and frames.
- Medium-duty: Hollow-wall anchors or molly bolts for mirrors and shelves.
- Heavy-duty: Toggle bolts or channel toggles for larger mirrors, handrails, or cabinets when studs aren’t available.
If you’re installing self-drilling anchors, avoid overtightening. Too much force can chew up the plaster surface and weaken the hold.
Step 11: Add screws or hooks and stop when snug
Insert the screw or hanging hook and tighten until snug, not “I am now one with the wall.” Over-tightening can damage plaster, crush the anchor, or reduce holding strength.
If the hardware is meant to leave a small gap (for a wire hanger or bracket), leave the correct clearance instead of driving the screw flush.
Step 12: Hang the item carefully (two people for heavy pieces)
Lift the piece into place and lower it onto the hardware slowly. For heavy mirrors and oversized frames, use two people. One person can guide the wire or bracket while the other keeps the item level.
If you’re hanging a heavy mirror on plaster, toggle bolts with picture hooks are a common reliable method. For very heavy pieces, a French cleat system is often the best choice because it spreads weight more evenly.
Step 13: Level it and stabilize the bottom
Check level before calling the job done. Tiny adjustments matter, especially in older homes where ceilings and trim may not be perfectly straight.
For mirrors and large frames, consider small adhesive bumpers or stabilizing strips at the bottom corners to reduce shifting. This helps keep the piece from tilting every time someone closes a door with enthusiasm.
Step 14: Test the hold and inspect the plaster
Gently test the mount for movement. Don’t yank it, but make sure it feels secure. Then inspect the area around the hardware for hairline cracks or crumbling.
If you see cracking, stop and fix it before loading more weight onto that point. It’s much easier to repair a small issue than a larger section of failed plaster.
Step 15: Document the hardware and keep future fixes easy
Save the anchor packaging (or snap a photo of it) so you know the weight rating and type for future adjustments. This is especially helpful if you’re rehanging items later or moving things room to room.
If you rotate art often, consider picture rail molding. It was originally popular for plaster walls for a reason: it protects the wall and makes rearranging art much easier.
Best Hardware Choices for Plaster Walls (Quick Practical Guide)
For lightweight pictures and décor
Lightweight picture-hanging kits are convenient because they include multiple options (adhesive, nail-in, push-in, and screw-in pieces). They’re a good match for gallery walls and small décor, especially when you’re still testing layouts.
Adhesive options can work well on smooth, sealed surfaces, but always check surface restrictions and weight limits. Some products are not recommended for wallpaper, delicate surfaces, or rough textures, and many require a clean wall plus a waiting period after painting.
For medium-weight frames, mirrors, and shelves
Hollow-wall anchors and molly bolts are often a sweet spot for plaster walls when studs aren’t available. They provide better support than simple plastic anchors and are commonly used for framed art, mirrors, and shelves.
If you need a stronger hold in a hollow wall, modern toggle designs and strap-style toggles are excellent upgrades over basic anchors. They’re especially useful when you need more confidence than a small expansion anchor can provide.
For heavy items and safety-critical installs
Heavy mirrors, cabinets, handrails, or anything that could hurt someone if it falls should be treated as a “high consequence” install. If you can hit studs, do that. If you can’t, use a heavy-duty toggle or channel toggle rated well above the load, and use multiple points when appropriate.
For wide or heavy pieces, a French cleat is one of the cleanest and strongest methods because it spreads the weight across a larger area and can catch multiple studs.
Common Mistakes to Avoid on Plaster Walls
- Using nails for everything: Plaster is brittle. Screws are usually safer and more controlled.
- Skipping the pilot hole: Many anchors require it. Forcing hardware can crack plaster.
- Ignoring wall type: Lath-and-plaster behaves differently than drywall and masonry.
- Over-tightening anchors: This can weaken the hold instead of improving it.
- Trusting one stud-finder pass: Verify on lath-and-plaster walls.
- Using adhesives on the wrong surface: Textured, dusty, or delicate walls can fail.
- Choosing hardware with no safety margin: Always give yourself some buffer.
Real-World Experiences and Lessons Learned (Extended Notes)
One of the most common experiences homeowners have with plaster walls is assuming the wall will behave like drywall because it “looks smooth.” Then the first nail goes in, the plaster chips, and the room suddenly becomes a repair project. The lesson here is simple: plaster rewards patience. The people who get the best results are usually the ones who slow down and do the boring setup stepsmeasure, level, pilot hole, correct anchorbefore they drill anything.
Another frequent experience comes from older homes with lath-and-plaster: stud finders can be confusing. Homeowners often report getting inconsistent readings or “finding” a stud every few inches. That’s usually the lath, plaster keys, or metal mesh interfering with the sensor. A more reliable routine is to use the stud finder as a first guess, then confirm with a tiny test hole or a magnetic scanner to find nails in the lath. It feels like extra work, but it prevents the classic mistake of mounting a heavy object to “not actually a stud.”
A lot of people also learn the hard way that anchor instructions matter more than they expected. There’s a strong temptation to use whatever screw is nearby, but mismatched screws can reduce anchor performance or crack the surface. Homeowners who follow the packaging directionsespecially for pilot-hole size and screw typeusually get a cleaner install and a stronger hold. It’s not glamorous advice, but it works.
Adhesive hanging products create a different kind of experience: they’re fantastic when used correctly, and deeply annoying when surface prep is skipped. Many failures come down to rushing the prepdust on the wall, using household cleaner instead of alcohol, or hanging the frame too soon after pressing the strips. People often think the product failed when the real issue was installation timing or surface compatibility. On a smooth, painted surface, properly applied adhesive strips can be great for lighter décor. On rough, flaky, or delicate plaster, they can be a gamble.
Heavy mirror installs are where people become believers in “use two fasteners” and “ask for help.” Even when one anchor is technically rated for the load, using two properly spaced points usually makes the mirror easier to level, more stable over time, and less likely to shift. Homeowners also report that a second person makes a huge differencenot just for lifting, but for accurate placement while you’re aligning wires, hooks, or brackets.
Finally, people living in historic homes often discover a long-term strategy: reduce the number of new holes. That’s why picture rails still make sense today. Homeowners who rotate art seasonally or like to redecorate frequently often end up loving rail systems because they preserve the plaster and make layout changes easy. In other words, the “old-fashioned” solution turns out to be the smartest modern one.
If there’s one big takeaway from real-life plaster wall projects, it’s this: success usually comes from matching the hardware to the weight, matching the method to the wall, and resisting the urge to rush. Plaster isn’t difficultit’s just not forgiving. Treat it with respect, and it’ll hold your art beautifully for years.
Conclusion
Hanging things on plaster walls doesn’t have to feel risky. Once you know how plaster behaves, the process becomes straightforward: identify the wall type, weigh the item, choose the right hardware, drill carefully, and avoid over-tightening. For heavier pieces, prioritize studs or heavy-duty toggles, and don’t be shy about using two mounting points or a French cleat.
Whether you’re hanging one photo frame or building a full gallery wall in a 1920s home, the best results come from precisionnot force. Slow and steady wins this one, and your plaster walls will stay intact.