Table of Contents >> Show >> Hide
- Before You Start: The Two Outdoor Lighting “Lanes”
- Lighting Design That Doesn’t Look Like an Airport Runway
- Tools & Materials Checklist
- How to Install Outdoor Lighting: 14 Steps
- Common Problems (and the “No Panic” Fixes)
- Maintenance and Upgrades That Keep Your System Looking New
- Conclusion
- Experience Add-On: Real-World Lessons From Installing Outdoor Lighting
Outdoor lighting is one of those rare home upgrades that does three jobs at once: it makes your place safer to walk around at night, more secure, and
(let’s be honest) a whole lot more “nice house, who dis?” from the street. The trick is installing it in a way that looks intentionalnot like you
dropped a handful of path lights and hoped for the best.
This guide focuses on the most DIY-friendly option: low-voltage landscape lighting (typically powered by a transformer plugged into an
outdoor GFCI outlet). If you’re planning to run new 120-volt circuits, add junction boxes, or hardwire fixtures, that’s a “call a licensed electrician”
moment. Electricity is not the place to freestyle.
Before You Start: The Two Outdoor Lighting “Lanes”
Lane 1: Low-voltage landscape lighting (DIY-friendly)
Low-voltage systems use a transformer to step household power down to a safer low voltage for landscape fixtures. You set the transformer near an outdoor
outlet, run low-voltage cable through the yard, and connect fixtures with outdoor-rated connectors. Great for path lights, spotlights, garden accents,
deck steps, and most “make my yard look fancy” projects.
Lane 2: Line-voltage (120V) outdoor lighting (pro territory for most homeowners)
Hardwired exterior sconces, new circuits, buried conduit runs, and anything that requires opening electrical boxes or running new line-voltage cable
should follow local code and is safest handled by a qualified electrician. If you’re unsure which lane you’re in, assume it’s Lane 2 and get help.
Lighting Design That Doesn’t Look Like an Airport Runway
Pick your “why” first
- Safety: illuminate steps, changes in elevation, and dark corners.
- Navigation: guide people along paths and to doors without blasting their retinas.
- Ambience: soft light around seating, landscaping, trees, and architectural features.
- Security: reduce hiding spots and add consistent, predictable illumination.
Use layers (like good music)
- Path lighting for walkways and edges.
- Accent lighting (uplights, spotlights, well lights) for trees, textures, and features.
- Task lighting for grills, gates, stairs, and outdoor work areas.
Quick example layout (small front yard)
For a 30–40 foot walkway: place path lights on alternating sides every few yards, then add 1–2 accent lights aimed at a focal point (like a specimen tree
or a textured wall). You’ll get guidance lighting without turning the path into a glowing landing strip.
Tools & Materials Checklist
What you’ll likely need
- Low-voltage transformer (with timer and/or photocell is a big win)
- Outdoor-rated low-voltage landscape cable (gauge depends on run length and load)
- Fixtures (path lights, spotlights, deck lights, etc.) rated for outdoor use
- UL-listed outdoor wire connectors or manufacturer-approved waterproof connectors
- Wire stripper/cutter, screwdriver, and (if needed) a crimp tool
- Hand trowel or flat spade for shallow trenching
- Measuring tape, flags or marking paint, and a notepad (or phone notes)
- Optional but helpful: multimeter, headlamp, and extra connectors
Safety gear & safety brain
- Work gloves and eye protection
- GFCI-protected outdoor outlet (test it)
- Common sense rule: if you feel out of your depth, stop and call a pro
How to Install Outdoor Lighting: 14 Steps
These steps are written for a typical low-voltage outdoor lighting installation. Read your fixture and transformer manuals firstthen use
the steps below as the “big picture” plan so you don’t end up re-digging the same trench three times (the unofficial national pastime).
-
Step 1: Decide what you’re lighting and what “success” looks like.
Walk your yard at night with a flashlight. Notice trip hazards, dark corners, and features you’d love to highlight. Write down goals like “safer front
steps” or “make the maple tree look dramatic.” -
Step 2: Choose fixture types that match the job.
Path lights guide movement. Spotlights and uplights highlight trees and architecture. Deck and step lights prevent face-planting. If you’re tempted to
use only path lights everywhere, pauseaccent lighting is what makes a yard look designed. -
Step 3: Sketch a simple plan (yes, even a messy one).
Draw your house outline, outlets, paths, beds, and where you want fixtures. Mark where cable will run. Planning now prevents the “why is this wire
crossing my lawn like it owns the place?” problem later. -
Step 4: Add up wattage and size your transformer with breathing room.
Total the wattage of all fixtures (or bulbs) on the system. Choose a transformer that comfortably supports the load and allows for future additions.
LEDs make this easier because they use less energy, so you can run more lights with less strain. -
Step 5: Pick the right cable gauge and plan to avoid voltage drop.
Longer runs and higher wattage loads benefit from thicker cable. If you’ve got a longer walkway or multiple zones, consider splitting runs instead of
dragging one cable path across the entire property like a marathon route. -
Step 6: Call 811 before you dig.
Even for shallow trenching, contacting 811 helps you avoid buried utility lines. Do this a few business days before you plan to dig, and wait until
markings are done. Then dig carefully around any marked areas. -
Step 7: Stage a “mock install” at dusk (a.k.a. the glow test).
Set fixtures on the ground where you think you want themdon’t stake them in yet. When it gets dark, move them around until the lighting feels
balanced. This is the fastest way to prevent over-lighting or awkward glare. -
Step 8: Mount the transformer near a GFCI-protected outdoor outlet.
Install the transformer according to manufacturer instructions and keep it in an accessible spot (you’ll want to adjust timers or settings). Outdoor
power should be GFCI-protected, especially anywhere moisture is involved. -
Step 9: Lay the low-voltage cable along your planned route (leave slack).
Start from the transformer location and route cable along walkway edges or planting bedsareas that are less likely to get attacked by future shovel
adventures. Leave extra cable at each fixture location for easier connections and future tweaks. -
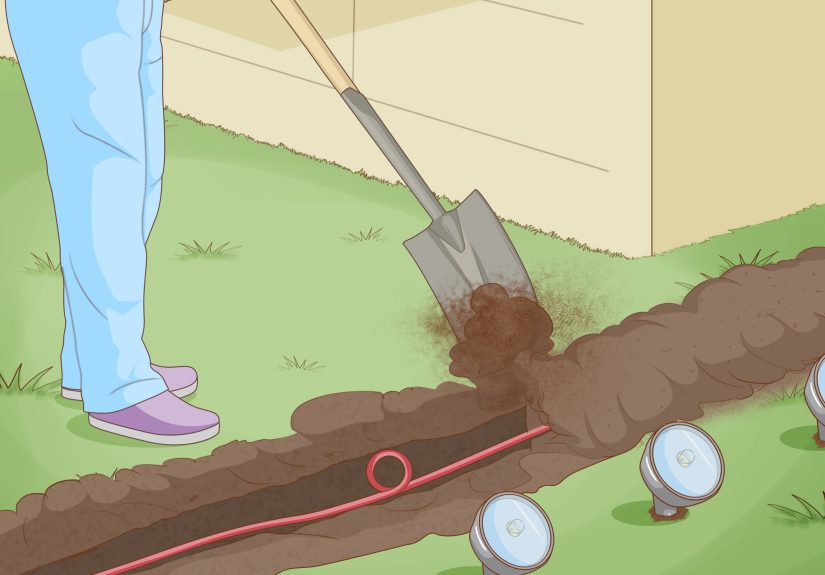
Step 10: Dig a shallow trench where needed (keep it neat, not deep).
Use a hand trowel or spade to create a narrow trench for the cable where you need to hide or protect it. Low-voltage cable is commonly buried shallow,
but follow your product instructions and local best practices. The goal is protection from lawn equipment and a clean look. -
Step 11: Install fixtures in their final positions (level matters).
Stake path lights firmly so they don’t lean after the first rain. For spotlights, aim at the target feature but avoid shining into windows or toward a
neighbor’s seating area (unless you’re trying to start a feud). -
Step 12: Make waterproof, outdoor-rated connections.
Use connectors approved for outdoor low-voltage landscape wiring. Many fixture instructions call for UL-listed connectors suitable for outdoor use.
Keep splices accessible and protected rather than burying a messy connection and hoping for the best. -
Step 13: Connect the cable to the transformer, then test before covering anything.
With all fixtures connected, attach the main cable to the transformer terminals as directed, then plug the transformer into the outlet and power it on.
Confirm every light turns on. If something fails, unplug power and re-check that fixture’s connection and bulb seating. -
Step 14: Adjust the aim, then cover the cable and clean up.
Once lighting looks right, finalize fixture positions, tuck cable into the trench, and replace soil/mulch/sod. Leave small service loops near fixtures
so you can adjust placement later. Set the timer or photocell so lights run only when needed.
Common Problems (and the “No Panic” Fixes)
Some lights are dimmer than others
- Shorten the run length or split into separate cable runs.
- Use thicker gauge cable for longer distances.
- Double-check connectorsloose or corroded connections can cause voltage loss.
A fixture won’t turn on
- Unplug power, then re-seat the connector and confirm wire contact.
- Check the bulb/LED module is installed correctly.
- Swap with a working bulb or fixture to isolate whether it’s the light or the connection.
The transformer trips or shuts off
- Make sure the outlet is working and the GFCI is not tripped.
- Confirm total wattage doesn’t exceed the transformer rating.
- Inspect for damaged cable insulation or wet/failed connectors.
Maintenance and Upgrades That Keep Your System Looking New
Do a quick seasonal check
- Re-aim spotlights after plant growth spurts or storms.
- Check connectors for moisture intrusion or corrosion.
- Replace cracked stakes before fixtures start “leaning into their feelings.”
Switch to LED if you haven’t already
LEDs are efficient and long-lasting, which is especially helpful outdoors where changing bulbs can feel like an extreme sport. Quality LEDs can use
significantly less energy than incandescent options and can last much longer, reducing ongoing maintenance.
Conclusion
Installing outdoor lighting is part design project, part practical safety upgrade, and part “future you will be grateful” move. If you plan carefully,
keep connections weatherproof, test before you bury anything, and respect safety basics like 811 marking and GFCI protection, you’ll end up with a system
that looks professionaland doesn’t require midnight troubleshooting with a flashlight in your mouth.
Experience Add-On: Real-World Lessons From Installing Outdoor Lighting
Here’s what people rarely tell you until after you’ve installed outdoor lighting: the install is the easy part. The real game is everything that
happens in the weeks and months afterwardplants grow, soil settles, sprinklers exist, and someone inevitably decides the flower bed “needs a little
refreshing,” which is landscaping code for “your wire is about to be relocated.”
One of the biggest “aha” moments is how much placement changes once it’s actually dark. In daylight, a path light seems perfectly centered. At night, you
realize it’s lighting the side of a shrub like it’s starring in a dramatic monologue, while the actual walkway remains suspiciously moody. That’s why the
dusk mock-layout is gold. People who skip it often reinstall lights at least onceusually after hosting guests and hearing the polite-but-deadly line:
“It’s so charming out here… where am I supposed to walk?”
Another lesson: glare is the enemy. A few lights aimed too high can make your yard feel like a movie premiere, not a relaxing outdoor
space. The best-looking installs usually use lower brightness with better angleswashing textures, grazing stone, and highlighting leaves without shining
into eyes or windows. If your first test looks harsh, don’t assume you need different fixtures. Often you just need a small aim adjustment, a shield, or a
wider spacing pattern.
Cable management is where good installs become great installs. The practical move is leaving extra slack at fixture locations and keeping connections
accessible. That little loop of cable may look unnecessary on install dayuntil you decide to move a light two feet to the left because your plant grew
into a leafy monster. Without slack, moving one fixture becomes “rewire half the yard,” which is how weekend projects become personal rivalries.
Waterproof connections are another place where experience speaks loudly. Outdoor environments are relentless: moisture, soil chemistry, sprinklers, heat,
and freeze-thaw cycles (depending on where you live) all work together to turn a weak connection into a flickering light show. People who use proper
outdoor-rated connectors and take a minute to make clean wire contact generally enjoy years of “set it and forget it.” People who rush connectors often
meet the outdoor lighting gremlinthe one who waits until the first party night to make one fixture mysteriously die.
Lastly, there’s the “future-proofing” factor. Most homeowners start with a simple walkway plan, then realize outdoor lighting is addictivein a good way.
Once you see how great one tree looks with a soft uplight, suddenly every tree is auditioning. Building in transformer capacity headroom, choosing cable
routes that make expansion easy, and splitting runs thoughtfully will save you money and effort later. The best installs feel like a system you can grow,
not a one-time project you dread touching again.
If you take anything from these real-world lessons, let it be this: test at night, avoid glare, protect your connections, and leave yourself
flexibility. Outdoor lighting is supposed to make your home feel easier to live innot become a seasonal drama series called “Where Did That Wire
Go?”