Table of Contents >> Show >> Hide
- Why Choose a Curved Brick Walkway?
- Tools and Materials You’ll Need
- Step 1: Plan and Mark the Curve
- Step 2: Determine Depth and Dig the Base
- Step 3: Build a Solid Base for Your Curved Walkway
- Step 4: Add and Screed the Bedding Sand
- Step 5: Choose and Lay Your Brick Pattern
- Step 6: Mark and Cut the Curved Edges
- Step 7: Install the Border and Edge Restraints
- Step 8: Compact and Fill the Joints
- Step 9: Final Touches and Maintenance Tips
- Real-World Experiences: What DIYers Learn the Hard Way
- 1. The Curve Always Looks Different from the Street
- 2. Underestimating the Base Work Is the #1 Regret
- 3. Cutting Curves Takes Patience (and Safety Glasses)
- 4. Patterns Look Busier Outside Than They Do in the Store
- 5. Joint Sand and Edging Save You from Future Headaches
- 6. The Walkway Changes How You Use the Yard
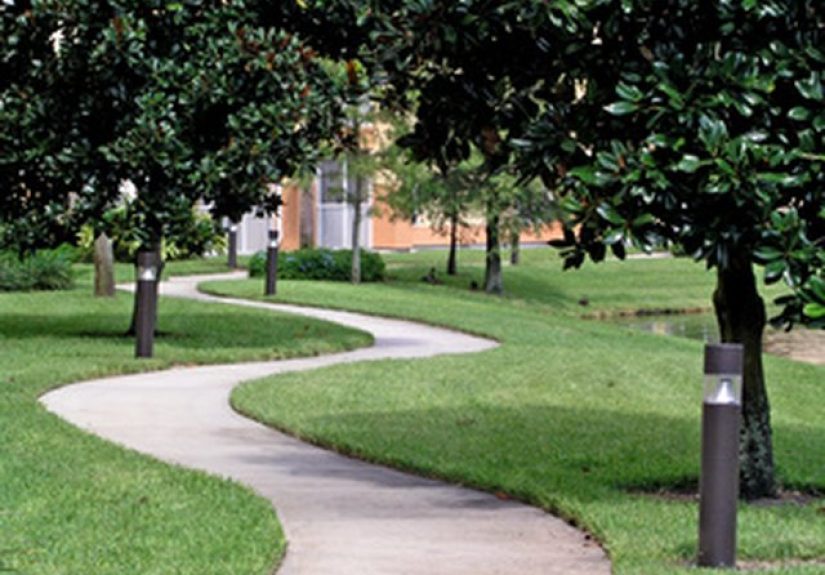
A straight sidewalk gets the job done. A curved brick walkway, though, looks like it wandered out of a garden magazine and decided to live in your yard.
It softens harsh lines, guides guests gently to your front door, and instantly boosts curb appeal. The best part? You don’t need to be a professional
mason to build onejust some planning, patience, and a willingness to get a little dusty.
In this guide, we’ll walk through how to lay a curved brick walkway step by stepfrom planning the curve and digging the base to setting the bricks,
cutting the radius, and locking everything in place. Along the way, you’ll pick up practical, real-world tips that pros use to keep their walkways flat,
solid, and weed-resistant for years.
Why Choose a Curved Brick Walkway?
A curved walkway does more than look pretty. It changes how people move through your space. A soft, sweeping curve can:
- Lead visitors naturally to your door, patio, or garden gate.
- Work around trees, garden beds, or existing landscaping instead of fighting them.
- Make a small yard feel larger by drawing the eye through the space.
- Add character and charm that a straight path just can’t match.
Brick and concrete pavers are also durable, relatively low-maintenance, and easy to repair. If a brick cracks or stains, you can pull it up and swap it out
instead of patching concrete. With a proper base, a brick walkway can last for decades.
Tools and Materials You’ll Need
Basic Tools
- Measuring tape and marking paint or landscape chalk
- Flexible garden hose or rope (for laying out the curve)
- Shovel and digging spade
- Hand tamper or plate compactor (rented if needed)
- Rubber mallet
- Level and straight 2×4 screed board
- String line and stakes
- Brick chisel and hammer or a masonry saw with diamond blade
- Push broom
- Wheelbarrow and rake
Materials
- Paving bricks or pavers rated for walkways
- Crushed stone or gravel base (often 3/4″ minus or similar)
- Coarse bedding sand (about 1″ thick layer)
- Landscape fabric (especially in clay or poor soil)
- Paver edging (plastic, metal, or brick-on-edge borders)
- Polymeric or jointing sand for filling gaps between bricks
Before you start digging, call your local utility locating service (in the U.S., dial 811) to make sure there are no hidden gas or electrical lines
under your future masterpiece.
Step 1: Plan and Mark the Curve
Think Function First, Fancy Later
Start by deciding where the walkway begins and ends. Does it run from the driveway to the front door? From the patio to a backyard gate?
Measure the general distance and think about how much room people need to walk comfortablytypically 32–36 inches for a small garden path
and 40–48 inches for a main entry walk.
Lay Out the Curve
A flexible garden hose is your secret weapon for shaping curves. Lay it on the ground to trace the path you have in mind. Adjust until the
curve feels smooth and naturalno sharp kinks or awkward angles. You want a gentle “S” or sweeping arc, not a snake having a bad day.
Once you’re happy with the line, use marking paint or chalk to trace along both sides of the hose, creating the approximate width of your walkway.
Step back and view it from different anglessidewalk, street, porchto be sure the curve looks right from every vantage point.
Step 2: Determine Depth and Dig the Base
A gorgeous brick pattern won’t mean much if the base underneath is weak. Most walkway failures (settling, puddling, and tripping hazards) come from
skimping on the foundation.
How Deep Should You Dig?
For a typical residential curved walkway, you’ll usually excavate about 6–9 inches below finished grade. That depth generally allows for:
- 4–6 inches of compacted gravel base for strength and drainage
- 1 inch of bedding sand for leveling
- 2–2.5 inches of brick or paver thickness
In colder climates or heavy clay soil, you might go a bit deeper to combat frost heave and improve drainage. The key is consistency:
keep the excavation relatively uniform so your walkway doesn’t end up with thin spots that sink over time.
Digging the Trench
Remove grass, roots, and topsoil within your marked lines. Dig down to your planned depth, making the trench slightly wider than the final walkway to
leave room for edge restraints. As you go, periodically check depth with a tape measure.
Use a rake to level the bottom roughly, then compact the soil with a hand tamper or plate compactor. This compaction step keeps the ground from
settling later and helps your base materials perform properly.
Add Landscape Fabric (Optional but Wise)
If your soil is clay-heavy or you’re worried about weeds, lay landscape fabric over the compacted subsoil before adding gravel. This helps keep the
base stone from migrating into the soil and reduces weed growth through the joints.
Step 3: Build a Solid Base for Your Curved Walkway
Spread and Compact the Gravel
Pour in your crushed stone base in 2-inch layers. After each layer, rake it roughly level and compact it thoroughly. Don’t try to dump all 4–6 inches
at oncelayering and compacting is what makes the base solid.
Aim for a slight slopeabout 1/8″ to 1/4″ per footso water runs off the walkway instead of pooling on it. Use a level and a straight 2×4 as a screed,
checking along the length and across the width.
Install Edge Restraints (If Using Them at the Base Stage)
Some systems use paver edging that gets anchored into the compacted base and locked in later with spikes and sand. For a curved route, choose edging
designed to flex so it can follow the contour of your path. If you’re using bricks on edge as borders, you may set them later once the field bricks
are in place.
Step 4: Add and Screed the Bedding Sand
After the gravel is compacted and graded, spread a 1-inch layer of coarse sand over the base. This sand layer lets you fine-tune the surface and
seat the bricks evenly.
How to Screed the Sand
Lay small pipes or pieces of conduit along the path as guides, then drag a straight 2×4 over them to smooth the sand to a consistent 1-inch depth.
Once you’ve screeded a section, carefully remove the guides and fill in any voids with sand, lightly smoothing them out.
Avoid walking on the sand once it’s screededfootprints create low spots. Work in sections so you can move backward as you lay bricks.
Step 5: Choose and Lay Your Brick Pattern
Curved walkways look great with several classic brick patterns. Popular options include:
- Running bond: Bricks offset by half a length in each row; simple, clean, and easy to cut around curves.
- Herringbone: Bricks laid at 45° or 90° angles in a zigzag; very strong and visually striking.
- Basketweave: Bricks in pairs, alternating direction; adds old-world charm.
For your first curved walkway, running bond is usually the most forgiving. It keeps cuts simpler and works well with gentle arcs.
Start Laying the Field Bricks
Begin at one end of the walkway and lay bricks on the sand, pressing them down slightly and tapping with a rubber mallet to seat them.
Follow the general curve you created with your layout lines, but don’t worry about perfect edges yetyou’ll cut and refine the curve soon.
Keep small, consistent gaps between bricks (usually 1/8″ or so, depending on your paver design). Use a level occasionally to ensure the surface stays
even and follows the desired slope.
Step 6: Mark and Cut the Curved Edges
Once the main field of bricks is down, it’s time to give the walkway its final shape. This is where the curve really comes to life.
Mark the Curve
Lay a flexible garden hose, length of PVC, or rope along the edge of the walkway where you want the finished curve to be. Use a wax pencil, chalk,
or marker to trace the line onto the bricks that need trimming.
Cutting the Bricks
For gentle curves, you can often get away with cutting bricks into wedges using:
- A masonry saw with a diamond blade (cleanest and easiest for many cuts).
- A brick chisel and hammer (more old-school, but works for smaller projects).
Cut the bricks so that the factory edges face outward where they’ll be visible, and the cut edges face inward toward the field. For tight curves,
you’ll end up with more triangular pieces and a bit more waste. That’s normaldon’t panic when you see a pile of offcuts.
After cutting, place the bricks back into the sand bed, following your marked curve. Tap them into place so the top surfaces align neatly with the rest
of the walkway.
Step 7: Install the Border and Edge Restraints
The border is like the picture frame for your walkwayit holds everything together and makes the curve pop visually.
Border Options
- Bricks on edge: Turn bricks vertically or on edge to define the path and emphasize the curve.
- Contrasting color: Use a different brick color for the border to highlight the shape.
- Flexible edging: Plastic or metal edging anchored with spikes, often hidden under soil or mulch.
Whatever you choose, make sure the edging or border is snug against the bricks and anchored into the compacted base, not just sitting in loose soil.
Good edge restraint is crucial for keeping your curved walkway from spreading over time.
Step 8: Compact and Fill the Joints
With the bricks laid and the borders in, it’s time to lock everything togetherthis is what turns a loose pile of bricks into a solid walkway.
First Compaction
Use a plate compactor or hand tamper to compact the surface. If you’re worried about scuffing delicate bricks, lay a sheet of cardboard or a
compactor pad under the machine. This step seats the bricks firmly into the sand and evens out tiny height differences.
Fill the Joints
Spread dry joint sand or polymeric sand over the entire walkway. Use a broom to sweep the sand into all the gaps between bricks.
Work from several directions to make sure the joints fill completely.
Compact again, then sweep in more sand. Repeat until the joints are filled nearly to the top. If you’re using polymeric sand, follow the bag’s
instructions carefullyusually you mist the surface lightly with water to activate the binding agents.
Step 9: Final Touches and Maintenance Tips
Once the joints are filled, give the walkway a final sweep to clear off excess sand. If you want extra protection against stains and weeds, you can
seal the bricks with a paver sealer rated for exterior use.
Ongoing Care
- Top off joint sand every year or two if you see gaps forming.
- Brush away leaves and debris to avoid staining.
- Pull or spot-treat weeds early before roots get well established.
- Replace any damaged bricks promptly to keep the surface even.
With basic maintenance, your curved brick walkway should stay stable, attractive, and trip-free for many seasons.
Real-World Experiences: What DIYers Learn the Hard Way
Reading instructions is great. Hearing what actually happens when people start digging in their yards is even better. Here are some experience-based
lessons that tend to show up again and again when folks build a curved brick walkway for the first time.
1. The Curve Always Looks Different from the Street
Many DIYers sketch a beautiful flowing curve on paper, lay it out in the yard, and then realize that from the sidewalk or driveway, it looks a little… odd.
That’s normal. Your yard has slopes, plantings, and perspective lines that don’t show up in a flat drawing. The fix is simple: be ready to adjust.
After you lay out the curve with a hose, take a walkliterally. Stand at the front door, sidewalk, and driveway. Look across the yard from multiple angles.
If the path looks too “wiggly” or too straight, nudge the hose a few inches here and there. Small adjustments can make a big difference.
2. Underestimating the Base Work Is the #1 Regret
Almost everyone underestimates how much time the base takes. Digging, hauling gravel, compacting, and checking slope isn’t glamorous,
but that’s what determines whether your walkway still looks good five years from now. People who rush this step usually see bricks settle, tilt,
or develop low spots that collect water.
The most common “I wish I had…” comments are:
- “I wish I had dug just a little deeper and used more gravel.”
- “I should have rented the plate compactor instead of only using a hand tamper.”
- “I should have taken more time to get the slope right.”
If you’re going to overdo anything, overdo the base. You’ll never see it, but you’ll feel the difference every time you walk on the path.
3. Cutting Curves Takes Patience (and Safety Glasses)
Cutting bricks to follow a curve looks intimidating in photos, but in practice it’s more about patience than skill. DIYers often discover that the
first few cuts are rough, then suddenly they find a rhythmmark, cut, test fit, repeat. A rented masonry saw makes this much easier and cleaner,
especially on tighter curves.
The big lesson: don’t rush the cutting stage. Take your time fitting the border, keep the factory edges where they’ll be seen, and remember that
small imperfections usually disappear once sand fills the joints and plants or mulch surround the walkway.
4. Patterns Look Busier Outside Than They Do in the Store
Showroom displays of herringbone or basketweave patterns look fantastic, but outdoorswith plants, siding, and other textures aroundsome patterns
can feel “busy” along a curve. Many homeowners start with an ambitious pattern and realize a simple running bond would have been easier to cut and
easier on the eyes.
That doesn’t mean you can’t get creative. A good compromise is a simple field pattern with a contrasting color or orientation for the border.
That keeps the focus on the curve while still giving you a custom look.
5. Joint Sand and Edging Save You from Future Headaches
It’s tempting to treat joint sand and edging as “optional upgrades,” but people who skip them tend to regret it. Without edge restraints,
bricks slowly walk outward over time, especially along curves where the forces naturally push outward. Without well-filled joints, sand washes out,
weeds move in, and bricks loosen.
Experienced DIYers almost universally say that spending a bit more time and money on solid edging and polymeric sand up front saves them from
relaying bricks or constantly fighting weeds later.
6. The Walkway Changes How You Use the Yard
One pleasant surprise many homeowners share is how a curved brick walkway subtly changes the way they use their yard. Guests stop to admire it,
kids follow it like a trail, and you might find yourself adding solar lights, low plantings, or a bench along the route just because the path
feels inviting.
In other words, you’re not just building a path. You’re quietly redesigning how people move and linger in your outdoor space. Once that curved brick
walkway is in place, it’s hard to imagine the yard without it.
Put in the planning, take your time with the base, be patient with the cuts, and don’t be afraid to tweak the design as you go.
When you finally step back from your finished curved brick walkway, you’ll see more than a DIY projectyou’ll see a permanent upgrade
that makes your whole home feel more polished and welcoming.