Table of Contents >> Show >> Hide
- What Is a Bunny Topiary, Exactly?
- DIY Bunny Topiary Supplies
- Pick Your Bunny Style (3 Popular Approaches)
- Step-by-Step: How to Make a DIY Bunny Topiary
- Step 1: Create a Stable Base (No Wobbly Bunny Energy)
- Step 2: Build the Bunny Body and Head
- Step 3: Make Arms and Legs (Optional but Extra Cute)
- Step 4: Add Bunny Ears (The Whole Point)
- Step 5: (Optional) Paint the Foam a Neutral Color
- Step 6: Attach Moss Without Losing Your Mind
- Step 7: Sculpt the Shape (This Is Where It Starts Looking Expensive)
- Step 8: Add Face Details (Keep It Subtle)
- Step 9: Mount the Bunny in the Pot
- Step 10: Add Optional “Topiary” Details
- Pro Tips for a Cleaner Finish
- Styling Ideas: Where a Bunny Topiary Looks Best
- Easy Variations (So You Can Make More Than One)
- Care, Storage, and Reuse
- Troubleshooting: Fix the Most Common Bunny Problems
- Budget Breakdown (Example)
- Experience-Based Tips: The Stuff You Only Learn While Making One (About )
- Conclusion
If your spring decor vibe is “I want it cute, a little fancy, and I refuse to pay boutique prices,” welcome.
A bunny topiary is basically the Easter version of a tuxedo: it looks upscale, it photographs like a dream,
and it somehow makes your whole room feel like it has its life together.
The best part? You don’t need a greenhouse, a degree in shrub-sculpting, or a secret handshake with a florist.
This guide pulls together the most common, proven methods used across U.S. craft and home-decor tutorials:
a simple bunny form (foam/cardboard/wire), a stable base (pot + foam/gravel), and a “green coat” (moss, faux boxwood,
or a mix). You’ll end up with a long-lasting DIY bunny topiary that looks store-boughtwithout the store-bought price tag.
What Is a Bunny Topiary, Exactly?
Traditionally, “topiary” means shaping live plants into tidy balls, spirals, or animalsusually with a frame and a lot
of patience. For home decor, though, a bunny topiary is often a faux topiary: a bunny-shaped form covered
in preserved moss, faux greenery, or both, then placed in a pot like a little green statue that never needs watering.
You can go two ways:
- Faux bunny topiary (recommended for most DIYers): Lightweight, easy to store, and forgiving if you’re new to moss.
- Live bunny topiary: Beautiful but higher maintenance (light, watering, pruning). Great if you love real plants and commitment.
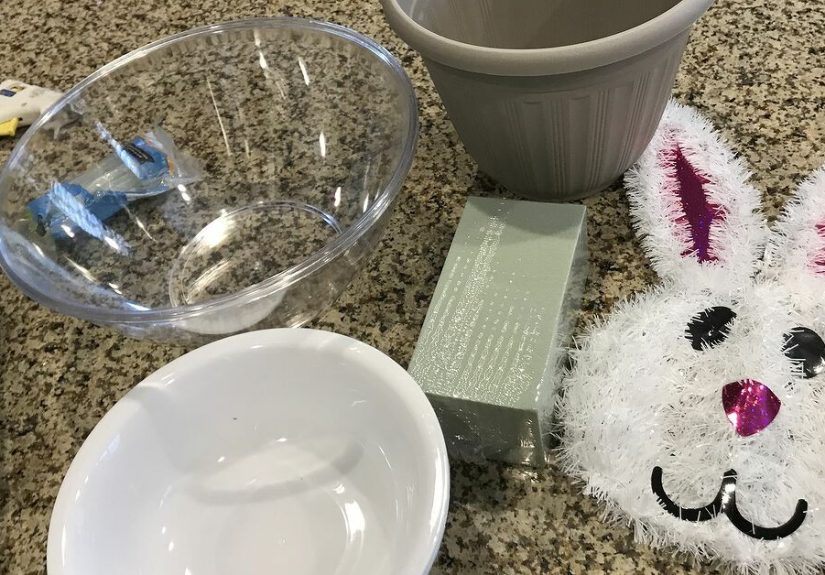
DIY Bunny Topiary Supplies
Think of this like building a tiny bunny “skeleton” and then giving it a moss “jacket.” Here’s what you’ll need.
Core Structure
- Foam shapes: 2 large foam eggs (or 1 large + 1 medium foam ball) for body and head
- Arms/legs options: cardboard tubes (toilet paper rolls), floral wire, pipe cleaners, or lightweight cardboard strips
- Ears: cardboard, craft foam, or a thin piece of styrofoam (reinforced)
- Skewers/dowels: bamboo skewers or a short wooden dowel to “pin” parts together
- Tape: masking tape or packing tape to smooth seams and reinforce pieces
Green “Coat” (Your Bunny’s Outfit)
- Sheet moss: great coverage, less crumbly, easy to wrap
- Reindeer moss / preserved moss: fluffy texture; amazing for sculpting and patching
- Spanish moss (optional): perfect for covering soil/foam in the pot
- Optional faux greenery: faux ivy vine, mini boxwood picks, or sprigs for extra detail
Adhesives & Tools
- Hot glue gun: low-temp is easier on fingers (high-temp is stronger but spicier)
- Craft glue: white glue or tacky glue helps moss grab before hot glue locks it in
- Scissors (plus wire cutters if using wire)
- Craft knife (optional for carving foam)
- Floral pins or push pins: optional, useful for holding moss while glue sets
- Gloves/finger protectors: hot glue has zero empathy
Base + Pot
- Small terracotta pot or decorative container
- Floral foam block (or a chunk of craft foam) to hold the bunny securely
- Gravel/rocks for weight and stability
Pick Your Bunny Style (3 Popular Approaches)
Before you glue a single moss crumb, decide which look fits your space, time, and patience level.
- Classic tabletop moss bunny: foam eggs/balls + arms/legs + moss. Great for mantels and centerpieces.
- Giant “statement” bunny: larger bowls/foam forms stacked and covered in moss. Big impact, more glue.
- Grapevine bunny: wreath forms wired together for a rustic, twiggy look. Awesome on porches or in planters.
This tutorial focuses on the most versatile option: the classic tabletop DIY bunny topiary.
You can scale it up or down once you’ve made one.
Step-by-Step: How to Make a DIY Bunny Topiary
Step 1: Create a Stable Base (No Wobbly Bunny Energy)
Put floral foam into your pot so it sits snugly. Add gravel or rocks around it for weight.
If your container is tall, fill the bottom with rocks first, then set foam on top.
The goal: when you poke the bunny into the foam, it stays upright like it pays rent.
Step 2: Build the Bunny Body and Head
Use a large foam egg for the body and a slightly smaller foam egg or ball for the head.
Align them so the bunny looks balanced (head slightly forward reads “adorable,” too far forward reads “about to faceplant”).
Insert two bamboo skewers (or one thicker skewer/dowel) from head into body, then hot glue at the connection point.
Wrap tape around the seam to smooth it and reinforce the join.
Step 3: Make Arms and Legs (Optional but Extra Cute)
You can keep your bunny “minimalist” (no limbs) or add arms and legs for that Williams-Sonoma-style personality.
- Easy method: cut toilet paper rolls into tubes for arms/legs, bend slightly, tape into shape.
- Flexible method: floral wire or pipe cleaners wrapped in tape to bulk them up.
Attach limbs with hot glue and reinforce with tape. Don’t worry if it looks a little weird at this stage.
Many crafts have a “why did I do this” phase. This is normal.
Step 4: Add Bunny Ears (The Whole Point)
Cut two ear shapes from cardboard or craft foam. Make them slightly thicker than you think you needfloppy ears are cute on real rabbits,
less cute on a topiary that’s supposed to look polished.
Reinforce ears by doubling the material or adding a strip of cardboard down the center. Insert a skewer into each ear base,
then push into the head. Secure with hot glue. Tape around the base to blend the join.
Step 5: (Optional) Paint the Foam a Neutral Color
This step is surprisingly helpful. A quick coat of tan, brown, or green paint reduces “white foam peeking” if your moss has thin spots.
Let it dry fully before moving on. If you skip paint, you’ll just be more careful with coverage later.
Step 6: Attach Moss Without Losing Your Mind
The best strategy is a two-adhesive approach: brush on craft glue for tack, then use hot glue in short sections to lock it down.
Work in small patches so hot glue doesn’t set before moss touches it.
- Brush craft glue onto a small area (like a 3–4 inch patch).
- Add hot glue in dots or short lines over that patch.
- Press sheet moss on first for coverage; use reindeer moss to fill gaps and sculpt curves.
- Hold moss in place with a popsicle stick or gloved fingers to avoid burns.
Keep going until the entire bunny is covered. Trim excess moss with scissors to sharpen the silhouetteespecially around the ears and face.
Step 7: Sculpt the Shape (This Is Where It Starts Looking Expensive)
Step back every few minutes and look at the outline. If one ear is chunkier, trim it. If the head looks lumpy, add fluff moss in low spots.
Your goal is a clean bunny profile, not “mossy potato with ambition.”
Step 8: Add Face Details (Keep It Subtle)
For a classy look, use black push pins, small beads, or tiny buttons for eyes. A small pin or bead can be the nose.
Place features slightly higher than you thinktoo low makes the bunny look… concerned.
Step 9: Mount the Bunny in the Pot
Push a dowel or thick skewer up into the bunny’s underside, then insert it into the floral foam in the pot.
If it wobbles, remove it, add hot glue into the hole in the foam, and reinsert.
Cover visible foam in the pot with Spanish moss, sheet moss, or even small stones. This little detail instantly upgrades the final look.
Step 10: Add Optional “Topiary” Details
Want it to read more like a traditional topiary and less like a moss sculpture? Wrap faux ivy or greenery vine around the body and arms.
You can also tuck mini faux boxwood sprigs into the moss for extra dimension.
Pro Tips for a Cleaner Finish
- Use sheet moss for coverage, reindeer moss for shaping. Sheet moss is faster; reindeer moss is your patch kit.
- Glue in small sections. Hot glue sets fast. Small sections = less stress and fewer strings everywhere.
- Protect your hands. Hot glue can seep through moss. A popsicle stick is the unsung hero of moss crafts.
- Weight matters. A heavier pot (or rocks inside) prevents topple disasters on busy tables.
- Trim like a barber, not a lumberjack. Short snips keep the bunny crisp.
Styling Ideas: Where a Bunny Topiary Looks Best
Your DIY bunny topiary can be a centerpiece, a mantel focal point, or an entryway “hello spring” moment.
Try pairing it with:
- neutral eggs (speckled, wooden, or faux)
- a simple ribbon bow around the neck
- a small moss wreath lying flat under the pot
- candlesticks and a low greenery garland for a layered spring mantel
Easy Variations (So You Can Make More Than One)
1) The “Dollar Store” Bunny Topiary
Swap foam eggs for stackable bowls or plastic forms, then cover with craft moss. This creates a bigger bunny quickly and often costs less.
If you go large, plan for extra glue and a longer “moss application” session.
2) The Grapevine Bunny
Use grapevine wreaths for head and body, wire them together, then add ears and greenery. This version looks rustic and works well outdoors on a covered porch.
3) The “Real Plant” Inspired Look
Add a few faux boxwood picks and ivy to mimic the layered texture of live topiary frames. You still get the botanical vibe without the watering schedule.
Care, Storage, and Reuse
- Keep dry: preserved moss doesn’t love moisture. Avoid humid windowsills and misting.
- Dust gently: use a soft paintbrush or a cool hairdryer setting from a distance.
- Store smart: place in a box tall enough for the ears, or cover ears with tissue to prevent bending.
- Reuse it yearly: swap ribbon colors and add seasonal accessories (tiny carrots, mini eggs, spring florals).
Troubleshooting: Fix the Most Common Bunny Problems
“My moss won’t stick.”
Use craft glue as a base layer, then hot glue to anchor. Also check your moss: very dry, crumbly moss may need more “press time” to grip.
“I can see foam through the moss.”
Patch with reindeer moss (it’s fluffier) and trim after it sets. Painting the foam beforehand also helps.
“My bunny is wobbly in the pot.”
Add more weight (rocks), and make sure the dowel goes deep into the foam. Hot glue into the foam hole can lock it in place.
“The ears look uneven.”
Trim and resculpt. If one ear is floppy, reinforce from the back with a hidden strip of cardboard and re-moss over it.
Budget Breakdown (Example)
A small DIY bunny topiary can be surprisingly budget-friendly, especially if you use dollar store supplies and coupons for moss.
Typical costs might look like this:
- Foam eggs/balls: low-cost craft aisle
- Moss: the main expense (sheet moss stretches farther than you think)
- Pot + floral foam: inexpensive, and you may already have a spare container
- Extras (pins, ribbon, faux ivy): optional upgrades
Experience-Based Tips: The Stuff You Only Learn While Making One (About )
If you’ve never made a moss-covered topiary before, here’s the most honest spoiler: the bunny won’t look cute right away.
The early stages are pure “craft goblin” energyfoam shapes, tape everywhere, and a form that resembles a science fair project more than spring decor.
This is normal. The magic happens during the moss phase, and especially during the trimming-and-sculpting phase.
One of the biggest “aha” moments people have is realizing that moss behaves differently depending on type.
Sheet moss is your fast friend: it covers large areas quickly and helps you get to that “okay, it’s becoming a bunny” stage sooner.
Reindeer moss is the detail tool: it fills seams, softens transitions, and makes your bunny look plush instead of patchy.
If you try to do the entire bunny with only reindeer moss, you’ll spend more time chasing crumbs and less time enjoying the process.
If you try to do it with only sheet moss, you may end up with visible seams or flatter texturestill cute, just less “high-end.”
Mixing both gives you the best of each.
Another common experience: hot glue is faster, but craft glue is calmer.
Hot glue locks moss down immediately, which feels great… until you realize you just glued a big wrinkle into the bunny’s cheek.
Craft glue (white or tacky) gives you a little wiggle room, which is helpful on curves like the head and shoulders.
A lot of crafters end up loving a hybrid method: brush craft glue on a small patch, then add hot glue in short lines or dots.
That combo helps moss grip and reduces the “hot glue string” situation that turns your workspace into a spiderweb exhibit.
Time-wise, this project often takes longer than expectedmostly because of moss coverage.
Even small bunnies can take an hour or two if you’re being careful (and you should be).
If you’re making multiple bunnies, it gets easier because you build a rhythm: glue, press, trim, rotate.
Pro tip from the “I learned the hard way” category: rotate your bunny constantly.
If you only work from the front, you’ll later discover a bald spot on the back that’s about to be featured in every mirror reflection in your house.
The final “experience” lesson is about silhouette: the ears and face do most of the storytelling.
When your bunny looks “off,” it’s usually because the ears are slightly uneven, too thick, or placed too far apart.
A few careful snips can dramatically improve the look. For the face, less is more. Tiny eyes and a subtle nose look chic.
Big button eyes can push the bunny toward “cartoon,” which might be exactly what you wantjust decide on purpose.
And yes, you will probably get at least one small hot glue burn unless you use a tool or finger protectors.
Consider it a craft rite of passage… but also, please don’t. Use the popsicle stick. Your fingertips deserve better.
Conclusion
A DIY bunny topiary is the kind of project that punches above its weight: it’s simple materials, simple steps,
and a finish that looks impressively “designer.” Once you’ve made one bunny, you’ll start eyeing everything
as a potential topiary form (and honestly? that’s the correct mindset). Make one for your mantel, another for
the table, and suddenly your home is spring-readywith zero pressure to keep anything alive.