Table of Contents >> Show >> Hide
- Why Dried Orange Garlands Are So Popular
- Supplies You’ll Need
- Step 1: Slice and Prep the Oranges
- Step 2: Dry the Orange Slices
- Step 3: Turn Dried Oranges into a Garland
- Where to Hang Your Dried Orange Garland
- How Long Will a Dried Orange Garland Last?
- Common Problems and How to Fix Them
- Experiences, Tips, and Creative Ideas for Your Dried Orange Garland
If you’ve ever scrolled past a cozy holiday photo and thought, “Why does their house look like a Christmas movie and mine looks like a storage unit?”, I have one word for you: oranges. A dried orange garland is simple, inexpensive, and smells faintly like you have your life together. It brings that warm, old-fashioned charm you see in cottagecore photos, but it’s totally doable in a regular kitchen with a regular oven.
In this guide, you’ll learn exactly how to dry orange slices, string them into a sturdy garland, and keep them looking bright instead of burnt. We’ll cover oven and dehydrator methods, thickness, temperature, timing, storage, and fun ways to style your dried orange garland on mantels, trees, and wreaths. By the end, you’ll be ready to turn a bag of oranges into the prettiest holiday decor you own.
Why Dried Orange Garlands Are So Popular
Dried orange garlands are the perfect mix of nostalgic and trendy. They look like something your great-grandmother might have hung by a wood stove, but they also fit right in with modern rustic, Scandinavian, minimalist, or farmhouse decor. Bloggers, stylists, and home decor sites love them because they’re:
- Affordable: A few oranges, some twine, and a baking sheet get you several feet of garland for a fraction of store-bought decor.
- Eco-friendly: You’re using real fruit and natural fibers, which makes this a low-waste, reusable decoration.
- Customizable: Add cinnamon sticks, star anise, bay leaves, pinecones, or wooden beads for different looks.
- Reusable: If you dry the slices thoroughly and store them well, they can last for multiple seasons.
Most importantly, they’re beginner-friendly. If you can slice an orange and set a timer, you can absolutely make a dried orange slice garland.
Supplies You’ll Need
Before you start, gather everything in one spot. A little prep makes the whole DIY feel more like a fun craft and less like kitchen chaos.
Basic Supplies
- 4–8 fresh oranges (navel or similar; you can mix in blood oranges for deeper color)
- Sharp serrated knife or mandoline
- Cutting board
- Paper towels or a clean tea towel
- Baking sheets
- Parchment paper or a wire rack that fits on the baking sheet
- Oven (or food dehydrator, if you have one)
- Cooling rack (optional but helpful)
For the Garland
- Twine, jute, cotton string, or thin ribbon
- Large needle, wooden skewer, toothpick, or paper clip (for poking holes)
- Scissors
- Optional: mini bells, wooden beads, cinnamon sticks, greenery, or dried herbs for embellishment
Step 1: Slice and Prep the Oranges
The thickness of your slices is one of the biggest factors in how evenly they dry. Too thick and they’ll stay sticky; too thin and they can curl or brown quickly.
- Aim for 1/8 to 1/4 inch thick slices. This range is recommended by many DIY tutorials and gives a good balance of color, strength, and drying time.
How to slice:
- Wash and dry the oranges.
- Slice crosswise (through the “equator” of the fruit) so you see the star-shaped segments.
- Discard the very end pieces or set them aside for potpourri.
After slicing, gently blot excess juice from both sides of each slice with paper towels or a tea towel. Many crafters recommend this step because it speeds up drying and helps prevent overly dark spots in the center.
Step 2: Dry the Orange Slices
You can make a dried orange garland with an oven, a dehydrator, or sometimes even an air fryer. The key is low heat and patiencethis is more “slow Sunday project” than “speed run.”
Oven Method (Most Common)
- Preheat the oven to between 170°F and 225°F. A lot of U.S. sources recommend staying around 170–200°F for the most vibrant color, with some going up to 225°F if you watch closely.
- Line your baking sheets with parchment paper or place a wire rack on top of the sheet to help air circulate around the slices.
- Arrange the orange slices in a single layer. They can touch slightly, but don’t overlap or they won’t dry evenly.
- Bake low and slow. Total time is usually 3–5 hours, depending on your oven, slice thickness, and temperature. At 170–200°F, many tutorials report around 3–4 hours; slightly higher temps can shorten the time but increase browning risk.
- Flip the slices periodically. Turn each slice every 30–60 minutes to promote even drying and prevent sticking.
- Rotate pans if needed. If your oven has hot spots, swap the top and bottom trays halfway through.
If the slices are browning quickly, reduce the temperature. Some makers start as low as 170°F, especially if their oven runs hot.
Dehydrator Method
If you have a food dehydrator, you’ll get very even results and often brighter, more natural color:
- Set the dehydrator to about 130–135°F (often labeled as a fruit or medium setting).
- Arrange slices in a single layer on the trays.
- Dehydrate for roughly 8–12 hours, checking occasionally after the first few hours.
- Some makers reduce the temp slightly toward the end to finish any slightly damp slices without browning.
How to Tell When Your Oranges Are Done
Fully dried slices are the secret to a garland that lasts:
- The slices should feel dry and leathery, not wet or sticky.
- The centers may still be a bit translucent but should not feel squishy.
- If moisture remains, they’re more likely to mold in storage or sag on your garland.
When you think they’re done, let them cool on a wire rack. Cooling helps the remaining moisture evaporate and gives you a clearer sense of their final texture.
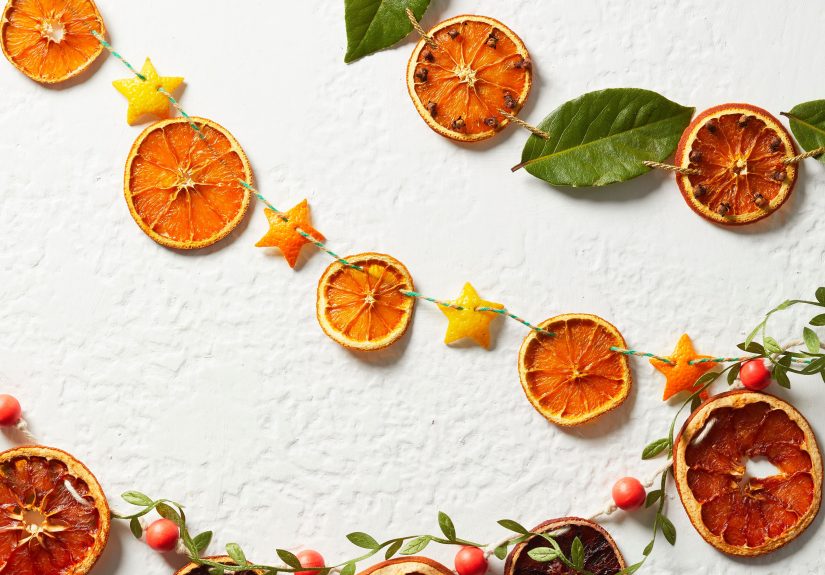
Step 3: Turn Dried Oranges into a Garland
Once your kitchen smells like citrus and your slices are dry, it’s time to string your dried orange garland.
Plan Your Length and Spacing
Before you start poking holes, decide where the garland is going:
- Measure your mantel, window, banister, or tree section.
- Add extra length for draping and tyingusually an additional 12–24 inches works well.
- Decide how close together you want the slices. Many people like 1–2 inches between each slice for a full look; more space creates a lighter, minimalist feel.
Punch Holes in the Slices
There are two popular methods for adding holes to your dried orange slices:
- Single-hole method: Use a skewer, needle, or unfolded paper clip to make one hole near the top of each slice. Thread the twine through the same direction for each slice. This lets the slices hang more like ornaments.
- Double-hole method: Punch two small holes near the top, about 1/4 inch apart. Thread the twine in one hole and out the other so the slice sits flat and faces front. This is great for mantel and doorway garlands because the oranges don’t spin as much.
String the Garland
- Cut your twine to the desired length, leaving extra for hanging.
- Wrap tape around the end of the twine or use a large needle to make threading easier.
- Thread each slice onto the twine using your chosen hole pattern.
- Slide slices along the twine to adjust spacing as you go.
- Optional: Tie small knots on either side of each slice to keep them locked in place or to separate clusters of oranges and embellishments.
Embellish (If You Want to Get Fancy)
Dried orange garlands are beautiful on their own, but you can add:
- Cinnamon sticks: Tie short sticks in between slices for a cozy holiday feel.
- Star anise or bay leaves: Add a botanical, old-world style.
- Mini bells: String tiny brass bells between oranges for a soft jingle.
- Greenery: Layer the garland over faux or real pine, eucalyptus, or cedar branches.
- Wooden beads: Alternate beads and slices for a more structured, Scandinavian look.
Where to Hang Your Dried Orange Garland
Once your garland is finished, you can hang it almost anywhere indoors that’s cool and dry:
- On a mantel: Drape it over greenery, candles, or stocking hooks.
- Around a doorway: Frame an entryway for a festive “citrus arch.”
- On a Christmas tree: Wrap it around the tree like ribbon, or hang shorter strands vertically.
- On a stair rail: Layer it over a garland of pine or eucalyptus.
- In the kitchen: String a short garland on a shelf or across a window for a farmhouse touch.
Keep the garland away from open flames and high heat sources, just as you would with any other dry plant-based decor.
How Long Will a Dried Orange Garland Last?
If your orange slices are completely dried, they can last several months, and many people reuse their dried orange garland for more than one season. The keys are:
- Thorough drying: Any remaining moisture increases the risk of mold.
- Cool, dry storage: At the end of the season, store the garland in a breathable container (like a paper box) in a dry, low-humidity area.
- Away from pests: While dried oranges aren’t very tempting compared to actual food, you still want to avoid damp basements or garages where critters might explore.
Over time, the color may fade slightly, moving from vibrant orange to a softer, antique tone. Many people actually love this aged lookit adds to the vintage charm.
Common Problems and How to Fix Them
My Slices Are Burning
If your slices are getting too dark or browned at the edges:
- Lower the oven temperature to 170–190°F.
- Move the tray to a higher rack.
- Check and flip more often (every 20–30 minutes).
My Slices Are Still Sticky After Hours
If the centers feel tacky even after several hours:
- Make sure your slices are no thicker than 1/4 inch.
- Blot them more thoroughly before baking.
- Leave them in the oven with the heat off and the door slightly open for an extra hour to gently finish drying.
The Garland Is Sagging or Tearing
When slices tear or droop:
- Use the double-hole threading method so each slice sits more securely.
- Space slices a bit farther apart on the twine.
- Check that the slices are fully dry; damp slices are heavier and more fragile.
Experiences, Tips, and Creative Ideas for Your Dried Orange Garland
Part of the fun of making a dried orange garland is that everyone ends up with a slightly different result, even if they follow similar steps. Over time, some patterns and “unofficial rules” have emerged from crafters and home decorators who make citrus garlands every year.
One common discovery is that mixing citrus types transforms a simple garland into a showpiece. Combining regular oranges with blood oranges, lemons, and even small grapefruits gives you a gradient of color from deep reddish orange to pale yellow. Strung together, they look like tiny stained-glass windows when the light hits them. Many people use this mixed-citrus approach for garlands that hang in front of windows, where the sun can shine through and highlight the slices.
Another shared experience: the first batch is almost always a test run. New makers often slice a little too thick, forget to flip slices regularly, or underestimate how long it takes for the moisture to evaporate. The result might be edges that are too dark or centers that stay sticky. Instead of treating that first tray as a failure, think of it as your practice round. You can still use the best slices on a smaller garland or as individual ornaments, and then adjust thickness or temperature on the next batch.
People who make dried orange slice garlands year after year also talk about how this project becomes a seasonal ritual. It’s easy to turn it into a family or friends’ activity: one person slices, another blots, someone else arranges slices on trays, and everyone takes turns checking the oven. While the oranges dry, you can put on holiday music, a favorite movie, or just let the house fill with that gentle citrus scent. By the time the garland is ready to string, it feels less like a craft project and more like a tradition.
There are also some clever styling tricks people pick up over time. For example, shorter garlandsthree to four feet longare easier to handle and very versatile. You can drape smaller strands over picture frames, layer them on open shelving, or wrap them around a simple wreath. Longer garlands are fantastic for mantels and stair rails, but breaking a long garland into a few smaller pieces gives you more freedom to move decor around each year.
Experienced makers also experiment with layering textures. A dried orange garland looks beautiful by itself, but when you layer it over pine garland, tuck in a few sprigs of eucalyptus, or add tiny white lights, the whole display feels richer and more intentional. Some people like to alternate oranges with natural elements like cinnamon sticks, bay leaves, or pinecones for a more dimensional, woodland look. Others keep the garland clean and simple, letting the bright circles of citrus be the star.
One more lesson that comes up often: storage matters. People who’ve had their garlands last two, three, or even four seasons are almost always the ones who dry the slices thoroughly and store them carefully. They pack the garland in tissue or paper, keep it in a dry closet, and avoid plastic bags that can trap any lingering moisture. When they unpack it the following year, the garland might be a touch more muted in color, but it still looks charming and usable.
Ultimately, making a dried orange garland is about more than just stringing fruit on twine. It’s a slow, hands-on activity that adds warmth and personality to your home. Whether you’re decorating for Christmas, autumn, or just because you’re in the mood for cozy, this simple DIY project can become one of those small, satisfying traditions you look forward to every year.