Table of Contents >> Show >> Hide
- What “paper” method works best?
- What you’ll need
- 10 Steps: Make a Temporary Tattoo with Paper (Water-Transfer Method)
- Step 1: Pick a design that will actually transfer well
- Step 2: Mirror the image (most people forget this)
- Step 3: Size it for the body part
- Step 4: Print on the correct side of the tattoo paper
- Step 5: Let it dry like you mean it
- Step 6: Apply the adhesive/film layer smoothly
- Step 7: Cut out your tattoo (leave a tiny margin)
- Step 8: Prep your skin for maximum stick
- Step 9: Place tattoo face-down and press with a thoroughly damp cloth
- Step 10: Peel the backing, let it set, then don’t mess with it
- Troubleshooting: common problems (and quick fixes)
- Safety notes (because your skin is not printer paper)
- How to remove a temporary tattoo (fast and gentle)
- Optional: The plain paper “perfume/deodorant hack” (use with caution)
- Wrap-up
- Experiences & Lessons Learned (Real-Life Tips)
Want the vibe of a tattoo without the lifelong “commitment issues” talk? A paper-based temporary tattoo is the
sweet spot: fun, customizable, and removable when your aunt asks if it’s “forever.” This guide walks you through
the most reliable at-home approachprintable temporary tattoo paper (water-transfer style), plus
a quick optional “plain paper hack” for emergencies (a.k.a. you’re already dressed for the party).
Important: Skin can be dramatic. If you have sensitive skin, allergies, eczema, or you’re making
these for kids, do a small patch test first and skip anything that stings, burns, or makes your skin angry.
What “paper” method works best?
There are two common DIY routes:
-
Best results (recommended): Printable temporary tattoo paper + water transfer. This is
closest to store-bought decals, with clearer lines and better staying power. -
Viral hack (less predictable): Regular paper + fragrance/deodorant/hairspray transfer tricks.
It can work, but results vary, and fragrance products can irritate skin.
The 10 steps below use the recommended water-transfer method because it’s more consistent, more
beginner-friendly, and less likely to turn your forearm into a smudgy regret.
What you’ll need
- Printable temporary tattoo paper (water-transfer sheets)
- Inkjet printer (most consumer tattoo papers are designed for inkjet printing)
- Scissors or a craft knife
- Clean, dry cloth or paper towel
- Water
- Rubbing alcohol (optional, for skin prep)
- Baby oil/coconut oil/olive oil (for removal)
10 Steps: Make a Temporary Tattoo with Paper (Water-Transfer Method)
-
Step 1: Pick a design that will actually transfer well
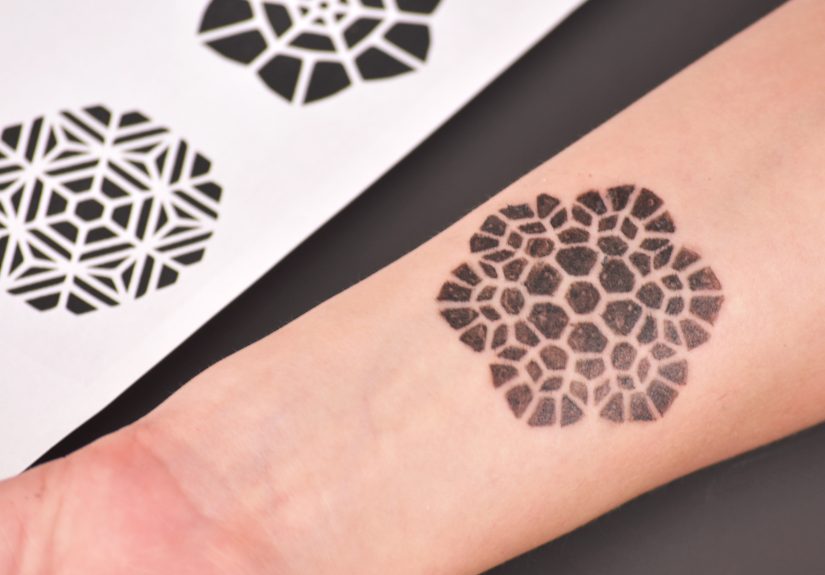
Bold lines and high-contrast shapes transfer the cleanest. Tiny fine-line script looks cute on your screen…
and then turns into a mysterious ink noodle on your wrist. If you’re new, choose a design with thicker outlines
and simple shading.Pro tip: If your design includes text, you’ll want to mirror it before printing (next step),
so it reads correctly once transferred. -
Step 2: Mirror the image (most people forget this)
For tattoos that face the “right way” on your skinespecially letteringflip the design horizontally in your
editing/printing settings. If you skip this, your tattoo will read like it was applied in a mirror… because it
was.If you’re placing the tattoo on an arm and want it readable to others, mirror it and position it so it faces outward.
-
Step 3: Size it for the body part
Measure the area (a quick ruler check beats guessing). As a rule of thumb:
- Wrist/ankle: 1–2 inches wide
- Forearm: 2–4 inches wide
- Shoulder/calf: 3–5 inches wide
If your design has lots of detail, size up. Tiny details are like whispers at a concert: they get lost.
-
Step 4: Print on the correct side of the tattoo paper
Follow your tattoo paper’s directions for which side to print on and what printer settings to use.
In general, select a high-quality print setting and let the ink dry completely.Reality check: If the ink is even slightly damp, it can smear when you apply the adhesive layer,
and then you’ll be wearing “abstract art” instead of your intended design. -
Step 5: Let it dry like you mean it
Give the print at least several minutes to drylonger if your printer lays down heavy ink. If you can, wait
10–15 minutes. This is the difference between crisp lines and a tattoo that looks like it got caught in the rain. -
Step 6: Apply the adhesive/film layer smoothly
Most printable tattoo paper kits include a clear adhesive sheet. Peel and place it carefully over the printed design,
smoothing from the center outward to avoid bubbles and wrinkles.Use a card (like a gift card) to burnish it gently. Wrinkles in the film = wrinkles in the tattoo.
-
Step 7: Cut out your tattoo (leave a tiny margin)
Cut as close as you reasonably can without slicing into the artwork. A thin border helps prevent lifting at the edges,
especially on curved areas like wrists and ankles.If you’re making multiple tattoos, label the backs lightly in pencil so you don’t mix them up mid-application.
-
Step 8: Prep your skin for maximum stick
Clean, dry, intact skin is the goal. Wash with mild soap and water, dry completely, and avoid applying lotion right before.
Oil and moisturizer can block adhesion.If you’re applying on a hairy area, consider trimming (not shaving right beforefreshly shaved skin can be more sensitive).
Sweat is also the enemy, so apply before workouts or outdoor heat. -
Step 9: Place tattoo face-down and press with a thoroughly damp cloth
Remove the protective top film if your paper requires it, then place the tattoo face-down on the skin.
Press a thoroughly damp cloth or paper towel over it so the backing is evenly wet.Hold steady pressure for about 25–35 seconds. No sliding. No peeking. This is not a soufflé, but it still hates disruption.
-
Step 10: Peel the backing, let it set, then don’t mess with it
Peel the paper backing away slowly. If part of the tattoo lifts, lay it back down and press with the damp cloth for another 10–15 seconds.
Once it’s transferred, let it air-dry for a minute.For best longevity, avoid rubbing, tight clothing friction, and long hot showers for the first hour.
Troubleshooting: common problems (and quick fixes)
Problem: It looks faded or patchy
- Cause: Not enough moisture or pressure.
- Fix: Use a wetter cloth and press evenly. Try 5–10 seconds longer next time.
Problem: The edges lift quickly
- Cause: Oils/lotion on skin, lots of movement, or no margin around the design.
- Fix: Clean skin again, leave a thin border, and avoid wrists/knuckles for super delicate designs.
Problem: It cracks after a day
- Cause: Placement on high-movement areas (hands, elbows) or lots of friction.
- Fix: Move the tattoo to a flatter area (forearm, upper arm, shoulder) and pat dry after showers.
Problem: It smears before you even apply it
- Cause: Ink wasn’t dry before applying the adhesive film.
- Fix: Print again and give it more drying time. (Yes, it hurts. But less than wearing a smudge dragon.)
Safety notes (because your skin is not printer paper)
-
Avoid “black henna” products: Some so-called black henna can contain hair-dye chemicals that may cause severe reactions.
If something smells strongly chemical and stains very dark very fast, skip it. - Patch test: Try a small tattoo on the inner arm and wait 24 hours if you’re sensitive or allergy-prone.
- Don’t apply on broken/irritated skin: Cuts, rashes, sunburn, and freshly shaved skin can increase irritation.
- Stop if it burns: Remove with soap and water (or oil), then monitor. Seek medical advice if symptoms persist or worsen.
How to remove a temporary tattoo (fast and gentle)
Most water-transfer tattoos fade with washing, but if you want it gone now:
- Soak a cotton pad with baby oil, coconut oil, or olive oil.
- Press on the tattoo for 20–30 seconds.
- Rub gently in circles until it lifts.
- Wash with mild soap and water, then moisturize.
Avoid harsh scrubbingyour tattoo might be temporary, but your skin deserves a long-term relationship.
Optional: The plain paper “perfume/deodorant hack” (use with caution)
If you don’t have tattoo paper, you may see tutorials that use regular paper plus fragrance/deodorant/hairspray to transfer ink.
This can work for quick fun, but it’s less consistent and fragrance products can trigger irritationespecially for sensitive skin.
If you try it, do a patch test and avoid heavy fragrance.
Quick overview
- Print a mirrored design on regular paper (high contrast works best).
- Clean and dry skin; apply a light layer of stick product (some use deodorant) and let it get tacky.
- Press paper ink-side down; apply fragrance lightly to the back of the paper, hold steady, then peel carefully.
- Seal lightly with a skin-safe setting spray if you have one (avoid heavy hairspray on sensitive skin).
For clearer results and fewer variables, the water-transfer tattoo paper method is the move.
Wrap-up
Making a temporary tattoo with paper is basically arts-and-crafts meets “try it before you ink it.”
With printable tattoo paper, clean skin prep, and steady pressure, you can get a crisp, realistic result in minutes
then remove it the second you get bored. That’s the kind of commitment we can all get behind.
Experiences & Lessons Learned (Real-Life Tips)
If you’ve ever watched someone apply a temporary tattoo and thought, “That looks easy,” you’re right… right up until
the moment someone gets impatient and peeks too soon. One of the most common experiences people report is the
“early peel tragedy”: you lift the backing after 10 seconds, see a half-transferred design, and try to
shove it back into place like nothing happened. (Spoiler: it happened.) The fix is boring but effectivecommit to the full
press time, keep pressure steady, and don’t slide the cloth around like you’re buffing a car.
Another frequent lesson: placement matters more than you think. A tattoo that looks flawless on your upper arm
can look cracked on your wrist by lunchtime, simply because wrists bend, rub against sleeves, and get washed constantly.
People who want the tattoo to last through a full day event (weddings, concerts, game day) tend to have better luck placing
it on flatter, lower-friction areas like the outer forearm, shoulder, upper back, or calf. Meanwhile, hands and fingers are
the “hard mode” of temporary tattoosfun, but high maintenance.
Design choice is the sneaky third factor. First-timers often go for delicate script or tiny symbols because they’re
trendybut thin lines don’t always transfer sharply, especially if your printer or paper lays down ink softly.
People consistently get the best “wow, that looks real” reactions from designs with bold outlines, clean shapes,
and intentional contrast. A black-and-gray botanical piece with solid linework usually performs better than micro-lettering.
And yes, mirroring text is the rite of passage: nearly everyone forgets once, then lives with a backwards “BRAVE” for an afternoon.
Skin prep stories are surprisingly universal: someone applies lotion out of habit, then wonders why the tattoo lifts at the edges.
Oil and moisturizer can act like a barrier. The people who get the longest wear time usually apply tattoos to clean, completely dry
skin and wait a little after showering so there’s no lingering moisture. If the event includes heat or dancing, applying the tattoo
before you start sweating can be the difference between “nice ink” and “melted sticker.”
Finally, there’s the “removal panic” experience: you love the tattoo at noon, but by dinner you’re over it and want it gone immediately.
The gentlest removals come from oil + patiencepress oil on the tattoo, let it soften, then rub gently. People who scrub
aggressively often end up with red skin that lasts longer than the tattoo itself, which is the opposite of what we’re going for.
Bottom line: treat the process like a mini craft project, not a speedrun, and your temporary tattoo will look convincingly real
long enough to enjoy it, short enough to ghost it without consequences.