Table of Contents >> Show >> Hide
- Why This Origami House Model Works for Beginners
- Materials and Setup
- Know These Folding Basics Before Step 1
- How to Make an Origami House: 8 Steps
- Step 1: Start with a Square in Diamond Position
- Step 2: Fold in Half Horizontally and Unfold
- Step 3: Bring Left and Right Corners to the Center Line
- Step 4: Create the Roof Reference Fold
- Step 5: Form the Roof by Folding Top Flaps Outward
- Step 6: Build the Base so the House Can Stand
- Step 7: Lock the Shape with Light Reinforcement Folds
- Step 8: Decorate and Duplicate
- Common Mistakes and Quick Fixes
- Creative Variations for Your Origami Village
- Where This Project Works Best
- Conclusion
- Extended Experience Notes: Real-World Lessons from Origami House Sessions (500+ Words)
If you’ve ever wanted a tiny paper home that looks adorable on a desk, bookshelf, or holiday display,
you’re in the right place. This guide walks you through how to make an origami house in 8 steps
using beginner-friendly folds, clear instructions, and practical tricks that keep your roof crisp and your walls
standing tall. No complicated engineering degree requiredjust paper, a flat surface, and the willingness to
refold something once or twice when your “square” mysteriously turns into a rhombus.
This tutorial is designed for real life: kids, adults, classrooms, weekend crafters, and anyone who enjoys
satisfying “ta-da!” moments. You’ll learn the exact fold sequence, how to fix common mistakes, and how to build
an entire mini neighborhood once you finish your first house. Along the way, we’ll naturally weave in useful
origami folding techniques, beginner tips, and creative variations so your model looks intentionalnot
like a paper taco wearing a roof.
By the end, you’ll have one sturdy little house and enough confidence to make a whole village in different colors,
sizes, and styles. Let’s fold.
Why This Origami House Model Works for Beginners
A good beginner model has three qualities: simple geometry, visible progress, and quick wins. This
paper house craft checks all three. You start with a square, use repeated folds that build muscle
memory, and quickly see the roof and walls emerge. That visual progress keeps motivation highespecially for kids
who want to see results fast.
Unlike hyper-detailed animal models with tiny reverse folds, this house gives you margin for error. If one crease
is a little off, you can still finish a model that looks charming. Better yet, once it stands up properly, it’s
easy to decorate with windows, doors, chimneys, and even a suspiciously optimistic little mailbox.
It’s also practical for group settings. In classrooms, after-school clubs, birthday tables, and family craft
nights, the model scales beautifully: one person folds one house, then everyone combines models into one display.
Instant collaboration, instant joy, zero glitter cleanup crisis.
Materials and Setup
What You Need
- 1 square sheet of paper (15 x 15 cm / 6 x 6 in is ideal for beginners)
- A flat, hard folding surface (table or desk)
- Your fingers (yes, still the premium folding tool)
- Optional: ruler, bone folder, marker pens, stickers
Paper Choice Tips
For your first few houses, use medium-thin origami paper that holds creases well but isn’t too slippery.
If you only have printer paper, cut it into a square and keep expectations cheerful. For display models,
patterned paper or double-sided paper gives roofs and walls more character.
Workspace Rules for Cleaner Folds
- Work on a dry, uncluttered surface.
- Line up corners before pressing a crease.
- Press from center outward to avoid ripples.
- Take 5 extra seconds per fold; save 15 minutes of “why is this leaning?” later.
Know These Folding Basics Before Step 1
Valley Fold
The paper folds toward you, creating a “V” shape in the crease line. This is the most common fold in beginner
models.
Mountain Fold
The opposite direction of a valley fold. The crease rises like a ridge. In diagrams, mountain and valley folds
are often shown with different line styles.
Pre-Creasing
Pre-creasing means making guideline folds first, then unfolding. It’s like lightly sketching before painting:
your later folds become cleaner, faster, and more accurate.
How to Make an Origami House: 8 Steps
Step 1: Start with a Square in Diamond Position
Place your square paper so one corner points up (diamond orientation). Smooth it flat. If one side is colored,
decide now whether that color will appear on the roof, walls, or both.
Beginner tip: If your paper has a printed side, start with the printed side down when you want
more color to show on the outside after folds.
Step 2: Fold in Half Horizontally and Unfold
Bring the top corner down to the bottom corner, align carefully, then crease. Unfold. You now have a central
horizontal guideline. This line helps set roof symmetry later.
Don’t “mash” the fold. A crisp crease is firm, not violent.
Step 3: Bring Left and Right Corners to the Center Line
Fold the left corner inward toward the center guideline. Repeat with the right corner so both sides mirror each
other. You should now have a shape resembling a kite or narrow house body.
Check that both edges meet cleanly. If one overlaps, reopen and correct nowthis is where wall alignment is set.
Step 4: Create the Roof Reference Fold
Take the top point and fold it downward about one-quarter to one-third of the model height, depending on how tall
you want your roof. Crease firmly, then unfold slightly if needed to inspect placement.
Think of this fold as your roofline blueprint. Too high = very tall roof, short walls. Too low = bungalow vibes.
Both can look great; pick intentionally.
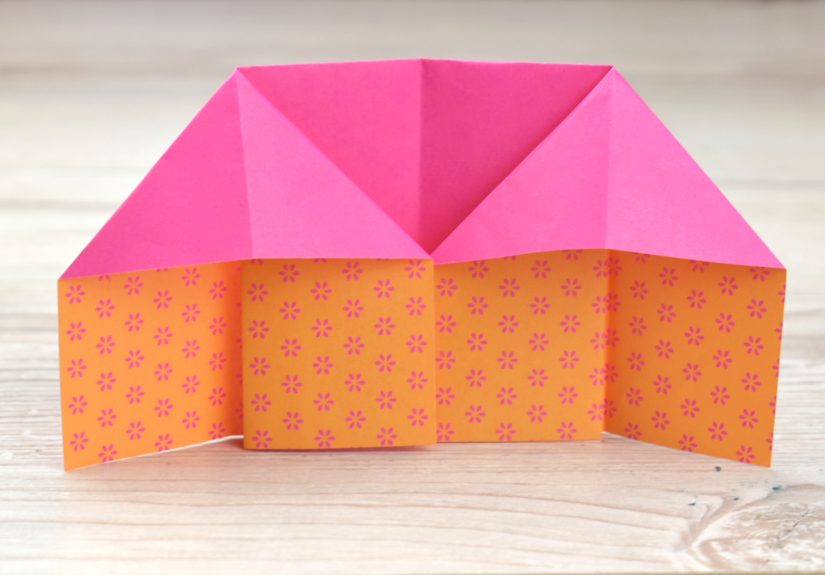
Step 5: Form the Roof by Folding Top Flaps Outward
Open the top layers gently and push the upper sections outward along existing creases. Flatten so two slanted roof
sides appear. This is the “magic moment” where the house silhouette starts to show.
If the top fights you, don’t force it. Re-crease previous lines and try again with smaller adjustments. Origami is
precision plus patience, not arm wrestling.
Step 6: Build the Base so the House Can Stand
Fold a small strip at the bottom upward to create a base lip. This acts like a foot for stability. Flip and check
whether the model can stand on a flat surface.
If it leans, widen the base fold slightly and flatten the bottom edge with your fingertip or ruler.
Step 7: Lock the Shape with Light Reinforcement Folds
Make tiny adjustment folds on side edges where necessary so walls stay straight and roof angles match.
You’re not changing the modeljust tuning it. Think “paper architecture finishing school.”
At this stage, run a nail lightly along major creases to sharpen edges. Clean lines make the model look instantly
more advanced.
Step 8: Decorate and Duplicate
Add windows, a door, a tiny chimney, or seasonal details with pens and stickers. Then fold more houses in
different colors and sizes to create a village scene.
One house is a craft. Ten houses are a neighborhood. Twenty houses are an urban planning simulation with excellent
vibes.
Common Mistakes and Quick Fixes
1) “My house won’t stand up.”
Increase the bottom base fold by a few millimeters and re-flatten. Most stability issues come from a base that’s
too narrow or uneven.
2) “My roof is crooked.”
Reopen to Step 4 and verify symmetry. Uneven rooflines usually start with one side folded deeper than the other.
Use the center crease as your truth line.
3) “Paper keeps tearing.”
You may be using paper that’s too thin or overworking one crease. Fold more gently, avoid repeated refolding in
exactly the same spot, and switch to sturdier origami paper.
4) “Edges look puffy, not crisp.”
Press folds from center out. If needed, use a ruler edge or bone folder to sharpen without crushing the model.
Creative Variations for Your Origami Village
Classic Cottage
Use warm wall colors and a dark roof. Draw a round window and tiny flower boxes.
Modern Townhouse
Choose monochrome paper (white, gray, black), use straight marker lines, add minimalist windows.
Holiday House
Add wreaths, string lights, snow caps, pumpkins, or spooky silhouettes depending on season.
Storybook Village
Mix size scales: large houses in front, smaller ones behind for depth. Add paper trees, roads, and a tiny “don’t
feed the paper dragons” sign.
Where This Project Works Best
- Kids’ craft time: clear steps, visible results, decoration-friendly.
- Classroom activity: teaches sequence following, symmetry, and fine motor practice.
- Home decor mini display: seasonal mantels, shelves, and table centerpieces.
- Relaxing hobby break: short, satisfying project for stress relief.
- Party table craft: affordable materials and high replay value.
Conclusion
Learning how to make an origami house in 8 steps is one of the easiest ways to build confidence
in paper folding. You practice core skillsalignment, pre-creasing, valley and mountain foldswithout getting
buried in complexity. Better still, the final model is useful: it stands up, decorates beautifully, and scales
into a full village project.
Start with one square. Fold slowly. Keep creases crisp. Then make another house faster, cleaner, and with your
own style. That’s how beginner origami becomes a real creative habit.
And if your first roof leans a little? Perfect. That just means it has character. Architects call it “asymmetrical
charm.” You can too.
Extended Experience Notes: Real-World Lessons from Origami House Sessions (500+ Words)
Across family craft nights, school tables, and community workshops, one pattern appears again and again:
the origami house is a confidence builder. People who begin with “I’m bad at crafts” often
finish their first model with a grin and immediately ask for another square sheet. Why? Because the project offers
visible progress in under ten minutes. You can literally see a roof forming in your hands. That immediate feedback
is powerful, especially for beginners who have never tried structured folding before.
In classroom-style sessions, the most useful strategy is pacing by checkpoints, not by clock. Instead of saying
“we’ll do this in 12 minutes,” facilitators who get the best outcomes say, “we’ll pause when everyone reaches
the center crease.” That removes pressure and helps kids who need extra alignment time. It also prevents the
classic domino problem: one rushed fold leads to three correction folds, then frustration. Interestingly, when
students are allowed to perfect Step 3 before moving on, their roofs in Step 5 become dramatically cleaner.
The learning transfer is obviouspatience early creates beauty later.
In parent-child sessions, the social dynamic matters as much as the folding sequence. Adults often want to “fix”
every imperfect edge, but the better approach is coaching language: “Let’s compare both sides,” “Which corner
should meet this line?” and “Want to try that crease once more?” That wording keeps ownership with the child.
The result is not just a finished house but a finished house that feels earned. After one or two models, kids
usually begin customizing: square windows, heart windows, giant doors, roof stripes, even pet drawings in the
yard. Decoration becomes a storytelling layer, not merely an afterthought.
In adult hobby groups, the project often evolves into a design challenge. One table experiments with roof angles.
Another explores different papers: matte, patterned, foil accents, recycled magazine sheets. The key insight from
these sessions is that paper behavior changes everything. Smooth, medium-weight sheets are forgiving and
ideal for clean edges. Soft textured paper gives warmth and character but can blur tiny folds. Very thin paper
creases quickly yet may reveal every correction. Experienced folders usually test one “prototype house” first,
then commit to a batch once dimensions feel right. It’s the paper-craft version of making a sample before sewing.
Seasonal displays reveal another practical lesson: scale creates depth. A village built with only one paper size
looks flat. But when makers use three sizeslarge in front, medium in the middle, small in backthe scene suddenly
feels cinematic. Add folded trees, a narrow paper road, and a soft background card, and you get a shelf display
that looks surprisingly professional. In holiday settings, people often keep a neutral base village and swap only
small details: pumpkins in fall, snow dots in winter, flowers in spring, flags in summer. Same houses, new mood.
The emotional side is worth noting too. Repetitive folding can be calm and grounding. Many participants describe
an “off-ramp” effect: the project helps them transition out of a noisy day into focused, low-stress creativity.
The house model works well for this because it has structure without intimidation. You don’t need to memorize
complex symbols or advanced collapses. You just follow a clear route and adjust as needed.
Final takeaway from real sessions: treat each house as iteration, not exam. Your first house teaches the sequence.
Your second house improves symmetry. Your third house introduces style. By the fifth, you’re no longer asking,
“Can I do this?” You’re asking, “Should this neighborhood have a bakery?” That shiftfrom doubt to playful design
is exactly why this model remains one of the best entry points into easy origami for beginners.