Table of Contents >> Show >> Hide
- What You’ll Need
- Before You Start: Make Sure Your Paper Is Square
- Key Folds You’ll Use
- Step-by-Step: Fold a Classic Origami Mouse
- Step 1: Start in a diamond and create guiding creases
- Step 2: Make two squash folds (this is where it starts looking like something)
- Step 3: Form the ears and define the head area
- Step 4: Flip, shape the body, and lock in the tail
- Step 5: Refine the silhouette (the “this is definitely a mouse” stage)
- Step 6: Pop and shape the ears (the cuteness upgrade)
- Make Your Origami Mouse Look Better Than Your First One
- Troubleshooting: Common Problems and Fixes
- Fun Variations: Make a Whole Mouse Family
- A Quick Note on Wet-Folding (Optional, but Cool)
- Conclusion: Your Paper Mouse Era Has Begun
- Experiences: What Folding an Origami Mouse Feels Like in Real Life (and Why People Keep Making Them)
If you’ve ever wanted a pet mouse that won’t steal your snacks, chew your charging cables, or stare at you like it pays rent, you’re in luck.
An origami mouse is cute, desk-friendly, and (best of all) completely house-trained. With one square sheet of paper and a little patience,
you can fold a surprisingly realistic paper mouseears, nose, tail, and all.
This guide walks you through a classic, traditional-style origami mouse with clear steps, practical tips, and a few “I learned this the hard way”
fixesbecause the only thing worse than a crooked mouse is a crooked mouse that knows it’s crooked.
What You’ll Need
- One square sheet of paper (6 in x 6 in / 15 cm x 15 cm is a sweet spot for beginners)
- A flat surface for crisp creases
- Optional: pencil/marker for eyes and whiskers
- Optional: a pencil, chopstick, or rounded tool to shape the ears
Paper choice matters (more than you think)
For your first mouse, standard origami paper (“kami”) is ideal: thin enough to fold cleanly, sturdy enough to hold shape.
Regular copy paper can work too, especially if that’s what you havejust expect slightly thicker layers near the end.
If you want a larger, sturdier display mouse, you can size up your paper; if you want tiny mice (for a mini “mouse parade”),
thinner paper will save your fingers from wrestling a bulky stack of layers.
Before You Start: Make Sure Your Paper Is Square
Most printable paper in the U.S. is letter-sized (8.5 in x 11 in), which is not square. If you don’t have pre-cut origami paper, here’s the simplest fix:
- Place the paper vertically (portrait orientation).
- Fold the top right corner diagonally down so the top edge meets the left side, forming a triangle.
- Crease sharply, then trim (or carefully tear along the crease) the extra rectangle strip at the bottom.
- Unfold: you now have a perfect square.
Purists will remind you that “true origami uses no cutting.” Purists are also welcome to cut their own squares in silence.
Key Folds You’ll Use
You do not need to memorize a dictionary of origami terms, but knowing these three will make the steps feel less like a magic trick:
- Valley fold: fold the paper toward you so it “dips” like a valley.
- Mountain fold: fold the paper away from you so it “peaks” like a mountain.
- Squash fold: open a pocket of paper and flatten it into a new shapelike politely flattening a tiny paper tent.
Step-by-Step: Fold a Classic Origami Mouse
These steps are written so you can follow them without diagrams. Take your time and keep your creases neatorigami is basically
“calm ambition + sharp folding.”
Step 1: Start in a diamond and create guiding creases
- Rotate your square so it looks like a diamond (one corner pointing up).
- If your paper has two colors, start with the lighter side facing up for a two-tone effect.
- Fold bottom corner up to the top corner. Crease, then unfold.
- Fold right corner over to the left corner. Crease, then unfold.
- Now fold the lower left edge up to the vertical center crease. Repeat on the lower right edge. You should get a neat kite shape at the bottom.
Why we do this: those first creases act like “roads” that guide the more interesting folds later. Skipping them is how people end up with
a mouse that looks like it lost a fight with a stapler.
Step 2: Make two squash folds (this is where it starts looking like something)
- Focus on the right flap area created by your kite folds.
- Gently open the paper pocket by pulling an inner corner upward while pushing the lower section inward.
- Flatten that opened pocket into a clean triangular flap (this is the squash fold).
- Repeat the same squash fold on the left side.
- Rotate your paper slightly so the shape is comfortable to work with (you’re setting up the “mouse body” structure).
Pro tip: if the squash fold fights you, it usually means your pre-creases weren’t sharp enough. Re-crease the lines, then try again.
Origami is oddly honest that way.
Step 3: Form the ears and define the head area
- You’ll see small flaps near the top area. Fold these small flaps toward the center crease, stacking them neatly.
- Fold both of those small flaps over to one side (often to the right). These become the mouse’s ears later.
- Take the far right corner (the pointy end) and fold it inward to create a shorter “nose” point.
- Unfold that last nose fold, then tuck the flap behind (this sets the angle so the nose isn’t a spear).
If your ears look uneven: don’t panic. This is paper, not surgery. You can often adjust ear angles later when shaping.
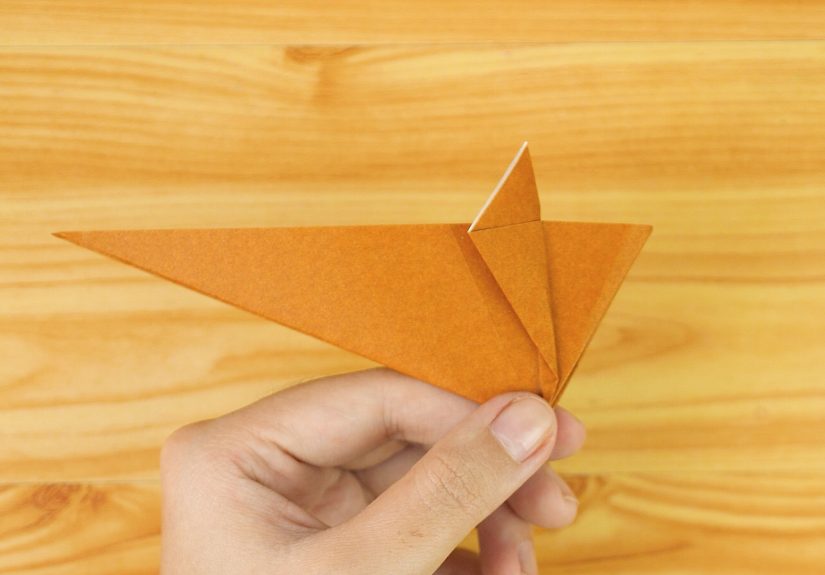
Step 4: Flip, shape the body, and lock in the tail
- Flip the model over to the other side.
- Fold the top right and bottom right corners diagonally toward the center crease, sharpening the body silhouette.
- Fold the model in half from top to bottom, flattening the layers inside. The top right point becomes the nose.
- Now take the left corner (this will be the tail) and fold it diagonally down and inward, aligning edges with an existing crease line.
Why this works: folding in half gives the mouse a strong spine; the diagonal tail fold helps it look more “mouse” and less “paper airplane leftover.”
Step 5: Refine the silhouette (the “this is definitely a mouse” stage)
At this point, you should see a recognizable animal profile: a nose point in front, a body hump, and a tail point in back.
If yours looks like a penguin, you probably flipped one fold directionunfold the last step or two and re-check symmetry.
- Adjust posture: fold the back slightly differently to make the mouse sit up taller or lower to the ground.
- Tail style: keep it straight for a clean look, or curve it slightly by gently rolling it around a pencil.
Step 6: Pop and shape the ears (the cuteness upgrade)
- Fold one ear flap backward. Try different angles until it feels expressive (yes, your mouse has a personality now).
- Repeat on the other ear.
- Use a pencil, chopstick, or rounded tool to gently open and round the ears. Press with your thumb to curve them.
- If you want your mouse to look forward instead of upward, fold the lower section underneath to change the head angle.
Make Your Origami Mouse Look Better Than Your First One
Your first mouse will be lovable. Your second mouse will be better. Your fifth mouse will make you wonder why you ever doubted yourself.
Here’s what actually improves the final look:
1) Crease like you mean it
Crisp creases are the difference between “adorable desk mouse” and “crumpled receipt with dreams.”
Run a fingernail along each crease, and press down firmly on flat folds.
2) Keep things symmetrical
Most mouse weirdness is symmetry weirdness. Line up corners carefully before you crease. If one side drifts, your ears will drift,
your nose will drift, and suddenly you’ve folded a “mouse that’s looking for its contact lens.”
3) Use shaping, not force
Once the base folds are done, improve the mouse by shaping:
gently curve the back, round the ears, and soften the tail. A little sculpting goes a long way.
Troubleshooting: Common Problems and Fixes
Problem: My squash fold won’t flatten cleanly
- Likely cause: pre-creases weren’t sharp or aligned.
- Fix: reopen the pocket, re-crease the guiding lines, then flatten slowly from the center outward.
Problem: The ears look tiny or disappear
- Likely cause: ear flaps weren’t folded cleanly to the center, or got trapped too deep.
- Fix: unfold to the ear step, make the small flaps more precise, then refold and round them open with a pencil.
Problem: The mouse won’t “sit” and keeps flopping over
- Likely cause: body folds aren’t tight, tail angle is off, or paper is too slick/thick for the size.
- Fix: sharpen the central spine crease, adjust tail angle slightly downward, and consider a slightly larger square next time.
Problem: The nose is too pointy (aka “paper spear”)
- Fix: shorten the nose by folding the tip inward, then tuck it behind to soften the profile.
Fun Variations: Make a Whole Mouse Family
Once you can fold one mouse reliably, you can crank out a whole adorable colonywithout needing tiny cages or tiny legal paperwork.
Two-tone mice
Use paper with different colors on each side. Depending on how you start and fold, you can get a contrasting head vs. body effect that looks
surprisingly fancy with almost zero extra effort.
Mini mice
Try 3 in x 3 in (7.5 cm x 7.5 cm) squares for tiny mice. Use thinner paper, and expect your fingers to feel like they just completed a
small but meaningful workout.
Display mice
Scale up to 8 in x 8 in (20 cm x 20 cm) or larger and shape the back more. Larger paper makes sculpting easier and helps the mouse look more
dimensional on a shelf or table setting.
A Quick Note on Wet-Folding (Optional, but Cool)
If you’ve seen origami animals with soft curves instead of sharp edges, that’s often wet-folding.
The idea is simple: lightly dampen thicker paper so you can sculpt smooth, rounded forms that hold as they dry.
For a mouse, wet-folding can make the back look more lifelike and the ears more naturally curved.
Keep it gentle: wet-folding is not “soak the paper and hope.” It’s “slightly damp, controlled shaping.”
If you’re just starting, master the dry fold firstthen experiment when you want your mouse to look like it has tiny muscles.
Conclusion: Your Paper Mouse Era Has Begun
Folding an origami mouse is a perfect mix of approachable and satisfying: it uses a small set of basic folds,
teaches you how to control symmetry, and rewards you with an animal that looks surprisingly expressive for something made of paper.
Make one, then make three. Try different papers. Adjust the ears like you’re casting actors for a tiny Broadway show.
And if someone asks why you have paper mice on your desk, tell them the truth: “Because I’m an adult and I make my own choices.”
Experiences: What Folding an Origami Mouse Feels Like in Real Life (and Why People Keep Making Them)
People don’t just fold an origami mouse once and move on. This model has a sneaky way of turning into a habit, because it teaches skills fast
and gives instant payoff. Beginners often describe the first attempt as a mix of “This is relaxing” and “Why is paper suddenly so complicated?”
That emotional whiplash is normaland honestly part of the charm.
One of the most common experiences is the crease-confidence curve. On mouse #1, you crease lightly because you’re afraid of committing.
On mouse #2, you crease harder because you realize the paper won’t explode. By mouse #5, you’re making crisp folds with the decisiveness of someone
who now believes in themselves, at least in the area of geometric rodents. This model rewards firm, accurate creasing more than almost any “cute animal”
fold, so improvement is obvious and motivating.
Another classic moment: the first successful squash fold. Many folders remember the exact second the paper pocket finally opens and
flattens neatlybecause it’s the first time you feel like you’re not just folding paper, you’re transforming it. That’s why origami teachers love
models like this mouse: it introduces compound folds without feeling like an advanced engineering project. When the squash fold clicks, you start noticing
it everywhere in other models (and you quietly become the person who says, “Oh, that’s just a squash fold,” which is both helpful and slightly unbearable).
The ears are where the fun personality shows up. People often experiment with ear angles the way they’d adjust eyebrows on a drawing.
Fold them back sharply and your mouse looks alert; open them wider and it looks friendly; tilt one ear slightly and suddenly your mouse seems mischievous.
It’s surprisingly expressive for a model made from a single square. This is also where many folders first learn that shaping can matter as much as
“correct steps.” Two people can follow the same instructions and end up with mice that feel totally different.
If you fold with kids (or anyone who enjoys adding flair), the shared experience usually becomes decorating. Eyes and whiskers turn a clean origami model
into a character. In classrooms and craft groups, people often name their mice, line them up in “families,” or create little paper scenescheese triangles,
tiny paper houses, or a cardboard “mouse hole” taped to the baseboard. The mouse is small enough to feel playful, but structured enough to feel like a real
accomplishment.
Finally, there’s the oddly satisfying experience of using whatever paper is available. Many folders try fancy origami paper at first, then discover that
a patterned scrap, a page from an old (non-important!) magazine, or even a nicely colored flyer can produce a mouse with instant style. It becomes a little
ritual: you see an interesting pattern, you imagine it as a mouse, and five minutes later you’ve turned “random paper” into “tiny desk companion.”
That’s the real reason origami mice multiplybecause the world keeps handing you potential mice in the form of paper.