Table of Contents >> Show >> Hide
Looking to add a touch of rustic charm to your home décor? One of the most striking ways to do so is by creating decorative herringbone wood letters. Whether you’re personalizing your entryway, designing a unique centerpiece, or crafting a memorable gift, herringbone wood letters combine elegance and creativity in a way that’s both timeless and trendy. This guide will walk you through everything you need to know to make these gorgeous wooden letters, with tips and tricks to help you achieve the perfect look.
Materials You’ll Need
Before you begin, it’s important to gather the materials you’ll need to create your decorative herringbone wood letters. Here’s a basic list of items to get you started:
- Wooden letters: You can purchase pre-cut wooden letters at most craft stores, or you can cut your own from wood boards using a jigsaw or laser cutter.
- Wooden strips or planks: Choose wood that suits your aesthetic. Popular choices include pine, oak, and walnut. The strips should be of uniform thickness (about 1/4″ to 1/2″ thick) and should be cut to various lengths for the herringbone pattern.
- Wood glue: A strong adhesive will hold your strips in place as you create the herringbone design.
- Wood stain or paint: To finish the wood and enhance its natural beauty, choose a wood stain that complements your décor. You could also paint the letters if you’d prefer a more vibrant look.
- Ruler and pencil: To ensure your cuts are accurate and to map out your pattern.
- Handsaw or miter saw: These tools will help you cut your wooden strips precisely for the herringbone pattern.
- Sandpaper: For smoothing rough edges on both the strips and letters.
- Brushes: For applying the wood finish or stain evenly.
- Clamps: These will be useful for holding pieces together while the glue dries.
Step-by-Step Guide to Making Herringbone Wood Letters
Creating your own decorative herringbone wood letters might seem daunting at first, but with a little patience and attention to detail, the process becomes quite enjoyable. Follow these steps to create a stunning piece of décor:
Step 1: Prepare the Wooden Letters
If you’re using pre-made wooden letters, start by giving them a light sanding to remove any rough edges. If you’re cutting your own letters from a wooden board, use a jigsaw or laser cutter to carve out the shape. After cutting, sand the edges and surfaces to smooth out any rough patches. Make sure the surface is clean and dry before moving to the next step.
Step 2: Cut the Wooden Strips
Measure the width of your wooden letters and cut your strips to fit. A classic herringbone pattern involves diagonal lines that meet at a point, creating a V-shaped arrangement. You’ll need to cut your strips at 45-degree angles to form this pattern. Use a miter saw or handsaw to ensure precise cuts. Make sure the strips are long enough to cover the entire letter, but be mindful of the thickness and width to maintain balance in the design.
Step 3: Plan and Lay Out the Herringbone Pattern
Before gluing, lay out the wooden strips on the letter to visualize how the herringbone pattern will look. Start from one corner and work your way across. You can choose to have the strips align perfectly with the edges or angle them slightly to add a more dynamic look. Arrange the strips in alternating directions, ensuring each line meets at a point to create the V-shape characteristic of herringbone.
Step 4: Glue the Strips onto the Letter
Once you’re happy with the layout, start gluing each strip into place using wood glue. Apply a thin layer of glue to the back of each strip and press it firmly onto the letter. Use clamps to hold the strips in place while the glue dries, ensuring that everything remains aligned. Wipe away any excess glue with a damp cloth before it sets.
Step 5: Sand and Finish
After the glue has fully dried, it’s time to smooth out the surface. Use sandpaper to gently sand the wood strips, removing any rough edges and ensuring a seamless finish. If you prefer a cleaner, modern look, you can stain or paint the wood to match your style. A clear wood finish will highlight the natural beauty of the wood, while a stain can add depth and character to the letter.
Step 6: Final Touches
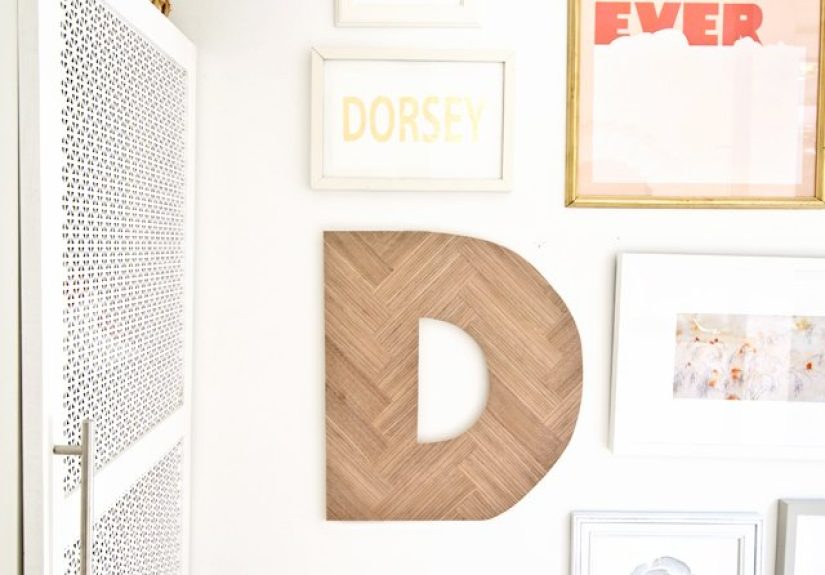
Once the stain or paint is dry, your herringbone wood letters are ready to be displayed! You can hang them on the wall, place them on a shelf, or even give them as a thoughtful, handmade gift. Consider pairing your letters with other complementary décor pieces, such as framed artwork or decorative shelves, to create a cohesive look in your space.
Design Ideas for Herringbone Wood Letters
The beauty of herringbone wood letters is that they can be tailored to fit any style or theme. Here are a few ideas to inspire your own project:
- Rustic Charm: Use reclaimed wood for a vintage, rustic look. Combine the natural imperfections of reclaimed wood with a distressed paint finish for a farmhouse feel.
- Modern Elegance: For a sleek and modern design, opt for light-colored wood with a matte finish. Pair the letters with minimalist décor to create a stylish, understated look.
- Bold Color Pop: If you’re looking to make a statement, choose bright or contrasting colors for the strips. This can add a fun, dynamic touch to a child’s room or a playful kitchen sign.
- Neutral Tones: For a more calming and sophisticated vibe, use neutral tones like gray, beige, or walnut. These colors will work well in any space and complement other wood elements in your home.
of Experience: Crafting Decorative Herringbone Wood Letters
Creating decorative herringbone wood letters is more than just a crafting projectit’s a rewarding process that allows you to personalize your home in a meaningful way. When I first attempted making herringbone wood letters, I was excited by the challenge but a little apprehensive about achieving the right look. However, after a few trial runs, I quickly realized that the process is more forgiving than I anticipated. One of the best parts about herringbone is that it doesn’t have to be perfect. The uneven edges and slight misalignments add character and charm to the final piece.
The key to success lies in the preparation and patience. Taking the time to properly measure and cut your wood strips will ensure a cleaner, more professional finish. I initially rushed through this step, and the result was a less cohesive pattern. Once I slowed down and made sure each cut was accurate, the difference was remarkable.
Another important lesson I learned was the significance of sanding. I underestimated how much sanding could enhance the overall look of the letter. While it might seem like a small step, sanding the surface smooths out the rough patches and makes the wood look polished. It also allows the stain or paint to adhere better, which is crucial for creating a high-quality finish. The choice of finish can also make a huge difference in the final product. I experimented with both matte and glossy finishes, and while glossy adds a bit of shine, matte finishes gave my letters a more sophisticated, understated look.
Overall, this project is an enjoyable and highly customizable way to add personality to your home. The herringbone pattern offers endless design possibilities, and the satisfaction of creating something with your own hands is second to none. If you’re looking to try something new and add a unique touch to your décor, making herringbone wood letters is definitely worth the effort.
Conclusion
Making decorative herringbone wood letters is an excellent way to personalize your space with a touch of elegance and creativity. With the right materials, tools, and a bit of patience, you can create beautiful pieces that will enhance any room. Whether you go for a rustic, modern, or vibrant look, the herringbone pattern adds a sophisticated flair that can’t be beat. So, gather your supplies, roll up your sleeves, and start crafting your own custom wood letters today!
sapo: Learn how to create beautiful decorative herringbone wood letters for your home décor with this easy-to-follow guide. Personalize your space with unique, stylish letters in just a few simple steps!